概述
- Flask采用MVT模型,即Model, Template, View
- Model:定义数据的存储格式,并且提供了数据库访问的API
- View:定义那些数据被显示,是业务逻辑处理模块
- Template:定义数据如何被显示
实例1(简单实例)
- 在项目文件夹创建虚拟环境,安装依赖包
- virtualenv venv
- venvScriptsactivate
- pip install –r requirements.txt
- 创建程序实例app,是一个Flask类的对象
- 客户端(浏览器)把请求发送给Web服务器,Web服务器再把请求发送给Flask程序实例,程序实例需要知道对每个URL运行哪些代码,在Flask中通过app.route装饰器定义,保存了一个URL到Python函数的映射关系(路由)
- 路由后面的函数是视图函数,视图函数的返回值称为响应,是客户端接收到的内容
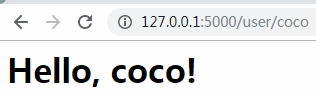
- <>中的内容为动态路由,用于生成针对个人的欢迎消息
- run()启动服务,启动后进入轮询,直到Ctrl+C停止
- Flask从客户端收到请求时,通过视图函数中的请求对象(上下文)保存客户端发送的HTTP请求,Flask中的上下文分为程序(current_app、g)和请求(request、session)两类
requirements.txt


 1 alembic==1.0.1
 2 asn1crypto==0.24.0
 3 cffi==1.11.5
 4 Click==7.0
 5 cryptography==2.3.1
 6 Flask==1.0.2
 7 Flask-Migrate==2.3.0
 8 Flask-Script==2.0.6
 9 Flask-SQLAlchemy==2.3.2
10 Flask-WTF==0.14.2
11 idna==2.7
12 ItsDangerous==1.1.0
13 Jinja2==2.10
14 Mako==1.0.7
15 MarkupSafe==1.0
16 Pillow==5.3.0
17 pycparser==2.19
18 PyMySQL==0.9.2
19 python-dateutil==2.7.3
20 python-editor==1.0.3
21 six==1.11.0
22 SQLAlchemy==1.2.12
23 Werkzeug==0.14.1
24 WTForms==2.2.1
- 在templates目录中创建模板文件
index.html
1 <h1>Hello World!</h1>
user.html
1 <h1>Hello, {{ name }}!</h1>
- 编写主程序文件
python.py
 1 from flask import Flask, render_template
 2
 3 app = Flask(__name__)
 4
 5 @app.route('/')
 6 def index():
 7     return render_template('index.html')
 8
 9 @app.route('/user/<name>')
10 def user(name):
11     return render_template('user.html', name=name)
12
13 if __name__ == '__main__':
14     app.run(debug=True)
- 启动项目
- python hello.py
- 浏览器访问

实例2(添加css样式,js动态效果)
hello.py
 1 from flask import Flask, render_template
 2
 3 app = Flask(__name__)
 4
 5 @app.route('/')
 6 def index():
 7     return render_template('index.html')
 8
 9 @app.route('/user/<name>')
10 def user(name):
11     return render_template('user.html', name=name)
12
13 if __name__ == '__main__':
14     app.run(debug=True)
index.html
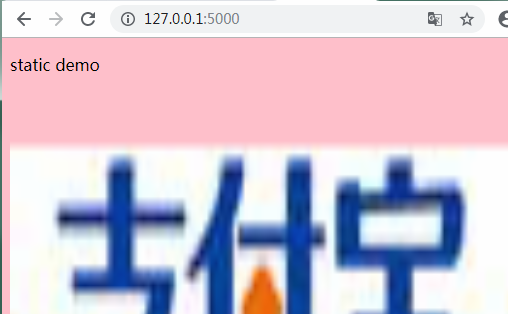
 1 <!DOCTYPE html>
 2 <html lang="en">
 3 <head>
 4     <meta charset="UTF-8">
 5     <title>static demo</title>
 6     <!-- 使用url_for加载静态文件 url_for第一个参数必须是'static',然后后面跟一个关键字参数filename='文件路径',从static文件夹下面开始寻找的 -->
 7     <link rel="stylesheet" href="{{ url_for('static',filename='css/index.css') }}">
 8     <script src="../static/js/index.js"></script>
 9 </head>
10 <body>
11
12 <p>static demo</p>
13 <div>
14 <img src="{{ url_for('static',filename='images/zhifubao.png') }}" alt="" width="500px" height="500px">
15 </div>
16 </body>
17 </html>
index.css
1 body{
2     background: pink;
3 }
index.js
1 alert('hello world!');

实例3(模板渲染,表单,validators)
- 现在的视图函数中包含两部分:请求改变程序状态,生成请求的响应,这两部分分别称为业务逻辑和表现逻辑,当程序变大时,程序的可维护性会变差。
- 把表现逻辑移到模板函数中,模板是一个包含响应文本的文件,其中包含用占位符表示的动态部分,具体值需要在请求上下文中得到,替换后再返回最终的响应结果,这一过程称为渲染模板。Flask使用Jinja2作为模板渲染引擎
- 默认情况下,Flask在程序文件夹中的templates子文件夹中寻找模板,render_template()函数的第一个参数是模板文件名,随后的键值对参数是模板变量中的真实值,左边的变量是参数名,即模板中的占位符,右边的变量是当前作用域中的变量,即同名参数的值
- 模板中{{ name }}表示变量,是一种特殊的占位符,告诉模板引擎这个位置的值从渲染模板时使用的数据中获取
- 过滤器:如:Hello, {{ name|capitalize }},以首字母大写形式显示
- 模板继承:如:{%extends "base.html"%},表示本模板继承自base.html,{% block title %}Index{% endblock %},表示重写的部分
- 链接:url_for('static', filename='css/styles.css', _external=True),生成:http://localhost:5000/static/css/styles.css
- request.form获取POST请求中提交的表单数据
- Flask-WTF能保护所有表单免收跨站请求伪造(Cross-Site Request Forgery,CSRF),为实现CSRF保护,Flask-WTF需要程序设置一个密钥,Flask-WTF使用这个密钥生成加密令牌,再用令牌验证请求中表单数据的真伪
- app.config字典可用来存储框架、扩展和程序本身的配置变量,SECRET_KEY配置通用密钥,加密强度取决于变量值的机密程度,不同程序要使用不同的密钥,且要确保其他人不知道你所用的字符串,通常将密钥保存在环境变量中,而不直接写入代码
- 使用Flask-WTF时,每个Web表单都由一个集成自Form的类表示,这个类定义表单中的一组字段,每个字段都用对象表示,字段对象可附属一个或多个验证函数,以验证用户提交的输入值是否符合需求
- StringField构造函数中的可选参数validators指定一个由验证函数组成的列表,在接受用户提交的数据之前验证数据,验证函数Required()确保提交的字段不为空
index.html
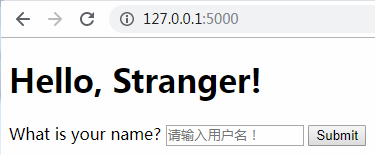
 1 <!DOCTYPE html>
 2 <html lang="en">
 3 <head>
 4     <meta charset="UTF-8">
 5     <title>static demo</title>
 6     <!-- 使用url_for加载静态文件 url_for第一个参数必须是'static',然后后面跟一个关键字参数filename='文件路径',从static文件夹下面开始寻找的 -->
 7     <link rel="stylesheet" href="{{ url_for('static',filename='css/index.css') }}">
 8     <script src="../static/js/index.js"></script>
 9 </head>
10 <body>
11
12 <div class="page-header">
13 <h1>Hello, {% if name %}{{ name }}{% else %}Stranger{% endif %}!</h1>
14 </div>
15 <form method="POST">
16     {{ form.hidden_tag() }}
17     {{ form.name.label }} {{ form.name() }}
18     {{ form.submit() }}
19 </form>
20 </body>
21 </html>
hello.py
 1 from flask import Flask, render_template
 2 from flask_wtf import FlaskForm
 3 from wtforms import StringField, SubmitField
 4 from wtforms.validators import Required
 5
 6 app = Flask(__name__)
 7 app.config["SECRET_KEY"] = "12345678"
 8
 9 class NameForm(FlaskForm):
10     name = StringField('What is your name?',
11             render_kw={
12             "type"       : "text",
13             "placeholder": "请输入用户名!",
14             "class":"validate-username",
15             "size" : 15})
16     submit = SubmitField('Submit')
17
18 @app.route('/',methods=['GET', 'POST'])
19 def index():
20     name = None
21     form = NameForm()
22     if form.validate_on_submit():
23         name = form.name.data
24         form.name.data = ''
25     return render_template('index.html', form=form, name=name)
26
27 @app.route('/user/<name>')
28 def user(name):
29     return render_template('user.html', name=name)
30
31 if __name__ == '__main__':
32     app.run(debug=True)

实例4(重定向,用户会话,flash消息)
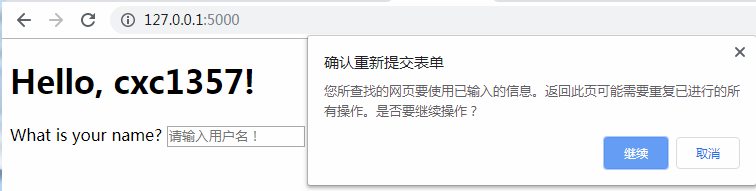
- 提交用户名后刷新页面,会提示重新提交表单,原因是刷新页面时浏览器会重新发送之前已经发送的最后一个请求,即再次提交表单,为避免这种情况,使用重定向作为POST请求的响应,浏览器收到重定向响应时,会向重定向的URL发起GET请求,显示页面内容,但这样会带来另一个问题,重定向后的页面无法保存之前提交的用户名,解决的办法是使用用户会话(session)保存用户数据,sesseion本质上是一个Python字典,将用户信息保存在用户本地的客户端中
- 重定向地址使用Flask提供的URL生成函数url_for()生成,参数是端点名,即路由的内部名称,默认情况下就是相应视图函数的名称,即处理根地址的index()。效果和redirect('/')是一样的
- 请求完成后,需要让用户知道状态发生了变化,可使用flash()函数完成,并在模板中渲染Flash消息
 1 from flask import Flask, render_template, session, redirect, url_for
 2 from flask_wtf import FlaskForm
 3 from wtforms import StringField, SubmitField
 4 from wtforms.validators import Required
 5
 6 app = Flask(__name__)
 7 app.config["SECRET_KEY"] = "12345678"
 8
 9 class NameForm(FlaskForm):
10     name = StringField('What is your name?',
11             render_kw={
12             "type"       : "text",
13             "placeholder": "请输入用户名!",
14             "class":"validate-username",
15             "size" : 15},validators=[Required()])
16     submit = SubmitField('Submit')
17
18 @app.route('/',methods=['GET', 'POST'])
19 def index():
20     form = NameForm()
21     if form.validate_on_submit():
22         session['name'] = form.name.data
23         return redirect(url_for('index'))
24     return render_template('index.html', form=form, name=session.get('name'))
25
26 @app.route('/user/<name>')
27 def user(name):
28     return render_template('user.html', name=name)
29
30 if __name__ == '__main__':
31     app.run(debug=True)
实例5(数据库交互,更改端口)
- 使用 Flask-SQLAlchemy 管理数据库,完成ORM操作
- 模型:一个Python类对应一张表,类中属性对应数据库表中的列
- 数据库操作
- filter_by():查询
- add():添加
- delete():删除
- 关系(两个类中分别写)
- users = db.relationship('User', backref='role')
- role_id = db.Column(db.Integer, db.ForeignKey('roles.id'))
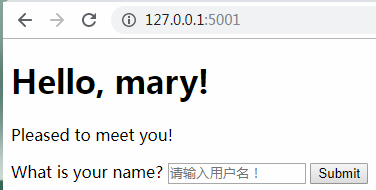
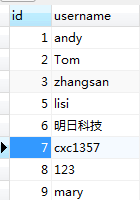
- 若用户信息在数据库中,则显示欢迎信息,若用户不在数据库中,则在数据库中添加用户
- 使用 Flask-Migrate 实现数据库迁移,跟踪数据库模式的变化,然后增量式的把变化应用到数据库中
- 在run()函数中实现服务端口的更改
hello.py
 1 from flask import Flask, render_template, session, redirect, url_for, flash
 2 from flask_sqlalchemy import SQLAlchemy
 3 from flask_wtf import FlaskForm
 4 from wtforms import StringField, SubmitField
 5 from wtforms.validators import Required
 6 from config import config
 7
 8 app = Flask(__name__)
 9 app.config["SECRET_KEY"] = "12345678"
10 app.config['SQLALCHEMY_DATABASE_URI'] = 'mysql+pymysql://root:123456@127.0.0.1:3306/shop'
11 app.config['SQLALCHEMY_COMMIT_ON_TEARDOWN'] = True
12 db = SQLAlchemy(app)
13
14 class NameForm(FlaskForm):
15     name = StringField('What is your name?',
16             render_kw={
17             "type"       : "text",
18             "placeholder": "请输入用户名!",
19             "class":"validate-username",
20             "size" : 15},validators=[Required()])
21     submit = SubmitField('Submit')
22
23 @app.route('/',methods=['GET', 'POST'])
24 def index():
25     form = NameForm()
26     if form.validate_on_submit():
27         user = User.query.filter_by(username=form.name.data).first()
28         if user is None:
29             user = User(username = form.name.data)
30             db.session.add(user)
31             session['known'] = False
32         else:
33             session['known'] = True
34         session['name'] = form.name.data
35         form.name.data = ''
36         return redirect(url_for('index'))
37     return render_template('index.html',form = form, name = session.get('name'), known = session.get('known', False))
38
39 class User(db.Model):
40     __tablename__ = 'user'
41     id = db.Column(db.Integer, primary_key=True)
42     username = db.Column(db.String(64))
43     def __repr__(self):
44         return '<User %r>' % self.username
45
46 if __name__ == '__main__':
47     app.run(
48     host = '127.0.0.1',
49     port = 5001,
50     debug=True
51     )
index.html
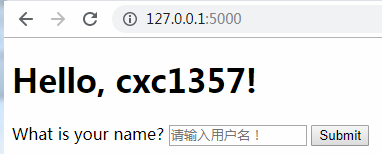
 1 <!DOCTYPE html>
 2 {% extends "base.html" %}
 3 {% block page_content %}
 4 <html lang="en">
 5 <head>
 6     <meta charset="UTF-8">
 7     <title>static demo</title>
 8     <!-- 使用url_for加载静态文件 url_for第一个参数必须是'static',然后后面跟一个关键字参数filename='文件路径',从static文件夹下面开始寻找的 -->
 9     <link rel="stylesheet" href="{{ url_for('static',filename='css/index.css') }}">
10     <script src="../static/js/index.js"></script>
11 </head>
12 <body>
13
14 <div class="page-header">
15 <h1>Hello, {% if name %}{{ name }}{% else %}Stranger{% endif %}!</h1>
16 {% if not known %}
17 <p>Pleased to meet you!</p>
18 {% else %}
19 <p>Happy to see you again!</p>
20 {% endif %}
21 </div>
22 <form method="POST">
23     {{ form.hidden_tag() }}
24     {{ form.name.label }} {{ form.name() }}
25     {{ form.submit() }}
26 </form>
27 </body>
28 </html>
29 {% endblock %}

参考
Flask教程
https://yq.aliyun.com/zt/3074776
url_for:静态资源加载
https://www.cnblogs.com/guyuyun/p/9942859.html
https://www.jianshu.com/p/0e77f4eb650c
流程控制
https://blog.csdn.net/xujin0/article/details/96567884
css 样式
https://www.cnblogs.com/yiluhuakai/p/8401740.html
css id class
https://www.runoob.com/css/css-id-class.html
flask jQuery
https://www.cnblogs.com/clnchanpin/p/6920103.html
flask css
https://blog.csdn.net/weixin_33595571/article/details/86608238
{%include%}
https://blog.csdn.net/xujin0/article/details/97102530
前端流程
https://blog.csdn.net/xtaydwxf1988/article/details/75043753
终止服务
https://www.itranslater.com/qa/details/2326227523467740160
表单类
https://blog.csdn.net/kylinxjd/article/details/94645086
https://www.jianshu.com/p/0ba3ec040fb2
CSRF token
https://www.cnblogs.com/mengbin0546/p/9966431.html
登录验证
https://www.jianshu.com/p/06bd93e21945
wtforms注入样式
https://www.cnblogs.com/haiyan123/p/8254228.html
https://greyli.com/flask-form-custom-form-style/
Flask轻量级博客
https://blog.csdn.net/feit2417/article/details/80837297
CentOS部署
https://blog.csdn.net/weixin_43925725/article/details/86742259
GET和POST