1.守护进程方式(socket)
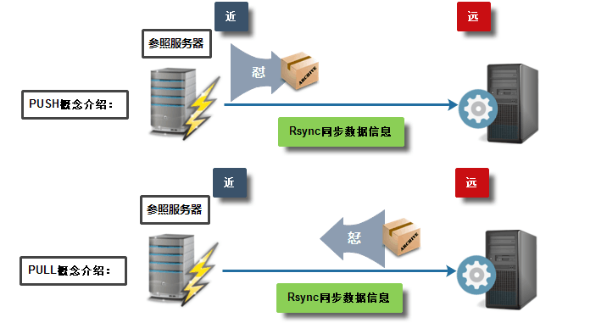
语法:
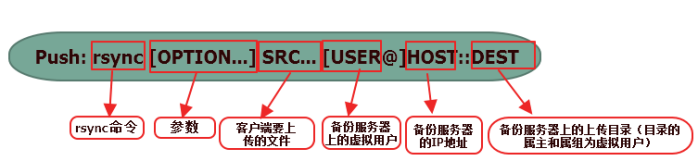
Access via rsync daemon:
  Pull: rsync [OPTION...] [USER@]HOST::SRC... [DEST]
        rsync [OPTION...] rsync://[USER@]HOST[:PORT]/SRC... [DEST]
  Push: rsync [OPTION...] SRC... [USER@]HOST::DEST(DEST为模块名字)
        rsync [OPTION...] SRC... rsync://[USER@]HOST[:PORT]/DEST
1.1、rsync 软件部署过程(服务端):
1.确认rsync软件服务是否存在【一般为系统自带】
[root@backup ~]# ## 01: 确认rsync软件服务是否存在
 [root@backup ~]# rpm -qa rsync
rsync-3.0.6-12.el6.x86_64
[root@backup ~]# rpm -qa|grep rsyn*
rsyslog-5.8.10-10.el6_6.x86_64
rsync-3.0.6-12.el6.x86_64
2.编辑配置文件【自己创建的】
[root@backup ~]#vim /etc/rsyncd.conf
##rsyncd.conf start##
uid = rsync
gid = rsync
use chroot = no
max connections = 200             ##多少个人可以并发往服务器上传输数据
timeout = 300
pid file = /var/run/rsyncd.pid
lock file = /var/run/rsync.lock                 ##服务停止的时候会用到,不用创建也会有
log file = /var/log/rsyncd.log
[backup]                               ##模块名称
path = /backup
ignore errors
read only = false
list = false          ##当list = true
        可以看到配置文件中所有的模块信息:rsync rsync_backup@172.16.1.41::
hosts allow = 172.16.1.0/24
hosts deny = 0.0.0.0/32
auth users = rsync_backup
secrets file = /etc/rsync.password

3.创建用户
[root@backup ~]# # 创建用户
[root@backup ~]# useradd -s /sbin/nologin -M rsync
[root@backup ~]# id rsync
uid=923(rsync) gid=923(rsync) groups=923(rsync)
4.创建目录
[root@backup ~]# # 创建目录
[root@backup ~]# mkdir /backup -p
[root@backup ~]# ll -d /backup/
drwxr-xr-x 2 root root 4096 May  4 12:00 /backup/
5、修改备份目录权限
[root@backup ~]# # 修改备份目录权限
[root@backup ~]# chown -R rsync.rsync /backup/
[root@backup ~]# ll -d /backup/
drwxr-xr-x 2 rsync rsync 4096 May  4 12:00 /backup/
6、创建认证用户密码文件
[root@backup ~]# # 创建认证用户密码文件
[root@backup ~]# echo "rsync_backup:123456" >/etc/rsync.password
[root@backup ~]# cat /etc/rsync.password
rsync_backup:123456
[root@backup ~]# chmod 600 /etc/rsync.password
[root@backup ~]# ll /etc/rsync.password
-rw------- 1 root root 20 May  4 12:04 /etc/rsync.password
7、启动rsync守护进程服务
启动rsync守护进程服务
rsync --daemon
[root@backup /]# rsync --daemon
[root@backup /]# ps -ef |grep rsync
root       1885      1  0 12:08 ?        00:00:00 rsync --daemon
root       1887   1250  0 12:09 pts/1    00:00:00 grep rsync
经过上面的配置,服务器已经配置好了,但是每次开机的时候都要开启守护进程,这个时候我们就要利用下面几种方式来实现开机自启动。
另外,还可以将守护进程加入开机自启动,下面提供几种开机自启动的方式。
1) 利用/etc/rc.local
[root@backup ~]# echo "# rsync boot info" >>/etc/rc.local
[root@backup ~]# echo "rsync --daemon" >>/etc/rc.local
[root@backup ~]# tail -2 /etc/rc.local
# rsync boot info
rsync --daemon
2) 编写脚本文件
编写出脚本文件,可以利用rsync --daemon启动命令
将编写脚本文件,放置到/etc/init.d/ 目录下面
脚本内容信息要添加 # chkconfig: 2345 55 25
授予脚本执行权限
添加到chkconfig启动管理服务列表中
3) xinetd自启动rsync服务,添加到chkconfig启动管理服务列表中


1.如果机器上没有xinetd这个软件,要先安装
[root@backup backup]# yum install -y xinetd
Loaded plugins: fastestmirror, security
Setting up Install Process
Determining fastest mirrors
 * base: mirrors.aliyun.com
 * epel: mirrors.aliyun.com
 * extras: mirrors.aliyun.com
 * updates: mirrors.aliyun.com
(省略安装过程)
2.修改配置文件vim /etc/xinetd.d/rsync,将disable改为no
[root@backup xinetd.d]# vim /etc/xinetd.d/rsync
# default: off
# description: The rsync server is a good addition to an ftp server, as it
#       allows crc checksumming etc.
service rsync
{
        disable = no    ##(原有的yes改成no)
        flags           = IPv6
        socket_type     = stream
        wait            = no
        user            = root
        server          = /usr/bin/rsync
        server_args     = --daemon
        log_on_failure  += USERID
}
3.开启xinetd服务
[root@backup xinetd.d]# /etc/init.d/xinetd start
Starting xinetd:                                           [  OK  ]
[root@backup xinetd.d]#
4.查看xinetd端口,看是否开启
[root@backup xinetd.d]# netstat -lntup|grep 873      ###查看xinetd
tcp        0      0 :::873                      :::*                        LISTEN      4070/xinetd
[root@backup xinetd.d]# /etc/init.d/xinetd stop
Stopping xinetd:                                           [  OK  ]

[root@backup xinetd.d]# rsync --daemon
[root@backup xinetd.d]# netstat -lntup|grep 873
tcp        0      0 0.0.0.0:873                 0.0.0.0:*                   LISTEN      4091/rsync
tcp        0      0 :::873                      :::*                        LISTEN      4091/rsync
5.添加到chkconfig启动管理服务列表中
[root@backup run]# chkconfig --add xinetd
[root@backup run]# chkconfig --list |grep 3:on
crond              0:off    1:off    2:on    3:on    4:on    5:on    6:off
network            0:off    1:off    2:on    3:on    4:on    5:on    6:off
rsyslog            0:off    1:off    2:on    3:on    4:on    5:on    6:off
sshd               0:off    1:off    2:on    3:on    4:on    5:on    6:off
sysstat            0:off    1:on    2:on    3:on    4:on    5:on    6:off
xinetd             0:off    1:off    2:off    3:on    4:on    5:on    6:off
[root@backup run]#
1.2、rsync 软件部署(客户端):
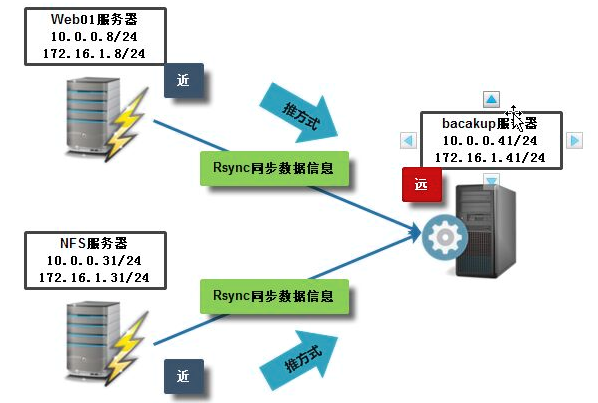
客户端采取守护进程推送的方式来传输数据:
Push: rsync [OPTION...] SRC... [USER@]HOST::DEST(DEST为模块名字)
往备份服务器上推送文件:
[root@nfs01 ~]# rsync -avzP /etc/hosts rsync_backup@172.16.1.41::backup
Password:                    ##需要输入连接172.16.1.41的服务器密码。
sending incremental file list
hosts

         323 100%    0.00kB/s    0:00:00 (xfer#1, to-check=0/1)

sent 199 bytes  received 27 bytes  41.09 bytes/sec
total size is 323  speedup is 1.43
如果连接服务器免密码登录时,接下来配置过程:
1、rsync客户端密码认证文件
 [root@nfs01 ~]# echo "dadong123" >"/etc/rsync.password"
  [root@nfs01 ~]# cat /etc/rsync.password
  dadong123
2、客户端密码文件授权修改600
[root@nfs01 ~]# ll -d /etc/rsync.password
-rw-r--r-- 1 root root 7 May  5 09:56 /etc/rsync.password
[root@nfs01 ~]# chmod 600 /etc/rsync.password
[root@nfs01 ~]# ll -d /etc/rsync.password
-rw------- 1 root root 7 May  5 09:56 /etc/rsync.password
[root@nfs01 ~]#
3、实现免秘钥登录
[root@nfs01 ~]# rsync -avz /etc/sysconfig/network rsync_backup@172.16.1.41::backup --password-file=/etc/rsync.password
sending incremental file list
network

sent 98 bytes  received 27 bytes  250.00 bytes/sec
total size is 30  speedup is 0.24
[root@nfs01 ~]#
经过上面三步,客户端向服务器推文件,即可实现免密码传输。
1.2.1、rsync客户端访问服务端原理

原理讲解:
1)客户端执行推送命令,将客户端上面的数据传送到服务器。
2)数据到达服务器端验证阶段时,需要经过秘钥和用户名等验证,客户端这时候就要知道服务器上配置文件中的普通用户使用rsync时的用户名和密码;如果通过验证,用户的身份就会变成服务器上预先设定好的用户rsync。
3)当普通用户进入到服务器端时,身份变成rsync时,那么他对模块中的路径/backup就有执行和管理权限,因为在做服务器端配置时,就已经将/backup的属组和属组设为rsync。
4)完成传输。
1.3、守护进程常见问题排错
1.3.1 常见问题:@ERROR: auth failed on module dadong
   客户端的错误现象:
   [root@nfs01 tmp]# rsync -avz /etc/hosts rsync_backup@172.16.1.41::backup
Password:
@ERROR: auth failed on module backup
rsync error: error starting client-server protocol (code 5) at main.c(1503) [sender=3.0.6]

   异常问题解决:
   1. 密码真的输入错误,用户名真的错误
   2. secrets file = /etc/rsync.password指定的密码文件和实际密码文件名称不一致
   3. /etc/rsync.password文件权限不是600
   4. rsync_backup:123456密码配置文件后面注意不要有空格
   5. rsync客户端密码文件中只输入密码信息即可,不要输入虚拟认证用户名称
1.3.2 错误问题:rsync服务端开启的iptables防火墙
  【客户端的错误】
   No route to host
  【错误演示过程】
   [root@nfs01 tmp]# rsync -avz /etc/hosts rsync_backup@172.16.1.41::backup
   rsync: failed to connect to 172.16.1.41: No route to host (113)
   rsync error: error in socket IO (code 10) at clientserver.c(124) [sender=3.0.6]
  【异常问题解决】
   关闭rsync服务端的防火墙服务(iptables)
   [root@backup mnt]# /etc/init.d/iptables stop
   iptables: Setting chains to policy ACCEPT: filter          [  OK  ]
   iptables: Flushing firewall rules:                         [  OK  ]
   iptables: Unloading modules:                               [  OK  ]
   [root@backup mnt]# /etc/init.d/iptables status
   iptables: Firewall is not running.
1.3.3 错误问题:rsync客户端执行rsync命令错误:
   客户端的错误现象:
   [root@nfs01 tmp]# rsync -avz /etc/hosts rsync_backup@172.16.1.41::/backup
   ERROR: The remote path must start with a module name not a /
   rsync error: error starting client-server protocol (code 5) at main.c(1503) [sender=3.0.6]
   异常问题解决:
   rsync命令语法理解错误,::/backup是错误的语法,应该为::backup(rsync模块)
1.3.4 错误问题:Unknown module 'backup'
[root@nfs01 tmp]# rsync -avz /etc/hosts rsync_backup@172.16.1.41::backup
@ERROR: Unknown module 'backup'
rsync error: error starting client-server protocol (code 5) at main.c(1503) [sender=3.0.6]
   异常问题解决:
   1. /etc/rsyncd.conf配置文件模块名称书写错误
1.3.5 错误问题:Permission denied
 [root@nfs01 tmp]# rsync -avz /etc/hosts rsync_backup@172.16.1.41::backup
Password:
sending incremental file list
hosts
rsync: mkstemp ".hosts.5z3AOA" (in backup) failed: Permission denied (13)
sent 196 bytes  received 27 bytes  63.71 bytes/sec
total size is 349  speedup is 1.57
rsync error: some files/attrs were not transferred (see previous errors) (code 23) at main.c(1039) [sender=3.0.6]
   异常问题解决:
   1. 共享目录的属主和属组不正确,不是rsync
   2. 共享目录的权限不正确,不是755
1.3.6 错误问题:chdir failed
[root@nfs01 tmp]# rsync -avz /etc/hosts rsync_backup@172.16.1.41::backup
Password:
@ERROR: chdir failed
rsync error: error starting client-server protocol (code 5) at main.c(1503) [sender=3.0.6]
    异常问题解决:
    1. 备份存储目录没有建立
    2. 建立的备份存储目录和配置文件定义不一致
说明:如果没有备份存储目录
1.3.7 错误问题:invalid uid rsync
 [root@nfs01 tmp]# rsync -avz /etc/hosts rsync_backup@172.16.1.41::backup
Password:
@ERROR: invalid uid rsync
rsync error: error starting client-server protocol (code 5) at main.c(1503) [sender=3.0.6]
    异常问题解决:
rsync服务对应rsync虚拟用户不存在了
1.3.8 rsync客户端连接慢问题
错误日志输出
2017/03/08 20:14:43 [3422] params.c:Parameter() - Ignoring badly formed line in configuration file: ignore errors
2017/03/08 20:14:43 [3422] name lookup failed for 172.16.1.31: Name or service not known
2017/03/08 20:14:43 [3422] connect from UNKNOWN (172.16.1.31)
2017/03/08 20:14:43 [3422] rsync to backup/ from rsync_backup@unknown (172.16.1.31)
2017/03/08 20:14:43 [3422] receiving file list
2017/03/08 20:14:43 [3422] sent 76 bytes  received 83 bytes  total size 349
正确日志输出
2017/03/08 20:16:45 [3443] params.c:Parameter() - Ignoring badly formed line in configuration file: ignore errors
2017/03/08 20:16:45 [3443] connect from nfs02 (172.16.1.31)
2017/03/08 20:16:45 [3443] rsync to backup/ from rsync_backup@nfs02 (172.16.1.31)
2017/03/08 20:16:45 [3443] receiving file list
2017/03/08 20:16:45 [3443] sent 76 bytes  received 83 bytes  total size 349
    异常问题解决:
查看日志进行分析
1.3.9 rsync服务没有正确启动
Connection refused (111)
[root@dadong-muban ~]# rsync -avz /etc/hosts rsync_backup@172.16.1.41::backup
rsync: failed to connect to 172.16.1.41: Connection refused (111)
rsync error: error in socket IO (code 10) at clientserver.c(124) [sender=3.0.6]
解决 rsync服务没开启
[root@dadong-muban ~]# rsync --daemon
[root@dadong-muban ~]# ss -lntup |grep rsync
tcp LISTEN 0 5 :::873 :::* users:(("rsync",1434,5))
tcp LISTEN 0 5 *:873 *:* users:(("rsync",1434,4))
[root@dadong-muban ~]# rsync -avz /etc/hosts rsync_backup@172.16.1.41::backup
Password:
sending incremental file list
hosts

sent 196 bytes received 27 bytes 49.56 bytes/sec
total size is 349 speedup is 1.57
1.3.10 rsync error: errors selecting input/output file
[root@web02 172.16.1.7]# rsync -avzP /backup rsync_backup@172.16.1.41::backup
rsync: getcwd(): No such file or directory (2)
rsync error: errors selecting input/output files, dirs (code 3) at util.c(992) [receiver=3.0.6]
[root@web02 172.16.1.7]# cd /
[root@web02 /]# rsync -avzP /backup rsync_backup@172.16.1.41::backup
Password:
sending incremental file list
backup/
backup/.tar.gz

        1121 100%    0.00kB/s    0:00:00 (xfer#1, to-check=0/2)

sent 1225 bytes  received 31 bytes  34.41 bytes/sec
total size is 1121  speedup is 0.89
[root@web02 /]#
出现上面的问题原因是当前目录在所要传送的目录里面,跳出当前目录即可。
2、本地复制方式(相当于cp scp ls)
语法:
Local:  rsync [OPTION...] SRC... [DEST]
2.1、rsync命令等价rm命令
[root@backup ~]# # rm删除命令
[root@backup ~]# rm -f dadong/*
[root@backup ~]# ll dadong
total 0
[root@backup ~]# rsync --delete dadong /tmp/
rsync: --delete does not work without -r or -d.
rsync error: syntax or usage error (code 1) at main.c(1422) [client=3.0.6]
[root@backup ~]# rsync -r --delete dadong /tmp/
[root@backup ~]# ll /tmp/
total 16
drwxr-xr-x 78 root root 4096 May  4 08:56 etc
-rw-r--r--  1 root root  324 May  3 16:20 hosts
drwxr-xr-x  2 root root 4096 May  4 09:20 dadong
-rw-r--r--  1 root root 3280 May  4 08:54 passwd
[root@backup ~]#
[root@backup ~]# rsync -r --delete dadong/ /tmp/
[root@backup ~]# ll /tmp/
total 0
2.2、rsync等价于ls
[root@backup ~]# # 查看文件信息命令ls,但是rsync查看文件时,后面必须要加上文件名,不能单独使用。
[root@backup ~]# rsync /tmp/
drwxrwxrwt        4096 2017/05/04 09:21:42 .
[root@backup ~]# rsync /etc/
drwxr-xr-x        4096 2017/05/04 09:07:46 .
-rw-------           0 2017/03/08 12:03:35 .pwd.lock
-rw-r--r--        4439 2016/04/12 15:56:23 DIR_COLORS
-rw-r--r--        5139 2016/04/12 15:56:23 DIR_COLORS.256color
-rw-r--r--        4113 2016/04/12 15:56:23 DIR_COLORS.lightbgcolor
2.3、rsync等价于scp
[root@backup ~]# # 将hosts文件复制NFS服务器/tmp目录中
[root@backup ~]# scp -rp dadong 10.0.0.31:/tmp/
The authenticity of host '10.0.0.31 (10.0.0.31)' can't be established.
RSA key fingerprint is 38:2f:fc:b7:05:37:43:2e:f9:44:3d:eb:d7:cb:f9:54.
Are you sure you want to continue connecting (yes/no)? yes
Warning: Permanently added '10.0.0.31' (RSA) to the list of known hosts.
root@10.0.0.31's password:
b                                                                                      100%    0     0.0KB/s   00:00
c                                                                                      100%    0     0.0KB/s   00:00
a
[root@backup ~]# rsync -r dadong 10.0.0.31:/tmp/
root@10.0.0.31's password:
3.隧道方式(scp)
语法:
Access via remote shell:
  Pull: rsync [OPTION...] [USER@]HOST:SRC... [DEST]
  Push: rsync [OPTION...] SRC... [USER@]HOST:DEST
实例
[root@backup ~]# # rsync [OPTION...] SRC... [USER@]HOST:DEST
[root@backup ~]# rsync -rp /etc/hosts  root@10.0.0.31:/tmp
root@10.0.0.31's password:
rsync error: received SIGINT, SIGTERM, or SIGHUP (code 20) at rsync.c(546) [sender=3.0.6]
[root@backup ~]# rsync -rp -e "ssh -p 22" /etc/hosts  root@10.0.0.31:/tmp
root@10.0.0.31's password:
rsync -vzrtopgP  -e 'ssh -p 22' dadong@172.16.1.41:/opt /tmp
说明:[USER@]中的user是推送到目标服务器上的一个用户,这个用户必须先存在,而且要对目标文件有写入权限,即user可以是普通用户dadong,必须对/tmp有写入权限。如果没有可以通过授权属主和属组的方式授权。
解决方法:
1.在目标服务器上的root权限下将普通用户yu设置为文件mao的属组和属主
[yu@nfs01 opt]$ su - root
Password:
[root@nfs01 ~]# cd /home/
[root@nfs01 home]# ls
mao  dadong  stu4  stu5  yu
[root@nfs01 home]# id yu
uid=893(yu) gid=893(yu) groups=893(yu)
[root@nfs01 home]# chown yu.yu mao
[root@nfs01 home]# ll
total 20
drwx------  2 yu   yu   4096 May  4 15:13 mao
drwxr-xr-x. 4 root root 4096 May  3 15:00 dadong
drwx------. 2 stu4 stu4 4096 May  3 13:39 stu4
drwx------. 2 stu5 stu5 4096 May  3 13:39 stu5
drwx------  3 yu   yu   4096 May  4 16:02 yu
[root@nfs01 home]
2.客户端服务器上推送
[root@backup opt]# rsync -avzP -e  "ssh -p 22" /tmp/passwd  yu@10.0.0.31:/home/mao
yu@10.0.0.31's password:           ##此时普通用户yu对于文件有所有权限
sending incremental file list
passwd
        1173 100%    0.00kB/s    0:00:00 (xfer#1, to-check=0/1)

sent 542 bytes  received 31 bytes  163.71 bytes/sec
total size is 1173  speedup is 2.05
[root@backup opt]#
注:此处隧道方式使用的密码是ssh连接Linux的密码,即登录Linux的密码。