MySQL主从原理:
一,master记录二进制日志,在每个事务更新数据完成之前,master在二进制日志中记录这些改变、mysql将事务写入二进制日志,即使事务中的语句都是交叉执行的。在事件写入二进制日志完成后,master通知存储引擎提交事务。
二,slave将master的binary log拷贝到它自己的中继日志。首先,slave开始一个工作线程——I/O线程。I/O线程在master上打开一个普通的连接,然后开始binlog dump process。Binlog dump process从master的二进制日志中读取事件,如果已经执行完master产生的所有文件,它会睡眠并等待master产生新的事件。I/O线程将这些事件写入中继日志。
三,SQL slave thread(SQL从线程)处理该过程的最后一步。SQL线程从中继日志读取事件,并重新执行其中的事件而更新slave的数据,使其与master中的数据一致。
主从配置:
主机名 IP 系统版本 mysql版本 角色
mysqlmaster.cn 10.10.10.69 CentOS Linux release 7.4.1708 (Core) 5.7.20 master
mysqlslave.cn 10.10.10.72 CentOS Linux release 7.4.1708 (Core) 5.7.20 slave
步骤一、主从服务环境初始化
[root@mysqlmaster ~]# iptables -F
[root@mysqlmaster ~]# systemctl stop firewalld
[root@mysqlmaster ~]# systemctl disable firewalld
[root@mysqlmaster ~]# systemctl stop NetworkManager
[root@mysqlmaster ~]# systemctl disable NetworkManager
步骤二,安装mysql
下载地址:https://downloads.mysql.com/archives/community/
下载相应软件包后解压并把安装包上传到服务器
安装以下软件包,顺序从上到下,注意顺序错误会报错!!!!
mysql-community-common-5.7.20-1.el7.x86_64.rpm
mysql-community-libs-5.7.20-1.el7.x86_64.rpm
mysql-community-client-5.7.20-1.el7.x86_64.rpm
mysql-community-server-5.7.20-1.el7.x86_64.rpm
安装
[root@mysqlmaster ~]# yum -y install mysql-community-common-5.7.20-1.el7.x86_64.rpm
已加载插件:fastestmirror, langpacks
正在检查 mysql-community-common-5.7.20-1.el7.x86_64.rpm: mysql-community-common-5.7.20-1.el7.x86_64
mysql-community-common-5.7.20-1.el7.x86_64.rpm 将被安装
正在解决依赖关系
--> 正在检查事务
---> 软件包 mysql-community-common.x86_64.0.5.7.20-1.el7 将被 安装
--> 解决依赖关系完成
依赖关系解决
========================================================================================
Package 架构 版本 源 大小
========================================================================================
正在安装:
mysql-community-common
x86_64 5.7.20-1.el7 /mysql-community-common-5.7.20-1.el7.x86_64 2.5 M
事务概要
========================================================================================
安装 1 软件包
总计:2.5 M
安装大小:2.5 M
Downloading packages:
Running transaction check
Running transaction test
Transaction check error:
file /usr/share/mysql/charsets/swe7.xml from install of mysql-community-common-5.7.20-1.el7.x86_64 conflicts with file from package mariadb-libs-1:5.5.56-2.el7.x86_64
错误概要
-------------
如上所示,出现了错误导致无法安装,但从错误信息可以看到,由于已经安装了mariadb数据库导致无法再安装mysql数据库,那就先把mariadb数据库卸载,
[root@mysqlmaster ~]# yum -y remove mariadb* (主从服务器均要卸载系统自带的mariadb数据库后才能安装mysql)
已加载插件:fastestmirror, langpacks
正在解决依赖关系
--> 正在检查事务
---> 软件包 mariadb-libs.x86_64.1.5.5.56-2.el7 将被 删除
--> 正在处理依赖关系 libmysqlclient.so.18()(64bit),它被软件包 2:postfix-2.10.1-6.el7.x86_64 需要
--> 正在处理依赖关系 libmysqlclient.so.18(libmysqlclient_18)(64bit),它被软件包 2:postfix-2.10.1-6.el7.x86_64 需要
--> 正在检查事务
---> 软件包 postfix.x86_64.2.2.10.1-6.el7 将被 删除
--> 解决依赖关系完成
依赖关系解决
========================================================================================
Package 架构 版本 源 大小
========================================================================================
正在删除:
mariadb-libs x86_64 1:5.5.56-2.el7 @anaconda 4.4 M
为依赖而移除:
postfix x86_64 2:2.10.1-6.el7 @anaconda 12 M
事务概要
========================================================================================
移除 1 软件包 (+1 依赖软件包)
安装大小:17 M
Downloading packages:
Running transaction check
Running transaction test
Transaction test succeeded
Running transaction
正在删除 : 2:postfix-2.10.1-6.el7.x86_64 1/2
正在删除 : 1:mariadb-libs-5.5.56-2.el7.x86_64 2/2
验证中 : 1:mariadb-libs-5.5.56-2.el7.x86_64 1/2
验证中 : 2:postfix-2.10.1-6.el7.x86_64 2/2
删除:
mariadb-libs.x86_64 1:5.5.56-2.el7
作为依赖被删除:
postfix.x86_64 2:2.10.1-6.el7
完毕!
[root@xuegodslave ~]# yum -y install mysql-community-common-5.7.20-1.el7.x86_64.rpm
已加载插件:fastestmirror, langpacks
正在检查 mysql-community-common-5.7.20-1.el7.x86_64.rpm: mysql-community-common-5.7.20-1.el7.x86_64
mysql-community-common-5.7.20-1.el7.x86_64.rpm 将被安装
正在解决依赖关系
--> 正在检查事务
---> 软件包 mysql-community-common.x86_64.0.5.7.20-1.el7 将被 安装
--> 解决依赖关系完成
依赖关系解决
========================================================================================
Package 架构 版本 源 大小
========================================================================================
正在安装:
mysql-community-common
x86_64 5.7.20-1.el7 /mysql-community-common-5.7.20-1.el7.x86_64 2.5 M
事务概要
========================================================================================
安装 1 软件包
总计:2.5 M
安装大小:2.5 M
Downloading packages:
Running transaction check
Running transaction test
Transaction test succeeded
Running transaction
正在安装 : mysql-community-common-5.7.20-1.el7.x86_64 1/1
验证中 : mysql-community-common-5.7.20-1.el7.x86_64 1/1
已安装:
mysql-community-common.x86_64 0:5.7.20-1.el7
完毕!
如上所示已经安装成功第一个包,同样的操作把剩下的三个包安装完毕!(主从服务器均进行同样操作)
步骤三,启动MySQL服务,并进行MySQL服务初始化(主从服务器均进行同样操作)
[root@mysqlmaster ~]# systemctl start mysqld
[root@mysqlmaster ~]# grep "password" /var/log/mysqld.log 查询mysql初始密码,
2018-05-12T14:50:13.167604Z 1 [Note] A temporary password is generated for root@localhost: Lil=#:VjS8*Z (初始密码)
[root@mysqlmaster ~]# mysql_secure_installation
Securing the MySQL server deployment.
Enter password for user root: 这里输入:Lil=#:VjS8*Z
The existing password for the user account root has expired. Please set a new password.
New password: 输入新密码 zX@987Weqqrd1
Re-enter new password: 重复一遍确认 zX@987Weqqrd1
The 'validate_password' plugin is installed on the server.
The subsequent steps will run with the existing configuration
of the plugin.
Using existing password for root.
Estimated strength of the password: 100
Change the password for root ? ((Press y|Y for Yes, any other key for No) : y 修改密码确认
New password: 再次输入 zX@987Weqqrd1
Re-enter new password: 再次输入 zX@987Weqqrd1
Estimated strength of the password: 100
Do you wish to continue with the password provided?(Press y|Y for Yes, any other key for No) : y 确认修改
By default, a MySQL installation has an anonymous user,
allowing anyone to log into MySQL without having to have
a user account created for them. This is intended only for
testing, and to make the installation go a bit smoother.
You should remove them before moving into a production
environment.
Remove anonymous users? (Press y|Y for Yes, any other key for No) : y 移除匿名用户
Success.
Normally, root should only be allowed to connect from
'localhost'. This ensures that someone cannot guess at
the root password from the network.
Disallow root login remotely? (Press y|Y for Yes, any other key for No) : y 不允许root远程登录
Success.
By default, MySQL comes with a database named 'test' that
anyone can access. This is also intended only for testing,
and should be removed before moving into a production
environment.
Remove test database and access to it? (Press y|Y for Yes, any other key for No) : y 删除测试数据库
- Dropping test database...
Success.
- Removing privileges on test database...
Success.
Reloading the privilege tables will ensure that all changes
made so far will take effect immediately.
Reload privilege tables now? (Press y|Y for Yes, any other key for No) : y 刷新权限表
Success.
All done!
说明:MySQL服务要求密码强度及复杂的都十分严格,如果需要使用简单密码可以修改系统配置文件/etc/my.cnf 加入validate_password=off 然后重启mysql服务进行修改就可以使用简单密码(以上步骤主从服务器均要执行)
步骤四、登录MySQL主服务器,创建一个测试数据库及表,并创建一个授权账号进行主从数据同步
[root@mysqlmaster ~]# mysql -uroot -p'zX@987Weqqrd1' 使用新密码登录mysql
mysql: [Warning] Using a password on the command line interface can be insecure.
Welcome to the MySQL monitor. Commands end with ; or g.
Your MySQL connection id is 6
Server version: 5.7.20 MySQL Community Server (GPL)
Copyright (c) 2000, 2017, Oracle and/or its affiliates. All rights reserved.
Oracle is a registered trademark of Oracle Corporation and/or its
affiliates. Other names may be trademarks of their respective
owners.
Type 'help;' or 'h' for help. Type 'c' to clear the current input statement.
mysql>
mysql> show databases; 查看当前数据库
+--------------------+
| Database |
+--------------------+
| information_schema |
| mysql |
| performance_schema |
| sys |
+--------------------+
4 rows in set (0.00 sec)
mysql> create database test; 创建一个名为test的数据库
Query OK, 1 row affected (0.00 sec)
mysql> show databases;
+--------------------+
| Database |
+--------------------+
| information_schema |
| mysql |
| performance_schema |
| sys |
| test | 新建数据库
+--------------------+
5 rows in set (0.00 sec)
mysql> use test; 切换到test数据库
Database changed
mysql> show tables; 查询当前数据库表
Empty set (0.00 sec)
mysql> create table test1(id int,name varchar(20)); 创建一个测试表
Query OK, 0 rows affected (0.03 sec)
mysql> show tables;
+----------------+
| Tables_in_test |
+----------------+
| test1 |
+----------------+
1 row in set (0.00 sec)
创建授权账号:slave 指定从服务器IP:10.10.10.72 密码:A@*qw92!derS
mysql> grant replication slave on *.* to slave@10.10.10.72 identified by "A@*qw92!derS";
Query OK, 0 rows affected, 1 warning (0.00 sec)
步骤五、主从服务器配置:
修改master系统配置文件 /etc/my.cnf 末尾加入 一下内容
log-bin=mysql-bin-master 启用二进制日志
server-id=1 本机数据库ID 标示
binlog-do-db=test 可以被从服务器复制的库, 二进制需要同步的数据库名(创建的测试数据库)
binlog-ignore-db=mysql 不可以被从服务器复制的库
[root@mysqlmaster ~]# systemctl restart mysqld 重启数据库服务器
[root@mysqlmaster ~]# mysql -uroot -p'zX@987Weqqrd1' 登录数据库
mysql: [Warning] Using a password on the command line interface can be insecure.
Welcome to the MySQL monitor. Commands end with ; or g.
Your MySQL connection id is 3
Server version: 5.7.20-log MySQL Community Server (GPL)
Copyright (c) 2000, 2017, Oracle and/or its affiliates. All rights reserved.
Oracle is a registered trademark of Oracle Corporation and/or its
affiliates. Other names may be trademarks of their respective
owners.
Type 'help;' or 'h' for help. Type 'c' to clear the current input statement.
mysql>
mysql> show master status; 查看数据库状态信息
+-------------------------+----------+--------------+------------------+-------------------+
| File | Position | Binlog_Do_DB | Binlog_Ignore_DB | Executed_Gtid_Set |
+-------------------------+----------+--------------+------------------+-------------------+
| mysql-bin-master.000001 | 154 | test | mysql | |
+-------------------------+----------+--------------+------------------+-------------------+
1 row in set (0.00 sec)
mysql> show binlog eventsG
*************************** 1. row ***************************
Log_name: mysql-bin-master.000001
Pos: 4
Event_type: Format_desc
Server_id: 1
End_log_pos: 123
Info: Server ver: 5.7.20-log, Binlog ver: 4
*************************** 2. row ***************************
Log_name: mysql-bin-master.000001
Pos: 123
Event_type: Previous_gtids
Server_id: 1
End_log_pos: 154
Info:
2 rows in set (0.00 sec)
如上所示,master服务器已配置成功
mysqldump -uroot -p'zX@987Weqqrd1' test >test.sql 导出master测试数据库test
[root@mysqlmaster ~]# mysqldump -uroot -p'zX@987Weqqrd1' test >test.sql
mysqldump: [Warning] Using a password on the command line interface can be insecure.
[root@mysqlmaster ~]# ll test.sql
-rw-r--r-- 1 root root 1790 5月 13 00:01 test.sql
将导出的数据库传到slave服务器上
[root@mysqlmaster ~]# scp test.sql 10.10.10.72:/root
The authenticity of host '10.10.10.72 (10.10.10.72)' can't be established.
ECDSA key fingerprint is SHA256:cHQticA8/IMXFPFXspEnN0h4FLG7LaXnT8Zpr7ricrA.
ECDSA key fingerprint is MD5:1a:70:c5:60:05:47:6a:75:8a:47:db:85:51:1c:32:2c.
Are you sure you want to continue connecting (yes/no)? yes
Warning: Permanently added '10.10.10.72' (ECDSA) to the list of known hosts.
root@10.10.10.72's password:
test.sql 100% 1790 1.9MB/s 00:00
配置从服务器
[root@xuegodslave ~]# mysql -uslave -p'A@*qw92!derS' -h 10.10.10.69 在slave服务器上使用授权账号slave登录master mysql测试授权账号能否登录
mysql: [Warning] Using a password on the command line interface can be insecure.
Welcome to the MySQL monitor. Commands end with ; or g.
Your MySQL connection id is 8
Server version: 5.7.20-log MySQL Community Server (GPL)
Copyright (c) 2000, 2017, Oracle and/or its affiliates. All rights reserved.
Oracle is a registered trademark of Oracle Corporation and/or its
affiliates. Other names may be trademarks of their respective
owners.
Type 'help;' or 'h' for help. Type 'c' to clear the current input statement.
mysql>
mysql> show databases;
+--------------------+
| Database |
+--------------------+
| information_schema |
+--------------------+
1 row in set (0.00 sec)
如上所示查询不到test测试数据库
mysql> exit; 退出master数据库
Bye
[root@xuegodslave ~]# mysql -uroot -p'zX@987Weqqrd1' 登录slave服务器,密码初始化与master相同
mysql: [Warning] Using a password on the command line interface can be insecure.
Welcome to the MySQL monitor. Commands end with ; or g.
Your MySQL connection id is 12
Server version: 5.7.20 MySQL Community Server (GPL)
Copyright (c) 2000, 2017, Oracle and/or its affiliates. All rights reserved.
Oracle is a registered trademark of Oracle Corporation and/or its
affiliates. Other names may be trademarks of their respective
owners.
Type 'help;' or 'h' for help. Type 'c' to clear the current input statement.
mysql>
mysql> show databases;
+--------------------+
| Database |
+--------------------+
| information_schema |
| mysql |
| performance_schema |
| sys |
+--------------------+
4 rows in set (0.01 sec)
mysql> create database test; 创建测试数据库
Query OK, 1 row affected (0.01 sec)
mysql> exit; 退出数据库
Bye
[root@xuegodslave ~]# mysql -uroot -p'zX@987Weqqrd1' test<test.sql 将master导出的数据库内容导入slave创建的test数据库内
mysql: [Warning] Using a password on the command line interface can be insecure.
[root@xuegodslave ~]# mysql -uroot -p'zX@987Weqqrd1' 登录slave服务器
mysql: [Warning] Using a password on the command line interface can be insecure.
Welcome to the MySQL monitor. Commands end with ; or g.
Your MySQL connection id is 15
Server version: 5.7.20 MySQL Community Server (GPL)
Copyright (c) 2000, 2017, Oracle and/or its affiliates. All rights reserved.
Oracle is a registered trademark of Oracle Corporation and/or its
affiliates. Other names may be trademarks of their respective
owners.
Type 'help;' or 'h' for help. Type 'c' to clear the current input statement.
mysql> show databases;
+--------------------+
| Database |
+--------------------+
| information_schema |
| mysql |
| performance_schema |
| sys |
| test |
+--------------------+
5 rows in set (0.00 sec)
mysql> use test; 切换到test数据库
Reading table information for completion of table and column names
You can turn off this feature to get a quicker startup with -A
Database changed
mysql> show tables; 查看数据库内容
+----------------+
| Tables_in_test |
+----------------+
| test1 | 已存在master服务器创建的表test1,导入成功
+----------------+
1 row in set (0.00 sec)
mysql> exit;
Bye
[root@xuegodslave ~]# systemctl stop mysqld 停掉slave数据库服务
[root@xuegodslave ~]# vim /etc/my.cnf 编辑slave服务器数据库配置文件末尾添加一行 server-id=2 (从服务器ID号,不要和主ID相同 ,如果设置多个从服务器,每个从服务器必须有一个唯一的server-id值,必须与主服务器的以及其它从服务器的不相同。可以认为server-id值类似于IP地址:这些ID值能唯一识别复制服务器群集中的每个服务器实例。)
[root@xuegodslave ~]# systemctl start mysqld 启动mysql服务
[root@xuegodslave ~]# mysql -uroot -p'zX@987Weqqrd1' 登录mysql服务器
mysql: [Warning] Using a password on the command line interface can be insecure.
Welcome to the MySQL monitor. Commands end with ; or g.
Your MySQL connection id is 3
Server version: 5.7.20 MySQL Community Server (GPL)
Copyright (c) 2000, 2017, Oracle and/or its affiliates. All rights reserved.
Oracle is a registered trademark of Oracle Corporation and/or its
affiliates. Other names may be trademarks of their respective
owners.
Type 'help;' or 'h' for help. Type 'c' to clear the current input statement.
mysql> stop slave; 停止slave
Query OK, 0 rows affected, 1 warning (0.00 sec)
mysql> change master to master_host='10.10.10.69',master_user='slave',master_password='change master to master_host='10.10.10.69',master_user='slave',master_password='A@*qw92!derS'; (授权slave服务器同步master,指定账号和密码)
Query OK, 0 rows affected, 2 warnings (0.05 sec)
mysql> start slave; 启动slave
Query OK, 0 rows affected (0.01 sec)
mysql> show slave status G 查看状态
*************************** 1. row ***************************
Slave_IO_State: Waiting for master to send event
Master_Host: 10.10.10.69
Master_User: slave
Master_Port: 3306
Connect_Retry: 60
Master_Log_File: mysql-bin-master.000001
Read_Master_Log_Pos: 448
Relay_Log_File: xuegodslave-relay-bin.000002
Relay_Log_Pos: 675
Relay_Master_Log_File: mysql-bin-master.000001
Slave_IO_Running: Yes 一个负责与主机的io通信
Slave_SQL_Running: Yes 负责自己的slave mysql进程
如上图所示,主从服务器均运行并连接成功
再到主服务器上查看状态:
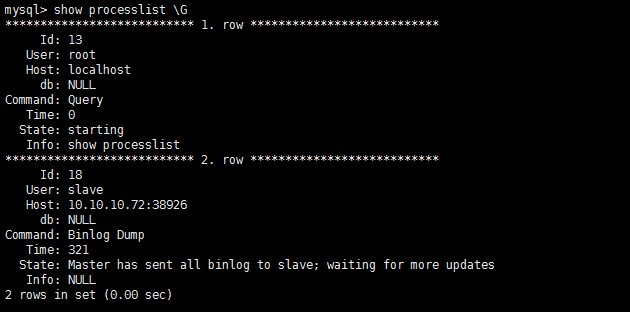
最后在master服务器中的test数据库中插入数据进行同步测试:
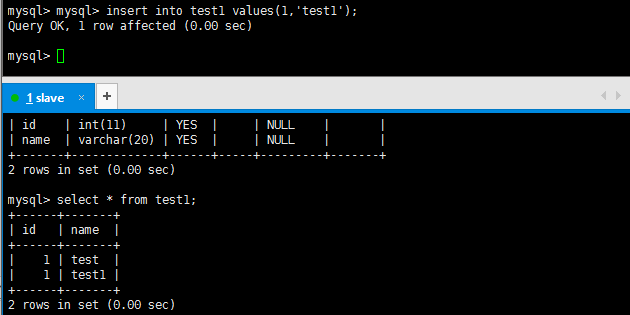
测试成功,主从服务器已成功同步数据!
>>>>>>>>>>>>>>>>>>>>>>>>>>>>>>>>>>>>>>>>>>>>>>>>>>>>>>>>>>>>>>>>>>>>>>>>>>>>>>>>>>>>>>>>>>>>>>>>>>>>>>>>>>>>>>>>>>>>
如果遇到主从不同步,看一下主从bin-log的位置,然后再同步。
在主服务器上看二进制日志事件列表
mysql> show binlog events G
从服务器执行MySQL命令下:
mysql> stop slave; #先停止slave服务
mysql> change master to master_log_file='mysql-bin-master.000001',master_log_pos=1164;
#根据上面主服务器的show master status的结果,进行从服务器的二进制数据库记录回归,达到同步的效果
mysql>slave start; #启动从服务器同步服务
mysql> show slave statusG; #用show slave statusG;看一下从服务器的同步情况
Slave_IO_Running: Yes
Slave_SQL_Running: Yes
如果都是yes,那代表已经在同步
重启从服务器,再查看状态:
停止从服务器slave stop;
开启从服务器slave start;
排错思路:
1、二进制日志没有开启
2、IPTABLES 没有放开端口
3、对应的主机 IP地址写错了
SQL线程出错
1、主从服务器数据库结构不统一
出错后,数据少,可以手动解决创建插入,再更新slave状态。
注:如果主上误删除了。那么从上也就误删除了。 #因此主上要定期做mysqldump备份。