在之前的文章中介绍了如何对关系型数据数据通过auto-sharding进行分布式数据存储,今天介绍如何对物理文件(小文件,基本小于100K)进行分布式存储。
接着看一下要配置的测试环境(与前一篇中类似):
模拟2个shard服务和一个config服务, 均运行在10.0.4.85机器上,只是端口不同:
Shard1:27020
Shard2:27021
Config:27022
Mongos启动时默认使用的27017端口
在C,D,E磁盘下分别建立如下文件夹:
mongodb\bin
mongodb\db
然后用CMD命令行依次打开相应文件夹下的mongd文件:
c:\mongodb\bin\mongod --dbpath c:\mongodb\db\ --port 27020
d:\mongodb\bin\mongod --dbpath d:\mongodb\db\ --port 27021
e:\mongodb\bin\mongod --configsvr --dbpath e:\mongodb\db\ --port 27022 (注:config配置服务器)
启动mongos时,默认开启了27017端口
e:\mongodb\bin\mongos --configdb 10.0.4.85:27022
然后打开mongo:
E:\mongodb\bin>mongo 回车 (有时加端口会造成下面的addshard命令出问题)
> use admin
switched to db admin
> db.runCommand( { addshard : "10.0.4.85:27020", allowLocal : 1, maxSize:2 , minKey:1, maxKey:10} )
--添加sharding,maxsize单位是M,此处设置比较小的数值只为演示sharding效果
{ "shardAdded" : "shard0000", "ok" : 1 }
> db.runCommand( { addshard : "10.0.4.85:27021", allowLocal : 1, minKey:1000} )
{ "shardAdded" : "shard0001", "ok" : 1 }
注:如果要移除sharding,可用下面写法
db.runCommand( { removeshard : "localhost:10000" } );
> db.runCommand({listshards:1}); --查看shard节点列表
> config = connect("10.0.4.85:27022")
> config = config.getSisterDB("config")
> dnt_mongodb=db.getSisterDB("dnt_mongodb");
dnt_mongodb
> db.runCommand({enablesharding:"dnt_mongodb"})
{ "ok" : 1 }
> db.printShardingStatus()


sharding version: { "_id" : 1, "version" : 3 }
shards:
{
"_id" : "shard0000",
"host" : "10.0.4.85:27020",
"maxSize" : NumberLong( 2 )
}
{ "_id" : "shard0001", "host" : "10.0.4.85:27021" }
databases:
{ "_id" : "admin", "partitioned" : false, "primary" : "config" }
{ "_id" : "dnt_mongodb", "partitioned" : true, "primary" : "shard0001" }
> db.runCommand( { shardcollection : "dnt_mongodb.attach_gfstream.chunks", key : { files_id : 1 } } ) --此处与之前的数据存储方式有些不同,目前shard似乎仅支持files_id
{ "collectionsharded" : "dnt_mongodb.attach_gfstream.chunks", "ok" : 1 }
注:运行上面命令之前需要设置files_id为唯一索引[unique index]。
创建完sharding和设置相应信息后,我们加载一下测试数据,我用下面代码来读取要本地文件,然后批量向mongodb中添加(通过循环修改文件名来添加相同大小的文件)。
代码
/// 上传文件到mongodb
/// </summary>
/// <param name="uploadDir">要上传文件所在路径</param>
/// <param name="fileName">要上传的文件名</param>
/// <returns></returns>
public bool UploadFile(string uploadDir, string fileName)
{
for (int i = 1; i < 10000; i++)
{
try
{
Mongo mongo = mongoDB;
mongo.Connect();
IMongoDatabase DB = mongo["dnt_mongodb"];
using (FileStream fileStream = new FileStream(uploadDir + fileName, FileMode.Open))
{
int nFileLen = (int)fileStream.Length;
byte[] myData = new Byte[nFileLen];
fileStream.Read(myData, 0, nFileLen);
GridFile fs = new GridFile(DB, "attach_gfstream");
using (GridFileStream gfs = fs.Create(fileName + i))
{
gfs.Write(myData, 0, nFileLen);
}
}
mongo.Disconnect();
}
catch { }
}
return true;
}
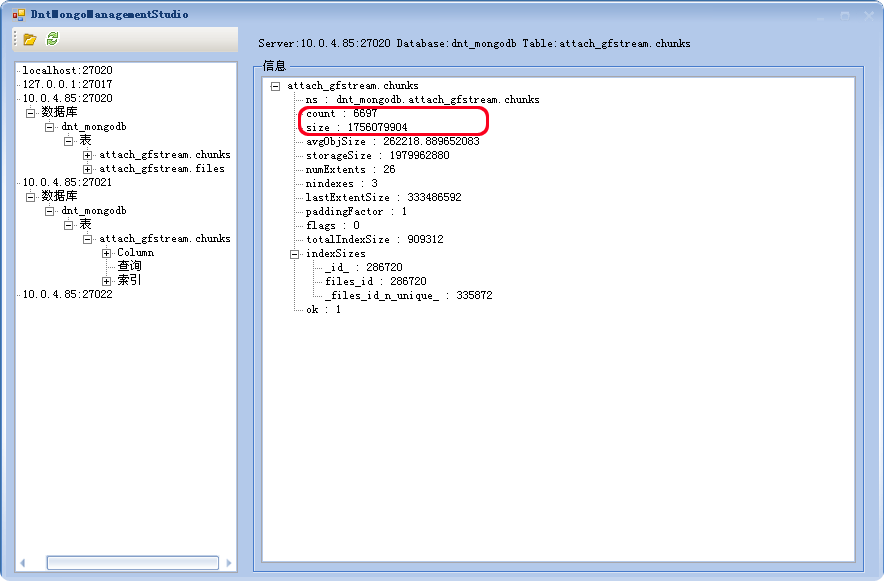
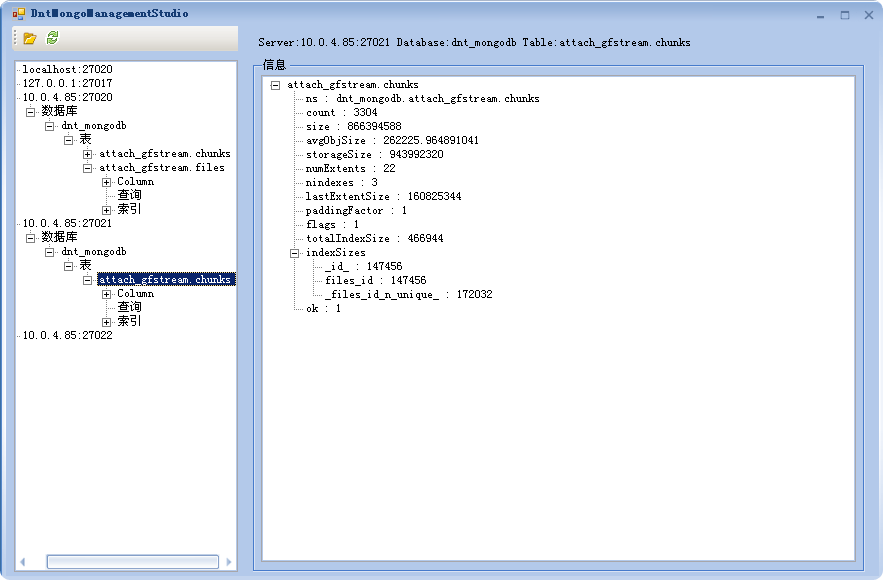
在批量添加约10000次(约10000个文件)之后,mongodb开始把sharding出来的chunk从shard0000分布到shard0001上,我们可以用下面指令来进行验证:
> db.printShardingStatus()
sharding version: { "_id" : 1, "version" : 3 }
shards:
{
"_id" : "shard0000",
"host" : "10.0.4.85:27020",
"maxSize" : NumberLong( 2 )
}
{ "_id" : "shard0001", "host" : "10.0.4.85:27021" }
databases:
{ "_id" : "admin", "partitioned" : false, "primary" : "config" }
{ "_id" : "dnt_mongodb", "partitioned" : true, "primary" : "shard0000" }
dnt_mongodb.attach_gfstream.chunks chunks:
{ "files_id" : { $minKey : 1 } } -->> { "files_id" : ObjectId("4c85fd02145a9b1534010d89") } on : shard0001 { "t" : 2000, "i" : 0 }
{ "files_id" : ObjectId("4c85fd02145a9b1534010d89") } -->> { "files_id" : ObjectId("4c85fdec145a9b0b340005a7") } on : shard0000 { "t" :3000, "i" : 1 }
{ "files_id" : ObjectId("4c85fdec145a9b0b340005a7") } -->> { "files_id" : ObjectId("4c85fe08145a9b0b34000aaf") } on : shard0001 { "t" :3000, "i" : 4 }
{ "files_id" : ObjectId("4c85fe08145a9b0b34000aaf") } -->> { "files_id" : ObjectId("4c85fe27145a9b0b34000fb7") } on : shard0001 { "t" :4000, "i" : 1 }
{ "files_id" : ObjectId("4c85fe27145a9b0b34000fb7") } -->> { "files_id" : ObjectId("4c85fe43145a9b0b340014bf") } on : shard0000 { "t" :4000, "i" : 7 }
{ "files_id" : ObjectId("4c85fe43145a9b0b340014bf") } -->> { "files_id" : ObjectId("4c85fe61145a9b0b340019c7") } on : shard0000 { "t" :4000, "i" : 8 }
{ "files_id" : ObjectId("4c85fe61145a9b0b340019c7") } -->> { "files_id" : ObjectId("4c85fe7b145a9b0b34001ecf") } on : shard0000 { "t" :5000, "i" : 1 }
{ "files_id" : ObjectId("4c85fe7b145a9b0b34001ecf") } -->> { "files_id" : ObjectId("4c85fe9a145a9b0b340023d7") } on : shard0001 { "t" :5000, "i" : 4 }
{ "files_id" : ObjectId("4c85fe9a145a9b0b340023d7") } -->> { "files_id" : ObjectId("4c85feb7145a9b0b340028df") } on : shard0001 { "t" :6000, "i" : 1 }
{ "files_id" : ObjectId("4c85feb7145a9b0b340028df") } -->> { "files_id" : ObjectId("4c85feea145a9b0b340032ef") } on : shard0000 { "t" :6000, "i" : 4 }
{ "files_id" : ObjectId("4c85feea145a9b0b340032ef") } -->> { "files_id" : ObjectId("4c85ff25145a9b0b34003cff") } on : shard0000 { "t" :7000, "i" : 1 }
{ "files_id" : ObjectId("4c85ff25145a9b0b34003cff") } -->> { "files_id" : ObjectId("4c85ff57145a9b0b3400470f") } on : shard0001 { "t" :7000, "i" : 4 }
{ "files_id" : ObjectId("4c85ff57145a9b0b3400470f") } -->> { "files_id" : ObjectId("4c85ff87145a9b0b3400511f") } on : shard0001 { "t" :8000, "i" : 1 }
{ "files_id" : ObjectId("4c85ff87145a9b0b3400511f") } -->> { "files_id" : ObjectId("4c85ffcd145a9b0b34005b2f") } on : shard0000 { "t" :8000, "i" : 16 }
{ "files_id" : ObjectId("4c85ffcd145a9b0b34005b2f") } -->> { "files_id" : ObjectId("4c85fff7145a9b0b3400653f") } on : shard0000 { "t" :8000, "i" : 17 }
{ "files_id" : ObjectId("4c85fff7145a9b0b3400653f") } -->> { "files_id" : ObjectId("4c860021145a9b0b34006f4f") } on : shard0000 { "t" :8000, "i" : 18 }
{ "files_id" : ObjectId("4c860021145a9b0b34006f4f") } -->> { "files_id" : ObjectId("4c86004f145a9b0b3400795f") } on : shard0000 { "t" :8000, "i" : 19 }
{ "files_id" : ObjectId("4c86004f145a9b0b3400795f") } -->> { "files_id" : ObjectId("4c860080145a9b0b3400836f") } on : shard0000 { "t" :9000, "i" : 1 }
{ "files_id" : ObjectId("4c860080145a9b0b3400836f") } -->> { "files_id" : ObjectId("4c8600b5145a9b0b34008d7f") } on : shard0001 { "t" :9000, "i" : 7 }
{ "files_id" : ObjectId("4c8600b5145a9b0b34008d7f") } -->> { "files_id" : ObjectId("4c860115145a9b0b3400a183") } on : shard0001 { "t" :9000, "i" : 8 }
{ "files_id" : ObjectId("4c860115145a9b0b3400a183") } -->> { "files_id" : ObjectId("4c860198145a9b0b3400b587") } on : shard0001 { "t" :10000, "i" : 1 }
{ "files_id" : ObjectId("4c860198145a9b0b3400b587") } -->> { "files_id" : ObjectId("4c8601fc145a9b0b3400c98b") } on : shard0000 { "t" :10000, "i" : 11 }
{ "files_id" : ObjectId("4c8601fc145a9b0b3400c98b") } -->> { "files_id" : ObjectId("4c86025b145a9b0b3400dd8f") } on : shard0000 { "t" :10000, "i" : 12 }
{ "files_id" : ObjectId("4c86025b145a9b0b3400dd8f") } -->> { "files_id" : ObjectId("4c8602ca145a9b0b3400f193") } on : shard0000 { "t" :10000, "i" : 13 }
{ "files_id" : ObjectId("4c8602ca145a9b0b3400f193") } -->> { "files_id" : ObjectId("4c860330145a9b0b34010597") } on : shard0000 { "t" :10000, "i" : 14 }
{ "files_id" : ObjectId("4c860330145a9b0b34010597") } -->> { "files_id" : { $maxKey : 1 } } on : shard0000 { "t" : 10000, "i" : 15 }
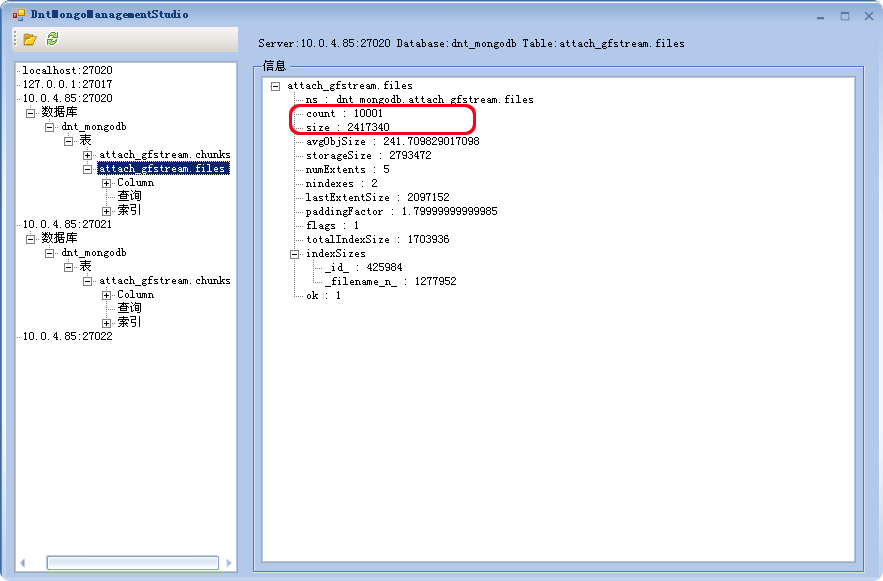
当前,综合比较,发现还是chunks的值要远大于files集合所占用的磁盘空间(前者存储文件二进制流信息,后者存储结构化数据信息(如文件名称大小等):
下面是一个测试,用于读写shard0001(注意不是shard0000)上的图片数据,因为mongos可以很好的管理sharding下各分区下的数据chunk,所以我们只要告诉它要取的文件名称即可:)
比如要获取"2010\09\07\2\2856090617370.gif6243"这个文件(带日期型文件路径只是一种格式,因为我们的产品会将上传的附件放到相应磁盘目录下,这种带路径的命名方式会方便与磁盘路径进行对应),其目前位于shard0001中,我们只要通过下面html代码即可获取图文件信息:
相应的getfile.aspx.cs 代码参见如下:
{
public Mongo Mongo { get; set; }
public IMongoDatabase DB
{
get
{
return this.Mongo["dnt_mongodb"];
}
}
/// <summary>
/// Sets up the test environment. You can either override this OnInit to add custom initialization.
/// </summary>
public virtual void Init()
{
string ConnectionString = "Server=10.0.4.85:27017;ConnectTimeout=30000;ConnectionLifetime=300000;MinimumPoolSize=512;MaximumPoolSize=51200;Pooled=true";
if (String.IsNullOrEmpty(ConnectionString))
throw new ArgumentNullException("Connection string not found.");
this.Mongo = new Mongo(ConnectionString);
this.Mongo.Connect();
}
protected void Page_Load(object sender, EventArgs e)
{
if (!string.IsNullOrEmpty(Request.QueryString["filename"]))
{
string filename = Request.QueryString["filename"];
Init();
String filesystem = "attach_gfstream";
GridFile fs = new GridFile(DB, filesystem);
GridFileStream gfs = fs.OpenRead(filename);
Byte[] buffer = new Byte[gfs.Length];
//下面的Expires和Cache-Control设置主要用于squid反向加速,更多内容参见 http://www.cnblogs.com/daizhj/archive/2010/08/19/1803454.html
HttpContext.Current.Response.AddHeader("Expires", DateTime.Now.AddDays(20).ToString("r"));
HttpContext.Current.Response.AddHeader("Cache-Control", "public");
// 需要读的数据长度
long dataToRead = gfs.Length;
int length;
while (dataToRead > 0)
{
// 检查客户端是否还处于连接状态
if (HttpContext.Current.Response.IsClientConnected)
{
length = gfs.Read(buffer, 0, 10000);
HttpContext.Current.Response.OutputStream.Write(buffer, 0, length);
HttpContext.Current.Response.Flush();
buffer = new Byte[10000];
dataToRead = dataToRead - length;
}
else
{
// 如果不再连接则跳出死循环
dataToRead = -1;
}
}
gfs.Dispose();
this.Mongo.Disconnect();
HttpContext.Current.Response.End();
}
}
}
当然,上面只是对chunks进行sharding,如果要对files集合分片时,可以用下面命令行:
> db.runCommand( { shardcollection : "dnt_mongodb.attach_gfstream.files", key : { _id : 1 } } )
{ "collectionsharded" : "dnt_mongodb.attach_gfstream.files", "ok" : 1 }
在我添加了近50万记录后,mongos开始将新的文件信息保存到shard0001上,如下图:

可以使用如下命令行来查看 shard上的信息:
> db.printShardingStatus()
.../省略之前files_id的shard信息
{ "filename" : "2010\\09\\08\\2\\1393993713076.gif1" } -->> { "filename" : "2010\\09\\08\\2\\2396571814760.gif9999" } on : shard0000 { "t" : 1000, "i" : 7 }
{ "filename" : "2010\\09\\08\\2\\2396571814760.gif9999"} -->> { "filename" : "2010\\09\\08\\2\\2819270318096.gif25366" } on : shard0000 { "t" : 2000, "i" : 2 }
{ "filename" : "2010\\09\\08\\2\\2819270318096.gif25366" } -->> { "filename" : "2010\\09\\08\\2\\3100748419355.gif999" } on : shard0000{ "t" : 2000, "i" : 3 }
{ "filename" : "2010\\09\\08\\2\\3100748419355.gif999" } -->> { "filename" : { $maxKey : 1 } } on : shard0001 { "t" : 2000, "i" : 0 }
下面是mongos上进行sharding时的信息:
Wed Sep 08 17:32:34 [conn6] ns: dnt_mongodb.attach_gfstream.files ClusteredCursor::query ShardConnection had to change attempt: 0
Wed Sep 08 17:38:49 [conn55] autosplitting dnt_mongodb.attach_gfstream.chunks size: 188884488 shard: ns:dnt_mongodb.attach_gfstream.chunks at: shard0001:10.0.4.85:27021 lastmod: 11|3 min: { files_id: ObjectId('4c8755b3145a9b16d41d5dc9') } m
ax: { files_id: MaxKey } on: { files_id: ObjectId('4c8759a5145a9b16d42300d7') }(splitThreshold 188743680)
Wed Sep 08 17:38:49 [conn55] config change: { _id: "4_85-2010-09-08T09:38:49-10", server: "4_85", time: new Date(1283938729648), what: "split", ns: "dnt_mongodb.attach_gfstream.chunks", details: { before: { min: { files_id: ObjectId('4c8755
b3145a9b16d41d5dc9') }, max: { files_id: MaxKey } }, left: { min: { files_id: ObjectId('4c8755b3145a9b16d41d5dc9') }, max: { files_id: ObjectId('4c8759a5145a9b16d42300d7') } }, right: { min: { files_id: ObjectId('4c8759a5145a9b16d42300d7')
}, max: { files_id: MaxKey } } } }
Wed Sep 08 17:38:49 [conn98] ns: dnt_mongodb.attach_gfstream.chunks ClusteredCursor::query ShardConnection had to change attempt: 0
如果访问的图片分别位于shard0000和shard0001时,mongos会自行将请求调度到相应sharding上,比如下面的链接文件分别指定shard000和shard0001:
<img src="getfile.aspx?filename=2010\09\08\2\1393993713076.gif5" width="30" /> 位于shard0000
<img src="getfile.aspx?filename=2010\09\08\2\3197962515515.gif9" width="30" /> 位于shard0001
好了,今天的文章就先到这里了。
原文链接:http://www.cnblogs.com/daizhj/archive/2010/09/08/1821481.html
BLOG: http://daizhj.cnblogs.com/
作者:daizhj,代震军