我们已经看过一些线程的例子了。尽管我们将要在下一章深入介绍同步问题,但就目前来说还没有介绍过它。由于线程与应用程序代码中的其他代码相比是无序运行的,我们不能确定在一个线程中影响一个特定共享资源的动作会在另外一个线程访问同样共享资源之前完成。有很多方法处理这些问题,但是这里我们将介绍一种简单方式;使用定时器/时钟。通过定时器,我们可以确定一个方法在一个特定时间间隔内执行,这个方法可以在继续运行之前检查需要的动作是否已经完成。这是一个非常简单的模型,但是可以应用到很多场景中去。
时钟由两个对象组成,一个TimerCallback 和 一个定时器。TimerCallback委托定义了在一个特定间隔内要调用的方法,而定时器就是时钟本身。TimerCallback与定时器的一个特定方法关联。定时器的构造函数(被重载)有四个参数。第一个参数是之前定义的TimerCallback。第二个一个是用来向特定方法传输状态值的对象(相当于一个是函数名,一个是函数参数)。最后两个参数是开始定时方法调用前的等待时间和顺序TimerCallback方法调用的间隔。这两个参数可以输入整数/长整型表示的毫秒数,但是你可以从下面的例子中看到,另外一个选择是使用System.TimeSpan对象,这样的话无论你使用ticks, 毫秒,秒,分钟,小时或者天都是可以的。
想要了解上面描述的逻辑是如何运行的最简单方式就是看一段代码,下面的这段代码启动两个线程。第二个线程会在第一个完成工作以后再开始运行;thread_timer.cs:
/*************************************
/* Copyright (c) 2012 Daniel Dong
 *
 * Author:oDaniel Dong
 * Blog:o  www.cnblogs.com/danielWise
 * Email:o guofoo@163.com
 *
 */

using System;
using System.Collections.Generic;
using System.Text;
using System.Threading;

namespace SimpleThread
{
    public class ThreadTimer
    {
        private string message;
        private static Timer tmr;
        private static bool complete;

        static void Main()
        {
            ThreadTimer obj = new ThreadTimer();
            Thread t = new Thread(new ThreadStart(obj.GenerateText));
            t.Start();

            TimerCallback tmrCallBack = new TimerCallback(obj.GetText);
            tmr = new Timer(tmrCallBack, null, TimeSpan.Zero, TimeSpan.FromSeconds(2));
            //Start immediately, loop for every 2 seconds.
            //Dispose corresponding resources immediately after do not use the timer.

            do
            {
                if (complete)
                {
                    break;
                }
            } while (true);
            Console.WriteLine("Exit Main().");
            Console.ReadLine();
        }

        public void GenerateText()
        {
            StringBuilder sb = new StringBuilder();

            for (int i = 1; i < 20; i++)
            {
                sb.Append("This is line ");
                sb.Append(i.ToString());
                sb.Append(Environment.NewLine);
            }

            message = sb.ToString();
        }

        public void GetText(object state)
        {
            if (string.IsNullOrEmpty(message))
            {
                return;
            }
            Console.WriteLine("Message is: ");
            Console.WriteLine(message);
            tmr.Dispose();
            complete = true;
        }
    }
}
输出如下结果:
线程生成线程
我们已经通过代码知道如何从void Main()生成一个线程。在一个类似的方式下,我们也可以在一个线程内生成多个线程。例如,假设有一个Car类,它有一个公共方法StartTheEngine().StartTheEngine()方法调用另外三个私有方法:CheckTheBattery(), CheckForFuel()以及CheckTheEngine().由于检查电池,油料和引擎这些任务可以同时发生,我们可以在不同线程中运行这些方法。这里是Car类如何在thread_spinning.cs中实现的:
/*************************************
/* Copyright (c) 2012 Daniel Dong
 *
 * Author:oDaniel Dong
 * Blog:o  www.cnblogs.com/danielWise
 * Email:o guofoo@163.com
 *
 */

using System;
using System.Collections.Generic;
using System.Text;
using System.Threading;

namespace SimpleThread
{
    class Car
    {
        public void StartTheEngine()
        {
            Console.WriteLine("Starting the engine!");
            //Declare three new threads.
            Thread batt = new Thread(new ThreadStart(CheckTheBattery));
            Thread fuel = new Thread(new ThreadStart(CheckForFuel));
            Thread eng = new Thread(new ThreadStart(CheckTheEngine));

            batt.Start();
            fuel.Start();
            eng.Start();

            for (int i = 1; i < 100000000; i++)
            {
                //some real executing code here.
            }
            Console.WriteLine("Engine is ready!");
            Console.ReadLine();
        }

        public void CheckTheBattery()
        {
            Console.WriteLine("Checking the Battery!");
            for (int i = 1; i < 100000000; i++)
            {
                //some real executing code here.
            }
            Console.WriteLine("Finished checking the Battery!");
        }

        public void CheckForFuel()
        {
            Console.WriteLine("Checking for Fuel!");
            for (int i = 1; i < 100000000; i++)
            {
                //some real executing code here.
            }
            Console.WriteLine("Fuel is available!");
        }

        public void CheckTheEngine()
        {
            Console.WriteLine("Checking the Engine!");
            for (int i = 1; i < 100000000; i++)
            {
                //some real executing code here.
            }
            Console.WriteLine("Finished checking the engine!");
        }
    }
}
在StartTheEngine()方法内,我们创建了三个线程并依次启动他们。让我们在我们的类中加一个入口以便于我们可以看到代码执行结果:
static void Main(string[] args)
{
    Console.WriteLine("Entering void Main!");
    int j;
    Car myCar = new Car();
    Thread worker = new Thread(new ThreadStart(myCar.StartTheEngine));
    worker.Start();
    for (int i = 1; i < 100000000; i++)
    {
        //
    }
    Console.WriteLine("Exiting void Main!");
    Console.ReadLine();
}
在Void Main()方法中我们又创建了一个新线程并在那个线程中执行StartTheEngine()方法,如图片1所示:
图1
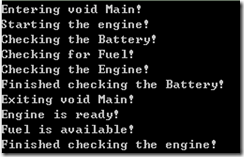
输出结果如下:
如上图所示,这些方法每个都在自己的线程中按照对应时间片执行。
线程生成线程
我们可以将Car类拆分成单独的类同时可以在一个新的Engine类中创建两个新方法:Check1() 和 Check2(). 然后Engine类将会如图2显示的那样在自己的线程中执行Check1() 和 Check2()方法。
图2
我们将从Car类中移出CheckTheEngine()方法,然后创建一个新的Engine类;thread_spinning2.cs:
/*************************************
/* Copyright (c) 2012 Daniel Dong
 *
 * Author:oDaniel Dong
 * Blog:o  www.cnblogs.com/danielWise
 * Email:o guofoo@163.com
 *
 */

using System;
using System.Collections.Generic;
using System.Text;
using System.Threading;

namespace SimpleThread
{
    class Engine
    {
        public void CheckTheEngine()
        {
            Thread chck1 = new Thread(new ThreadStart(Check1));
            Thread chck2 = new Thread(new ThreadStart(Check2));
            chck1.Start();
            chck2.Start();
            Console.WriteLine("Checking the engine!");
            for (int i = 1; i < 100000000; i++)
            {
                //some real executing code here
            }
            Console.WriteLine("Finished checking the engine!");
        }

        private void Check1()
        {
            Console.WriteLine("Starting the engine check!");
            for (int i = 1; i < 100000000; i++)
            {
                //some real executing code here
            }
            Console.WriteLine("Finished engine check 1!");
        }

        private void Check2()
        {
            Console.WriteLine("Starting the engine check2!");
            for (int i = 1; i < 100000000; i++)
            {
                //some real executing code here
            }
            Console.WriteLine("Finished engine check 2!");
        }
    }
}
Engine类的公共方法CheckTheEngine()创建了另外两个线程并调用Check1 和 Check2 方法。下面的输出结果:
通过上面的介绍我们知道从线程中创建线程非常简单。然而,你可能对这种方式下的劣势感兴趣:活跃线程数量上升以后,性能就会下降。
性能考虑
你创建越多的线程,系统就得维护更多的线程上下文和CPU指令。Windows任务管理器的进程选项卡将告诉你有多少个进程和线程正在运行。然而,从任务管理器里看到的是操作系统进程 ,它们与AppDomains是不同的。你可以在使用线程窗口调试一个指定的.NET 应用程序时查看运行的线程。
如果你想看在CLR中有多少个线程在运行,你可以使用Windows性能监视器工具并添加一系列特定的CLR性能类别。CLR对外提供一个.NET CLR LocksAndThreads的性能计数器类别,我们可以使用这个类别来获取更多关于CLR托管线程的信息。现在运行性能监视器并从.NET CLR LocksAndThread类别下添加如下表所示的计数器。

这里是thread_spinning2.cs 应用显示情况:
这里是对“.NET CLR LocksAndThreads”性能计数器信息的大体描述:
1. # of current logical Threads 计数器确定有304个托管线程由CLR 创建并拥有,由于我们添加了“_Global_”计数器实例,所以我们可以看到由CLR创建的所有线程。
2. # of current physical Threads 计数器确定有288个操作系统线程由CLR创建并拥有。
3. # of total recognized Threads计数器确定由19个操作系统线程由线程对象创建且被CLR识别出来。
4. Total # of Contentions 计数器确定了当运行时试图获取托管锁时发生了121次错误。对执行代码来说发生托管锁失败是很糟糕的。
下一篇我们将介绍线程生命周期…
![image_thumb[5] image_thumb[5]](https://images.cnblogs.com/cnblogs_com/danielWise/201201/201201131609202930.png)
![image_thumb[1] image_thumb[1]](https://images.cnblogs.com/cnblogs_com/danielWise/201201/201201131609206767.png)

![image_thumb[2] image_thumb[2]](https://images.cnblogs.com/cnblogs_com/danielWise/201201/201201131609221619.png)
![image_thumb[3] image_thumb[3]](https://images.cnblogs.com/cnblogs_com/danielWise/201201/201201131609229601.png)
![image_thumb[10] image_thumb[10]](https://images.cnblogs.com/cnblogs_com/danielWise/201201/201201131609234485.png)