简介:公司需要做个地图图片编辑功能,将平面图上传到Mapbox地图上,可拖拽、旋转、缩放图片至合适的地理位置上。当时发现MapboxGL不好弄,改成了leaflet地图,leaflet插件很多,找到https://github.com/IvanSanchez/Leaflet.ImageOverlay.Rotated图片编辑插件,但发现操作无法保证图片不变形,所以做了些改造,这里顺便做个笔记以便日后查阅。
1、Leaflet.ImageOverlay.Rotated插件原理分析:
添加图片要传入3个顶点坐标,topleft, topright, bottomleft,也是可以拖拽的三个控制点。
1 var overlay = L.imageOverlay.rotated(imgUrl, topLeftPoint, topRightPoint, bottomLeftPoint, {
2         opacity: 0.9,
3         interactive: true,
4         corners:[],
5         w: null,
6         h: null
7     });
图片添加到地图上,会生成一个外接矩形框(默认是看不到的,我加了border使其可见,便于分析),然后你拖拽3个顶点marker, 插件内部通过数学计算会推断第四个顶点的位置,然后根据4个顶点的位置显示图片。
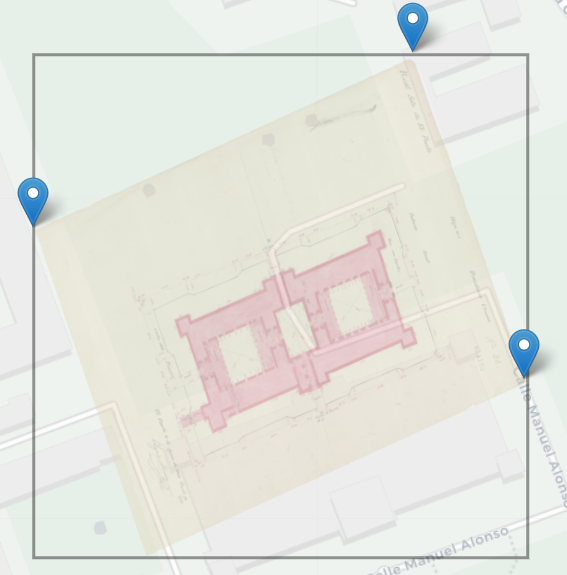
图(1)
每次拖拽都会调用reposition方法重设图片位置。
1 reposition: function(topleft, topright, bottomleft) {
2         this._topLeft    = L.latLng(topleft);
3         this._topRight   = L.latLng(topright);
4         this._bottomLeft = L.latLng(bottomleft);
5         this._reset();
6     },
重点逻辑在_reset方法中, 每次reset都会根据3个顶点推断第四个顶点,然后计算外接矩形框。
 1 _reset: function () {
 2     var div = this._image;
 3
 4     // Project control points to container-pixel coordinates
 5     // 1)先将3个顶点经纬度转成平面坐标
 6     var pxTopLeft    = this._map.latLngToLayerPoint(this._topLeft);
 7     var pxTopRight   = this._map.latLngToLayerPoint(this._topRight);
 8     var pxBottomLeft = this._map.latLngToLayerPoint(this._bottomLeft);
 9
10     // Infer coordinate of bottom right
11     // 2)然后第4个顶点坐标右下=右上-左上+左下
12     var pxBottomRight = pxTopRight.subtract(pxTopLeft).add(pxBottomLeft);
13
14     // pxBounds is mostly for positioning the <div> container
15     // 3)计算4个顶点的外接矩形,返回的pxBounds由四个顶点中的x、y最值构成,即max和min两个顶点对象
16     var pxBounds = L.bounds([pxTopLeft, pxTopRight, pxBottomLeft, pxBottomRight]);
17
18     //size是外接矩形的宽高,宽=max.x - min.x, 高=max.y - min.y
19     var size = pxBounds.getSize();
20
21     //用topLeft减去外接矩形最小顶点坐标得到topLeft相对于该外接矩形的坐标位置
22     var pxTopLeftInDiv = pxTopLeft.subtract(pxBounds.min);
23
24     // Calculate the skew angles, both in X and Y
25     //4)计算斜切角,这里用到了css3的skew样式,可改变dom结点的倾斜程度,如下图(2)
26     var vectorX = pxTopRight.subtract(pxTopLeft);
27     var vectorY = pxBottomLeft.subtract(pxTopLeft);
28     var skewX = Math.atan2( vectorX.y, vectorX.x );
29     var skewY = Math.atan2( vectorY.x, vectorY.y );
30
31     // LatLngBounds used for animations
32     this._bounds = L.latLngBounds( this._map.layerPointToLatLng(pxBounds.min),
33                                    this._map.layerPointToLatLng(pxBounds.max) );
34
35     L.DomUtil.setPosition(div, pxBounds.min);
36
37     div.style.width  = size.x + 'px';
38     div.style.height = size.y + 'px';
39
40     var imgW = this._rawImage.width;
41     var imgH = this._rawImage.height;
42     if (!imgW || !imgH) {
43         return;    // Probably because the image hasn't loaded yet.
44     }
45
46     //5)计算图片的缩放比例
47     var scaleX = pxTopLeft.distanceTo(pxTopRight)   / imgW * Math.cos(skewX);
48     var scaleY = pxTopLeft.distanceTo(pxBottomLeft) / imgH * Math.cos(skewY);
49
50     this._rawImage.style.transformOrigin = '0 0';
51
52     this._rawImage.style.transform =
53         'translate(' + pxTopLeftInDiv.x + 'px, ' + pxTopLeftInDiv.y + 'px)' +
54         'skew(' + skewY + 'rad, ' + skewX + 'rad) ' +
55         'scale(' + scaleX + ', ' + scaleY + ') ';
56 },
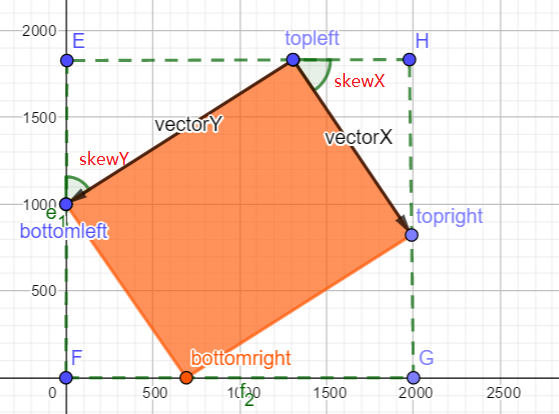
图(2)
由于图片完全由3个顶点的位置控制而没有约束,所以图片会出现长宽不等、邻边夹角变化导致的图片变形,因此要改造。
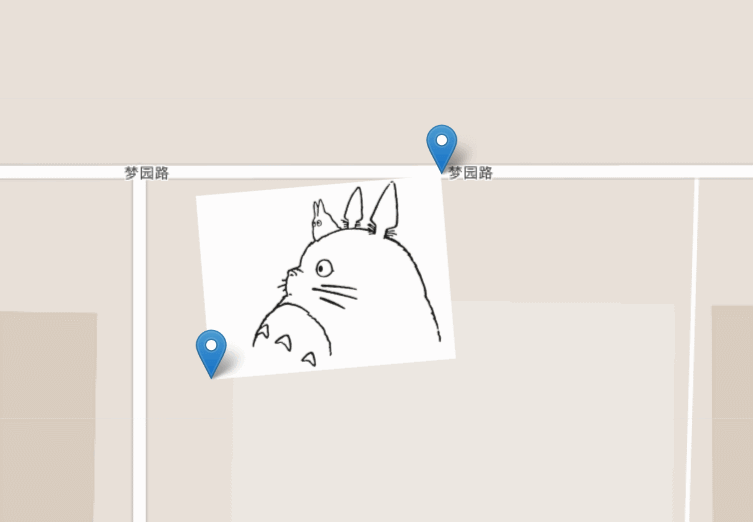
2、如何改造,实现图片不变形,即保证图片是矩形且长宽比不变,如下图所示:

图(3)
图片ABCD是第一次初始化位置,A和C是2个可拖拽的顶点,每次拖拽只要保证B、D两个顶点是唯一确定的就能能保证图片不变形。
向量AB在向量AC上的投影c的长度与向量AC的长度比值是常数,即 k1 = |c| / |AC|, k1是固定不变的。证明如下:
|c| / |AC| = 向量AB · 向量AC / (向量AC * 向量AC) = |AB|*|AC| *cosα/ |AC|^2 = |AB|/ |AC| * cosα = cosα ^2, 因为对固定长宽比例且不变形的矩形图片角α是不变的,所以|c| / |AC| = k是常数。
同理将向量AC逆时针旋转90度得到向量AU,向量AB在向量AU上的投影b的长度与向量AU的长度比值也是常数,即k2 = |b| / |AU|, k2是固定不变的。
我们发现向量AB=向量b+向量c, 因此我们每次只需要计算出b,c两个向量就可以唯一确定向量AB,进而确定了顶点B的位置。
同理,其它的顶点也这样计算。
计算用到了余弦定理、平面向量数学知识,关键代码贴下:
1)向量的数量积计算:
1  function getDotProduction(point1, point2){
2       return point1.x * point2.x + point1.y * point2.y;
3  }
2)向量顺时针旋转90度:
1  function getClockWiseRotate90DegreePoint(point){
2         return L.point([point.y, -point.x]);
3     }
3)计算新顶点的位置:
 1  function getCornerLatLng(point, bottomLeftMarkerLatLng, topRightMarkerLatLng){
 2         var boundsRectBottomLeft= L.point(0, 0);// origin
 3         var boundsRectTopRight= L.point(imgWidth, imgHeight);
 4         var diagonalVector = boundsRectTopRight.subtract(boundsRectBottomLeft);
 5         var pV = point.subtract(boundsRectBottomLeft);
 6         var rotate90V = getClockWiseRotate90DegreePoint(diagonalVector);
 7         var scaleX = getDotProduction(diagonalVector, pV) / getDotProduction(diagonalVector, diagonalVector);
 8         var scaleY = -getDotProduction(rotate90V, pV) / getDotProduction(rotate90V, rotate90V);
 9         var bLMarkerPx = L.Projection.SphericalMercator.project(bottomLeftMarkerLatLng);
10         var tRMarkerPx = L.Projection.SphericalMercator.project(topRightMarkerLatLng);
11         var vx = bLMarkerPx.add(tRMarkerPx.subtract(bLMarkerPx).multiplyBy(scaleX));
12         var vy = getClockWiseRotate90DegreePoint(bLMarkerPx.subtract(tRMarkerPx)).multiplyBy(scaleY);
13         var p = vx.add(vy);
14         return L.Projection.SphericalMercator.unproject(p);
15     }
4)拖拽事件及reset方法:topRightMarker.on('drag dragend', repositionImage);
bottomLeftMarker.on('drag dragend', repositionImage);

function repositionImage() {
        var tRlnglat = topRightMarker.getLatLng();
        var bLlnglat = bottomLeftMarker.getLatLng();
        var imgWidth = overlay.options.w;
        var imgHeight = overlay.options.h;

        var c1 = getCornerLatLng(L.point(0, imgHeight), bLlnglat, tRlnglat);  // raw image topleft
        var c2 = getCornerLatLng(L.point(imgWidth, imgHeight), bLlnglat, tRlnglat);  // raw image topright
        var c3 = getCornerLatLng(L.point(0, 0), bLlnglat, tRlnglat);  // raw image bottomLeft
        var c4 = getCornerLatLng(L.point(imgWidth, 0), bLlnglat, tRlnglat);

        overlay.options.corners = [c1, c2, c3, c4];

        overlay.reposition(c1, c2, c3);
    }
实现效果:
项目地址:https://github.com/wxzen/Leaflet.ImageOverlay.Rotated-by-Two-Markers