Linux系统的安装就不用讲了。初学者可以自己查一查网上的资料。
然后我们就是要安装nginx .这里我们选择编译安装。安装之前 一定要记得安装gcc.
yum install gcc
下载Nginx
mkdir /home/oldboy/tools -p
cd /home/oldboy/tools
wget -q http://nginx.org/download/nginx-1.6.3.tar.gz
tar -zxf nginx-1.6.3.tar.gz
cd nginx-1.6.3/
配置Nginx
./configure --prefix=/application/nginx-1.6.3 --user=nginx --group=nginx --with-http_ssl_module --with-http_stub_status_module
安装的路径 安装用户 安装用户组 带SSL和status模块
echo $?
检查返回值为0.则配置没问题。
编译和编译安装。
make && make install
创建nginx用户,设置为只是系统用户,不能登录使用
useradd nginx -s /sbin/nologin -M
创建一个软链接,方便启动。
ln -s /application/nginx-1.6.3/ /application/nginx
开启nginx
/application/nginx/sbin/nginx
检查nginx状态
/application/nginx/sbin/nginx -t
重启nginx配置
/application/nginx/sbin/nginx -s reload
检查nginx开启状态
ps -ef|grep nginx|grep -v grep
ss -lntup|grep nginx
curl 127.0.0.1 #测试本地是否可以访问nginx首页
防火漆开启80端口
firewall-cmd --list-all
firewall-cmd --add-port=80/tcp --permanent
firewall-cmd --reload
然后开始配置nginx.conf文件,这个是nginx的设置文件
vim nginx.conf
cp nginx.conf nginx.conf.bak
cat nginx.conf.default
egrep -v "#|^$" nginx.conf.default
egrep -v "#|^$" nginx.conf.default >nginx.conf
vim nginx.conf
配置文件修改
worker_processes  1; #这个是看你CPU有几核
events {
    worker_connections  1024;  #这个看并发连接数
}
http {
    include       mime.types;
    default_type  application/octet-stream;
    sendfile        on;
    keepalive_timeout  65;
    #nginx vhosts config 虚拟主机
    include extra/www.conf;
    include extra/bbs.conf;
    include extra/blog.conf;
    include extra/status.conf;
}
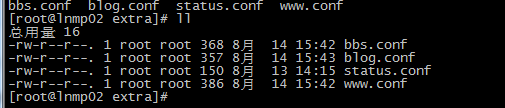
然后新建一个extra的文件夹,放入三个虚拟主机的conf。如www.conf bbs.conf blog.conf
一般我们都用虚拟主机的方式来挂载多个网页。
当然还有两种方式,一种是基于端口的,一种是基于IP地址的。
如下最原始的把所有配置都写在一个文件里的方式:
worker_processes  1;
events {
    worker_connections  1024;
}
http {
    include       mime.types;
    default_type  application/octet-stream;
    sendfile        on;
    keepalive_timeout  65;
    server {
        listen       80;
        server_name  www.etiantian.org;
        location / {
            root   html/web1/tpmo_411_dragonfruit/;
            index  index.html index.htm;
        }
        error_page   500 502 503 504  /50x.html;
        location = /50x.html {
            root   html;
        }
    }
    server
    {
        listen       80;
        server_name  bbs.etiantian.org;
        location / {
            root   html/bbs/zthtml5_Ganto/;
            index  index.html index.htm;
        }
        error_page   500 502 503 504  /50x.html;
        location = /50x.html {
            root   html;
        }
    }

    server
    {
        listen       80;
        server_name  blog.etiantian.org;
        location / {
            root   html/blog/;
            index  index.html index.htm;
        }
        error_page   500 502 503 504  /50x.html;
        location = /50x.html {
            root   html;
        }
    }
}
端口和IP的方式就不演示了。
然后看看我们刚刚新建的extra目录下的配置文件。
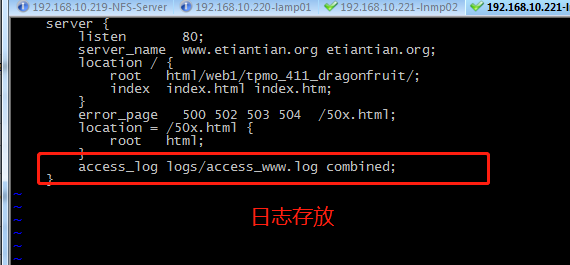
www.conf 这里面可以添加两个server_name ,相当于有一个别名,在访问etiantian.org 就可以直接访问www.etiantian.org
 server {
        listen       80;
        server_name  www.etiantian.org etiantian.org;
        location / {
            root   html/web1/tpmo_411_dragonfruit/;
            index  index.html index.htm;
        }
        error_page   500 502 503 504  /50x.html;
        location = /50x.html {
            root   html;
        }
        access_log logs/access_www.log combined;
    }
bbs.conf
server
    {
        listen       80;
        server_name  bbs.etiantian.org;
        location / {
            root   html/bbs/zthtml5_Ganto/;
            index  index.html index.htm;
        }
        error_page   500 502 503 504  /50x.html;
        location = /50x.html {
            root   html;
        }
        access_log logs/access_bbs.log combined;
    }
blog.conf
server
    {
        listen       80;
        server_name  blog.etiantian.org;
        location / {
            root   html/blog/;
            index  index.html index.htm;
        }
        error_page   500 502 503 504  /50x.html;
        location = /50x.html {
            root   html;
        }
        access_log logs/access_blog.log combined;
    }
status.conf 这个是检查nginx的状态的,包括连接数并发数等等
##status
server{
     listen 80;
     server_name status.etiantian.org;
     location / {
        stub_status on;
        access_log off;
      }


}

我们还要善用curl命令。
curl -i www.etiantian.org返回主机头
curl www.etiantian.org访问网页
检查nginx是否开启了80
lsof -i :80
然后就是nginx的日志设置和日志的轮训。日志我们只需要调用
access_log logs/access_www.log combined;这里名字我们取access_www
如图:
轮训,我们就用shell加定时任务了。
代码是这样的。
#! /bin/bash
Dateformat=`date +%Y%m%d `
Basedir="/application/nginx"
Nginxlogdir="$Basedir/logs"
Logname="access_www"
Logname1="access_bbs"
Logname2="access_blog"
[ -d $Nginxlogdir ] && cd $Nginxlogdir||exit 1
[ -f ${Logname}.log ]||exit 1
[ -f ${Logname1}.log ]||exit 1
[ -f ${Logname2}.log ]||exit 1
/bin/mv ${Logname}.log ${Dateformat}_${Logname}.log
/bin/mv ${Logname1}.log ${Dateformat}_${Logname1}.log
/bin/mv ${Logname2}.log ${Dateformat}_${Logname2}.log
$Basedir/sbin/nginx -s reload
大概的意思就是先定义几个变量,然后在调用时间函数做一个拼接。然后重新启动nginx。就是这个思路啦。
然后定时任务。
############cut-nginxlog###################
00 00 * * * /bin/sh /root/server/cut_nginx_log.sh &>/dev/null
每天执行一次。
------------------------------------------------------------------------------------------------------------------------------------------
要点:1、include 包含
2、别名
3、error_log
4、nginx_status
5、访问日志(log_format,access_log)
6、日志轮询,按天
7、rewrite,301跳转
普通url跳转
这个跳转是重点,但是学习视频掉了,所以没看见,大概就是可以根据POST或GET请求做跳转,根据文件类型做跳转,根据流量器的类型做跳转,反正还蛮复杂。属于nginx的优化。