一、简介
Celery是由Python开发、简单、灵活、可靠的分布式任务队列,其本质是生产者消费者模型,生产者发送任务到消息队列,消费者负责处理任务。Celery侧重于实时操作,但对调度支持也很好,其每天可以处理数以百万计的任务。特点:
- 简单:熟悉celery的工作流程后,配置使用简单
- 高可用:当任务执行失败或执行过程中发生连接中断,celery会自动尝试重新执行任务
- 快速:一个单进程的celery每分钟可处理上百万个任务
- 灵活:几乎celery的各个组件都可以被扩展及自定制
应用场景举例:
1.web应用:当用户在网站进行某个操作需要很长时间完成时,我们可以将这种操作交给Celery执行,直接返回给用户,等到Celery执行完成以后通知用户,大大提好网站的并发以及用户的体验感。
2.任务场景:比如在运维场景下需要批量在几百台机器执行某些命令或者任务,此时Celery可以轻松搞定。
3.定时任务:向定时导数据报表、定时发送通知类似场景,虽然Linux的计划任务可以帮我实现,但是非常不利于管理,而Celery可以提供管理接口和丰富的API。
二、架构&工作原理
Celery由以下三部分构成:消息中间件(Broker)、任务执行单元Worker、结果存储(Backend),如下图:

工作原理:
- 任务模块Task包含异步任务和定时任务。其中,异步任务通常在业务逻辑中被触发并发往消息队列,而定时任务由Celery Beat进程周期性地将任务发往消息队列;
- 任务执行单元Worker实时监视消息队列获取队列中的任务执行;
- Woker执行完任务后将结果保存在Backend中;
消息中间件Broker
消息中间件Broker官方提供了很多备选方案,支持RabbitMQ、Redis、Amazon SQS、MongoDB、Memcached 等,官方推荐RabbitMQ。
任务执行单元Worker
Worker是任务执行单元,负责从消息队列中取出任务执行,它可以启动一个或者多个,也可以启动在不同的机器节点,这就是其实现分布式的核心。
结果存储Backend
Backend结果存储官方也提供了诸多的存储方式支持:RabbitMQ、 Redis、Memcached,SQLAlchemy, Django ORM、Apache Cassandra、Elasticsearch。
三、安装使用
这里我使用的redis作为消息中间件,redis安装可以参考https://www.cnblogs.com/wdliu/p/9360286.html。
Celery安装:
pip3 install celery
简单使用
目录结构:
project/
├── __init__.py
├── config.py
└── tasks.py
各目录文件说明:
__init__.py:初始化Celery以及加载配置文件
#!/usr/bin/env python3
# -*- coding:utf-8 -*-
# Author:wd
from celery import Celery
app = Celery('project')                                # 创建 Celery 实例
app.config_from_object('project.config')               # 加载配置模块
config.py: Celery相关配置文件,更多配置参考:http://docs.celeryproject.org/en/latest/userguide/configuration.html

#!/usr/bin/env python3
# -*- coding:utf-8 -*-
# Author:wd

BROKER_URL = 'redis://10.1.210.69:6379/0' # Broker配置,使用Redis作为消息中间件

CELERY_RESULT_BACKEND = 'redis://10.1.210.69:6379/0' # BACKEND配置,这里使用redis

CELERY_RESULT_SERIALIZER = 'json' # 结果序列化方案

CELERY_TASK_RESULT_EXPIRES = 60 * 60 * 24 # 任务过期时间

CELERY_TIMEZONE='Asia/Shanghai'   # 时区配置

CELERY_IMPORTS = (     # 指定导入的任务模块,可以指定多个
    'project.tasks',
)
tasks.py :任务定义文件
#!/usr/bin/env python3 # -*- coding:utf-8 -*- # Author:wdfrom project import app
@app.task
def show_name(name):
return name
启动Worker:
celery worker -A project -l debug
各个参数含义:
worker: 代表第启动的角色是work当然还有beat等其他角色;
-A :项目路径,这里我的目录是project
-l:启动的日志级别,更多参数使用celery --help查看
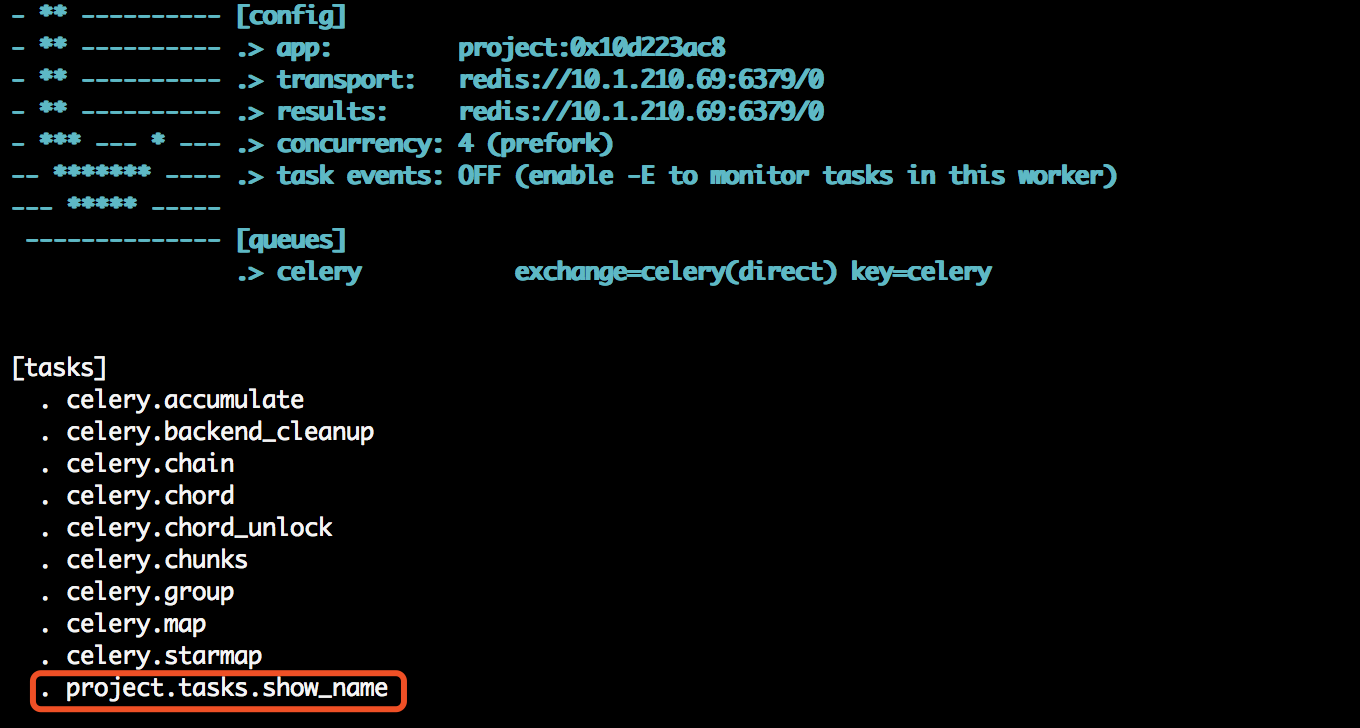
查看日志输出,会发现我们定义的任务,以及相关配置:
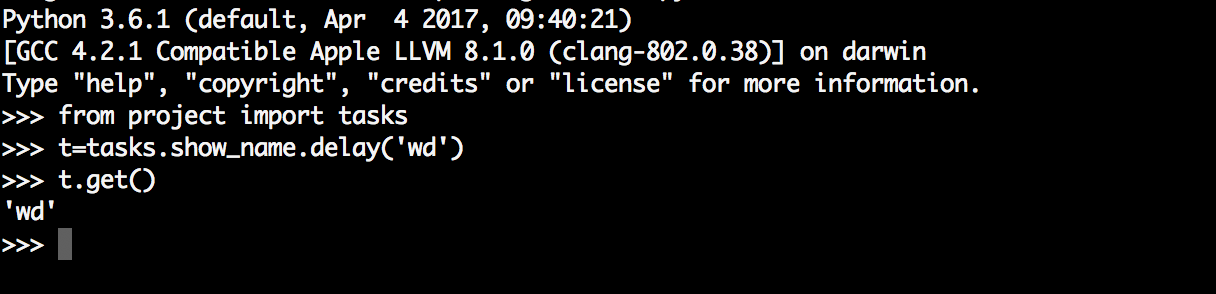
虽然启动了worker,但是我们还需要通过delay或apply_async来将任务添加到worker中,这里我们通过交互式方法添加任务,并返回AsyncResult对象,通过AsyncResult对象获取结果:
AsyncResult除了get方法用于常用获取结果方法外还提以下常用方法或属性:
- state: 返回任务状态;
- task_id: 返回任务id;
- result: 返回任务结果,同get()方法;
- ready(): 判断任务是否以及有结果,有结果为True,否则False;
- info(): 获取任务信息,默认为结果;
- wait(t): 等待t秒后获取结果,若任务执行完毕,则不等待直接获取结果,若任务在执行中,则wait期间一直阻塞,直到超时报错;
- successfu(): 判断任务是否成功,成功为True,否则为False;
四、进阶使用
对于普通的任务来说可能满足不了我们的任务需求,所以还需要了解一些进阶用法,Celery提供了诸多调度方式,例如任务编排、根据任务状态执行不同的操作、重试机制等,以下会对常用高阶用法进行讲述。
定时任务&计划任务
Celery的提供的定时任务主要靠schedules来完成,通过beat组件周期性将任务发送给woker执行。在示例中,新建文件period_task.py,并添加任务到配置文件中:
period_task.py:
#!/usr/bin/env python3 # -*- coding:utf-8 -*- # Author:wd from project import app from celery.schedules import crontab@app.on_after_configure.connect
def setup_periodic_tasks(sender, **kwargs):
sender.add_periodic_task(10.0, add.s(1,3), name='1+3=') # 每10秒执行add
sender.add_periodic_task(
crontab(hour=16, minute=56, day_of_week=1), #每周一下午四点五十六执行sayhai
sayhi.s('wd'),name='say_hi'
)@app.task
def add(x,y):
print(x+y)
return x+y@app.task
def sayhi(name):
return 'hello %s' % name
config.py
#!/usr/bin/env python3
# -*- coding:utf-8 -*-
# Author:wd

BROKER_URL = 'redis://10.1.210.69:6379/0' # Broker配置,使用Redis作为消息中间件

CELERY_RESULT_BACKEND = 'redis://10.1.210.69:6379/0' # BACKEND配置,这里使用redis

CELERY_RESULT_SERIALIZER = 'json' # 结果序列化方案

CELERY_TASK_RESULT_EXPIRES = 60 * 60 * 24 # 任务过期时间

CELERY_TIMEZONE='Asia/Shanghai'   # 时区配置

CELERY_IMPORTS = (     # 指定导入的任务模块,可以指定多个
    'project.tasks',
    'project.period_task', #定时任务
)
启动worker和beat:
celery worker -A project -l debug #启动work
celery beat -A  project.period_task -l  debug #启动beat,注意此时对应的文件路径
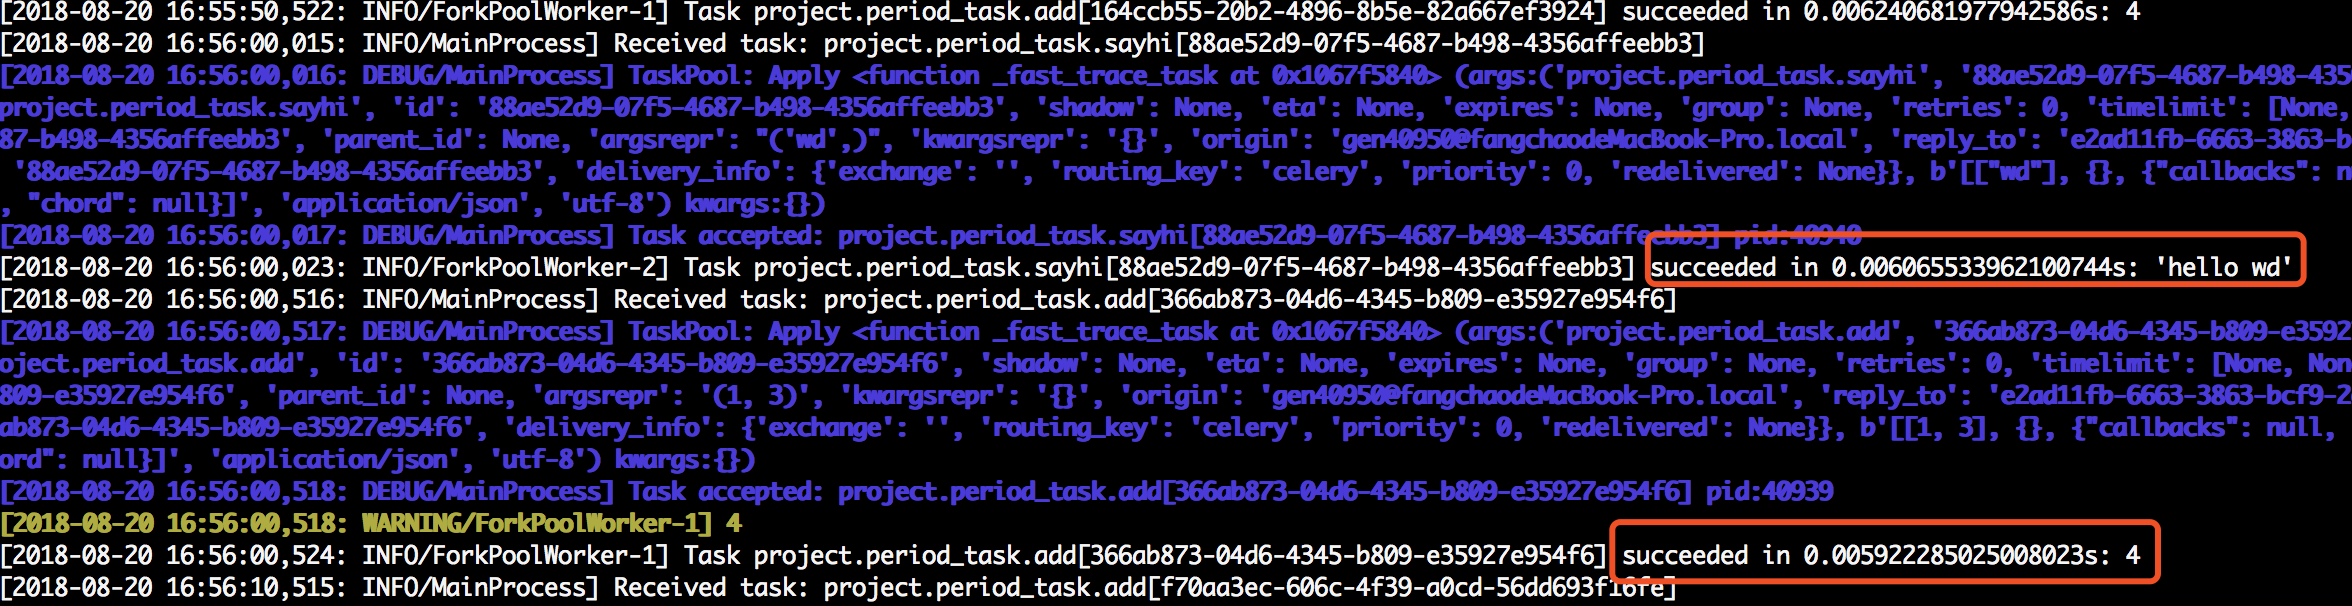
我们可以观察worker日志:
还可以通过配置文件方式指定定时和计划任务,此时的配置文件如下:
#!/usr/bin/env python3 # -*- coding:utf-8 -*- # Author:wdfrom project import app
from celery.schedules import crontabBROKER_URL = 'redis://10.1.210.69:6379/0' # Broker配置,使用Redis作为消息中间件
CELERY_RESULT_BACKEND = 'redis://10.1.210.69:6379/0' # BACKEND配置,这里使用redis
CELERY_RESULT_SERIALIZER = 'json' # 结果序列化方案
CELERY_TASK_RESULT_EXPIRES = 60 * 60 * 24 # 任务过期时间
CELERY_TIMEZONE='Asia/Shanghai' # 时区配置
CELERY_IMPORTS = ( # 指定导入的任务模块,可以指定多个
'project.tasks',
'project.period_task',
)app.conf.beat_schedule = {
'period_add_task': { # 计划任务
'task': 'project.period_task.add', #任务路径
'schedule': crontab(hour=18, minute=16, day_of_week=1),
'args': (3, 4),
},
'add-every-30-seconds': { # 每10秒执行
'task': 'project.period_task.sayhi', #任务路径
'schedule': 10.0,
'args': ('wd',)
},
}
此时的period_task.py只需要注册到woker中就行了,如下:
#!/usr/bin/env python3 # -*- coding:utf-8 -*- # Author:wd from project import app@app.task
def add(x,y):
print(x+y)
return x+y@app.task
def sayhi(name):
return 'hello %s' % name
同样启动worker和beat结果和第一种方式一样。更多详细的内容请参考:http://docs.celeryproject.org/en/latest/userguide/periodic-tasks.html#crontab-schedules
任务绑定
Celery可通过任务绑定到实例获取到任务的上下文,这样我们可以在任务运行时候获取到任务的状态,记录相关日志等。
修改任务中的period_task.py,如下:
#!/usr/bin/env python3
# -*- coding:utf-8 -*-
# Author:wd
from project import app
from celery.utils.log import get_task_logger

logger = get_task_logger(__name__)
@app.task(bind=True)  # 绑定任务
def add(self,x,y):
    logger.info(self.request.__dict__)  #打印日志
    try:
        a=[]
        a[10]==1
    except Exception as e:
        raise self.retry(exc=e, countdown=5, max_retries=3) # 出错每5秒尝试一次,总共尝试3次
    return x+y
在以上代码中,通过bind参数将任务绑定,self指任务的上下文,通过self获取任务状态,同时在任务出错时进行任务重试,我们观察日志:

内置钩子函数
Celery在执行任务时候,提供了钩子方法用于在任务执行完成时候进行对应的操作,在Task源码中提供了很多状态钩子函数如:on_success(成功后执行)、on_failure(失败时候执行)、on_retry(任务重试时候执行)、after_return(任务返回时候执行),在进行使用是我们只需要重写这些方法,完成相应的操作即可。
在以下示例中,我们继续修改period_task.py,分别定义三个任务来演示任务失败、重试、任务成功后执行的操作:
#!/usr/bin/env python3 # -*- coding:utf-8 -*- # Author:wd from project import app from celery.utils.log import get_task_logger from celery import Tasklogger = get_task_logger(name)
class demotask(Task):
</span><span style="color: rgba(0, 0, 255, 1)">def</span> on_success(self, retval, task_id, args, kwargs): <span style="color: rgba(0, 128, 0, 1)">#</span><span style="color: rgba(0, 128, 0, 1)"> 任务成功执行</span> logger.info(<span style="color: rgba(128, 0, 0, 1)">'</span><span style="color: rgba(128, 0, 0, 1)">task id:{} , arg:{} , successful !</span><span style="color: rgba(128, 0, 0, 1)">'</span><span style="color: rgba(0, 0, 0, 1)">.format(task_id,args)) </span><span style="color: rgba(0, 0, 255, 1)">def</span> on_failure(self, exc, task_id, args, kwargs, einfo): <span style="color: rgba(0, 128, 0, 1)">#</span><span style="color: rgba(0, 128, 0, 1)">任务失败执行</span> logger.info(<span style="color: rgba(128, 0, 0, 1)">'</span><span style="color: rgba(128, 0, 0, 1)">task id:{} , arg:{} , failed ! erros : {}</span><span style="color: rgba(128, 0, 0, 1)">'</span><span style="color: rgba(0, 0, 0, 1)"> .format(task_id,args,exc)) </span><span style="color: rgba(0, 0, 255, 1)">def</span> on_retry(self, exc, task_id, args, kwargs, einfo): <span style="color: rgba(0, 128, 0, 1)">#</span><span style="color: rgba(0, 128, 0, 1)">任务重试执行</span> logger.info(<span style="color: rgba(128, 0, 0, 1)">'</span><span style="color: rgba(128, 0, 0, 1)">task id:{} , arg:{} , retry ! einfo: {}</span><span style="color: rgba(128, 0, 0, 1)">'</span><span style="color: rgba(0, 0, 0, 1)">.format(task_id, args, exc))@app.task(base=demotask,bind=True)
def add(self,x,y):
try:
a=[]
a[10]==1
except Exception as e:
raise self.retry(exc=e, countdown=5, max_retries=1) # 出错每5秒尝试一次,总共尝试1次
return x+y@app.task(base=demotask)
def sayhi(name):
a=[]
a[10]==1
return 'hi {}'.format(name)@app.task(base=demotask)
def sum(a,b):
return 'a+b={} '.format(a+b)
此时的配置文件config.py:
#!/usr/bin/env python3 # -*- coding:utf-8 -*- # Author:wdfrom project import app
from celery.schedules import crontabBROKER_URL = 'redis://10.1.210.69:6379/0' # Broker配置,使用Redis作为消息中间件
CELERY_RESULT_BACKEND = 'redis://10.1.210.69:6379/0' # BACKEND配置,这里使用redis
CELERY_RESULT_SERIALIZER = 'json' # 结果序列化方案
CELERY_TASK_RESULT_EXPIRES = 60 * 60 * 24 # 任务过期时间
CELERY_TIMEZONE='Asia/Shanghai' # 时区配置
CELERY_IMPORTS = ( # 指定导入的任务模块,可以指定多个
'project.tasks',
'project.period_task',
)app.conf.beat_schedule = {
'add': { # 每10秒执行
'task': 'project.period_task.add', #任务路径
'schedule': 10.0,
'args': (10,12),
},
'sayhi': { # 每10秒执行
'task': 'project.period_task.sayhi', #任务路径
'schedule': 10.0,
'args': ('wd',),
},
'sum': { # 每10秒执行
'task': 'project.period_task.sum', #任务路径
'schedule': 10.0,
'args': (1,3),
},
}
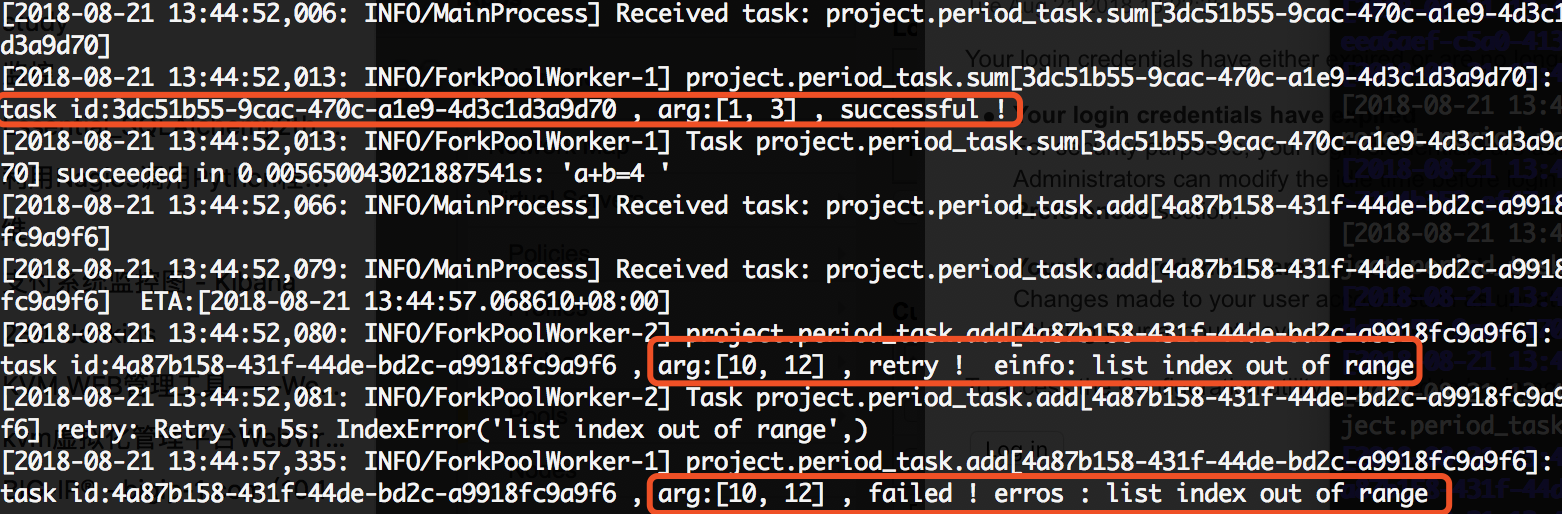
然后重启worker和beat,查看日志:
任务编排
在很多情况下,一个任务需要由多个子任务或者一个任务需要很多步骤才能完成,Celery同样也能实现这样的任务,完成这类型的任务通过以下模块完成:
-
group: 并行调度任务
-
chain: 链式任务调度
-
chord: 类似group,但分header和body2个部分,header可以是一个group任务,执行完成后调用body的任务
-
map: 映射调度,通过输入多个入参来多次调度同一个任务
-
starmap: 类似map,入参类似*args
-
chunks: 将任务按照一定数量进行分组
修改tasks.py:
#!/usr/bin/env python3 # -*- coding:utf-8 -*- # Author:wd from project import app@app.task
def add(x,y):
return x+y@app.task
def mul(x,y):
return x*y@app.task
def sum(data_list):
res=0
for i in data_list:
res+=i
return res
group: 组任务,组内每个任务并行执行
和project同级目录新建consumer.py如下:
from celery import group
from project.tasks import add,mul,sum
res = group(add.s(1,2),add.s(1,2))()  # 任务 [1+2,1+2]
while True:
    if res.ready():
        print('res:{}'.format(res.get()))
        break
结果:

chain:链式任务
链式任务中,默认上一个任务的返回结果作为参数传递给子任务
from celery import chain
from project.tasks import add,mul,sum
res = chain(add.s(1,2),add.s(3),mul.s(3))()  # 任务((1+2)+3)*3
while True:
    if res.ready():
        print('res:{}'.format(res.get()))
        break
#结果
#res:18
还可以使用|表示链式任务,上面任务也可以表示为:
res = (add.s(1,2) | add.s(3) | (mul.s(3)))()
res.get()
chord:任务分割,分为header和body两部分,hearder任务执行完在执行body,其中hearder返回结果作为参数传递给body
from celery import chord from project.tasks import add,mul,sum res = chord(header=[add.s(1,2),mul.s(3,4)],body=sum.s())() # 任务(1+2)+(3*4) while True: if res.ready(): print('res:{}'.format(res.get())) break#结果:
res:15
chunks:任务分组,按照任务的个数分组
from project.tasks import add,mul,sum
res = add.chunks(zip(range(5),range(5)),4)()  # 4 代表每组的任务的个数
while True:
    if res.ready():
        print('res:{}'.format(res.get()))
        break
结果:

delay &apply_async
对于delay和apply_async都可以用来进行任务的调度,本质上是delay对apply_async进行了再一次封装(或者可以说是快捷方式),两者都返回AsyncResult对象,以下是两个方法源码。


def delay(self, *args, **kwargs): """Star argument version of :meth:`apply_async`.Does not support the extra options enabled by :meth:`apply_async`. Arguments: *args (Any): Positional arguments passed on to the task. **kwargs (Any): Keyword arguments passed on to the task. Returns: celery.result.AsyncResult: Future promise. </span><span style="color: rgba(128, 0, 0, 1)">"""</span> <span style="color: rgba(0, 0, 255, 1)">return</span> self.apply_async(args, kwargs)</pre>
def apply_async(self, args=None, kwargs=None, task_id=None, producer=None, link=None, link_error=None, shadow=None, **options): """Apply tasks asynchronously by sending a message.Arguments: args (Tuple): The positional arguments to pass on to the task. kwargs (Dict): The keyword arguments to pass on to the task. countdown (float): Number of seconds into the future that the task should execute. Defaults to immediate execution. eta (~datetime.datetime): Absolute time and date of when the task should be executed. May not be specified if `countdown` is also supplied. expires (float, ~datetime.datetime): Datetime or seconds in the future for the task should expire. The task won't be executed after the expiration time. shadow (str): Override task name used in logs/monitoring. Default is retrieved from :meth:`shadow_name`. connection (kombu.Connection): Re-use existing broker connection instead of acquiring one from the connection pool. retry (bool): If enabled sending of the task message will be retried in the event of connection loss or failure. Default is taken from the :setting:`task_publish_retry` setting. Note that you need to handle the producer/connection manually for this to work. retry_policy (Mapping): Override the retry policy used. See the :setting:`task_publish_retry_policy` setting. queue (str, kombu.Queue): The queue to route the task to. This must be a key present in :setting:`task_queues`, or :setting:`task_create_missing_queues` must be enabled. See :ref:`guide-routing` for more information. exchange (str, kombu.Exchange): Named custom exchange to send the task to. Usually not used in combination with the ``queue`` argument. routing_key (str): Custom routing key used to route the task to a worker server. If in combination with a ``queue`` argument only used to specify custom routing keys to topic exchanges. priority (int): The task priority, a number between 0 and 9. Defaults to the :attr:`priority` attribute. serializer (str): Serialization method to use. Can be `pickle`, `json`, `yaml`, `msgpack` or any custom serialization method that's been registered with :mod:`kombu.serialization.registry`. Defaults to the :attr:`serializer` attribute. compression (str): Optional compression method to use. Can be one of ``zlib``, ``bzip2``, or any custom compression methods registered with :func:`kombu.compression.register`. Defaults to the :setting:`task_compression` setting. link (Signature): A single, or a list of tasks signatures to apply if the task returns successfully. link_error (Signature): A single, or a list of task signatures to apply if an error occurs while executing the task. producer (kombu.Producer): custom producer to use when publishing the task. add_to_parent (bool): If set to True (default) and the task is applied while executing another task, then the result will be appended to the parent tasks ``request.children`` attribute. Trailing can also be disabled by default using the :attr:`trail` attribute publisher (kombu.Producer): Deprecated alias to ``producer``. headers (Dict): Message headers to be included in the message. Returns: celery.result.AsyncResult: Promise of future evaluation. Raises: TypeError: If not enough arguments are passed, or too many arguments are passed. Note that signature checks may be disabled by specifying ``@task(typing=False)``. kombu.exceptions.OperationalError: If a connection to the transport cannot be made, or if the connection is lost. Note: Also supports all keyword arguments supported by :meth:`kombu.Producer.publish`. </span><span style="color: rgba(128, 0, 0, 1)">"""</span> <span style="color: rgba(0, 0, 255, 1)">if</span><span style="color: rgba(0, 0, 0, 1)"> self.typing: </span><span style="color: rgba(0, 0, 255, 1)">try</span><span style="color: rgba(0, 0, 0, 1)">: check_arguments </span>= self.<span style="color: rgba(128, 0, 128, 1)">__header__</span> <span style="color: rgba(0, 0, 255, 1)">except</span> AttributeError: <span style="color: rgba(0, 128, 0, 1)">#</span><span style="color: rgba(0, 128, 0, 1)"> pragma: no cover</span> <span style="color: rgba(0, 0, 255, 1)">pass</span> <span style="color: rgba(0, 0, 255, 1)">else</span><span style="color: rgba(0, 0, 0, 1)">: check_arguments(</span>*(args <span style="color: rgba(0, 0, 255, 1)">or</span> ()), **(kwargs <span style="color: rgba(0, 0, 255, 1)">or</span><span style="color: rgba(0, 0, 0, 1)"> {})) app </span>=<span style="color: rgba(0, 0, 0, 1)"> self._get_app() </span><span style="color: rgba(0, 0, 255, 1)">if</span><span style="color: rgba(0, 0, 0, 1)"> app.conf.task_always_eager: with denied_join_result(): </span><span style="color: rgba(0, 0, 255, 1)">return</span> self.apply(args, kwargs, task_id=task_id <span style="color: rgba(0, 0, 255, 1)">or</span><span style="color: rgba(0, 0, 0, 1)"> uuid(), link</span>=link, link_error=link_error, **<span style="color: rgba(0, 0, 0, 1)">options) </span><span style="color: rgba(0, 0, 255, 1)">if</span> self.<span style="color: rgba(128, 0, 128, 1)">__v2_compat__</span><span style="color: rgba(0, 0, 0, 1)">: shadow </span>= shadow <span style="color: rgba(0, 0, 255, 1)">or</span><span style="color: rgba(0, 0, 0, 1)"> self.shadow_name(self(), args, kwargs, options) </span><span style="color: rgba(0, 0, 255, 1)">else</span><span style="color: rgba(0, 0, 0, 1)">: shadow </span>= shadow <span style="color: rgba(0, 0, 255, 1)">or</span><span style="color: rgba(0, 0, 0, 1)"> self.shadow_name(args, kwargs, options) preopts </span>=<span style="color: rgba(0, 0, 0, 1)"> self._get_exec_options() options </span>= dict(preopts, **options) <span style="color: rgba(0, 0, 255, 1)">if</span> options <span style="color: rgba(0, 0, 255, 1)">else</span><span style="color: rgba(0, 0, 0, 1)"> preopts options.setdefault(</span><span style="color: rgba(128, 0, 0, 1)">'</span><span style="color: rgba(128, 0, 0, 1)">ignore_result</span><span style="color: rgba(128, 0, 0, 1)">'</span><span style="color: rgba(0, 0, 0, 1)">, self.ignore_result) </span><span style="color: rgba(0, 0, 255, 1)">return</span><span style="color: rgba(0, 0, 0, 1)"> app.send_task( self.name, args, kwargs, task_id</span>=task_id, producer=<span style="color: rgba(0, 0, 0, 1)">producer, link</span>=link, link_error=link_error, result_cls=<span style="color: rgba(0, 0, 0, 1)">self.AsyncResult, shadow</span>=shadow, task_type=<span style="color: rgba(0, 0, 0, 1)">self, </span>**<span style="color: rgba(0, 0, 0, 1)">options )</span></pre>
对于其使用,apply_async支持常用参数:
- eta:指定任务执行时间,类型为datetime时间类型;
- countdown:倒计时,单位秒,浮点类型;
- expires:任务过期时间,如果任务在超过过期时间还未执行则回收任务,浮点类型获取datetime类型;
- retry:任务执行失败时候是否尝试,布尔类型。;
- serializer:序列化方案,支持pickle、json、yaml、msgpack;
- priority:任务优先级,有0~9优先级可设置,int类型;
- retry_policy:任务重试机制,其中包含几个重试参数,类型是dict如下:
max_retries:最大重试次数
interval_start:重试等待时间
interval_step:每次重试叠加时长,假设第一重试等待1s,第二次等待1+n秒
interval_max:最大等待时间
####示例

add.apply_async((1, 3), retry=True, retry_policy={

'max_retries': 1,

'interval_start': 0,

'interval_step': 0.8,

'interval_max': 5,

})
更多参数参考:http://docs.celeryproject.org/en/latest/reference/celery.app.task.html#celery.app.task.Task.apply_async
五、管理与监控
Celery管理和监控功能是通过flower组件实现的,flower组件不仅仅提供监控功能,还提供HTTP API可实现对woker和task的管理。
安装使用
pip3 install flower
启动
 flower -A project --port=5555
# -A :项目目录
#--port 指定端口
访问http:ip:5555

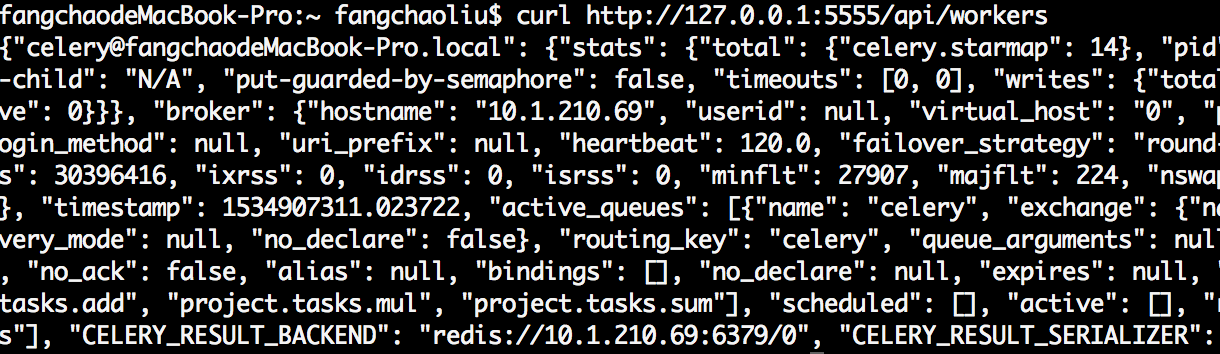
api使用,例如获取woker信息:
curl http://127.0.0.1:5555/api/workers
结果:
更多api参考:https://flower.readthedocs.io/en/latest/api.html
转载:https://www.cnblogs.com/wdliu/p/9517535.html
参考博文: https://www.cnblogs.com/wdliu/p/9530219.html