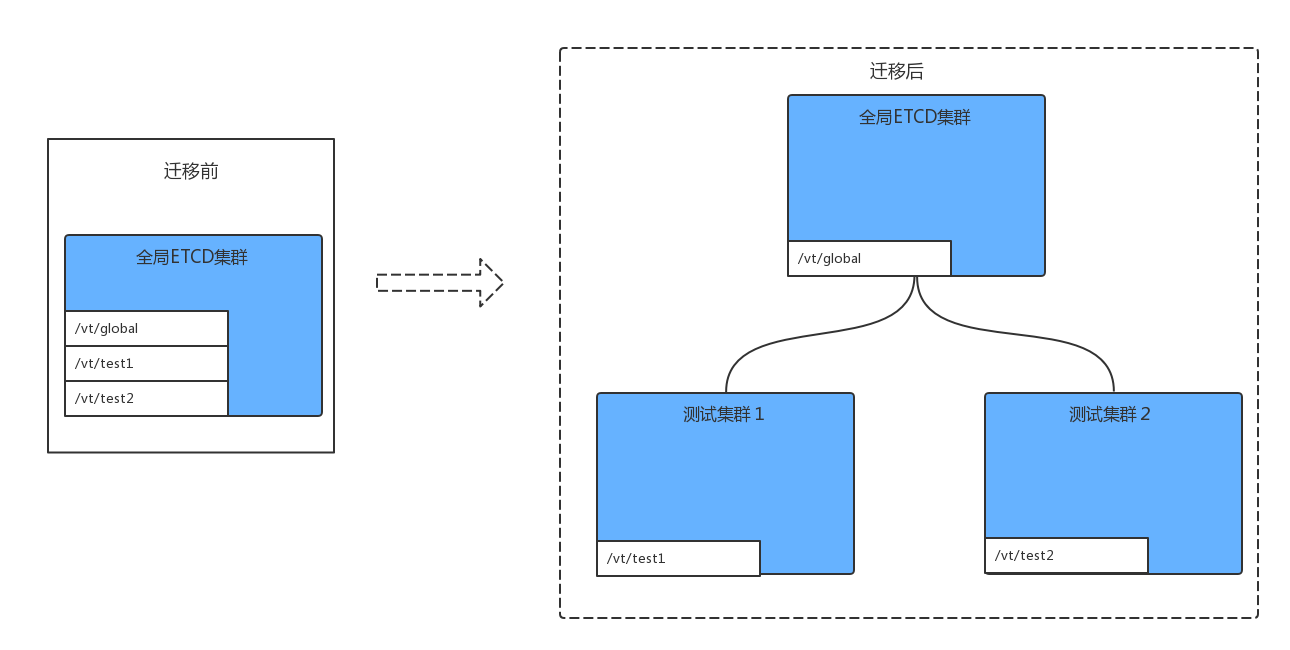
在使用vitess的时候我们会遇到刚开始所有的元数据都在同一个ETCD集群中,后续随着业务的增长需要进行数据中心拆分; 分别拆分成多个Local集群的数据中心;
以下就简单说明下迁移步骤:
迁移拓扑图:
1. 资源需求
机房: 机房1, 机房2
ETCD集群: 全局ETCD集群(global), 测试集群1(test1), 测试集群2(test2)
ETCD集群默认路径: 全局(/vt/global), 测试集群1(/vt/test1), 测试集群2(/vt/test2)
K8s集群:所有的部署都是基于k8s集群, 所以k8s集群的基本操作命令需要清楚
2. ETCD集群信息
//全局ETCD
etcd-global.test.com:4001
//机房1
etcd-test1.datacenter.local:4001
//机房2
etcd-test2.datacenter.local:4001
3. 操作步骤
(1). 数据验证
数据验证主要包括ETCD集群数据浏览, ETCD集群监控检查
//全局ETCD数据验证
export ETCDCTL_API=3 && etcdctl --endpoints="http://etcd-global.test.com:4001" --prefix=true --keys-only=true get /vt
export ETCDCTL_API=2 && etcdctl --endpoints="http://etcd-global.test.com:4001" cluster-health

//测试集群1 ETCD数据验证
export ETCDCTL_API=3 && etcdctl --endpoints="http://etcd-test1.datacenter.local:4001" --prefix=true --keys-only=true get /vt
export ETCDCTL_API=2 && etcdctl --endpoints="http://etcd-test1.datacenter.local:4001" cluster-health

//测试集群2 ETCD数据验证
export ETCDCTL_API=3 && etcdctl --endpoints="http://etcd-test2.datacenter.local:4001" --prefix=true --keys-only=true get /vt
export ETCDCTL_API=2 && etcdctl --endpoints="http://etcd-test2.datacenter.local:4001" cluster-health
(2). 测试机房1 数据迁移
测试机房1主要是从Global(ETCD集群)中把/vt/test1 目录迁移到 测试集群1(ETCD集群)中的/vt/test1目录下,并且保证服务可用。
#测试集群1操作
//从全局ETCd拷贝数据到测试集群1
export ETCDCTL_API=3 && etcdctl make-mirror --endpoints="http://etcd-global.test.com:4001" --dest-prefix="/vt/test1" --prefix="/vt/test1" "http://etcd-test1.datacenter.local:4001"
export ETCDCTL_API=3 && etcdctl --endpoints="http://etcd-test1.datacenter.local:4001" --prefix=true --keys-only=true get /vt

export ETCDCTL_API=3 && etcdctl --endpoints="http://etcd-global.test.com:4001" --prefix=true --keys-only=true get /vt/global/cells

#/vt/global/cells/test1 信息没有用,需要从global删除; 删除后通过vtctld才能看到CellInfo
export ETCDCTL_API=3 && etcdctl --endpoints=http://etcd-global.test.com:4001 del "/vt/global/cells/test1"

//更新CellInfo
vtctl -topo_implementation etcd2 -topo_global_server_address http://etcd-global.test.com:4001 -topo_global_root /vt/global GetCellInfo test1
vtctl -topo_implementation etcd2 -topo_global_server_address http://etcd-global.test.com:4001 -topo_global_root /vt/global UpdateCellInfo -server_address http://etcd-test1.datacenter.local:4001 -root /vt/test1 test1

//使用滚动更新更新VTCTLD
//更新测试集群1
kubectl -s https://192.168.110.120:8080 --insecure-skip-tls-verify=true --username="user" --password="pwd" --namespace=datacenter rolling-update vtctld-test1 --image=192.168.110.110/vitesss/lite:mysql57_2.2.3_master
//使用滚动更新更新VTGATE
//更新测试集群1
kubectl -s https://192.168.110.120:8080 --insecure-skip-tls-verify=true --username="user" --password="pwd" --namespace=datacenter rolling-update vtgate-test1 --image=192.168.110.110/vitesss/lite:mysql57_2.2.3_master
更新完成后进行验证,确保服务都可以正常访问,不会影响业务
(3). 测试机房2数据迁移
测试机房2主要是从Global(ETCD集群)中把/vt/test2 目录迁移到 测试集群2(ETCD集群)中的/vt/test2目录下,并且保证服务可用。
#测试集群2操作
//从全局ETCd拷贝数据到测试集群2
export ETCDCTL_API=3 && etcdctl make-mirror --endpoints="http://etcd-global.test.com:4001" --dest-prefix="/vt/test2" --prefix="/vt/test2" "http://etcd-test2.datacenter.local:4001"
export ETCDCTL_API=3 && etcdctl --endpoints="http://etcd-test2.datacenter.local:4001" --prefix=true --keys-only=true get /vt

//这部分需要好好校验
export ETCDCTL_API=3 && etcdctl --endpoints="http://etcd-global.test.com:4001" --prefix=true --keys-only=true get /vt/global/cells
//使用etcdctl更新删除cell信息
#/vt/global/cells/test2 信息没有用,需要从global删除; 删除后通过vtctld才能看到CellInfo
export ETCDCTL_API=3 && etcdctl --endpoints=http://etcd-global.test.com:4001 del "/vt/global/cells/test2"

//更新CellInfo
vtctl -topo_implementation etcd2 -topo_global_server_address http://etcd-global.test.com:4001 -topo_global_root /vt/global GetCellInfo test2
vtctl -topo_implementation etcd2 -topo_global_server_address http://etcd-global.test.com:4001 -topo_global_root /vt/global UpdateCellInfo -server_address http://etcd-test2.datacenter.local:4001 -root /vt/test2 test2

//使用滚动更新更新VTCTLD
//更新测试集群2
kubectl -s https://192.168.110.130:8080 --insecure-skip-tls-verify=true --username="user" --password="pwd" --namespace=datacenter rolling-update vtctld-test2 --image=192.168.110.110/vitesss/lite:mysql57_2.2.3_master

//使用滚动更新更新VTGATE
//更新测试集群2
kubectl -s https://192.168.110.130:8080 --insecure-skip-tls-verify=true --username="user" --password="pwd" --namespace=datacenter rolling-update vtgate-test2 --image=192.168.110.110/vitesss/lite:mysql57_2.2.3_master