一、redis集群相关
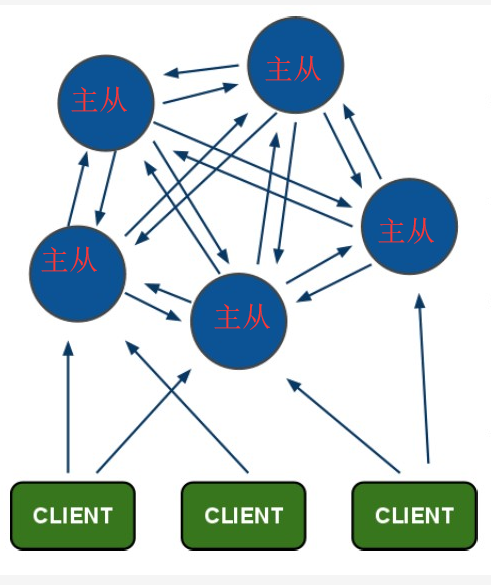
1.概念:redis集群是通过数据分区提供可用性的,这样即使一部分节点失效也可以继续处理请求。
2.原理:集群使用数据分片实现,一个redis集群包括16384个哈希槽,数据库中的每一个键都属于这16384中的一个,使用公式为 CRC16(key) % 16384,这个公式决定key属于哪一个槽。
比如说一个集群3个节点,A处理0-5500号的哈希槽,B处5501-11000的哈希槽,C处理11001-16384号哈希槽。
操作:
增加节点D:把ABC中一些哈希槽给D就行了
删除节点C:把C的哈希槽移动给别人,删除了C就好了。
3.主从
每个节点都有1-N个复制品,其中有一个为主节点,其余的为从,上面的例子中一旦B挂了,那么集群就挂了,没人处理5500-11000,那么B这边搞个主从,B1,B2就可以了,这样挂了一个主的从也能顶上去。但是B1,B2都挂了的话B还是挂了,集群一样会挂掉。
二、redis集群配置
接下来搭建redis集群,至少有3个才能搭建集群。
我们构建 redis-cluster 集群可以通过 redis-trib.rb 工具来完成。redis-trib.rb 是redis官方提供的一个集群管理工具,集成在redis安装包的 src 目录下。redis-trib.rb 封装了redis提供的集群命令,使用简单、便捷。redis-trib.rb 是由ruby语言编写的,所以使用该工具需要ruby语言环境的支持。
| 服务器 | 服务器序号 | 端口 | 路径 |
| 1.*.*.37 | 1 | 7201 | /opt/redis-cluster/7201 |
| 1.*.*.37 | 1 | 7202 | /opt/redis-cluster/7202 |
| 1.*.*.123 | 2 | 7203 | /opt/redis-cluster/7203 |
| 1.*.*.123 | 2 | 7204 | /opt/redis-cluster/7204 |
| 1.*.*.87 | 3 | 7205 | /opt/redis-cluster/7205 |
| 1.*.*.87 | 3 | 7206 | /opt/redis-cluster/7206 |
首先关闭防火墙
systemctl stop firewalld.service
systemctl disable firewalld.service
下载安装 redis
http://download.redis.io/releases/ 下查找合适的业务版本,并下载安装
wget http://download.redis.io/releases/redis-3.2.12.tar.gz
tar zxvf redis-3.2.12.tar.gz
cd redis-3.2.12
make
然后将redis加入系统命令中
make install
该命令会在ls /usr/local/bin 下生成redis的命令文件,后续就可以在任意目录中使用这些命令了

如果make不成功,可能使装gcc
也可能使缺少执行参数:make MALLOC=libc
redis基本配置
服务器(1)
创建数据目录,然后拷贝对应的配置文件到对应的目录下
mkdir -p /opt/redis-cluster/7201/data
mkdir -p /opt/redis-cluster/7202/data
cp /opt/redis-cluster/redis-3.2.12/redis.conf /opt/redis-cluster/7201 -rf
cp /opt/redis-cluster/redis-3.2.12/redis.conf /opt/redis-cluster/7202 -rf
服务器(2)
mkdir -p /opt/redis-cluster/7203/data
mkdir -p /opt/redis-cluster/7204/data
cp /opt/redis-cluster/redis-3.2.12/redis.conf /opt/redis-cluster/7203 -rf
cp /opt/redis-cluster/redis-3.2.12/redis.conf /opt/redis-cluster/7204 -rf
服务器(3)
mkdir -p /opt/redis-cluster/7205/data
mkdir -p /opt/redis-cluster/7206/data
cp /opt/redis-cluster/redis-3.2.12/redis.conf /opt/redis-cluster/7205 -rf
cp /opt/redis-cluster/redis-3.2.12/redis.conf /opt/redis-cluster/7206 -rf
修改配置项,建议搞到Windows的notpad++复制端口和ip,就是修改bind后面机器的ip以及端口即可了
port 7201(每个节点的端口号)
daemonize yes
bind 172.*.*.85(绑定当前机器 IP)
dir /opt/redis-cluster/7201/data/(数据文件存放位置)
pidfile /var/run/redis_7201.pid(pid 7201和port要对应)
cluster-enabled yes(启动集群模式)
cluster-config-file nodes7201.conf(7201和port要对应,这个文件是redis自己使用的,我们不需要编辑)
cluster-node-timeout 15000
appendonly yes
启动节点
cd /opt/redis-cluster/720*
redis-server redis.conf
测试
redis-cli -h 172.*.*.85 -p 7201

keys

如果连不上的话查看一下进程,先杀进程再修改配置,再重启,下面这个很明显就配错了

下载安装 ruby
yum install ruby
yum install rubygems
gem install redis --version 3.2.2
https://www.jianshu.com/p/cf4b564deb1a gem离线包安装
创建redis-trib.rb集群
redis-trib.rb

支持的操作如下:

1. create:创建集群

2. check:检查集群   check 其中一个ip:端口      即可查看整套集群信息

3. info:查看集群信息

4. fix:修复集群

5. reshard:在线迁移slot

6. rebalance:平衡集群节点slot数量

7. add-node:添加新节点

8. del-node:删除节点

9. set-timeout:设置节点的超时时间

10. call:在集群所有节点上执行命令

11. import:将外部redis数据导入集群
下面我们创建集群。注意:给redis-trib.rb的节点地址必须是不包含任何槽/数据的节点,否则会拒绝创建集群。
cd /opt/redis-cluster/redis-3.2.12/src
./redis-trib.rb create --replicas 1 ip.37:7201 ip.37:7202 ip.123:7203 ip.123:7204 ip.87:7205 ip.87:7206
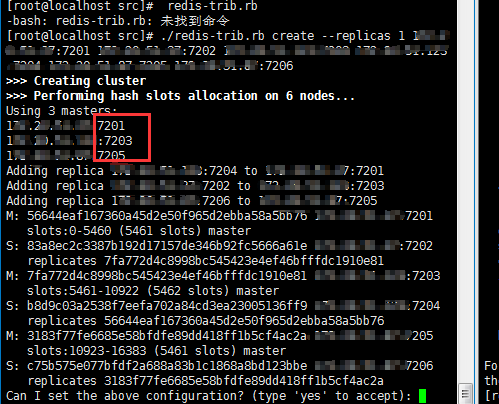
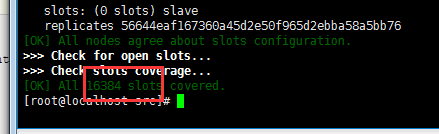
提问你允不允许用上面的配置,允许即可。16384个槽全部被分配,集群创建成功。
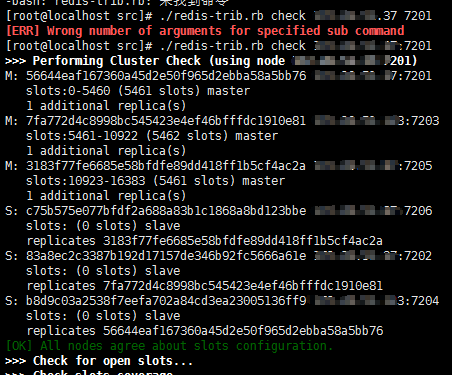
如果检测集群状态的话,随便check一个节点都会出来全部的信息,还能看到各自占用了什么槽,比如下面的0-5460.
修复集群
目前fix命令能修复两种异常,
1. 节点中存在处于迁移中(importing或migrating状态)的slot。
2. 节点中存在未分配的slot。
其它异常不能通过fix命令修复
redis-trib.rb fix 127.0.0.1:6379
在线迁移slot
redis-trib.rb reshard 127.0.0.1:6379
/usr/local/ruby/lib/ruby/gems/2.5.0/gems/redis-3.3.0/lib/redis/client.rb:459: warning: constant ::Fixnum is deprecated
>>> Performing Cluster Check (using node 127.0.0.1:6379)
M: bc775f9c4dea40820b82c9451778b1fcd42f92bc 127.0.0.1:6379
   slots:3225-5460 (2236 slots) master
   1 additional replica(s)
S: 648eb314863b82aaa676380be7db2ec307f5547d 127.0.0.1:6382
   slots: (0 slots) slave
   replicates bc775f9c4dea40820b82c9451778b1fcd42f92bc
M: 3b27d00d13706a032a92ff6b0a914af272dcaaf2 127.0.0.1:6380
   slots:0-3224,5461-13958 (11723 slots) master
   1 additional replica(s)
S: 57bda956485109552547aef6c77fba43d2124abf 127.0.0.1:6384
   slots: (0 slots) slave
   replicates d874f003257f1fb036bbd856ca605172a1741232
S: 65a6efb441ac44c348f7da8c62e26b888cda7c48 127.0.0.1:6383
   slots: (0 slots) slave
   replicates 3b27d00d13706a032a92ff6b0a914af272dcaaf2
M: d874f003257f1fb036bbd856ca605172a1741232 127.0.0.1:6381
   slots:13959-16383 (2425 slots) master
   1 additional replica(s)
[OK] All nodes agree about slots configuration.
>>> Check for open slots...
>>> Check slots coverage...
[OK] All 16384 slots covered.
How many slots do you want to move (from 1 to 16384)? 200               【提示迁移多少个槽】
What is the receiving node ID? 3b27d00d13706a032a92ff6b0a914af272dcaaf2                    【迁移到哪个节点ID?ID在上面输出就有】
Please enter all the source node IDs.
  Type 'all' to use all the nodes as source nodes for the hash slots.
  Type 'done' once you entered all the source nodes IDs.
Source node #1:
将外部redis数据导入集群
redis-trib.rb import --from 127.0.0.1:6378 127.0.0.1:6379