简单的说镜像就是一个容器的只读模板,用来创建容器。
当运行容器时需要指定镜像,如果本地没有该镜像,则会从 Docker Registry 下载。默认查找的是 Docker Hub。(Docker Hub 是官方提供的公共仓库)
Docker 的镜像是增量的修改,每次创建新的镜像都会在老的镜像上面构建一个增量的层,使用到的技术是Another Union File System(AUFS)。
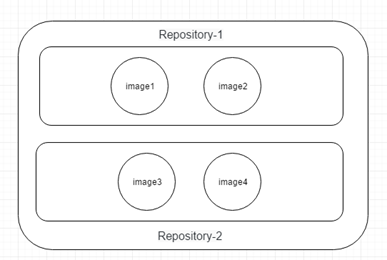
比如一个镜像名称 ubuntu:14.04,冒号前面的 ubuntu 是仓库名,后面的 14.04 是 TAG,不同的 TAG 可以对应相同的镜像,TAG 通常设置为镜像的版本号。
如果不加 TAG,这时 Docker 会使用默认的 TAG:latest。
镜像管理涉及到下面的命令:
一、查看镜像列表
# Management Commands
$ docker image ls +[镜像名称]
# 旧的命令格式如下:
$ docker images
举例
[root@TBEARZ206458 ~]# docker image ls
REPOSITORY          TAG                 IMAGE ID            CREATED             SIZE
ubuntu              latest              72300a873c2c        10 days ago         64.2MB
busybox             latest              6d5fcfe5ff17        2 months ago        1.22MB
hello-world         latest              fce289e99eb9        14 months ago       1.84kB

[root@TBEARZ206458 ~]# docker image ls ubuntu
REPOSITORY          TAG                 IMAGE ID            CREATED             SIZE
ubuntu              latest              72300a873c2c        10 days ago         64.2MB
二、查看镜像详细信息
上一个文档中也有 docker inspect 命令,它可以用来查看容器的信息,也可以用来查看镜像的信息 (查看元数据信息)
$ docker image inspect ubuntu
# 旧的命令格式如下:
$ docker inspect ubuntu
举例
[root@TBEARZ206458 ~]# docker image inspect ubuntu | grep Last
            "LastTagTime": "0001-01-01T00:00:00Z"
三、搜索镜像
$ docker search ubuntu
例如上面的命令执行之后
[root@TBEARZ206458 ~]# docker search ubuntu
NAME                                      DESCRIPTION                                     STARS      OFFICIAL      AUTOMATED
ubuntu                                    Ubuntu is a Debian-based Linux operating sys…   10575        [OK]
dorowu/ubuntu-desktop-lxde-vnc            Docker image to provide HTML5 VNC interface …   398                          [OK]
rastasheep/ubuntu-sshd                    Dockerized SSH service, built on top of offi…   243                          [OK]
consol/ubuntu-xfce-vnc                    Ubuntu container with "headless" VNC session…   211                          [OK]
ubuntu-upstart                            Upstart is an event-based replacement for th…   105          [OK]
ansible/ubuntu14.04-ansible               Ubuntu 14.04 LTS with ansible                   98                           [OK]
其中:
1、Official Images指docker标准库, 由docker 官方建立.
2、用户建立的image则会有userid的prefix.
3、automated builds 则是通过代码版本管理网站结合docker hub提供的接口生成的, 例如github, bitbucket,
你需要注册docker hub, 然后使用github或bitbucket的在账户链接到docker hub, 然后就可以选择在github或bitbucket里面的项目自动build docker image, 这样的话只要代码版本管理网站的项目有更新, 就会触发自动创建image.
四、拉取镜像
Registry中获得镜像或者仓库的命令
# Management Commands
$ docker image pull [OPTIONS] NAME[:TAG|@DIGEST]
# 旧的命令格式如下:
$ docker pull [OPTIONS] NAME[:TAG|@DIGEST]
比较常用的配置参数为 -a,代表下载仓库中的所有镜像,即下载整个存储库。
Name不仅可以指定Tag,也可以通过摘要(DIGEST)来进行拉取不同的镜像。我们可以查看镜像信息
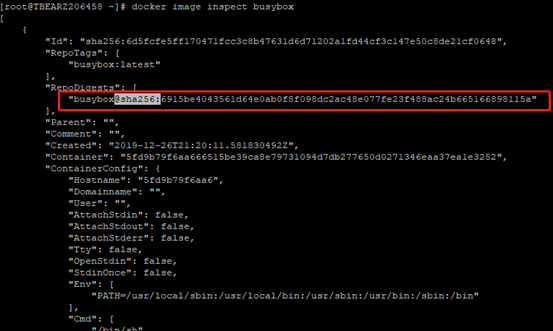
举例:拉取Ubuntu 14.04版本镜像
[root@TBEARZ206458 ~]# docker image pull ubuntu:14.04
14.04: Pulling from library/ubuntu
2e6e20c8e2e6: Pull complete
30bb187ac3fc: Pull complete
b7a5bcc4a58a: Pull complete
Digest: sha256:ffc76f71dd8be8c9e222d420dc96901a07b61616689a44c7b3ef6a10b7213de4
Status: Downloaded newer image for ubuntu:14.04
docker.io/library/ubuntu:14.04
对于 pull 下来的镜像来说,其默认的保存路径为 /var/lib/docker。因为这里的存储驱动为 aufs,所以具体路径为 /var/lib/docker/aufs。
五、构建镜像
对于我们 pull 的新镜像 ubuntu:14.04 来说,如果我们需要对其进行更新,可以创建一个容器,在容器中进行修改,然后将修改提交到一个新的镜像中。
# Management Commands
$ docker container commit [OPTIONS] CONTAINER [REPOSITORY[:TAG]]
# 旧的命令格式如下:
$ docker commit [OPTIONS] CONTAINER [REPOSITORY[:TAG]]
该命令的解释为从一个容器的修改中创建一个新的镜像。例如,我们运行一个容器,然后在其中创建一个文件,最后使用 commit 命令。
举例: 我们创建一个busybox的容器,里面添加两个文件file1和file2,然后将其提交到一个新的镜像中。
[root@TBEARZ206458 ~]# docker container run --name MyNewBusyBox -it busybox /bin/sh
/ # touch file1 file2
ctrl+p+q 后台运行
检查一下是否创建
[root@TBEARZ206458 ~]# docker container diff  MyNewBusyBox
A /file1
A /file2
C /root
A /root/.ash_history
创建一个新的镜像
[root@TBEARZ206458 ~]# docker container commit MyNewBusyBox
busybox             busybox:latest      hello-world         hello-world:latest  ubuntu              ubuntu:14.04        ubuntu:latest
[root@TBEARZ206458 ~]# docker container commit MyNewBusyBox busybox:mynew
sha256:9d1d031bfd1efe1adaf7db123c30f974647e165899c3d3fd179df0c0c3a41631
[root@TBEARZ206458 ~]# docker image ls busybox
REPOSITORY          TAG                 IMAGE ID            CREATED             SIZE
busybox             mynew               9d1d031bfd1e        15 seconds ago      1.22MB
busybox             latest              6d5fcfe5ff17        2 months ago        1.22MB
通过上述操作我们创建了一个新的镜像,但是本方法不推荐用在生产系统中,未来会很难维护镜像。最好的创建镜像的方法是 Dockerfile,修改镜像的方法是修改 Dockerfile,然后重新从 Dockerfile 中构建新的镜像。
构建 BUILD
docker 可以从一个 Dockerfile 文件中自动读取指令构建一个新的镜像。 Dockerfile 是一个包含用户构建镜像命令的文本文件。
docker image build [OPTIONS] PATH | URL
构建镜像时,该过程的第一件事是将 Dockerfile 文件所在目录下的所有内容递归的发送到守护进程。所以在大多数情况下,最好是创建一个新的目录,在其中保存 Dockerfile,并在其中添加构建 Dockerfile 所需的文件。
DockerFile的基本语法:略
举例:安装一个拥有dotnet core环境的centos,并运行事例代码。
预备工作:先创建一个dotnetCoreweb程序,然后通过FTP上传到Linux服务器上
我是放在了/home/lic/dockerfiledir 文件夹下
[root@TBEARZ206458 dockerfiledir]# ll
drwxr-xr-x 3 root root 4096 Mar  4 17:23 DotnetWebDemo
①在该文件夹下创建一个DockerFile
备注:这里我使用的是3.1版本的dotnetcore,注意下镜像的仓库位置,我在试验过程中遇到了版本不一致的问题,主要是拉取的镜像不能支持启动的dotnet程序
It was not possible to find any compatible framework version
如果是1.0-2.x 可以使用 microsoft/aspnetcore 这是镜像仓库地址,从图上也可以看到,这是一个过时的地址。
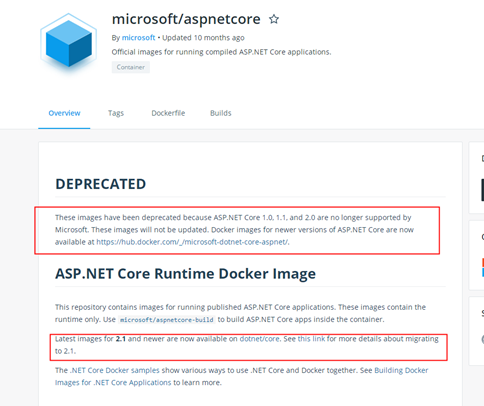
如果是3.0以上的可以使用下面的地址: https://hub.docker.com/_/microsoft-dotnet-core-aspnet/
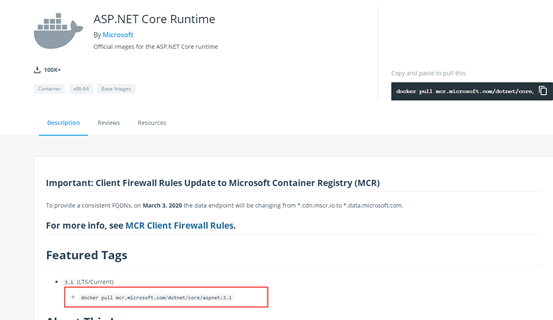
FROM mcr.microsoft.com/dotnet/core/aspnet:3.1

MAINTAINER licheng_cumt@163.com

# 容器暴露的端口
EXPOSE 5000

# 把当前目录内容拷贝到容器的home目录
COPY . /home

# 设置工作目录
WORKDIR /home

# 启动程序
ENTRYPOINT ["dotnet", "DotnetWebDemo/DotnetWebDemo.dll"]
② Builde一下镜像,大概过程如下
[root@TBEARZ206458 dockerfiledir]# docker image build -t centosdotnet:1.0.0 .
Sending build context to Docker daemon  344.6kB
Step 1/6 : FROM  docker.io/microsoft/dotnet
 ---> 56a634b88a04
Step 2/6 : MAINTAINER licheng_cumt@163.com
 ---> Running in f915b73424fc
Removing intermediate container f915b73424fc
 ---> 690e1fe5200d
Step 3/6 : EXPOSE 5000
 ---> Running in 8befbf97b8c1
Removing intermediate container 8befbf97b8c1
 ---> d50f54877f3b
Step 4/6 : COPY . /home
 ---> 54953a90f171
Step 5/6 : WORKDIR /home
 ---> Running in ddab8f58d279
Removing intermediate container ddab8f58d279
 ---> 7accfc7efc5b
Step 6/6 : ENTRYPOINT ["dotnet", "DotnetWebDemo/DotnetWebDemo.dll"]
 ---> Running in 4a6d400603b2
Removing intermediate container 4a6d400603b2
 ---> 12291ac40ff3
Successfully built 12291ac40ff3
Successfully tagged centosdotnet:1.0.0
查看一下镜像
[root@TBEARZ206458 dockerfiledir]# docker image ls -a
REPOSITORY                             TAG                 IMAGE ID            CREATED             SIZE
centosdotnet                           1.0.0               547d7924e8d2        21 minutes ago      208MB
<none>                                 <none>              b81319ea9700        21 minutes ago      208MB
<none>                                 <none>              fab8ef06bcba        21 minutes ago      208MB
<none>                                 <none>              fc5b570e7e66        21 minutes ago      207MB
<none>                                 <none>              252cd9849401        21 minutes ago      207MB
microsoft/dotnet-nightly               latest              437f8c6bee32        37 hours ago        1.74GB
busybox                                mynew               9d1d031bfd1e        3 days ago          1.22MB
microsoft/dotnet                       latest              56a634b88a04        8 days ago          1.74GB
mcr.microsoft.com/dotnet/core/aspnet   3.1                 e2cd20adb129        8 days ago          207MB
ubuntu                                 latest              72300a873c2c        13 days ago         64.2MB
centos                                 latest              470671670cac        6 weeks ago         237MB
busybox                                latest              6d5fcfe5ff17        2 months ago        1.22MB
ubuntu                                 14.04               6e4f1fe62ff1        2 months ago        197MB
hello-world                            latest              fce289e99eb9        14 months ago       1.84kB
microsoft/aspnetcore                   latest              db030c19e94b        18 months ago       347MB
上面的none应该是和centosdotnet镜像一起build之后出现的。
③启动镜像
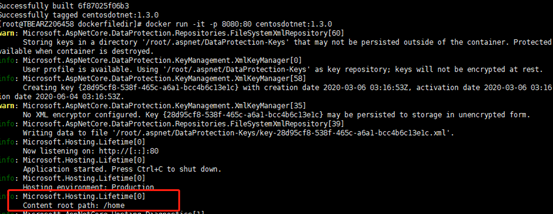
[root@TBEARZ206458 dockerfiledir]# docker run -it -p 8080:80 centosdotnet:1.0.0
warn: Microsoft.AspNetCore.DataProtection.Repositories.FileSystemXmlRepository[60]
      Storing keys in a directory '/root/.aspnet/DataProtection-Keys' that may not be persisted outside of the container. Protected data will be unavailable when container is destroyed.
info: Microsoft.AspNetCore.DataProtection.KeyManagement.XmlKeyManager[0]
      User profile is available. Using '/root/.aspnet/DataProtection-Keys' as key repository; keys will not be encrypted at rest.
info: Microsoft.AspNetCore.DataProtection.KeyManagement.XmlKeyManager[58]
      Creating key {4cb11721-8b0e-48f9-9749-a17abe7ec075} with creation date 2020-03-06 02:38:36Z, activation date 2020-03-06 02:38:36Z, and expiration date 2020-06-04 02:38:36Z.
warn: Microsoft.AspNetCore.DataProtection.KeyManagement.XmlKeyManager[35]
      No XML encryptor configured. Key {4cb11721-8b0e-48f9-9749-a17abe7ec075} may be persisted to storage in unencrypted form.
info: Microsoft.AspNetCore.DataProtection.Repositories.FileSystemXmlRepository[39]
      Writing data to file '/root/.aspnet/DataProtection-Keys/key-4cb11721-8b0e-48f9-9749-a17abe7ec075.xml'.
info: Microsoft.Hosting.Lifetime[0]
      Now listening on: http://[::]:80
info: Microsoft.Hosting.Lifetime[0]
      Application started. Press Ctrl+C to shut down.
info: Microsoft.Hosting.Lifetime[0]
      Hosting environment: Production
info: Microsoft.Hosting.Lifetime[0]
      Content root path: /home
这里主要是端口问题需要注意一下,一开始我也不理解
使用 -p 参数时,可以指定要映射的端口,并且在一个指定的端口上只可以绑定一个容器。支持的格式有:
1. IP:HostPort:ContainerPort
2. IP:ContainerPort
3. HostPort:ContainerPort
例如: docker run -d -p 8080:80 nginx
本地主机的 8080 端口被映射到了容器的 80 端口,通过localhost:8080就可以访问容器的80的nginx欢迎页面
验证一下上面的操作:访问一些 http://localhost:8080 就返回了一些信息
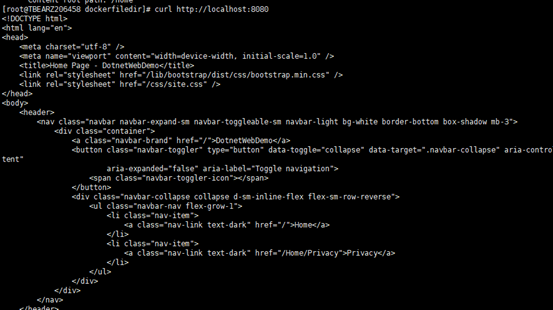
备注:这里我在部署程序之后,发现了一个问题,就是我 .net 程序能访问通,但是所有的静态文件访问失败了。
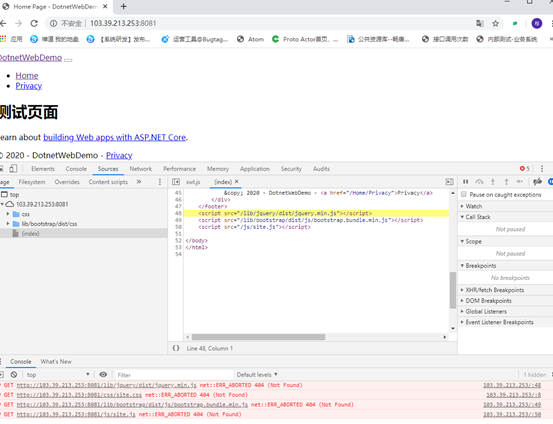
此问题的原因:在于刚刚那个DockerFile,里面这两行
# 设置工作目录 WORKDIR /home # 启动程序 ENTRYPOINT ["dotnet", "DotnetWebDemo/DotnetWebDemo.dll"]
本意是在docker的 home目录下 执行 dotnet DotnetWebDemo/DotnetWebDemo.dll 命令 以启动站点,结果是站点的确启动了,但是程序的启动目录也是/home
这时候,实际上我的wwwroot文件夹并不在该目录下面,所以就会报错。
两种解决办法
1.移动wwwroot目录到/home下,重启容器
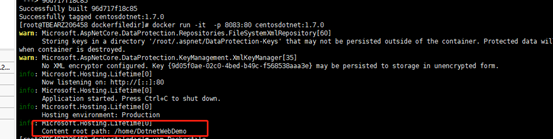
2.编辑DockerFile,重新打一下镜像,修改工作目录如下:
# 设置工作目录 WORKDIR /home/DotnetWebDemo //这里改一下 # 启动程序 ENTRYPOINT ["dotnet", "DotnetWebDemo.dll"] //这里改一下
六、删除镜像
我们删除 ubuntu:latest 镜像就可以使用如下命令:需要注意的是,如果该镜像正在被一个容器所使用,需要将容器删除才能成功的删除镜像。
# Management Commands
$ docker image rm ubuntu:latest
# 旧的命令格式如下:
$ docker rmi ubuntu:latest