在解析SpringIOC容器创建之前,我们先来看以下扩展原理:
1.BeanFactoryPostProcessor
2.BeanDefinitionRegistryPostProcessor
3.ApplicationListener/@EventListener与SmartInitializingSingleton
一、BeanFactoryPostProcessor BeanFactory的后置处理器
先看一下BeanFactoryPostProcessor源码:
@FunctionalInterface
public interface BeanFactoryPostProcessor {

	/**
	 * Modify the application context's internal bean factory after its standard
	 * initialization. All bean definitions will have been loaded, but no beans
	 * will have been instantiated yet. This allows for overriding or adding
	 * properties even to eager-initializing beans.
	 * @param beanFactory the bean factory used by the application context
	 * @throws org.springframework.beans.BeansException in case of errors
	 */
	void postProcessBeanFactory(ConfigurableListableBeanFactory beanFactory) throws BeansException;

}
该接口中只有一个方法为postProcessBeanFactory,可以看到他的执行时机是在BeanFactoy标准初始化之后,此时所有的Bean定义信息已被加载,但是没有Bean被实例化。
下面简单看个例子:
配置类代码如下:
@ComponentScan("com.practice.bean")
@Configuration
public class ExtConfig {
    @Bean
    public Person person(){
        return  new Person();
    }
}
自定义BeanFactoryPostProcessor实现类如下:
@Component
public class MyBeanFactoryPostProcessor implements BeanFactoryPostProcessor {
    @Override
    public void postProcessBeanFactory(ConfigurableListableBeanFactory beanFactory) throws BeansException {
        int count = beanFactory.getBeanDefinitionCount();
        String[] names = beanFactory.getBeanDefinitionNames();
        System.out.println("bean 定义数量为:" + count);
        for (String name : names) {
            System.out.println(name);
        }
        System.out.println("打印bean定义信息完毕");
    }
}
测试类如下:
  @Test
    public void test01() {
        AnnotationConfigApplicationContext applicationContext = new AnnotationConfigApplicationContext(ExtConfig.class);
        applicationContext.close();
    }
结果如下:
bean 定义数量为:8
org.springframework.context.annotation.internalConfigurationAnnotationProcessor
org.springframework.context.annotation.internalAutowiredAnnotationProcessor
org.springframework.context.annotation.internalCommonAnnotationProcessor
org.springframework.context.event.internalEventListenerProcessor
org.springframework.context.event.internalEventListenerFactory
extConfig
myBeanFactoryPostProcessor
person
Person 无参构造函数被执行
可以看出Peron的实例化在postProcessBeanFactory方法执行之后。
那么该方法是在什么时候执行的呢?
断点截图如下:
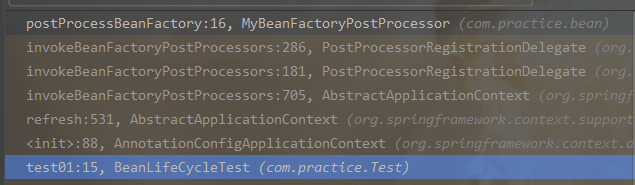
可以看到执行路径如下:
AnnotationConfigApplicationContext---refresh();
               ——————>AbstractApplicationContext.refresh();
                         ————————>
                // Invoke factory processors registered as beans in the context.
				invokeBeanFactoryPostProcessors(beanFactory);
进入invokeBeanFactoryPostProcessors(beanFactory);方法,可以大致看到执行顺序为
1,先找到所有的BeanFactoryPostProcessor
String[] postProcessorNames =
				beanFactory.getBeanNamesForType(BeanFactoryPostProcessor.class, true, false);
2.按照是否实现优先排序及排序接口分别放置到对应的List中,然后再去分别按序执行方法。
二、BeanDefinitionRegistryPostProcessor Bean定义注册后置处理器
BeanDefinitionRegistryPostProcessor 也是继承自BeanFactoryPostProcessor,但它定义了另外一个方法:
public interface BeanDefinitionRegistryPostProcessor extends BeanFactoryPostProcessor {
	/**
	 * Modify the application context's internal bean definition registry after its
	 * standard initialization. All regular bean definitions will have been loaded,
	 * but no beans will have been instantiated yet. This allows for adding further
	 * bean definitions before the next post-processing phase kicks in.
	 * @param registry the bean definition registry used by the application context
	 * @throws org.springframework.beans.BeansException in case of errors
	 */
	void postProcessBeanDefinitionRegistry(BeanDefinitionRegistry registry) throws BeansException;
}
postProcessBeanDefinitionRegistry根据注释来看,它的执行时机为所有符合规则的Bean定义将要被加载,但是没有bean被实例化,简单看一个例子,我们自己实现该接口,查看它的执行流程:
自定义实现类如下:
@Component
public class MyBeanDefinitionRegistryPostProcessor implements BeanDefinitionRegistryPostProcessor {
    @Override
    public void postProcessBeanDefinitionRegistry(BeanDefinitionRegistry registry) throws BeansException {
        int count = registry.getBeanDefinitionCount();
        System.out.println("bean 定义数量为"+count);
        String[] beanDefinitionNames = registry.getBeanDefinitionNames();
        for (String name:beanDefinitionNames) {
            System.out.println(name);
        }
        RootBeanDefinition beanDefinition = new RootBeanDefinition();
        beanDefinition.setBeanClass(PersonDao.class);
        registry.registerBeanDefinition("PersonDao",beanDefinition);

    }

    @Override
    public void postProcessBeanFactory(ConfigurableListableBeanFactory beanFactory) throws BeansException {
        System.out.println("MyBeanDefinitionRegistryPostProcessor.postProcessBeanFactory被执行");
    }
}
配置类和测试类上一致
测试结果如下:
bean 定义数量为9
org.springframework.context.annotation.internalConfigurationAnnotationProcessor
org.springframework.context.annotation.internalAutowiredAnnotationProcessor
org.springframework.context.annotation.internalCommonAnnotationProcessor
org.springframework.context.event.internalEventListenerProcessor
org.springframework.context.event.internalEventListenerFactory
extConfig
myBeanDefinitionRegistryPostProcessor
myBeanFactoryPostProcessor
person
MyBeanDefinitionRegistryPostProcessor.postProcessBeanFactory被执行
bean 定义数量为:10
org.springframework.context.annotation.internalConfigurationAnnotationProcessor
org.springframework.context.annotation.internalAutowiredAnnotationProcessor
org.springframework.context.annotation.internalCommonAnnotationProcessor
org.springframework.context.event.internalEventListenerProcessor
org.springframework.context.event.internalEventListenerFactory
extConfig
myBeanDefinitionRegistryPostProcessor
myBeanFactoryPostProcessor
person
PersonDao
打印bean定义信息完毕
Person 无参构造函数被执行
可以看到该方法在postProcessBeanFactory方法之前执行,并且我们也可以利用postProcessBeanDefinitionRegistry为容器添加注册组件
执行流程断点图如下:
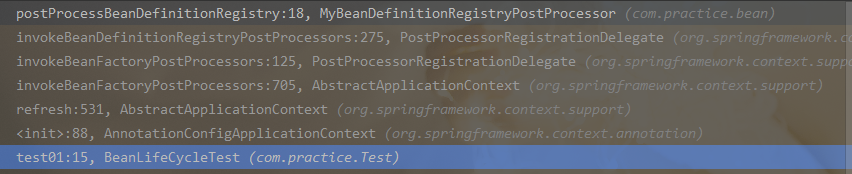
1.容器初始化——>2.refresh()——>invokeBeanFactoryPostProcessors(beanFactory);
——>PostProcessorRegistrationDelegate.invokeBeanFactoryPostProcessors(beanFactory, getBeanFactoryPostProcessors());
getBeanFactoryPostProcessors()返回为空List,进入实际执行方法:
1.postProcessorNames = beanFactory.getBeanNamesForType(BeanDefinitionRegistryPostProcessor.class, true, false);
返回我们自定义的实现类和一个org.springframework.context.annotation.internalConfigurationAnnotationProcessor内置的配置注释处理器--ConfigurationClassPostProcessor类实现了PriorityOrdered优先排序和BeanDefinitionRegistryPostProcessor 接口,会在第一次For循环即会执行,第二次是实现了Order接口的实现类,第三次才是自定义的MyBeanDefinitionRegistryPostProcessor 。
2.invokeBeanDefinitionRegistryPostProcessors(currentRegistryProcessors, registry);
	for (BeanDefinitionRegistryPostProcessor postProcessor : postProcessors) {
			postProcessor.postProcessBeanDefinitionRegistry(registry);
		}
执行实现的postProcessBeanDefinitionRegistry方法。
三、ApplicationListener应用监听器
在看ApplicationListener之前先看以下容器创建时refresh()中的两个方法:
1. // Initialize event multicaster for this context.为容器创建事件多播器
initApplicationEventMulticaster();
源代码如下:
protected void initApplicationEventMulticaster() {
		ConfigurableListableBeanFactory beanFactory = getBeanFactory();
		if (beanFactory.containsLocalBean(APPLICATION_EVENT_MULTICASTER_BEAN_NAME)) {
			this.applicationEventMulticaster =
					beanFactory.getBean(APPLICATION_EVENT_MULTICASTER_BEAN_NAME, ApplicationEventMulticaster.class);
			if (logger.isTraceEnabled()) {
				logger.trace("Using ApplicationEventMulticaster [" + this.applicationEventMulticaster + "]");
			}
		}
		else {
			this.applicationEventMulticaster = new SimpleApplicationEventMulticaster(beanFactory);
			beanFactory.registerSingleton(APPLICATION_EVENT_MULTICASTER_BEAN_NAME, this.applicationEventMulticaster);
			if (logger.isTraceEnabled()) {
				logger.trace("No '" + APPLICATION_EVENT_MULTICASTER_BEAN_NAME + "' bean, using " +
						"[" + this.applicationEventMulticaster.getClass().getSimpleName() + "]");
			}
		}
	}
可以看到先从容器中获取事件多播器,如果没有获取到,则创建一个SimpleApplicationEventMulticaster,并注册到容器中。
2.// Check for listener beans and register them. 注册事件监听器
registerListeners();
protected void registerListeners() {
		// Register statically specified listeners first.
		for (ApplicationListener<?> listener : getApplicationListeners()) {
			getApplicationEventMulticaster().addApplicationListener(listener);
		}

		// Do not initialize FactoryBeans here: We need to leave all regular beans
		// uninitialized to let post-processors apply to them!
		String[] listenerBeanNames = getBeanNamesForType(ApplicationListener.class, true, false);
		for (String listenerBeanName : listenerBeanNames) {
			getApplicationEventMulticaster().addApplicationListenerBean(listenerBeanName);
		}

		// Publish early application events now that we finally have a multicaster...
		Set<ApplicationEvent> earlyEventsToProcess = this.earlyApplicationEvents;
		this.earlyApplicationEvents = null;
		if (earlyEventsToProcess != null) {
			for (ApplicationEvent earlyEvent : earlyEventsToProcess) {
				getApplicationEventMulticaster().multicastEvent(earlyEvent);
			}
		}
	}
从容器中获取类型为ApplicationListener的组件,并添加到事件多播器(派发器)中。
在来看一个简单的事件分发布的例子:
ApplicationListener实现类:
@Component
public class MyApplicationListener implements ApplicationListener<MessageEvent> {
    @Override
    public void onApplicationEvent(MessageEvent myEvent) {
        System.out.println("监听到自定义事件。。。");
        myEvent.printMsg(myEvent.getMessage());
    }
}
ApplicationEvent实现类:
public class MessageEvent extends ApplicationEvent {

    private final String message;

    public MessageEvent(Object source, String message) {
        super(source);
        this.message = message;
    }

    public String getMessage() {
        return message;
    }
    public void printMsg(String message) {
        System.out.println(message);
    }
}
测试类:
  @Test
    public void test01() {
        AnnotationConfigApplicationContext applicationContext = new AnnotationConfigApplicationContext(ExtConfig.class);
        applicationContext.publishEvent(new MessageEvent(new Object(),"你好啊"));
        applicationContext.close();
    }
测试结果如下:
监听到自定义事件。。。
你好啊
执行流程很简单:
publishEvent()方法进入--->
执行getApplicationEventMulticaster().multicastEvent(applicationEvent, eventType);
---->invokeListener(listener, event);
@Override
	public void multicastEvent(final ApplicationEvent event, @Nullable ResolvableType eventType) {
		ResolvableType type = (eventType != null ? eventType : resolveDefaultEventType(event));
		Executor executor = getTaskExecutor();
		for (ApplicationListener<?> listener : getApplicationListeners(event, type)) {
			if (executor != null) {
				executor.execute(() -> invokeListener(listener, event));
			}
			else {
				invokeListener(listener, event);
			}
		}
	}
--->doInvokeListener(listener, event);
回调listener.onApplicationEvent(event);方法,打印结果。
3.使用注解实现事件监听。@EventListener与SmartInitializingSingleton
先来看以下@EventListener源码:
/**
 * @see EventListenerMethodProcessor
 */
@Target({ElementType.METHOD, ElementType.ANNOTATION_TYPE})
@Retention(RetentionPolicy.RUNTIME)
@Documented
public @interface EventListener {
从源码注释上我们看到了一个EventListenerMethodProcessor类,前去查看发现其实现了SmartInitializingSingleton接口,接口中
只有一个方法:
	/**
	 * Invoked right at the end of the singleton pre-instantiation phase,
	 * with a guarantee that all regular singleton beans have been created
	 * already. {@link ListableBeanFactory#getBeansOfType} calls within
	 * this method won't trigger accidental side effects during bootstrap.
	 * <p><b>NOTE:</b> This callback won't be triggered for singleton beans
	 * lazily initialized on demand after {@link BeanFactory} bootstrap,
	 * and not for any other bean scope either. Carefully use it for beans
	 * with the intended bootstrap semantics only.
	 */
	void afterSingletonsInstantiated();
执行时机为在单实例bean预实例化阶段结束时立即调用,保证所有常规单例Bean均已创建。
自定义方法如下:
@Component
public class TestListenerService {
    @EventListener
    public void  listener(ApplicationEvent event){
        System.out.println(event);
    }
}
还是刚才的测试类,结果如下:
org.springframework.context.event.ContextRefreshedEvent[source=org.springframework.context.annotation.AnnotationConfigApplicationContext@3abfe836, started on Tue Nov 26 20:54:31 CST 2019]
com.practice.bean.MessageEvent[source=java.lang.Object@4278a03f]
监听到自定义事件。。。
你好啊
org.springframework.context.event.ContextClosedEvent[source=org.springframework.context.annotation.AnnotationConfigApplicationContext@3abfe836, started on Tue Nov 26 20:54:31 CST 2019]
可以看到监听到了三个事件,容器刷新,自定义事件,容器关闭事件。
在EventListenerMethodProcessor类的afterSingletonsInstantiated()上打上断点,查看一下该方法在什么时候执行的:

可以看到是从容器创建进入refresh()方法:---->
// Instantiate all remaining (non-lazy-init) singletons./创建剩下的单实例Bean
finishBeanFactoryInitialization(beanFactory);------>
进入该方法后容器先调用getBean(beanName);方法创建好了所有剩下的单实例Bean,下面:
// Trigger post-initialization callback for all applicable beans...
		for (String beanName : beanNames) {
			Object singletonInstance = getSingleton(beanName);
			if (singletonInstance instanceof SmartInitializingSingleton) {
				final SmartInitializingSingleton smartSingleton = (SmartInitializingSingleton) singletonInstance;
				if (System.getSecurityManager() != null) {
					AccessController.doPrivileged((PrivilegedAction<Object>) () -> {
						smartSingleton.afterSingletonsInstantiated();
						return null;
					}, getAccessControlContext());
				}
				else {
					smartSingleton.afterSingletonsInstantiated();
				}
			}
		}
再去遍历所有的Bean是否属于SmartInitializingSingleton类型,
当beanName=org.springframework.context.event.internalEventListenerProcessor获取到EventListenerMethodProcessor实例并进入以下方法
smartSingleton.afterSingletonsInstantiated();方法--->
processBean(beanName, type);
进入该方法,看下面两段代码:
try {
annotatedMethods = MethodIntrospector.selectMethods(targetType,(MethodIntrospector.MetadataLookup<EventListener>) method ->
AnnotatedElementUtils.findMergedAnnotation(method, EventListener.class));
		}
for (Method method : annotatedMethods.keySet()) {
for (EventListenerFactory factory : factories) {
if (factory.supportsMethod(method)) {
Method methodToUse = AopUtils.selectInvocableMethod(method, context.getType(beanName));
ApplicationListener<?> applicationListener =
factory.createApplicationListener(beanName, targetType, methodToUse);
if (applicationListener instanceof ApplicationListenerMethodAdapter) {
((ApplicationListenerMethodAdapter) applicationListener).init(context, this.evaluator);
}
context.addApplicationListener(applicationListener);
break;
}
}
}创建了一个applicationListener instanceof ApplicationListenerMethodAdapter,并添加到容器中,后序执行到:
// Last step: publish corresponding event.
finishRefresh();---->
// Publish the final event.
publishEvent(new ContextRefreshedEvent(this));通过事件多播器(派发器)发布事件。
自定义事件是在applicationContext.publishEvent(new MessageEvent(new Object(),"你好啊"));
容器关闭是在调用applicationContext.close();方法-->publishEvent(new ContextClosedEvent(this));