概述
详细
首页大概分为几个部分
-
状态栏
-
标题栏
-
轮播图
-
切换的Tab
-
资讯列表
-
资讯列表头部推荐
-
刷新控件
一、准备工作
用到的库:
//recyclerview列表
compile 'com.android.support:recyclerview-v7:25.0.0'
//design库,用于tablayout,CoordinatorLayout折叠布局等
compile 'com.android.support:design:25.0.0'
//一键绑定控件
compile 'com.jakewharton:butterknife:5.1.1'
compile 'com.android.support:appcompat-v7:25.0.0'
//网络请求
compile 'com.squareup.picasso:picasso:2.5.2'
//ConstraintLayout
compile 'com.android.support.constraint:constraint-layout:1.0.2'
//轮播控件
compile 'com.youth.banner:banner:1.4.9'
//刷新加载控件
compile 'com.cjj.materialrefeshlayout:library:1.3.0'
//折叠控件,解决了滚动冲突
compile 'com.github.cpoopc:scrollablelayoutlib:1.0.1'
//RecyclerViewHeader
compile 'com.bartoszlipinski:recyclerviewheader2:2.0.1'
compile 'com.sothree.slidinguppanel:library:3.3.1'
二、程序实现
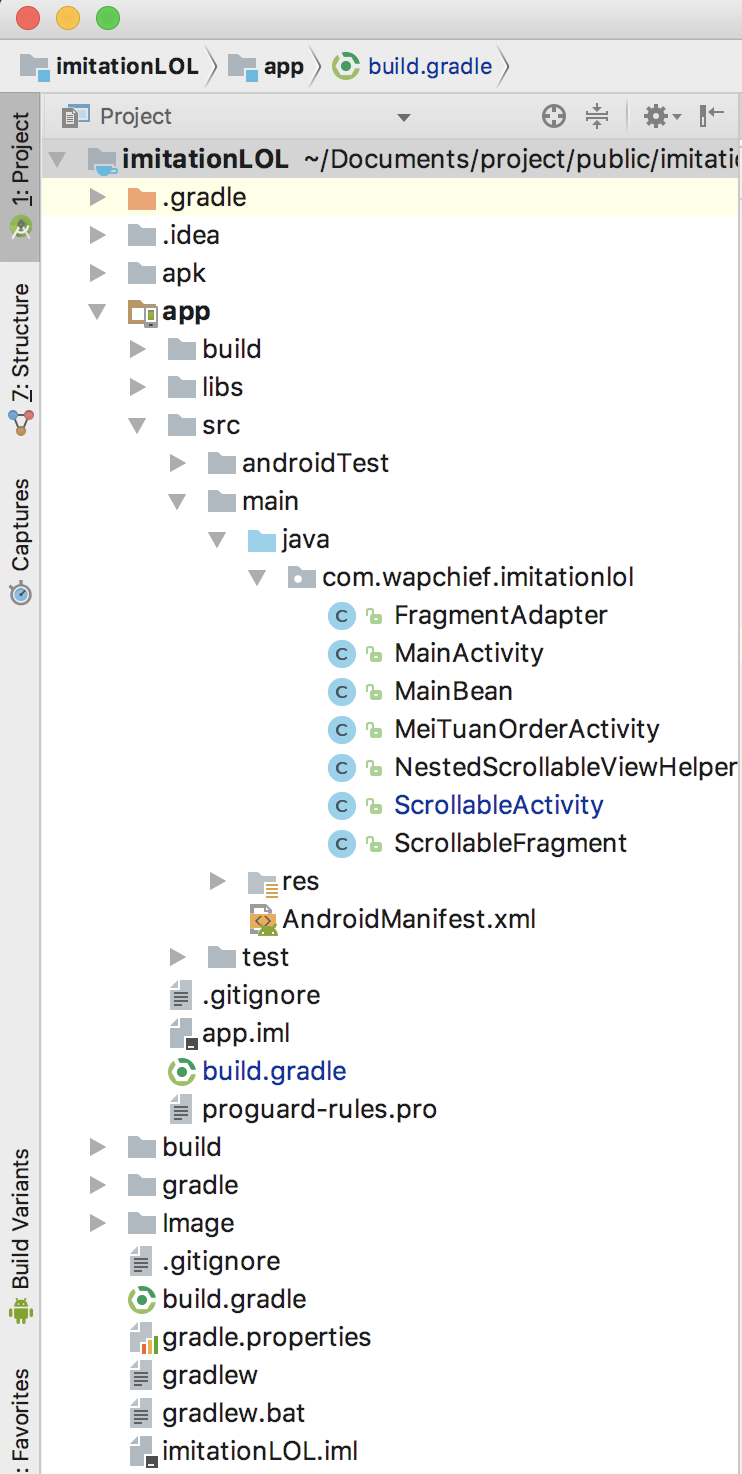
工程截图:

整个页面是一个Activity,最外层是刷新控件,然后是标题栏和折叠布局ScrollableLayout。
<com.cjj.MaterialRefreshLayout xmlns:android="http://schemas.android.com/apk/res/android"
    xmlns:app="http://schemas.android.com/apk/res-auto"
    android:layout_width="match_parent"
    android:layout_height="match_parent">

    <RelativeLayout
        android:layout_width="match_parent"
        android:layout_height="match_parent">

        <com.cpoopc.scrollablelayoutlib.ScrollableLayout
            android:id="@+id/scrollablelayout"
            android:layout_width="match_parent"
            android:layout_height="match_parent"
            android:layout_marginTop="16dp"
            android:orientation="vertical">

        </com.cpoopc.scrollablelayoutlib.ScrollableLayout>

        <include layout="@layout/title_bar" />
    </RelativeLayout>
</com.cjj.MaterialRefreshLayout>
ScrollableLayout里面嵌套了轮播图、tablayout、viewpager。
  <com.cpoopc.scrollablelayoutlib.ScrollableLayout            android:id="@+id/scrollablelayout"
            android:layout_width="match_parent"
            android:layout_height="match_parent"
            android:layout_marginTop="16dp"
            android:orientation="vertical">
            <!--header-->
            <com.youth.banner.Banner                android:id="@+id/header"
                android:layout_width="match_parent"
                android:layout_height="200dp" />

            <!--置顶的部分-->
            <android.support.design.widget.TabLayout                android:id="@+id/tab"
                android:layout_width="match_parent"
                android:layout_height="50dp"
                android:background="@color/white"
                app:tabIndicatorColor="@color/tab_select"
                app:tabMode="scrollable"
                app:tabSelectedTextColor="@color/tab_select" />
            <!--滚动视图-->
            <android.support.v4.view.ViewPager                android:id="@+id/vp"
                android:layout_width="match_parent"
                android:layout_height="match_parent" />
        </com.cpoopc.scrollablelayoutlib.ScrollableLayout>
然后切换是通过tab和viewpager联动加载的Fragment
Fragment中列表用的是RecyclerView,然后再给RecyclerView添加了一个Header,实现推荐功能。
<ScrollView xmlns:android="http://schemas.android.com/apk/res/android"
    android:layout_width="match_parent"
    android:layout_height="match_parent"
    >
    <RelativeLayout
        android:layout_width="match_parent"
        android:layout_height="match_parent">

        <android.support.v7.widget.RecyclerView
            android:layout_width="match_parent"
            android:id="@+id/fragment_lv"
            android:paddingLeft="12dp"
            android:paddingRight="12dp"
            android:nestedScrollingEnabled="false"
            android:layout_height="match_parent"/>

        <com.bartoszlipinski.recyclerviewheader2.RecyclerViewHeader
            android:id="@+id/header"
            android:layout_width="match_parent"
            android:layout_gravity=""
            android:nestedScrollingEnabled="false"
            android:layout_height="60dp"/>
    </RelativeLayout>
</ScrollView>
创建布局需要注意的问题
-
ScrollView和RecyclerView滚动冲突,造成滑动不流畅。
需要在RecyclerView设置android:nestedScrollingEnabled=”false”属性,使滚动事件交给ScrollView处理。 -
添加RecyclerViewHeader的时候,父布局只能识别RelativeLayout 、LinearLayout、和FrameLayout这三种控件。
-
ScrollableLayout子布局是固定的格式,分为三部分。
设置好布局后,进行数据的填充,先操作activty中的元素
实例化控件直接用ButterKnife一键绑定了。直接加载控件数据。
   private void initView() {        //加载轮播图数据
        initBanner();        //TabLayout
        initTabLayout();        //创建Fragment
        initFragment();        //监听滚动状态
        initOnClickScroll();
    }
随便在网上找了三张图片,使用Picasso框架完成图片的加载。
start开启轮播。
这时候打开app就能看到效果了。
该框架支持多种轮播样式风格,根据需要自己设置。
    /*轮播*/
    private void initBanner() {        //圆形指示器
        header.setBannerStyle(BannerConfig.CIRCLE_INDICATOR);        //指示器居中
        header.setIndicatorGravity(BannerConfig.CENTER);
        img.add("http://m.beequick.cn/static/bee/img/m/boot_logo-275a61e3.png");
        img.add("http://m.beequick.cn/static/bee/img/m/boot_logo-275a61e3.png");
        img.add("http://m.beequick.cn/static/bee/img/m/boot_logo-275a61e3.png");        header.setImageLoader(new ImageLoader() {
            @Override            public void displayImage(Context context, Object o, ImageView imageView) {
                Picasso.with(context)                        .load(url)                        .into(imageView);
            }
        });        header.setImages(img);        header.start();
    }
然后进行tablayout的初始化
 private String[] titles = new String[]{"最新", "专栏", "官方", "活动", "攻略", "娱乐", "收藏"};    /*初始化tab标签*/
    private void initTabLayout() {        for (int i=0;i<titles.length;i++){
            tab.addTab(tab.newTab().setText(titles[i]));
        }

    }
上面只是装载了标签数据,通过setupWithViewPager关联viewpager
    /*初始化Fragment*/
    private void initFragment() {
     ScrollableFragment fragment = new ScrollableFragment();
        ScrollableFragment fragment1 = new ScrollableFragment();
        ScrollableFragment fragment2 = new ScrollableFragment();
        ScrollableFragment fragment3 = new ScrollableFragment();
        ScrollableFragment fragment4 = new ScrollableFragment();
        ScrollableFragment fragment5 = new ScrollableFragment();
        ScrollableFragment fragment6 = new ScrollableFragment();
        fragmentList.add(fragment);
        fragmentList.add(fragment1);
        fragmentList.add(fragment2);
        fragmentList.add(fragment3);
        fragmentList.add(fragment4);
        fragmentList.add(fragment5);
        fragmentList.add(fragment6);
        adapterVP = new ViewPagerAdapter(getSupportFragmentManager());
        vp.setAdapter(adapterVP);
        tab.setupWithViewPager(vp);
    }
如果到这一步运行app,发现tab标签的状态或者颜色没有选中的效果,检查viewpager的adapter是否重写了getPageTitle方法
 public CharSequence getPageTitle(int position) {            return titles[position];
        }
到这里已经完成了acticity的工作,但是我们还要实现标题栏渐变消失的效果。
在android中大多数跟滚动有关的控件,都有自己的滚动监听事件,来让开发者调用,以实现高级的效果。
而这里用的是ScrollableLayout控件,该控件内部也是基于ScrollView滚动,所以在内部给我们封装好了监听事件,直接调动监听方法就可以
  /*滚动监听*/
    private void initOnClickScroll() {
        scrollablelayout.setOnScrollListener(new ScrollableLayout.OnScrollListener() {            @Override
            public void onScroll(int i, int i1) {                if (i >= i1) {
                    title.setVisibility(View.GONE);
                } else {
                    title.setVisibility(View.VISIBLE);
                }                //通过距离设置渐变效果
                float scale = (float) i1-i;                float alpha = (255 * scale);                float alpha2 = scale/i1*150;                float alphaTv = scale / i1 * 255;
                title.setBackgroundColor(Color.argb((int) alpha2, 0, 0, 0));
                titleBarTitle.setTextColor(Color.argb((int) alphaTv, 198, 166, 102));
                titleBarContent.setTextColor(Color.argb((int) alphaTv,198,166,102));
            }
        });
    }
onScroll有两个属性,一个I是滚动的距离,是根据手势滑动的距离计算出的距离,i1是从开始滚动到header消失这之间的总距离。也就是固定的。
为了区别,这里加了标题栏的显示和隐藏,当底部滚动视图置顶的时候,也就是i=i1的时候,就把标题栏隐藏掉。
但是我们这里是需要一个渐变隐藏的效果,也就是让控件背景颜色从不透明到全透明的实时渐变的一个过程。
颜色需要用到argb,有四个参数,第一个就是透明度,
如果需要递增则用255 * scale
递减用scale / i1 * 255
需要半透的话,把255再除以2。
Fragment里面需要操作的东西就少了
两行代码就实现了headerview的添加
  private void initAdapter() {
        View headerView = View.inflate(getContext(), R.layout.view_header, null);
        LinearLayoutManager layoutManager = new LinearLayoutManager(getActivity());
        recyclerView.setLayoutManager(layoutManager);        header.addView(headerView);        header.attachTo(recyclerView);
        adapter = new FragmentAdapter(data, getActivity());        //分割线
        recyclerView.addItemDecoration(new DividerItemDecoration(getActivity(), DividerItemDecoration.VERTICAL));
        recyclerView.setAdapter(adapter);
    }
三、运行效果

四、其他补充
其实要实现这种效果的方法还有很多,比如利用Design库中的CoordinatorLayout,和AppBarLayout结合来用,也能实现折叠效果。包括GitHub也有一些开源的库可供我们选择使用,像ScrollableLayout 、ObservableScrollView这些都是非常优秀的框架。在实际项目中节省了很多开发时间。唯一的时间成本就是我们学习这些框架的时间,当熟练运用之后,这些看似复杂的东西,可能只需要短短的几分钟而已