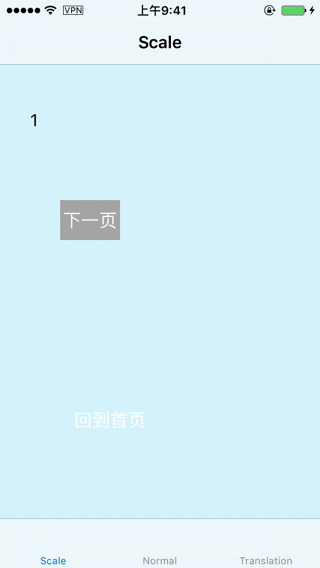
运行效果
实现思路
创建pan手势,添加到页面中,监听手势的动作。重写push的方法,在push之前截图保存到数组。重写pop的方法,在pop之前删除截图。pop的动画效果是利用截图的image添加到topView上,从视觉效果上实现缩放、平移的动画效果。以下是具体的实现思路:
1.创建Pan手势识别器
 delegate = self
        let panRecognizer = UIPanGestureRecognizer(target: self, action: #selector(paningGestureReceive(recoginzer:)))
        panRecognizer.delegate = self
        view.addGestureRecognizer(panRecognizer)
        //实现侧滑返回
        interactivePopGestureRecognizer?.delegate = self
2.实现手势的相应事件
//MARK: - Events
    @objc func paningGestureReceive(recoginzer:UIPanGestureRecognizer) {
        //如果只有一个控制器或者不允许全屏返回,return
        if self.viewControllers.count <= 1 || !canDragBack {
            return
        }

        let touchPoint = recoginzer.location(in: UIApplication.shared.keyWindow)

        switch recoginzer.state {
        case .began:
            isMoving = true
            startTouch = touchPoint
            if backgroundView == nil {
                let frame = TOP_VIEW?.frame
                backgroundView = UIView(frame: CGRect(x: 0, y: 0,  (frame?.size.width)!, height: (frame?.size.height)!))
                TOP_VIEW?.superview?.insertSubview(backgroundView!, belowSubview: TOP_VIEW!)

                blackMask = UIView(frame: CGRect(x: 0, y: 0,  (frame?.size.width)!, height: (frame?.size.height)!))
                blackMask?.backgroundColor = UIColor.black
                backgroundView?.addSubview(blackMask!)
            }
            backgroundView?.isHidden = false
            if lastScreenShotView != nil {
                lastScreenShotView?.removeFromSuperview()
            }

            let lastScreenShot = screenShotsList.lastObject as! UIImage
            lastScreenShotView = UIImageView(image: lastScreenShot)
            backgroundView?.insertSubview(lastScreenShotView!, belowSubview: blackMask!)

           break
        case .ended:
            //手势结束,判断是返回还是回到原位
            if touchPoint.x - (startTouch?.x)! > 50 {
                UIView.animate(withDuration: 0.3, animations: {
                    self.moveView(withX: self.kMAXWidth)
                }, completion: { (finished:Bool) in
                    self.popViewController(animated: false)
                    var frame = self.TOP_VIEW?.frame
                    frame?.origin.x = 0
                    self.TOP_VIEW?.frame = frame!
                    self.isMoving = false
                    self.backgroundView?.isHidden = true
                    // End paning,remove last screen shot
                    self.customAnimation.removeLastScreenShot()
                })
            } else {
                UIView.animate(withDuration: 0.3, animations: {
                    self.moveView(withX: 0)
                }, completion: { (finished:Bool) in
                    self.isMoving = false
                    self.backgroundView?.isHidden = true
                })
            }
           return //直接返回,不在往下执行
        case .cancelled:
            UIView.animate(withDuration: 0.3, animations: {
                self.moveView(withX: 0)
            }, completion: { (finished:Bool) in
                self.isMoving = false
                self.backgroundView?.isHidden = true
            })
            return
        default:
            break
        }
        if isMoving! {
            self.moveView(withX: touchPoint.x - (startTouch?.x)!)
        }
    }
3.创建截图需要的backgroundView和作为遮罩的blackMask,存放截图所需的数组
if backgroundView == nil {
                let frame = TOP_VIEW?.frame
                backgroundView = UIView(frame: CGRect(x: 0, y: 0,  (frame?.size.width)!, height: (frame?.size.height)!))
                TOP_VIEW?.superview?.insertSubview(backgroundView!, belowSubview: TOP_VIEW!)

                blackMask = UIView(frame: CGRect(x: 0, y: 0,  (frame?.size.width)!, height: (frame?.size.height)!))
                blackMask?.backgroundColor = UIColor.black
                backgroundView?.addSubview(blackMask!)
            }
            backgroundView?.isHidden = false
            if lastScreenShotView != nil {
                lastScreenShotView?.removeFromSuperview()
            }

            let lastScreenShot = screenShotsList.lastObject as! UIImage
            lastScreenShotView = UIImageView(image: lastScreenShot)
            backgroundView?.insertSubview(lastScreenShotView!, belowSubview: blackMask!)
4.在push前截图,并保存
override func pushViewController(_ viewController: UIViewController, animated: Bool) {
        if self.viewControllers.count >= 1 {
            let screenshot = getScreenshot()
            if screenshot != nil {
                screenShotsList.add(screenshot!)
            }
        }
        super.pushViewController(viewController, animated: animated)
    }
5.重写常用的pop方法,在pop前删除相应的截图
@discardableResult
    override func popViewController(animated: Bool) -> UIViewController? {
        screenShotsList.removeLastObject()
        return super.popViewController(animated: animated)
    }

    override func popToViewController(_ viewController: UIViewController, animated: Bool) -> [UIViewController]? {
        var removeCount = 0
        for i in stride(from: viewControllers.count-1, to: 0, by: -1) {
            if viewController == viewControllers[i] {
                break
            }
            screenShotsList.removeLastObject()
            removeCount = removeCount+1
        }
        customAnimation.removeCount = removeCount
        return super.popToViewController(viewController, animated: animated)
    }

    override func popToRootViewController(animated: Bool) -> [UIViewController]? {
        screenShotsList.removeAllObjects()
        customAnimation.removeAllScreenShot()
        return super.popToRootViewController(animated: animated)
    }
到此处能实现手势整体返回的效果,要实现点击返回按钮也能整体返回,需要自定义返回动画。实现协议UIViewControllerAnimatedTransitioning。
6.让navigationController遵守UINavigationControllerDelegate实现下面的方法,在方法里面可根据operation判断需要自定义的类型(pop/push)
 func navigationController(_ navigationController: UINavigationController,
 animationControllerFor operation: UINavigationControllerOperation,
 from fromVC: UIViewController,
  to toVC: UIViewController) -> UIViewControllerAnimatedTransitioning?
7.使用一个类实现UIViewControllerAnimatedTransitioning协议
func transitionDuration(using transitionContext: UIViewControllerContextTransitioning?) -> TimeInterval

//定义动画
func animateTransition(using transitionContext: UIViewControllerContextTransitioning)
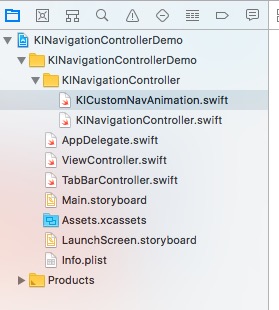
项目结构图
 KINavigationController使用演示例子
注:本文著作权归作者,由demo大师代发,拒绝转载,转载需要作者授权