SM框架整合
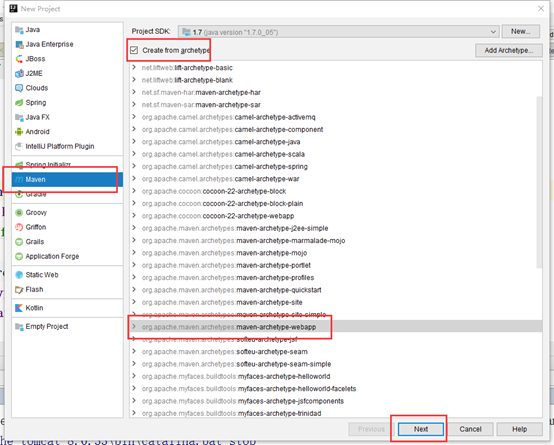
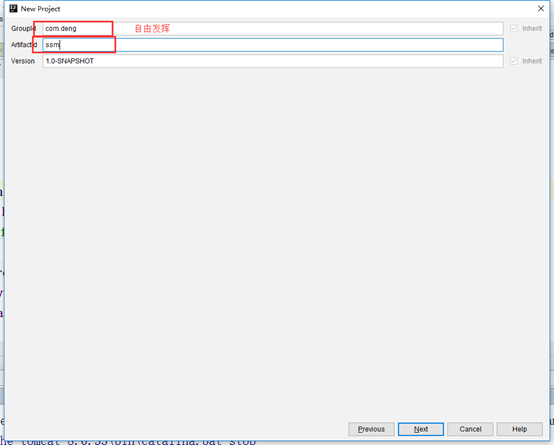
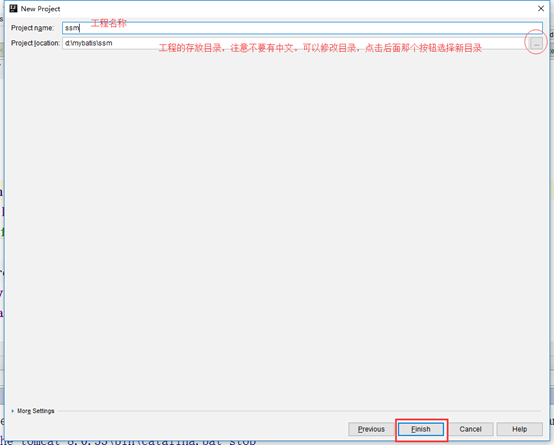
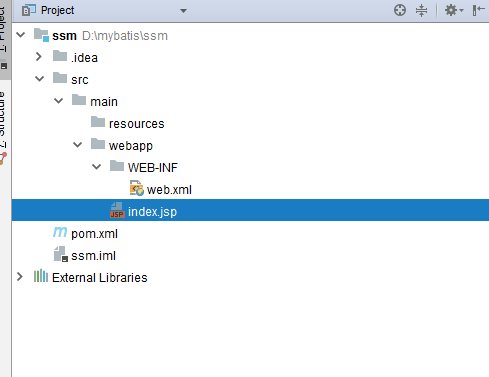
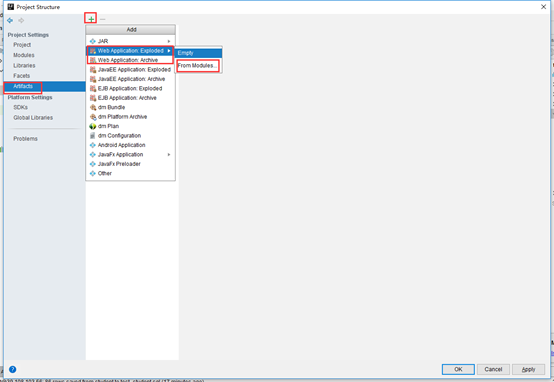
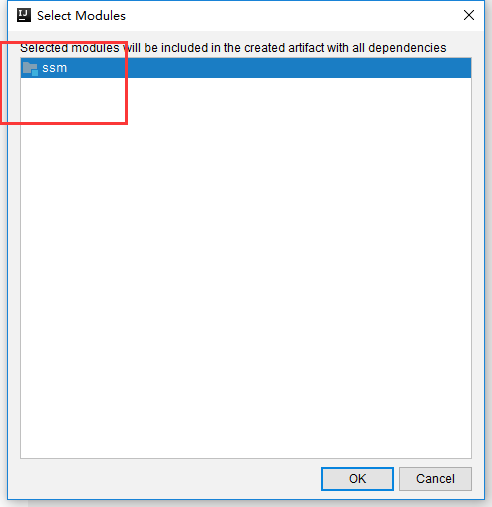
1 使用idea创建一个maven webapp项目


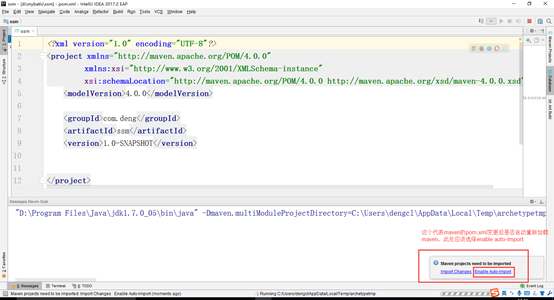
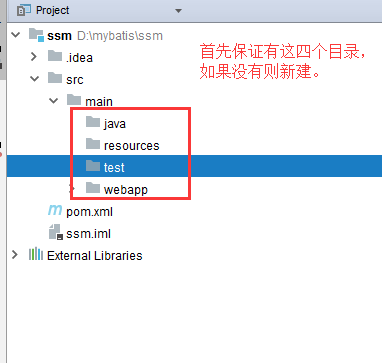
到此为止项目初步建立,需要等待maven对项目结构进行组织,直到状态栏的进度条完成,且项目的目录结构如下:
2 因为是SSM,需要操作数据库,现在准备数据以及表,此处选择mysql数据库
2.1 准备表
-- auto-generated definition
create table student
(
 ID int auto_increment
  primary key,
 stuName varchar(32) null,
 stuAge tinyint null,
 mobile varchar(11) null,
 address varchar(256) null,
 EntranceTime date null
)
;
2.2 准备初始化数据
INSERT INTO test.student (stuName, stuAge, mobile, address, EntranceTime) VALUES ('何靖', 8, '110', '天府三街', '2017-06-06');
INSERT INTO test.student (stuName, stuAge, mobile, address, EntranceTime) VALUES ('小强', 18, '69776977', '中和镇', '2017-06-06');
INSERT INTO test.student (stuName, stuAge, mobile, address, EntranceTime) VALUES ('小迪', 22, '1456789', '天华苑', '2017-06-01');
INSERT INTO test.student (stuName, stuAge, mobile, address, EntranceTime) VALUES ('情歌', 24, '6454422', '成都', '2017-05-31');
INSERT INTO test.student (stuName, stuAge, mobile, address, EntranceTime) VALUES ('周三', 23, '1223154', '德阳', '2017-06-01');
INSERT INTO test.student (stuName, stuAge, mobile, address, EntranceTime) VALUES ('红牛', 32, '120', '黄山', '2017-05-31');
INSERT INTO test.student (stuName, stuAge, mobile, address, EntranceTime) VALUES ('大米', 16, '180', '新希望', '2017-06-04');
INSERT INTO test.student (stuName, stuAge, mobile, address, EntranceTime) VALUES ('小米', 22, '180', '贝立美', '2017-06-04');
INSERT INTO test.student (stuName, stuAge, mobile, address, EntranceTime) VALUES ('黑米', 36, '180', '新希望', '2017-06-04');
INSERT INTO test.student (stuName, stuAge, mobile, address, EntranceTime) VALUES ('红米', 24, '180', '一楼', '2017-06-04');
INSERT INTO test.student (stuName, stuAge, mobile, address, EntranceTime) VALUES ('大豆', 25, '180', '二流', '2017-06-04');
INSERT INTO test.student (stuName, stuAge, mobile, address, EntranceTime) VALUES ('绿豆', 26, '180', '三楼', '2017-06-04');
INSERT INTO test.student (stuName, stuAge, mobile, address, EntranceTime) VALUES ('灰豆', 19, '180', '四楼', '2017-06-04');
INSERT INTO test.student (stuName, stuAge, mobile, address, EntranceTime) VALUES ('欧阳修', 23, '122', '五棵松', '2017-05-28');
INSERT INTO test.student (stuName, stuAge, mobile, address, EntranceTime) VALUES ('韩明', 12, '120', '鸟巢', '2017-05-29');
INSERT INTO test.student (stuName, stuAge, mobile, address, EntranceTime) VALUES ('李修', 21, '120', '长安', '2017-06-14');
INSERT INTO test.student (stuName, stuAge, mobile, address, EntranceTime) VALUES ('韩梅梅', 12, '2132354354', '大坪', '2017-06-01');
INSERT INTO test.student (stuName, stuAge, mobile, address, EntranceTime) VALUES ('东北F4', 99, '121313121', '铁岭', '2017-06-01');
INSERT INTO test.student (stuName, stuAge, mobile, address, EntranceTime) VALUES ('赵四', 32, '44111221', '东北', '2017-06-07');
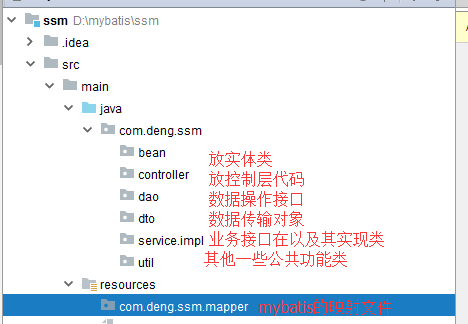
3 对项目目录结构进行完善
3.1 JDK环境确认
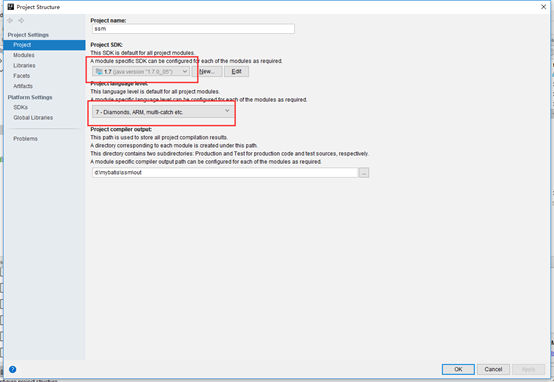
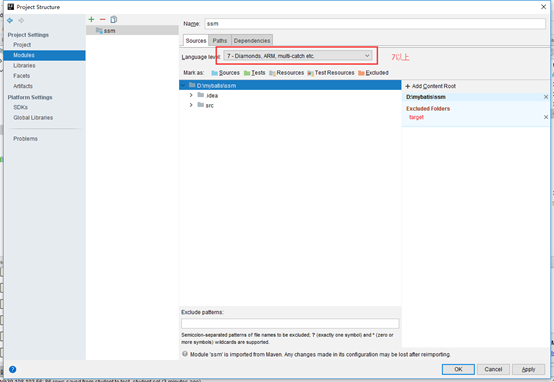
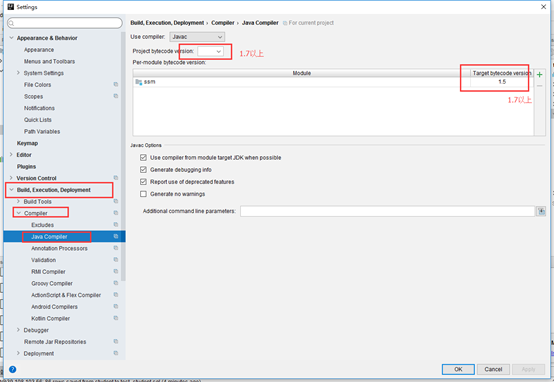
3.2 编译环境确认
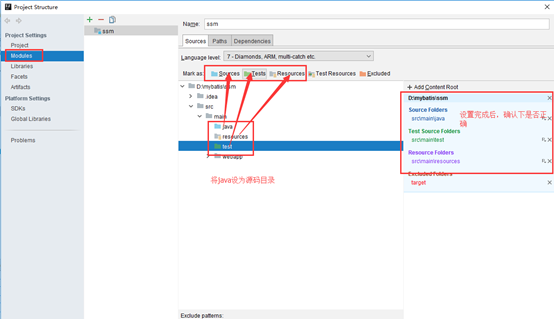
3.3 配置源码、资源、web、测试的目录
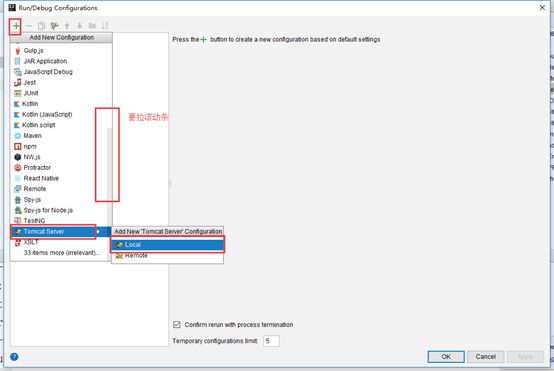
3.4 配置web容器tomcat
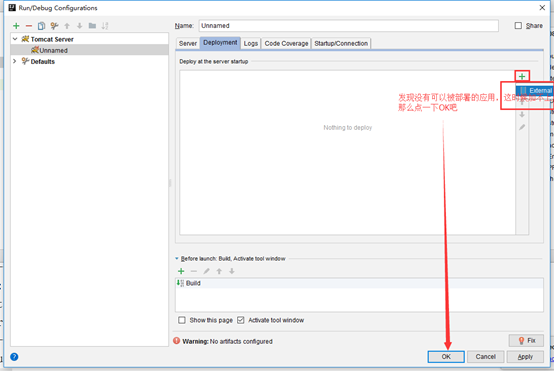
- 点击菜单中run-edit configurations打开运行配置的界面

先不要点OK,记住哦。
3.5 建立常见的代码包结构
4 增加必要的依赖
通过在pom.xml中增加相关依赖。
4.1 增加阿里云的maven远程库,加快依赖加载速度。
<!-- 阿里云maven资源库 -->
<repositories>
  <repository>
    <id>alimaven</id>
    <name>aliyun maven</name>
    <url>http://maven.aliyun.com/nexus/content/groups/public/</url>
  </repository>
</repositories>
4.2 增加jstl与javaee的相关依赖
<!-- 添加jstl依赖 -->
<dependency>
  <groupId>jstl</groupId>
  <artifactId>jstl</artifactId>
  <version>1.2</version>
</dependency>
<dependency>
  <groupId>javax</groupId>
  <artifactId>javaee-api</artifactId>
  <version>7.0</version>
</dependency>
4.3 增加数据库相关依赖
<!-- 添加mysql驱动依赖 -->
<dependency>
  <groupId>mysql</groupId>
  <artifactId>mysql-connector-java</artifactId>
  <version>5.1.41</version>
</dependency>
4.4 增加JUNIT相关依赖
<!-- 添加junit4依赖 -->
<dependency>
  <groupId>junit</groupId>
  <artifactId>junit</artifactId>
  <version>4.12</version>
  <!-- 指定范围,在测试时才会加载 -->
  <scope>test</scope>
</dependency>
4.5 增加mybatis相关依赖
<!-- 添加mybatis依赖 -->
<dependency>
  <groupId>org.mybatis</groupId>
  <artifactId>mybatis</artifactId>
  <version>3.2.8</version>
</dependency>

<!--CGLIB&asm 用于mybaitis缓存以及spring中的一些依赖-->
<dependency>
  <groupId>cglib</groupId>
  <artifactId>cglib-nodep</artifactId>
  <version>3.1</version>
</dependency>
<dependency>
  <groupId>asm</groupId>
  <artifactId>asm</artifactId>
  <version>3.3.1</version>
</dependency>
4.6 增加spring 核心相关依赖
<!-- 添加spring核心依赖 -->
<dependency>
  <groupId>org.springframework</groupId>
  <artifactId>spring-core</artifactId>
  <version>4.2.5.RELEASE</version>
</dependency>
<dependency>
  <groupId>org.springframework</groupId>
  <artifactId>spring-context</artifactId>
  <version>4.2.5.RELEASE</version>
</dependency>
<dependency>
  <groupId>org.springframework</groupId>
  <artifactId>spring-context-support</artifactId>
  <version>4.2.5.RELEASE</version>
</dependency>
<!-- spring aop -->
<dependency>
  <groupId>org.springframework</groupId>
  <artifactId>spring-aop</artifactId>
  <version>4.2.5.RELEASE</version>
</dependency>
<dependency>
  <groupId>org.springframework</groupId>
  <artifactId>spring-aspects</artifactId>
  <version>4.2.5.RELEASE</version>
</dependency>

<!-- spring test-->
<dependency>
  <groupId>org.springframework</groupId>
  <artifactId>spring-test</artifactId>
  <version>4.2.5.RELEASE</version>
  <scope>test</scope>
</dependency>
4.7 增加spring与mybatis集成的相关依赖
<!-- spring的数据库操作需求的依赖包-->
<dependency>
    <groupId>org.springframework</groupId>
    <artifactId>spring-oxm</artifactId>
    <version>${spring.version}</version>
</dependency>
<dependency>
    <groupId>org.springframework</groupId>
    <artifactId>spring-tx</artifactId>
    <version>${spring.version}</version>
</dependency>
<dependency>
    <groupId>org.springframework</groupId>
    <artifactId>spring-jdbc</artifactId>
    <version>${spring.version}</version>
</dependency>

<!-- 添加mybatis/spring整合包依赖 -->
<dependency>
  <groupId>org.mybatis</groupId>
  <artifactId>mybatis-spring</artifactId>
  <version>1.2.2</version>
</dependency>

<!-- 添加数据库连接池C3P0依赖 -->
<dependency>
  <groupId>c3p0</groupId>
  <artifactId>c3p0</artifactId>
  <version>0.9.1.1</version>
</dependency>
4.8 增加springmvc相关依赖
<!-- spring mvc 依赖库-->
<dependency>
  <groupId>org.springframework</groupId>
  <artifactId>spring-webmvc</artifactId>
  <version>4.2.5.RELEASE</version>
</dependency>
4.9 增加jackson相关依赖
<dependency>
  <groupId>com.fasterxml.jackson.core</groupId>
  <artifactId>jackson-databind</artifactId>
  <version>2.8.8</version>
</dependency>
4.10 增加文件上传相关依赖
<dependency>
  <groupId>commons-fileupload</groupId>
  <artifactId>commons-fileupload</artifactId>
  <version>1.3.1</version>
</dependency>
<dependency>
  <groupId>commons-io</groupId>
  <artifactId>commons-io</artifactId>
  <version>2.4</version>
</dependency>
4.11 增加日志相关依赖
<!-- 添加日志相关jar包 -->
<dependency>
  <groupId>log4j</groupId>
  <artifactId>log4j</artifactId>
  <version>1.2.17</version>
</dependency>
<dependency>
  <groupId>org.slf4j</groupId>
  <artifactId>slf4j-api</artifactId>
  <version>1.7.18</version>
</dependency>
<dependency>
  <groupId>org.slf4j</groupId>
  <artifactId>slf4j-log4j12</artifactId>
  <version>1.7.18</version>
</dependency>
4.12 增加其他依赖
<dependency>
  <groupId>org.apache.commons</groupId>
  <artifactId>commons-lang3</artifactId>
  <version>3.5</version>
</dependency>
4.13 添加mybatis的分页组件
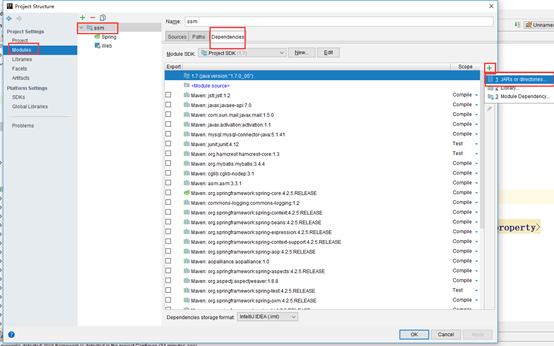
- 将pageutil.jar拷贝到WEB-INF/lib目录,如果没有则创建
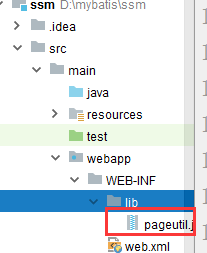
- 将pageutil.jar添加到编译环境。
5 配置mybatis
在resource目录下建立mybatis.xml
<?xml version="1.0" encoding="UTF-8" ?>
<!DOCTYPEconfiguration
        PUBLIC"-//mybatis.org//DTD Config 3.0//EN"
        "http://mybatis.org/dtd/mybatis-3-config.dtd">
<configuration>
    <settings>
        <!-- 这个配置使全局的映射器启用或禁用缓存 -->
        <setting name="cacheEnabled" value="false"/>
        <!-- 全局启用或禁用延迟加载。当禁用时,所有关联对象都会即时加载 -->
        <setting name="lazyLoadingEnabled" value="true"/>
        <!-- 当启用时,有延迟加载属性的对象在被调用时将会完全加载任意属性。否则,每种属性将会按需要加载 -->
        <setting name="aggressiveLazyLoading" value="false"/>
        <!-- 当启用时,字段自动映射为驼峰形式  -->
        <setting name="mapUnderscoreToCamelCase" value="true"/>
        <!-- 指定MyBatis如何自动映射列到字段/属性。PARTIAL只会自动映射简单,没嵌套的结果。FULL会自动映射有任意复杂的结果(嵌套的或其他情况)-->
        <setting name="autoMappingBehavior" value="PARTIAL"/>
    </settings>
    <!-- 别名定义 -->
    <typeAliases>
        <!-- 针对包定义别名,以后在mybaits的mapper文件中,使用这个包中的类可以直接写类名就好了 -->
        <package name="com.deng.ssm.bean"/>
    </typeAliases>

    <!--添加自定插件,此插件用于分页,其实现在pageutil.jar中-->
    <plugins>
        <plugin interceptor="page.PageInterceptor">
            <!--指定数据库方言为mysql-->
            <property name="dialect" value="page.dialect.MySQLDialect"></property>
        </plugin>
    </plugins>
</configuration>
6 定义数据库连接的相关属性信息
在resource目录下新建文件jbdc.properties
driver=com.mysql.jdbc.Driver
url=jdbc:mysql://39.108.103.56:3306/test?useUnicode=true&characterEncoding=UTF-8
username=root
password=10@idccom
#定义初始连接数
initialSize=2
#定义最大连接数
maxActive=20
#定义最小连接数
minActive=2
#定义最长等待时间
maxWait=60000
#是否在连接关闭时自动提交事务
autoCommitOnClose=false
#当获取连接失败重试次数
acquireRetryAttempts=2
7 实现spring以及与mybatis的整合的配置
在resource目录下新建spring-mybaits.xml
<?xml version="1.0" encoding="UTF-8"?>
<beans xmlns="http://www.springframework.org/schema/beans"
       xmlns:xsi="http://www.w3.org/2001/XMLSchema-instance"
       xmlns:context="http://www.springframework.org/schema/context"
       xmlns:tx="http://www.springframework.org/schema/tx"
       xmlns:aop="http://www.springframework.org/schema/aop"
       xsi:schemaLocation="http://www.springframework.org/schema/beans
                        http://www.springframework.org/schema/beans/spring-beans-4.0.xsd
                        http://www.springframework.org/schema/context
                        http://www.springframework.org/schema/context/spring-context-4.0.xsd
                        http://www.springframework.org/schema/tx
                        http://www.springframework.org/schema/tx/spring-tx-4.0.xsd
                         http://www.springframework.org/schema/aop
                        http://www.springframework.org/schema/aop/spring-aop-4.0.xsd
                        ">
    <!-- 自动扫描 -->
    <context:component-scan base-package="com.deng.ssm.service" />
    <!-- 引入实现JDBC配置文件 -->
    <bean id="propertyConfigurer"
          class="org.springframework.beans.factory.config.PropertyPlaceholderConfigurer">
        <property name="location" value="classpath:jdbc.properties" />
    </bean>


    <!-- 2.数据库连接池 -->
    <bean id="dataSource" class="com.mchange.v2.c3p0.ComboPooledDataSource">
        <!-- 配置连接池属性 -->
        <!-- 此处 ${Driver} 中的 ${属性名} 是访问属性文件中的指定属性-->
        <property name="driverClass" value="${driver}" />
        <property name="jdbcUrl" value="${url}" />
        <property name="user" value="${username}" />
        <property name="password" value="${password}" />
        <!-- c3p0连接池的私有属性 -->
        <property name="maxPoolSize" value="${maxActive}" />
        <property name="minPoolSize" value="${minActive}" />
        <property name="initialPoolSize" value="${initialSize}"/>
        <!-- 关闭连接后不自动commit -->
        <property name="autoCommitOnClose" value="${autoCommitOnClose}" />
        <!-- 获取连接超时时间 -->
        <property name="checkoutTimeout" value="${maxWait}" />
        <!-- 当获取连接失败重试次数 -->
        <property name="acquireRetryAttempts" value="2" />
    </bean>

    <!-- spring和MyBatis整合,通过spring来管理MyBatis的SqlSessionFactory会话工厂 -->
    <bean id="sqlSessionFactory" class="org.mybatis.spring.SqlSessionFactoryBean">
        <!--  指定数据库连接池引用 -->
        <property name="dataSource" ref="dataSource" />
        <!--  指定mybatis的配置文件路径,该配置文件下不需要再定义数据库连接信息和mapper信息了,但是可以
        有一些关于mybatis的配置信息-->
        <property name="configLocation" value="classpath:mybatis.xml"/>
        <!-- 指定mybatis的mapper配置文件路径,*代表通配符所有的意思
         value可以指定多个,由英文逗号分隔
         -->
        <property name="mapperLocations" value="classpath:com/deng/ssm/mapper/*.xml"></property>
    </bean>

    <!-- 定义sqlSession对象,通过SqlSessionTemplate来产生,需要在构造方法中指定会话工厂
     相当于原来mybatis中的sessionFactory.openSession();SqlSessionTemplate是线程安全的,所以采用单例模式
     -->
    <bean id="sqlSessionTemplate" class="org.mybatis.spring.SqlSessionTemplate" destroy-method="clearCache">
        <!--注入会话工厂-->
        <constructor-arg index="0" ref="sqlSessionFactory"/>
        <!--定义采用何种形式操作数据库,需要注意若是BATCH的话增删改返回的将不是影响的行数
        默认为SIMPLE-->
        <!--<constructor-arg index="1" value="BATCH"/>-->
    </bean>

    <!--
        定义mybaits的DAO接口所在的包名,spring会自动查找其下的接口,并为其自动创建bean,无需我们定义
     -->
    <bean class="org.mybatis.spring.mapper.MapperScannerConfigurer">
        <property name="basePackage" value="com.deng.ssm.dao" />
        <property name="sqlSessionTemplateBeanName" value="sqlSessionTemplate"/>
    </bean>


    <!-- (事务管理)transaction manager, use JtaTransactionManager for global tx -->
    <bean id="transactionManager" class="org.springframework.jdbc.datasource.DataSourceTransactionManager">
        <property name="dataSource" ref="dataSource"/>
    </bean>
    <!-- (事务管理)使用注解的方式来管理实务 -->
    <!--<tx:annotation-driven transaction-manager="transactionManager"/>-->
    <!-- 定义事务的切面(通知) -->
    <tx:advice id="txAdvice" transaction-manager="transactionManager" >
        <tx:attributes >
            <!-- 定义方法的事务规则 -->
            <tx:method  name="add*" propagation="REQUIRED" />
            <tx:method name="insert*" propagation="REQUIRED"/>
            <tx:method name="update*" propagation="REQUIRED"/>
            <tx:method name="del*" propagation="REQUIRED"/>
            <tx:method name="modify*" propagation="REQUIRED"/>
            <tx:method name="*" propagation="NEVER" read-only="true"/>
        </tx:attributes>
    </tx:advice>

    <!--通过AOP启用事务-->
    <aop:config>
        <aop:pointcut id="pt" expression="execution(* com.deng.ssm.service.impl.*.*(..))"/>
        <aop:advisor advice-ref="txAdvice" pointcut-ref="pt" />
    </aop:config>
</beans>
8 Spring mvc的配置
在resource目录下新建spring-mvc.xml
<beans xmlns="http://www.springframework.org/schema/beans"
       xmlns:xsi="http://www.w3.org/2001/XMLSchema-instance"
       xmlns:context="http://www.springframework.org/schema/context"
       xmlns:mvc="http://www.springframework.org/schema/mvc"
       xsi:schemaLocation="http://www.springframework.org/schema/beans
       http://www.springframework.org/schema/beans/spring-beans-4.0.xsd
       http://www.springframework.org/schema/context
       http://www.springframework.org/schema/context/spring-context-4.0.xsd
       http://www.springframework.org/schema/mvc
       http://www.springframework.org/schema/mvc/spring-mvc-4.0.xsd
">

    <!-- 定义自动扫描包的路径,在此处仅扫描Controller所在的包,如果有多个需要逗号分隔。
    需要注意:此处扫描和spring的自动扫描的包不要出现重叠
    -->
    <context:component-scan base-package="com.deng.ssm.controller"/>
    <!-- spring 3.2版本之后可以不用配置 -->
    <context:annotation-config/>
    <!-- 在springMVC-servlet.xml中配置<mvc:default-servlet-handler />后,会在Spring MVC上下文中定义一个
    org.springframework.web.servlet.resource.DefaultServletHttpRequestHandler,它会像一个检查员,
    对进入DispatcherServlet的URL进行筛查,如果发现是静态资源的请求,就将该请求转由Web应用服务器默认的Servlet处理,
    如果不是静态资源的请求,才由DispatcherServlet继续处理。
    -->
    <mvc:default-servlet-handler/>
    <!-- 注册spring mvc的注解驱动,只有注册了springmvc才能使用完整的注解功能 -->
    <mvc:annotation-driven>
        <mvc:message-converters register-defaults="true">
            <!-- 将StringHttpMessageConverter的默认编码设为UTF-8 -->
            <bean class="org.springframework.http.converter.StringHttpMessageConverter">
                <constructor-arg value="UTF-8" />
            </bean>
            <bean class="org.springframework.http.converter.ByteArrayHttpMessageConverter" />
            <!-- 将Jackson2HttpMessageConverter的默认格式化输出设为true -->
            <bean class="org.springframework.http.converter.json.MappingJackson2HttpMessageConverter">
                <property name="prettyPrint" value="true"/>
                <!-- 避免IE执行AJAX时,返回JSON出现下载文件 -->
                <property name="supportedMediaTypes" >
                    <list>
                        <value>application/json;charset=UTF-8</value>
                        <value>text/html;charset=UTF-8</value>
                    </list>
                </property>
            </bean>
        </mvc:message-converters>
    </mvc:annotation-driven>
    <!--InternalResourceViewResolver:用于支持Servlet、JSP视图解析;
    viewClass:JstlView表示JSP模板页面需要使用JSTL标签库,classpath中必须包含jstl的相关jar包;
    prefix和suffix:查找视图页面的前缀和后缀(前缀[逻辑视图名]后缀),比如传进来的逻辑视图名为hello,
    则该该jsp视图页面应该存放在“WEB-INF/jsp/hello.jsp”;-->
    <bean class="org.springframework.web.servlet.view.InternalResourceViewResolver">
        <property name="viewClass" value="org.springframework.web.servlet.view.JstlView"/>
        <property name="prefix" value="/WEB-INF/jsp/"/>
        <property name="suffix" value=".jsp"/>
    </bean>

    <!-- 用于文件上传 upload file,dependency commons-fileupload.jar -->
    <bean id="multipartResolver" class="org.springframework.web.multipart.commons.CommonsMultipartResolver">
        <!-- 单上传行为的最大上传文件大小,单位为字节 -->
        <property name="maxUploadSize" value="52428800"/>
        <!-- 允许上传的单个文件的最大大小,单位为字节 -->
        <property name="maxUploadSizePerFile" value="52428800"/>
    </bean>

</beans>
9 配置WEB.xml
<!DOCTYPEweb-appPUBLIC
 "-//Sun Microsystems, Inc.//DTD Web Application 2.3//EN"
 "http://java.sun.com/dtd/web-app_2_3.dtd" >

<web-app>

  <!--  定义spring相关的配置文件路径,除了springmvc之外的 -->
  <context-param>
    <param-name>contextConfigLocation</param-name>
    <param-value>
      classpath:/spring-mybatis.xml
    </param-value>
  </context-param>

  <!-- 用于处理post请求中文乱码的过滤器 -->
  <filter>
    <filter-name>characterEncodingFilter</filter-name>
    <filter-class>org.springframework.web.filter.CharacterEncodingFilter</filter-class>
    <init-param>
      <param-name>encoding</param-name>
      <param-value>UTF-8</param-value>
    </init-param>
    <init-param>
      <param-name>forceEncoding</param-name>
      <param-value>true</param-value>
    </init-param>
  </filter>
  <filter-mapping>
    <filter-name>characterEncodingFilter</filter-name>
    <url-pattern>/</url-pattern>
  </filter-mapping>

  <!--  通过serlvetContext监听器来加载spring容器 -->
  <listener>
    <listener-class>org.springframework.web.context.ContextLoaderListener</listener-class>
  </listener>

  <!-- spring mvc的核心servlet -->
  <servlet>
    <servlet-name>dispatcherServlet</servlet-name>
    <servlet-class>org.springframework.web.servlet.DispatcherServlet</servlet-class>
    <!--初始化參數-->
    <init-param>
      <!--通過初始化參數contextConfigLocation指定springmvc配置文件的路徑-->
      <param-name>contextConfigLocation</param-name>
      <param-value>classpath:/spring-mvc.xml</param-value>
    </init-param>
    <!--  当应用启动时加载该servlet -->
    <load-on-startup>1</load-on-startup>
  </servlet>
  <servlet-mapping>
    <servlet-name>dispatcherServlet</servlet-name>
    <!--
    /:支持RESTful,便于检索。
    /*:不能返回视图。
    *.do(必须以.do结尾的路径才能访问。)
    -->
    <url-pattern>/</url-pattern>
  </servlet-mapping>

</web-app>
10 配置log4j
在resource目录下新建log4j.properties
log4j.rootLogger=DEBUG,Console
log4j.appender.Console=org.apache.log4j.ConsoleAppender
log4j.appender.Console.layout=org.apache.log4j.PatternLayout
log4j.appender.Console.layout.ConversionPattern=%d [%t] %-5p [%c] - %m%n

log4j.logger.java.sql.ResultSet=DEBUG
log4j.logger.org.apache=DEBUG
log4j.logger.java.sql.Connection=DEBUG
log4j.logger.java.sql.Statement=DEBUG
log4j.logger.java.sql.PreparedStatement=DEBUG
11 通过一个显示所有学生的实例来验证框架是否搭建完成
11.1 创建学生bean
在com.deng.ssm.bean下建立类Student
package com.deng.ssm.bean;

import java.util.Date;

public class Student {

    private Integer id;
    private String stuName;
    private int stuAge;
    private String mobile;
    private String address;
    private Date entranceTime;

    public Integer getId() {
        return id;
    }

    public void setId(Integer id) {
        this.id = id;
    }

    public String getStuName() {
        return stuName;
    }

    public void setStuName(String stuName) {
        this.stuName = stuName;
    }

    public int getStuAge() {
        return stuAge;
    }

    public void setStuAge(int stuAge) {
        this.stuAge = stuAge;
    }

    public String getMobile() {
        return mobile;
    }

    public void setMobile(String mobile) {
        this.mobile = mobile;
    }

    public String getAddress() {
        return address;
    }

    public void setAddress(String address) {
        this.address = address;
    }

    public Date getEntranceTime() {
        return entranceTime;
    }

    public void setEntranceTime(Date entranceTime) {
        this.entranceTime = entranceTime;
    }
}
11.2 新建学生的数据操作接口IStudentDAO
在com.deng.ssm.dao下建立接口IStudentDAO
package com.deng.ssm.dao;

import com.deng.ssm.bean.Student;

import java.util.List;

public interface IStudentDAO {

    public List<Student> searchAll();
}
11.3 建立学生的Mapper文件
在resource的com/deng/ssm/mapper目录下新建StudentMapper.xml
<?xml version="1.0" encoding="UTF-8" ?>
<!DOCTYPEmapper
        PUBLIC"-//mybatis.org//DTD Mapper 3.0//EN"
        "http://mybatis.org/dtd/mybatis-3-mapper.dtd">
<!--  注意命名空间为该maper文件对应的DAO的全路径 -->
<mapper namespace="com.deng.ssm.dao.IStudentDAO" >

    <!--定义resultmap
        type的值为Student实体类名称,因为指定包的别名所以不用全路径
        -->
    <resultMap id="student_map" type="Student">
        <id property="id" column="id"/>
        <result property="stuName" column="stuName"/>
        <result property="stuAge" column="stuAge"/>
        <result property="mobile" column="mobile"/>
        <result property="address" column="address"/>
        <result property="entranceTime" column="entranceTime"/>
    </resultMap>

    <!--需要注意id的值等于接口中方法的名字-->
    <select id="searchAll" resultMap="student_map">
        select id,stuName, stuAge, mobile, address, EntranceTime
        from student
    </select>
</mapper>
11.4 建立学生的service接口
在包com.deng.ssm.service下建立StudentService接口
package com.deng.ssm.service;

import com.deng.ssm.bean.Student;

import java.util.List;

public interface StudentService {
    public List<Student> searchAll();
}
11.5 实现学生的service接口
在包com.deng.ssm.service.impl下建立StudentServiceImpl实现类
package com.deng.ssm.service.impl;

import com.deng.ssm.bean.Student;
import com.deng.ssm.dao.IStudentDAO;
import com.deng.ssm.service.StudentService;
import org.springframework.beans.factory.annotation.Autowired;
import org.springframework.stereotype.Service;

import java.util.List;

//通过@Service注解定义为一个Service bean
@Service
public class StudentServiceImpl implements StudentService {
//    自动装配DAO的实例
    @Autowired
    private IStudentDAO studentDAO;

    public List<Student> searchAll() {
        return studentDAO.searchAll();
    }
}
11.6 实现学生Controller
在包com.deng.ssm.controller下建立StudentController
package com.deng.ssm.controller;

import com.deng.ssm.bean.Student;
import com.deng.ssm.service.StudentService;
import org.springframework.beans.factory.annotation.Autowired;
import org.springframework.stereotype.Controller;
import org.springframework.ui.Model;
import org.springframework.web.bind.annotation.RequestMapping;

@Controller  //该注解代表这个类是一个Controller
@RequestMapping("/student")  //将这个类映射一个路劲各位/student,该可以不要
public class StudentController {

    @Autowired
    private StudentService studentService;

    @RequestMapping("/search")
    public String searchAll(Model model){
        model.addAttribute("students",studentService.searchAll());
        return "index";
    }
}
11.7 建立jsp页面,来显示所有的学生
在/WEB-INF/jsp下建立index.jsp
<%--
  Created by IntelliJ IDEA.
  User: dengcl
  Date: 2017/6/22
  Time: 11:48
  To change this template use File | Settings | File Templates.
--%>
<%@ page contentType="text/html;charset=UTF-8" language="java"
isELIgnored="false" %>
<%@ taglib prefix="c" uri="http://java.sun.com/jsp/jstl/core" %>
<html>
<head>
    <title>学生信息</title>
</head>
<body>
<%--<h1>学生信息</h1>--%>
<table width="100%">
    <caption>所有学生信息</caption>
    <thead>
        <tr>
            <th>ID</th>
            <th>姓名</th>
            <th>年龄</th>
            <th>手机</th>
            <th>地址</th>
            <th>入学时间</th>
        </tr>
    </thead>
    <tbody>
        <c:forEach items="${requestScope.students}" var="stu">
            <tr>
                <td>${stu.id}</td>
                <td>${stu.stuName}</td>
                <td>${stu.stuAge}</td>
                <td>${stu.mobile}</td>
                <td>${stu.address}</td>
                <td>${stu.entranceTime}</td>
            </tr>
        </c:forEach>
    </tbody>
</table>
</body>
</html>
11.8 启动应用,测试
打开浏览器,输入http://ip:port/上下文/student/search查看结果