作者:邓聪聪
我们常在Windowns下使用VMware,当然在Liunx中也有这样的软件供我们使用。生产环境的KVM宿主机越来越多,需要对宿主机的状态进行调控。这里用webvirtmgr进行管理。图形化的WEB,让人能更方便的查看kvm 宿主机的情况和操作
环境:CentnOS 6.8
工具:git clone git://github.com/retspen/webvirtmgr.git (去git_hub求源代码),(增加安装支持的软件源)yum -y install http://dl.fedoraproject.org/pub/epel/6/i386/epel-release-6-8.noarch.rpm
依赖:git python-pip libvirt-python libxml2-python python-websockify upervisor nginx novnc python-virtinst libvirt vm ridge-utils virt-manager qemu-kvm-tools virt-viewer virt-v2v tunctl unzip zip
安装KVM前需要查看本机系统配置是否支持安装(cat /proc/cpuinfo | egrep '(vmx|svm)' | wc -l; 结果>0 表示支持)
1 安装支持的软件源;
1 yum -y install http://dl.fedoraproject.org/pub/epel/6/i386/epel-release-6-8.noarch.rpm
2 安装相关软件;
1 yum -y install git python-pip libvirt-python libxml2-python python-websockify upervisor nginx novnc python-virtinst libvirt vm ridge-utils virt-manager qemu-kvm-tools virt-viewer virt-v2v tunctl unzip zip
3 从git-hub中下载相关的webvirtmgr代码;
1 cd /usr/local/src/
2 git clone git://github.com/retspen/webvirtmgr.git
4 安装webvirtmgr;
1 cd webvirtmgr/
2 pip install -r requirements.txt
6 对django进行环境配置;
 1 ./manage.py syncdb
 2 You just installed Django's auth system, which means you don't have any superusers defined.
 3 Would you like to create one now? (yes/no): yes
 4 Username (leave blank to use 'root'): 用户
 5 Email address: 邮箱
 6 Password:密码
 7 Password (again):密码
 8 ###==========================###
 9 ./manage.py collectstatic   #生成配置文件
10 ./manage.py createsuperuser   #添加管理员账号
11 /usr/bin/python2 manage.py createsuperuser   #添加管理员账号(同样使用python2版本执行,不要使用默认的python执行)
7 拷贝web到 相关目录;
1 cd ..
2 mkdir -pv /var/www
3 cp -Rv webvirtmgr /var/www/webvirtmg
4 chown -R nginx:nginx /var/www/webvirtmgr
8 设置ssh;
1 su - nginx -s /bin/bash
2 ssh-keygen #产生公私钥
3 ssh-copy-id (kvm-ip) #由于这里webvirtmgr和kvm服务部署在同一台机器,所以这里本地信任。如果kvm部署在其他机器,那么这个是它的ip
9 辑nginx配置文件
提前确保/etc/nginx/nginx.conf文件里开启了“include /etc/nginx/conf.d/*.conf;”
 1 [root@local]#vim /etc/nginx/conf.d/webvirtmgr.conf //添加下面内容到文件中
 2 server {
 3 listen 80 default_server;
 4
 5 server_name $hostname;
 6 #access_log /var/log/nginx/webvirtmgr_access_log;
 7
 8 location /static/ {
 9 root /var/www/webvirtmgr/webvirtmgr; # or /srv instead of /var
10 expires max;
11 }
12
13 location / {
14 proxy_pass http://127.0.0.1:8000;
15 proxy_set_header X-Real-IP $remote_addr;
16 proxy_set_header X-Forwarded-for $proxy_add_x_forwarded_for;
17 proxy_set_header Host $host:$server_port;
18 proxy_set_header X-Forwarded-Proto $remote_addr;
19 proxy_connect_timeout 600;
20 proxy_read_timeout 600;
21 proxy_send_timeout 600;
22 client_max_body_size 1024M; # Set higher depending on your needs
23 }
24 }
1 mv /etc/nginx/conf.d/default.conf /etc/nginx/conf.d/default.conf.bak
10 设置 supervisor;
 1 [root@openstack ops]# vim /etc/supervisord.conf //在文件末尾添加,注意将默认的python改为python2,因为上面只有用这个版本执行才不报错!
 2 [program:webvirtmgr]
 3 command=/usr/bin/python2 /var/www/webvirtmgr/manage.py run_gunicorn -c /var/www/webvirtmgr/conf/gunicorn.conf.py    #启动8000端口***如果报错无法启动,查看/var/www/wvirtmgr权限是否正常!!!
 4 directory=/var/www/webvirtmgr
 5 autostart=true
 6 autorestart=true
 7 logfile=/var/log/supervisor/webvirtmgr.log
 8 log_stderr=true
 9 user=nginx
10
11 [program:webvirtmgr-console]
12 command=/usr/bin/python2 /var/www/webvirtmgr/console/webvirtmgr-console    #启动6080端口(这是控制台vnc端口)
13 directory=/var/www/webvirtmgr
14 autostart=true
15 autorestart=true
16 stdout_logfile=/var/log/supervisor/webvirtmgr-console.log
17 redirect_stderr=true
18 user=nginx
[root@localhost ~]# netstat -lnpt
Active Internet connections (only servers)
Proto Recv-Q Send-Q Local Address Foreign Address State PID/Program name
tcp 0 0 127.0.0.1:8000 0.0.0.0:* LISTEN 1698/python2
tcp 0 0 0.0.0.0:6080 0.0.0.0:* LISTEN 1697/python2
tcp 0 0 0.0.0.0:5900 0.0.0.0:* LISTEN 544/qemu-kvm
tcp 0 0 0.0.0.0:8080 0.0.0.0:* LISTEN 32518/nginx
11 修改eth为物理网口,br为桥接网口配置文件
 1 cp ifcfg-eth0 ifcfg-br0
 2
 3 [root@vfeelit network-scripts]# cat ifcfg-br0
 4 DEVICE=br0
 5 TYPE=Bridge
 6 BOOTPROTO=static
 7 IPV6INIT=no
 8 ONBOOT=yes
 9 DELAY=0
10 IPADDR=192.168.1.66
11 NETMASK=255.255.255.0
12 GATEWAY=192.168.1.1
13 DNS1=8.8.8.8
14 [root@vfeelit network-scripts]# cat ifcfg-eth0
15 DEVICE=eth0
16 TYPE=Ethernet
17 BRIDGE=br0
18 BOOTPROTO=none
19 IPV6INIT=no
20 ONBOOT=yes
=========================
ifdown eth
ifup br0
ifup eth
================================================至此,web的部署基本完成。内部功能可参考其他文档
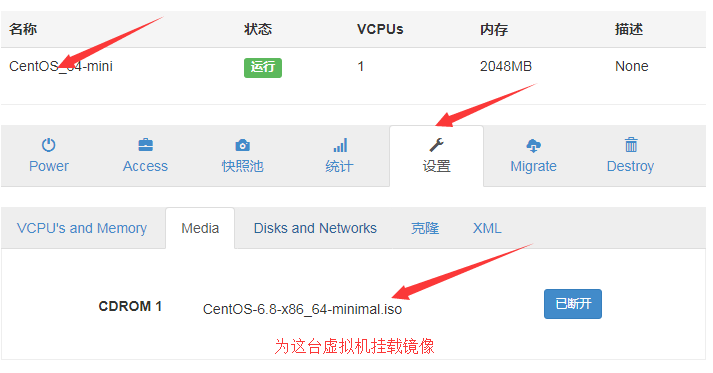
web创建虚拟机;
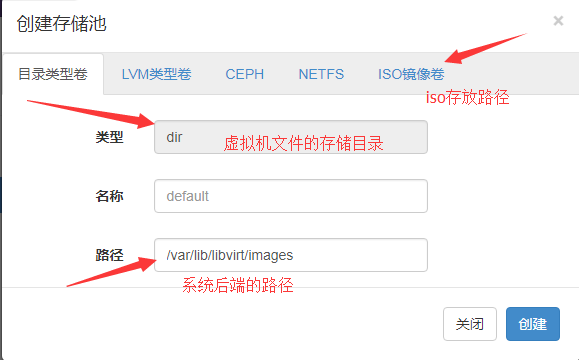
1:首先创建iso目录和虚拟机文件的存储目录
2 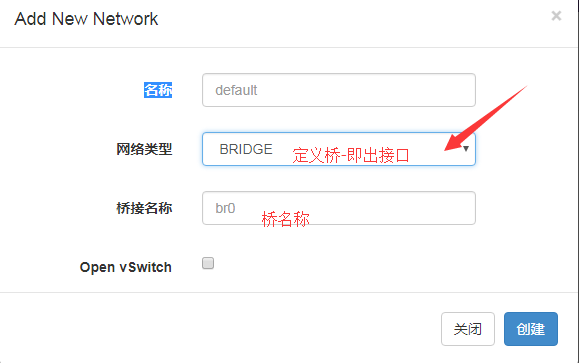
3 a: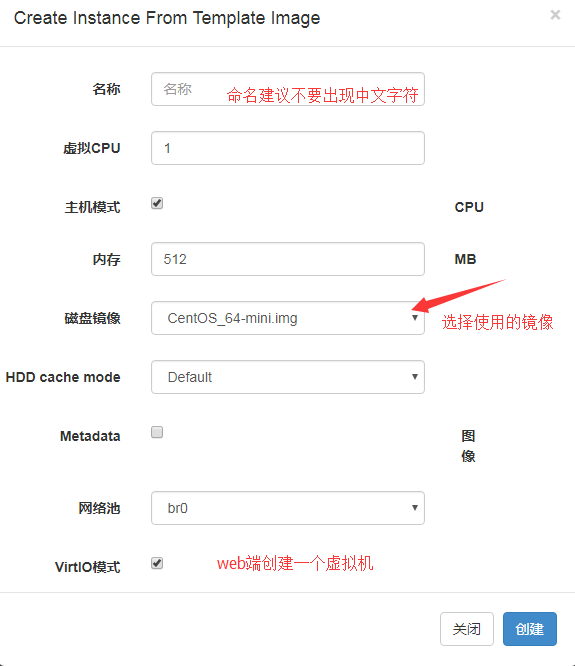 b;
b;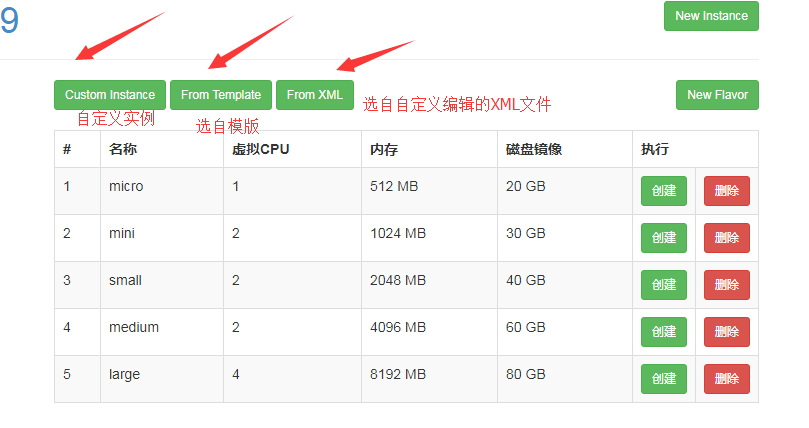
4