elasticsearch版本:6.8.6

机器:
192.168.130.130   master
192.168.130.131   data
192.168.130.132   client

机器足够可以设置多台,如helm 部署elasticsearch到kubernetes则采用了 3台master + 2台data + 2台clinet
一、安装JDK
for i in 192.168.130.130 192.168.130.131 192.168.130.132
do
   echo $i
   ssh $i "mkdir /opt/package";
done

for i in 192.168.130.131 192.168.130.132
do
   echo $i
   scp /opt/package/jdk-8u271-linux-x64.tar.gz $i:/opt/package
done

for i in 192.168.130.130 192.168.130.131 192.168.130.132
do
   echo $i
   ssh $i 'cd /opt/package &&  tar -xf jdk-8u271-linux-x64.tar.gz && mv jdk1.8.0_271 /usr/local/'
   ssh $i 'echo 'export JAVA_HOME=/usr/local/jdk1.8.0_271' >>/etc/profile'
   ssh $i 'echo 'export PATH=$PATH:$JAVA_HOME/bin' >>/etc/profile'
   ssh $i 'source >>/etc/profile'
done
二、修改系统配置
为了使得Elasticsearch获得高效稳定的性能,需要对系统和JVM两个方面进行优化
1、vim /etc/sysctl.conf ,新增如下两行:
fs.file-max=655360       #系统最大打开文件描述符数,建议修改为655360或者更高
vm.max_map_count=262144  #直接影响java线程数量,用来限制一个进程可以用于VM(虚拟内存区域大小)默认为65530,建议修改为262144或者更高
for i in 192.168.130.130
do
   echo $i
   ssh $i 'echo -e "fs.file-max=655360
vm.max_map_count=262144" >>/etc/sysctl.conf'
   ssh $i 'sysctl -p'
done
sysctl -p 重新加载文件/etc/sysctl.conf
Max_map_count文件包含限制一个进程可以拥有的VMA(虚拟内存区域)的数量。虚拟内存区域是一个连续的虚拟地址空间区域。在进程的生命周期中,每当程序尝试在内存中映射文件,链接到共享内存段,或者分配堆空间的时候,这些区域将被创建。
调优这个值将限制进程可拥有VMA的数量。限制一个进程拥有VMA的总数可能导致应用程序出错,因为当进程达到了VMA上线但又只能释放少量的内存给其他的内核进程使用时,操作系统会抛出内存不足的错误。
如果你的操作系统在NORMAL区域仅占用少量的内存,那么调低这个值可以帮助释放内存给内核用
2、vim /etc/security/limits.conf,增加如下代码:
* soft nproc 20480
* hard nproc 20480
* soft nofile 65536
* hard nofile 65536
* soft memlock unlimited
* hard memlock unlimited

* soft nofile     #任何一个用户可以打开的最大的文件描述符数量,默认1024,这里的数值会限制tcp连接
* soft nproc      #任何一个用户可以打开的最大进程数
 soft是一个警告值,而hard则是一个真正意义的阀值,超过就会报错
三、安装ES
1、下载ES
下载地址:wget https://artifacts.elastic.co/downloads/elasticsearch/elasticsearch-6.8.6.tar.gz
2、解压安装es
for i in 192.168.130.130 192.168.130.131 192.168.130.132
do
   echo $i
   ssh $i 'cd /opt/package &&  tar -xf elasticsearch-6.8.6.tar.gz && mv elasticsearch-6.8.6 /usr/local/elasticsearch'
   ssh $i 'useradd elasticsearch;chown -R elasticsearch:elasticsearch /usr/local/elasticsearch'
done
3、修改配置文件elasticsearch.yaml
各节点配置如下:
192.168.130.130
cluster.name: elasticsearch

node.data: false
node.master: true
node.ingest: true
node.name: es-master
network.host: 0.0.0.0
# see https://github.com/kubernetes/kubernetes/issues/3595
bootstrap.memory_lock: true

discovery:
  zen:
    ping.unicast.hosts: ["192.168.130.130","192.168.130.131","192.168.130.132"]
    minimum_master_nodes: 1


# see https://github.com/elastic/elasticsearch-definitive-guide/pull/679
processors: 1

# avoid split-brain w/ a minimum consensus of two masters plus a data node
gateway.expected_master_nodes: 1
gateway.expected_data_nodes: 1
gateway.recover_after_time: 5m
gateway.recover_after_master_nodes: 1
gateway.recover_after_data_nodes: 1
192.168.130.131
cluster.name: elasticsearch

node.data: true
node.master: false
node.ingest: true
node.name: es-data
network.host: 0.0.0.0
# see https://github.com/kubernetes/kubernetes/issues/3595
bootstrap.memory_lock: true

discovery:
  zen:
    ping.unicast.hosts: ["192.168.130.130","192.168.130.131","192.168.130.132"]
    minimum_master_nodes: 1

# see https://github.com/elastic/elasticsearch-definitive-guide/pull/679
processors: 1

# avoid split-brain w/ a minimum consensus of two masters plus a data node
gateway.expected_master_nodes: 1
gateway.expected_data_nodes: 1
gateway.recover_after_time: 5m
gateway.recover_after_master_nodes: 1
gateway.recover_after_data_nodes: 1
192.168.130.132
cluster.name: elasticsearch

node.data: false
node.master: false
node.ingest: true
node.name: es-client
network.host: 0.0.0.0
# see https://github.com/kubernetes/kubernetes/issues/3595
bootstrap.memory_lock: false

discovery:
  zen:
    ping.unicast.hosts: ["192.168.130.130","192.168.130.131","192.168.130.132"]
    minimum_master_nodes: 1

# see https://github.com/elastic/elasticsearch-definitive-guide/pull/679
processors: 1

# avoid split-brain w/ a minimum consensus of two masters plus a data node
gateway.expected_master_nodes: 1
gateway.expected_data_nodes: 1
gateway.recover_after_time: 5m
gateway.recover_after_master_nodes: 1
gateway.recover_after_data_nodes: 1
4、启动es
for i in 192.168.130.130 192.168.130.131 192.168.130.132
do
   echo $i
   ssh $i 'su - elasticsearch -c "/usr/local/elasticsearch/bin/elasticsearch -d"'
done

####   在root用户下
四、查看集群健康状态
lasticsearch 的集群监控信息中包含了许多的统计数据,其中最为重要的一项就是 集群健康 , 它在 status 字段中展示为 green 、 yellow 或者 red 。
curl -X GET "localhost:9200/_cluster/health?pretty"
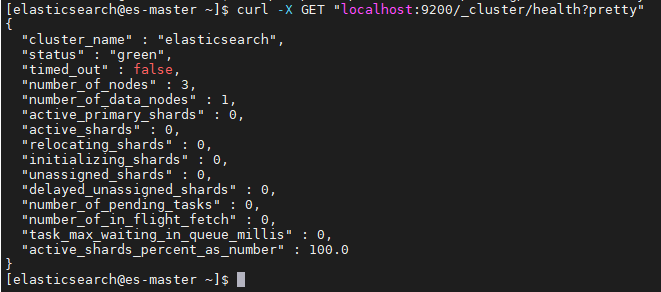
status 字段是我们最关心的
status 字段指示着当前集群在总体上是否工作正常。它的三种颜色含义如下:
green
所有的主分片和副本分片都正常运行。
yellow
所有的主分片都正常运行,但不是所有的副本分片都正常运行。
red
有主分片没能正常运行