一、rook简介
Rook是一个自管理的分布式存储编排系统,可以为Kubernetes提供便利的存储解决方案。Rook本身并不提供存储,而是在kubernetes和存储系统之间提供适配层,简化存储系统的部署与维护工作。目前,rook支持的存储系统包括:Ceph、CockroachDB、Cassandra、EdgeFS、Minio、NFS,其中Ceph为Stable状态,其余均为Alpha。本文仅介绍Ceph相关内容。
Rook由Operator和Cluster两部分组成:
- Operator:由一些CRD和一个All in one镜像构成,包含包含启动和监控存储系统的所有功能。
- Cluster:负责创建CRD对象,指定相关参数,包括ceph镜像、元数据持久化位置、磁盘位置、dashboard等等…
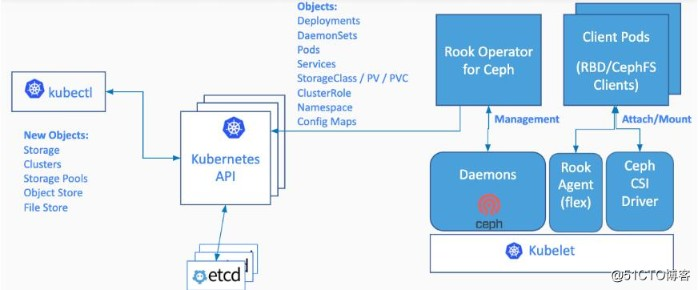
下图是Rook的体系结构图,Operator启动之后,首先创建Agent和Discover容器,负责监视和管理各个节点上存储资源。然后创建Cluster,Cluster是创建Operator时定义的CRD。Operator根据Cluster的配置信息启动Ceph的相关容器。存储集群启动之后,使用kubernetes元语创建PVC为应用容器所用。

1、系统要求
本次安装环境
- kubernetes 1.16
- centos7.7
- kernel 5.4.65-200.el7.x86_64
- flannel v0.12.0
须要安装lvm包
yum install -y lvm2
2、内核要求
RBD
通常发行版的内核都编译有,但你最好肯定下:
foxchan@~$ lsmod|grep rbd
rbd                   114688  0
libceph               368640  1 rbd
能够用如下命令放到开机启动项里
cat > /etc/sysconfig/modules/rbd.modules << EOF
modprobe rbd
EOF
CephFS
若是你想使用cephfs,内核最低要求是 4.17。
二、rook部署
2.1、环境说明
[root@k8s-master ceph]# kubectl get node
NAME         STATUS     ROLES    AGE   VERSION
k8s-master   NotReady   master   92m   v1.16.2
k8s-node1    Ready      <none>   92m   v1.16.2
k8s-node2    Ready      <none>   90m   v1.16.2
[root@k8s-node1 ~]# lsblk
NAME            MAJ:MIN RM  SIZE RO TYPE MOUNTPOINT
sda               8:0    0   20G  0 disk
├─sda1            8:1    0  200M  0 part /boot
└─sda2            8:2    0 19.8G  0 part
  ├─centos-root 253:0    0 15.8G  0 lvm  /
  └─centos-swap 253:1    0    4G  0 lvm
sdb               8:16   0   20G  0 disk
sr0              11:0    1 10.3G  0 rom
每个节点 sdb用来做ceph的数据盘
2.2、拉取项目
git clone --single-branch --branch v1.5.1 https://github.com/rook/rook.git
2.3、部署Rook Operator
获取镜像
可能由于国内环境无法Pull镜像,建议提前pull如下镜像
docker pull ceph/ceph:v15.2.5
docker pull rook/ceph:v1.5.1
docker pull registry.aliyuncs.com/it00021hot/cephcsi:v3.1.2
docker pull registry.aliyuncs.com/it00021hot/csi-node-driver-registrar:v2.0.1
docker pull registry.aliyuncs.com/it00021hot/csi-attacher:v3.0.0
docker pull registry.aliyuncs.com/it00021hot/csi-provisioner:v2.0.0
docker pull registry.aliyuncs.com/it00021hot/csi-snapshotter:v3.0.0
docker pull registry.aliyuncs.com/it00021hot/csi-resizer:v1.0.0

docker tag registry.aliyuncs.com/it00021hot/csi-snapshotter:v3.0.0 k8s.gcr.io/sig-storage/csi-snapshotter:v3.0.0
docker tag registry.aliyuncs.com/it00021hot/csi-resizer:v1.0.0 k8s.gcr.io/sig-storage/csi-resizer:v1.0.0
docker tag registry.aliyuncs.com/it00021hot/cephcsi:v3.1.2 quay.io/cephcsi/cephcsi:v3.1.2
docker tag registry.aliyuncs.com/it00021hot/csi-node-driver-registrar:v2.0.1 k8s.gcr.io/sig-storage/csi-node-driver-registrar:v2.0.1
docker tag registry.aliyuncs.com/it00021hot/csi-attacher:v3.0.0 k8s.gcr.io/sig-storage/csi-attacher:v3.0.0
docker tag registry.aliyuncs.com/it00021hot/csi-provisioner:v2.0.0 k8s.gcr.io/sig-storage/csi-provisioner:v2.0.0


####可以将其更改tag并推送到私有仓库;  另外或者tag为yaml文件中的名字,  建议修改为本地私有仓库
修改 operator.yaml 的镜像名,更改为私有仓库
  ROOK_CSI_CEPH_IMAGE: "10.2.55.8:5000/kubernetes/cephcsi:v3.1.2"
  ROOK_CSI_REGISTRAR_IMAGE: "10.2.55.8:5000/kubernetes/csi-node-driver-registrar:v2.0.1"
  ROOK_CSI_RESIZER_IMAGE: "10.2.55.8:5000/kubernetes/csi-resizer:v1.0.0"
  ROOK_CSI_PROVISIONER_IMAGE: "10.2.55.8:5000/kubernetes/csi-provisioner:v2.0.0"
  ROOK_CSI_SNAPSHOTTER_IMAGE: "10.2.55.8:5000/kubernetes/csi-snapshotter:v3.0.0"
  ROOK_CSI_ATTACHER_IMAGE: "10.2.55.8:5000/kubernetes/csi-attacher:v3.0.0"

  ROOK_CSI_KUBELET_DIR_PATH: "/data/k8s/kubelet"       ###如果之前有修改过kubelet 数据目录,这里需要修改
执行 operator.yaml
cd rook/cluster/examples/kubernetes/ceph
kubectl create -f crds.yaml -f common.yaml
kubectl create -f operator.yaml
2.4、配置cluster
cluster.yaml文件里的内容需要修改,一定要适配自己的硬件情况,请详细阅读配置文件里的注释,避免我踩过的坑。
此文件的配置,除了增删osd设备外,其他的修改都要重装ceph集群才能生效,所以请提前规划好集群。如果修改后不卸载ceph直接apply,会触发ceph集群重装,导致集群异常挂掉
修改内容如下:
vi cluster.yaml
- 修改内容如下,更多配置参考官网
apiVersion: ceph.rook.io/v1
kind: CephCluster
metadata:
# 命名空间的名字,同一个命名空间只支持一个集群
  name: rook-ceph
  namespace: rook-ceph
spec:
# ceph版本说明
# v13 is mimic, v14 is nautilus, and v15 is octopus.
  cephVersion:
#修改ceph镜像,加速部署时间
    image: image: 10.2.55.8:5000/kubernetes/ceph:v15.2.5
# 是否允许不支持的ceph版本
    allowUnsupported: false
#指定rook数据在节点的保存路径
  dataDirHostPath: /data/k8s/rook
# 升级时如果检查失败是否继续
  skipUpgradeChecks: false
# 从1.5开始,mon的数量必须是奇数
  mon:
    count: 3
# 是否允许在单个节点上部署多个mon pod
    allowMultiplePerNode: false
  mgr:
    modules:
    - name: pg_autoscaler
      enabled: true
# 开启dashboard,禁用ssl,指定端口是7000,你可以默认https配置。我是为了ingress配置省事。
  dashboard:
    enabled: true
    port: 7000
    ssl: false
# 开启prometheusRule
  monitoring:
    enabled: true
# 部署PrometheusRule的命名空间,默认此CR所在命名空间
    rulesNamespace: rook-ceph
# 开启网络为host模式,解决无法使用cephfs pvc的bug
  network:
    provider: host
# 开启crash collector,每个运行了Ceph守护进程的节点上创建crash collector pod
  crashCollector:
    disable: false
  placement:
    osd:
      nodeAffinity:
        requiredDuringSchedulingIgnoredDuringExecution:
          nodeSelectorTerms:
          - matchExpressions:
            - key: ceph-osd
              operator: In
              values:
              - enabled
# 存储的设置,默认都是true,意思是会把集群所有node的设备清空初始化。
  storage: # cluster level storage configuration and selection
    useAllNodes: false     #关闭使用所有Node
    useAllDevices: false   #关闭使用所有设备
    nodes:
    - name: "k8s-node1"  #指定存储节点主机
      devices:
      - name: "sdb"    #指定磁盘为/dev/sdb
    - name: "k8s-node2"
      devices:
      - name: "sdb"
更多 cluster 的 CRD 配置参考:
为osd节点增加label
[root@k8s-master ceph]# kubectl label nodes k8s-node1 ceph-osd=enabled
node/k8s-node1 labeled
[root@k8s-master ceph]# kubectl label nodes k8s-node2 ceph-osd=enabled
node/k8s-node2 labeled
执行安装
kubectl apply -f cluster.yaml
2.5、 增删osd
2.5.1 添加相关label
kubectl label nodes k8s-master ceph-osd=enabled
2.5.2 修改cluster.yaml
  storage: # cluster level storage configuration and selection
    useAllNodes: false     #关闭使用所有Node
    useAllDevices: false   #关闭使用所有设备
    nodes:
    - name: "k8s-node1"  #指定存储节点主机
      devices:
      - name: "sdb"    #指定磁盘为/dev/sdb
    - name: "k8s-node2"
      devices:
      - name: "sdb"
    - name: "k8s-master"
      devices:
      - name: "sdb"
2.5.3 apply cluster.yaml
kubectl apply -f cluster.yaml
删除重新安装rook-ceph会报错,可以执行如下命令生成secret。

kubectl -n rook-ceph create secret generic rook-ceph-crash-collector-keyring
2.6、 安装toolbox
Rook工具箱是一个容器,其中包含用于rook调试和测试的常用工具。 该工具箱基于CentOS,因此yum可以轻松安装您选择的更多工具。
kubectl apply -f toolbox.yaml
测试Rook
一旦 toolbox 的 Pod 运行成功后,我们就可以使用下面的命令进入到工具箱内部进行操作:
kubectl -n rook-ceph exec -it $(kubectl -n rook-ceph get pod -l "app=rook-ceph-tools" -o jsonpath='{.items[0].metadata.name}') bash
比如现在我们要查看集群的状态,需要满足下面的条件才认为是健康的:
查看rook状态:ceph status
- 所有 mons 应该达到法定数量
- mgr 应该是激活状态
- 至少有一个 OSD 处于激活状态
- 如果不是 HEALTH_OK 状态,则应该查看告警或者错误信息
2.7、访问dashboard
[root@k8s-master ceph]# kubectl get svc -n rook-ceph
NAME                       TYPE        CLUSTER-IP       EXTERNAL-IP   PORT(S)             AGE
csi-cephfsplugin-metrics   ClusterIP   10.103.103.152   <none>        8080/TCP,8081/TCP   9m39s
csi-rbdplugin-metrics      ClusterIP   10.109.21.95     <none>        8080/TCP,8081/TCP   9m41s
rook-ceph-mgr              ClusterIP   10.103.36.44     <none>        9283/TCP            8m50s
rook-ceph-mgr-dashboard    NodePort    10.104.55.171    <none>        7000:30112/TCP      8m50s
rook-ceph-mon-a            ClusterIP   10.103.40.41     <none>        6789/TCP,3300/TCP   9m36s
rook-ceph-mon-b            ClusterIP   10.96.138.43     <none>        6789/TCP,3300/TCP   9m14s
rook-ceph-mon-c            ClusterIP   10.108.169.68    <none>        6789/TCP,3300/TCP   9m3s

### 获得dashboard的登录密码,用户为admin ###。密码通过如下方式获得:
[root@k8s-master ceph]# kubectl get secrets -n rook-ceph rook-ceph-dashboard-password -o jsonpath='{.data.password}' | base64 -d
bagfSJpb/3Nj0DN5I#7Z
登录后界面如下:

三、部署块存储
3.1 创建pool和StorageClass
ceph-storageclass.yaml
kubectl apply -f csi/rbd/storageclass.yaml
# 定义一个块存储池
apiVersion: ceph.rook.io/v1
kind: CephBlockPool
metadata:
  name: replicapool
  namespace: rook-ceph
spec:
  # 每个数据副本必须跨越不同的故障域分布,如果设置为host,则保证每个副本在不同机器上
  failureDomain: host
  # 副本数量
  replicated:
    size: 3
    # Disallow setting pool with replica 1, this could lead to data loss without recovery.
    # Make sure you're *ABSOLUTELY CERTAIN* that is what you want
    requireSafeReplicaSize: true
    # gives a hint (%) to Ceph in terms of expected consumption of the total cluster capacity of a given pool
    # for more info: https://docs.ceph.com/docs/master/rados/operations/placement-groups/#specifying-expected-pool-size
    #targetSizeRatio: .5
---
# 定义一个StorageClass
apiVersion: storage.k8s.io/v1
kind: StorageClass
metadata:
   name: rook-ceph-block
# 该SC的Provisioner标识,rook-ceph前缀即当前命名空间
provisioner: rook-ceph.rbd.csi.ceph.com
parameters:
    # clusterID 就是集群所在的命名空间名
    # If you change this namespace, also change the namespace below where the secret namespaces are defined
    clusterID: rook-ceph

    # If you want to use erasure coded pool with RBD, you need to create
    # two pools. one erasure coded and one replicated.
    # You need to specify the replicated pool here in the `pool` parameter, it is
    # used for the metadata of the images.
    # The erasure coded pool must be set as the `dataPool` parameter below.
    #dataPool: ec-data-pool
    # RBD镜像在哪个池中创建
    pool: replicapool

    # RBD image format. Defaults to "2".
    imageFormat: "2"

    # 指定image特性,CSI RBD目前仅仅支持layering
    imageFeatures: layering

    # Ceph admin 管理凭证配置,由operator 自动生成
    # in the same namespace as the cluster.
    csi.storage.k8s.io/provisioner-secret-name: rook-csi-rbd-provisioner
    csi.storage.k8s.io/provisioner-secret-namespace: rook-ceph
    csi.storage.k8s.io/controller-expand-secret-name: rook-csi-rbd-provisioner
    csi.storage.k8s.io/controller-expand-secret-namespace: rook-ceph
    csi.storage.k8s.io/node-stage-secret-name: rook-csi-rbd-node
    csi.storage.k8s.io/node-stage-secret-namespace: rook-ceph
    # 卷的文件系统类型,默认ext4,不建议xfs,因为存在潜在的死锁问题(超融合设置下卷被挂载到相同节点作为OSD时)
    csi.storage.k8s.io/fstype: ext4
# uncomment the following to use rbd-nbd as mounter on supported nodes
# **IMPORTANT**: If you are using rbd-nbd as the mounter, during upgrade you will be hit a ceph-csi
# issue that causes the mount to be disconnected. You will need to follow special upgrade steps
# to restart your application pods. Therefore, this option is not recommended.
#mounter: rbd-nbd
allowVolumeExpansion: true
reclaimPolicy: Delete
3.2 demo示例
推荐pvc 和应用写到一个yaml里面
vim ceph-demo.yaml
#创建pvc
apiVersion: v1
kind: PersistentVolumeClaim
metadata:
  name: rbd-demo-pvc
spec:
  accessModes:
  - ReadWriteOnce
  resources:
    requests:
      storage: 1Gi
  storageClassName: rook-ceph-block
---
apiVersion: apps/v1
kind: Deployment
metadata:
  name: csirbd-demo-pod
  labels:
    test-cephrbd: "true"
spec:
  replicas: 1
  selector:
    matchLabels:
      test-cephrbd: "true"
  template:
    metadata:
      labels:
        test-cephrbd: "true"
    spec:
      containers:
       - name: web-server-rbd
         image: 10.2.55.8:5000/library/nginx:1.18.0
         volumeMounts:
           - name: mypvc
             mountPath: /usr/share/nginx/html
      volumes:
       - name: mypvc
         persistentVolumeClaim:
           claimName: rbd-demo-pvc
           readOnly: false

四、部署文件系统
4.1 创建CephFS
CephFS的CSI驱动使用Quotas来强制应用PVC声明的大小,仅仅4.17+内核才能支持CephFS quotas。
如果内核不支持,而且你需要配额管理,配置Operator环境变量 CSI_FORCE_CEPHFS_KERNEL_CLIENT: false来启用FUSE客户端。
使用FUSE客户端时,升级Ceph集群时应用Pod会断开mount,需要重启才能再次使用PV。
cd rook/cluster/examples/kubernetes/ceph
kubectl apply -f filesystem.yaml
五、删除ceph集群
删除ceph集群前,请先清理相关pod
删除块存储和文件存储
kubectl delete -n rook-ceph cephblockpool replicapool
kubectl delete storageclass rook-ceph-block
kubectl delete -f csi/cephfs/filesystem.yaml
kubectl delete storageclass csi-cephfs rook-ceph-block
kubectl -n rook-ceph delete cephcluster rook-ceph
删除operator和相关crd
kubectl delete -f cluster.yaml
kubectl delete -f operator.yaml
kubectl delete -f common.yaml
kubectl delete -f crds.yaml
清除主机上的数据
删除Ceph集群后,在之前部署Ceph组件节点的/data/rook/目录,会遗留下Ceph集群的配置信息。
rm -rf /data/k8s/rook/*
若之后再部署新的Ceph集群,先把之前Ceph集群的这些信息删除,不然启动monitor会失败;
# cat clean-rook-dir.sh
hosts=(
  192.168.130.130
  192.168.130.131
  192.168.130.132
)
for host in ${hosts[@]} ; do
  ssh $host "rm -rf /data/k8s/rook/*"
done
清除device
yum install gdisk -y
export DISK="/dev/sdb"
sgdisk --zap-all $DISK
dd if=/dev/zero of="$DISK" bs=1M count=100 oflag=direct,dsync
blkdiscard $DISK
ls /dev/mapper/ceph-* | xargs -I% -- dmsetup remove %
rm -rf /dev/ceph-*
如果因为某些原因导致删除ceph集群卡主,可以先执行以下命令, 再删除ceph集群就不会卡主了
kubectl -n rook-ceph patch cephclusters.ceph.rook.io rook-ceph -p '{"metadata":{"finalizers": []}}' --type=merge
转载于: https://my.oschina.net/u/4346166/blog/4752651
https://blog.csdn.net/qq_40592377/article/details/110292089