# -*- coding: utf-8 -*-
"""
Created on Tue Aug 28 22:19:26 2018
@author: Dev
"""
import numpy as np
import pandas as pd
import sys
import csv
import xlrd, xlwt
import json
读取csv格式文件
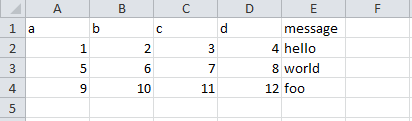
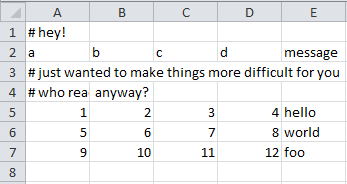
ex1.csv的文件内容:
path = 'D:LearningProgramPython Data Analyze'    # 设置文件路径
df = pd.read_csv(path + '\data\ex1.csv')  # 自动识别csv文件的分隔符
df1 = pd.read_table(path + '\data\ex1.csv', sep=',')    # 需手动指定分隔符


#执行结果(df和df1相同):
   a   b   c   d message
0  1   2   3   4   hello
1  5   6   7   8   world
2  9  10  11  12     foo
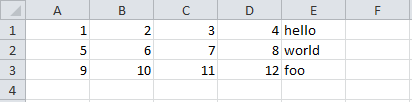
ex2.csv内容:
df2 = pd.read_csv(path + '\data\ex2.csv', header=None)    # 指定文件中没有column,会自动根据列的数量指定


#执行结果:
   0   1   2   3      4
0  1   2   3   4  hello
1  5   6   7   8  world
2  9  10  11  12    foo
# 设置列名,并将message列设置为索引列
names = ['a', 'b', 'c', 'd', 'message']
df3 = pd.read_csv(path + '\data\ex2.csv', names=names, index_col='message')
print(df3.index)
print(df3)


#执行结果:
Index(['hello', 'world', 'foo'], dtype='object', name='message')

               a   b   c   d
message
hello        1   2   3   4
world        5   6   7   8
foo          9  10  11  12
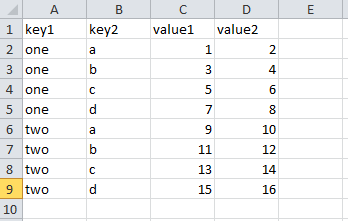
csv_mindex.csv内容:
# 将两列设置为索引
parsed = pd.read_csv(path + '\data\csv_mindex.csv', index_col=['key1', 'key2'])
print(parsed)


#执行结果:
               value1  value2
key1 key2
one  a            1       2
     b            3       4
     c            5       6
     d            7       8
two  a            9      10
     b            11      12
     c            13      14
     d            15      16
# ex3.txt中有多种空格类型(空格 TAB等)
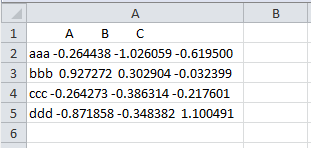
# 将txt文件转为列表格式(转换后格式较乱,不易使用)
list_a = list(open(path + '\data\ex3.txt'))
print(list_a)

--执行结果:
['            A         B         C
',
 'aaa -0.264438 -1.026059 -0.619500
',
 'bbb  0.927272  0.302904 -0.032399
',
 'ccc -0.264273 -0.386314 -0.217601
',
 'ddd -0.871858 -0.348382  1.100491
']


# 在分隔符中使用正则表达式对数据进行分割(s 表示多种不可见字符, +表示存在多个)
result = pd.read_table(path + '\data\ex3.txt', sep='s+')
print(result)


# 执行结果:
        A              B               C
aaa -0.264438    -1.026059        -0.619500
bbb  0.927272     0.302904        -0.032399
ccc -0.264273    -0.386314        -0.217601
ddd -0.871858    -0.348382         1.100491
ex4.csv内容:
# 跳过指定行
df4 = pd.read_csv(path + '\data\ex4.csv', skiprows=[0, 2, 3])
print(df4)


#执行结果:
   a   b   c   d message
0  1   2   3   4   hello
1  5   6   7   8   world
2  9  10  11  12     foo
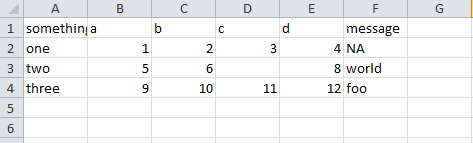
ex5.csv内容:
df5 = pd.read_csv(path + '\data\ex5.csv')
print(df5)
print(pd.isnull(df5))   # 判断是否有为空的值

#执行结果:
  something  a   b     c   d message
0       one  1   2   3.0   4     NaN
1       two  5   6   NaN   8   world
2     three  9  10  11.0  12     foo

   something      a      b      c      d  message
0      False  False  False  False  False     True
1      False  False  False   True  False    False
2      False  False  False  False  False    False


# 将指定的值设置为空值
df5 = pd.read_csv(path + '\data\ex5.csv', na_values=['NULL'])
print(df5)


#执行结果:
  something  a   b     c   d message
0       one  1   2   3.0   4     NaN
1       two  5   6   NaN   8   world
2     three  9  10  11.0  12     foo


# 设置多个na_values值
sentinels = {'message': ['foo', 'NA'], 'something': ['two']}
df5 = pd.read_csv(path + '\data\ex5.csv', na_values=sentinels)
print(df5)


#执行结果:
  something  a   b     c   d message
0       one  1   2   3.0   4     NaN
1       NaN  5   6   NaN   8   world
2     three  9  10  11.0  12     NaN
ex6.csv内容:

一共9999行数据,后面省略。。。
# 逐行读取
result = pd.read_csv(path + '\data\ex6.csv')
print(result)   # 行数过多时,一次读取所有行会显得多余


# 执行结果:
           one       two     three      four key
0     0.467976 -0.038649 -0.295344 -1.824726   L
1    -0.358893  1.404453  0.704965 -0.200638   B
2    -0.501840  0.659254 -0.421691 -0.057688   G
3     0.204886  1.074134  1.388361 -0.982404   R
4     0.354628 -0.133116  0.283763 -0.837063   Q
5     1.817480  0.742273  0.419395 -2.251035   Q
6    -0.776764  0.935518 -0.332872 -1.875641   U
       ...       ...       ...       ...  ..
9995  2.311896 -0.417070 -1.409599 -0.515821   L
9996 -0.479893 -0.650419  0.745152 -0.646038   E
9997  0.523331  0.787112  0.486066  1.093156   K
9998 -0.362559  0.598894 -1.843201  0.887292   G
9999 -0.096376 -1.012999 -0.657431 -0.573315   0


df = pd.read_csv(path + '\data\ex6.csv', nrows=5) # 只读取前5行


# 执行结果:
        one       two     three      four key
0  0.467976 -0.038649 -0.295344 -1.824726   L
1 -0.358893  1.404453  0.704965 -0.200638   B
2 -0.501840  0.659254 -0.421691 -0.057688   G
3  0.204886  1.074134  1.388361 -0.982404   R
4  0.354628 -0.133116  0.283763 -0.837063   Q


# 将1000行数据存储到chunker中
chunker = pd.read_csv(path + '\data\ex6.csv', chunksize=1000)
print(chunker)

# 执行结果:
<pandas.io.parsers.TextFileReader object at 0x000000000BCC4F98>


# 再统计key值的取值次数
total = pd.Series([])
for piece in chunker:
    total = total.add(piece['key'].value_counts(), fill_value=0)    # fill_value 使用0填充空值
print(total[:10])


# 执行结果:
0    151.0
1    146.0
2    152.0
3    162.0
4    171.0
5    157.0
6    166.0
7    164.0
8    162.0
9    150.0
dtype: float64
注:df.column.values 和 df.column.value_counts()的区别:
values以列表形式返回指定column的所有取值
value_counts()返回指定column的不同取值次数
value_counts(1)返回指定column的不同取值频率
文件写出
data = pd.read_csv(path + '\data\ex5.csv')
print(data)


# 执行结果
  something  a   b     c  d   message
0       one  1      2         3.0   4     NaN
1              two    5      6      NaN   8    world
2             three  9     10      11.0  12         foo
data.to_csv(path + '\data\ex5_2.csv') # 写出文件到指定目录(windows下,后面要输出的文件名开头必须有个表示路径的'\',不然不会生成文件,也不报错,很诡异。。。)
输出的ex5_2.csv的内容:

data.to_csv(sys.stdout, sep='|')    # 以竖线分隔

# 执行结果:

 |something|a|b|c|d|message
0|one|1|2|3.0|4|
1|two|5|6||8|world
2|three|9|10|11.0|12|foo
data.to_csv(sys.stdout, na_rep='NULL')  # 以NULL填充na值

# 执行结果
,something,a,b,c,d,message
0,one,1,2,3.0,4,NULL
1,two,5,6,NULL,8,world
2,three,9,10,11.0,12,foo
data.to_csv(sys.stdout, index=False, header=False)  #   不选取索引名和列名

# 执行结果:
one,1,2,3.0,4,
two,5,6,,8,world
three,9,10,11.0,12,foo
data.to_csv(sys.stdout, index=False, columns=['a', 'b', 'c'])   # 重新设置列名

# 执行结果:
a,b,c
1,2,3.0
5,6,
9,10,11.0
# 将Series写入csv文件:
# pd.date_range() 用于生成一个固定频率的时间索引
dates = pd.date_range('1/1/2000', periods=7, freq='H')  # start 起始值, end 结束值, freq频率, periods周期
ts = pd.Series(np.arange(7), index=dates)   # 使用生成的时间索引指定
ts.to_csv(path + '\data\tseries.csv')
print(ts.index)


# 执行结果:
DatetimeIndex(['2000-01-01 00:00:00', '2000-01-01 01:00:00',
               '2000-01-01 02:00:00', '2000-01-01 03:00:00',
               '2000-01-01 04:00:00', '2000-01-01 05:00:00',
               '2000-01-01 06:00:00'],
              dtype='datetime64[ns]', freq='H')
生成的tseries.csv的内容:
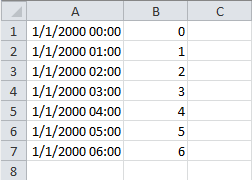
# parse_dates 指定某些列是否被解析为日期,布尔值或列表
data2 = pd.read_csv(path + '\data\tseries.csv', header=None, parse_dates=True)
print(data2)


# 执行结果:
                     0  1
0  2000-01-01 00:00:00  0
1  2000-01-01 01:00:00  1
2  2000-01-01 02:00:00  2
3  2000-01-01 03:00:00  3
4  2000-01-01 04:00:00  4
5  2000-01-01 05:00:00  5
6  2000-01-01 06:00:00  6
Tips: 如果IDE包含IPython(我用的是Spyder),在IPython界面输入 cd $path命令即可进入path变量所指定的目录下,就不用每次读取和写出时都带path了。

ex7.csv内容:

f = open('ex7.csv')    # 打开csv文件
reader = csv.reader(f)    # 使用csv.reader()读取
for line in reader:    # 逐行打印
    print(line)

# 执行结果:
['a', 'b', 'c']
['1', '2', '3']
['1', '2', '3', '4']

# 转换成列表
lines = list(csv.reader(open('ex7.csv')))
header, values = lines[0], lines[1:]    # 取第一行作为header,其余行作为values
# 先将values解压为元组,再与header合并,组成字典
data_dict = {h: v for h,v in zip(header, zip(*values))}
print(data_dict)

# 执行结果:
{'a': ('1', '1'), 'b': ('2', '2'), 'c': ('3', '3')}
使用csv.Dialect自定义文件格式
# 通常用于数据中包含特殊字符的情况
class my_dialect(csv.Dialect):
  # 自定义一个继承csv.Dialect的类
    lineterminator = '
'   # 每行结束符
    delimiter = ';'         # 定义分隔符
    quotechar = '"'         # 定义给包含特殊字符的数据所添加的符号
    quoting = csv.QUOTE_MINIMAL # 仅对包含特殊字符的数据加quotechar中定义的符号

csv.register_dialect('mycsv', my_dialect)   # 使用自定义名称mycsv 注册上面的类
with open('mydata.csv', 'w') as file_obj:  # 使用自定义文件格式写入数据
    writer = csv.writer(file_obj, 'mycsv')
    writer.writerow(('one', 'two', 'three'))
    writer.writerow(('1', '2', '3'))
    writer.writerow(('4', '5', '6'))
    writer.writerow(('7', '8', '9'))
生成的mydata.csv内容:
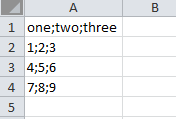
在mydata.csv文件中加入特殊符号(5前面加了单引号):
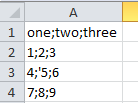
# 不带dialect的读取:
with open('mydata.csv', 'r') as file_obj:
    reader = csv.reader(file_obj)
    for row in reader:
        print(row)


# 执行结果:
['one;two;three']
['1;2;3']
["4;'5;6"]
['7;8;9']
# 带dialect的读取:
with open('mydata.csv', 'r') as file_obj:
    reader = csv.reader(file_obj, dialect='mycsv')
    for row in reader:
        print(row)


# 执行结果:
['one', 'two', 'three']
['1', '2', '3']
['4', "'5", '6']
['7', '8', '9']
发现在使用了自定义的dialect后,只有带特殊符号的数据被加了双引号("'5")
将数据转储为Excel的xls工作薄(xlwt)
wb = xlwt.Workbook()
print(wb)   # Workbook类型的对象

# 执行结果:
<xlwt.Workbook.Workbook object at 0x000000000BD1DC88>
wb.add_sheet('first_sheet', cell_overwrite_ok=True) # 新增名为first_sheet的sheet页,并且可覆盖写入
wb.get_active_sheet() # 获取当前sheet页序号
ws_1 = wb.get_sheet(0) # 根据获取的序号激活该sheet页
print(ws_1)
wb.add_sheet('first_sheet', cell_overwrite_ok=True) # 新增名为first_sheet的sheet页,并且可覆盖写入
wb.get_active_sheet()   # 获取当前sheet页序号
ws_1 = wb.get_sheet(0)  # 根据获取的序号激活该sheet页
print(ws_1)

# 执行结果:
<xlwt.Worksheet.Worksheet object at 0x000000000BD1D748>
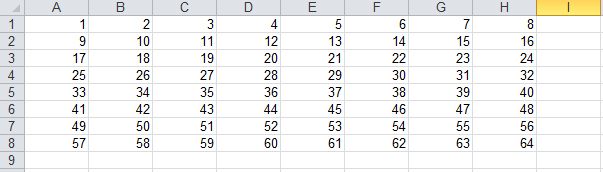
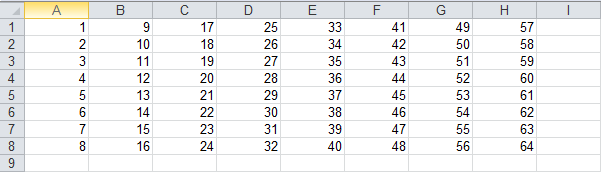
ws_2 = wb.add_sheet('second_sheet') # 在wb中再增加一张sheet页ws_2
data = np.arange(1, 65).reshape(8, 8)
ws_1.write(0, 0, 100)   # 在0行0列的位置写入100

# 将生成的data分别写入wb的两个sheet页中
for row in range(data.shape[0]):
    for col in range(data.shape[1]):
        # 需要将数据类型为numpy.int32的数组元素转换为int类型
        ws_1.write(row, col, int(data[row, col]))   # 先写行,后写列
        ws_2.write(row, col, int(data[col, row]))   # 先写列, 后写行

wb.save('workbook.xls') # 保存结果到xls文件中
first_sheet:
second_sheet:
生成xlsx工作簿(xlrd)
book = xlrd.open_workbook('workbook.xls')   # 读取刚才生成的工作簿文件
print(book) # Book对象

# 执行结果:
<xlrd.book.Book object at 0x000000000BC5B9E8>
常用方法:
print(book.nsheets)    # 查看sheet总页数
print(book.sheet_names())  # 查看所有的sheet页名

# 执行结果:
2
['first_sheet', 'second_sheet']
sheet_1 = book.sheet_by_name('first_sheet')  # 通过页名获取sheet页
sheet_2 = book.sheet_by_index(1)    # 通过索引获取sheet页
print(sheet_1.name) # sheet页名称
print(sheet_1.nrows)    # 总行数
print(sheet_1.ncols)    # 总行数

# 执行结果:
first_sheet
8
8
c1 = sheet_1.cell(0, 0)   # 返回(0, 0)(返回类型为xlrd.sheet.Cell)
print(c1)
print(c1.value) # 只返回实际值
print(c1.ctype) # 返回c1对应的数据类型(0: None, 1: string, 2: number, 3: date, 4: bool, 5: error)

# 执行结果:
number:1.0
1.0
2
print(sheet_2.row(1))   # 获取第1行的数据
result = [number.value for number in sheet_2.row(1)]# 通过.value获取实际值
print(result)

# 执行结果:
[number:2.0, number:10.0, number:18.0, number:26.0, number:34.0, number:42.0, number:50.0, number:58.0]
[2.0, 10.0, 18.0, 26.0, 34.0, 42.0, 50.0, 58.0]
print(sheet_2.row_values(1))    # 直接返回包含实际值的列表,省去了上面的转换过程
print(sheet_2.row_types(0)) # 返回第0行的数据类型列表(对应关系同ctype)

# 执行结果:
[2.0, 10.0, 18.0, 26.0, 34.0, 42.0, 50.0, 58.0]
array('B', [2, 2, 2, 2, 2, 2, 2, 2])
print(sheet_2.col(3))   # 获取第4列的数据
print(sheet_2.col_values(3, start_rowx=3, end_rowx=7))  # 获取第四列中第4行到第7行的数据
print(sheet_2.row_values(3, start_colx=3, end_colx=7)) # 获取第四行中第4列到第7列的数据

# 执行结果:
[number:25.0, number:26.0, number:27.0, number:28.0, number:29.0, number:30.0, number:31.0, number:32.0]
[28.0, 29.0, 30.0, 31.0]
[28.0, 36.0, 44.0, 52.0]
# 逐行打印
for row in range(sheet_1.ncols):
    for col in range(sheet_1.nrows):
        print(sheet_1.cell(row, col).value)

# 执行结果:
1.0
2.0
3.0
4.0
5.0
... ...
60.0
61.0
62.0
63.0
64.0
其他常用的数据格式
JSON格式
# 定义一个字符串类型的变量
obj = """
{"name": "Wes",
"places_lived": ["United States", "Spain", "Germany"],
"pet": null,
"siblings": [{"name": "Scott", "age": 25, "pet": "Zuko"},
              {"name": "Katie", "age": 33, "pet": "Cisco"}]
}
"""
result = json.loads(obj)    # 字符串 -> 字典
print(result)

asjson = json.dumps(result) # 字典 -> 字符串
print(asjson)

siblings = pd.DataFrame(result['siblings'], columns=['name', 'age', 'pet']) # 字典 -> DataFrame
print(siblings)

# 执行结果:
{'name': 'Wes', 'places_lived': ['United States', 'Spain', 'Germany'], 'pet': None, 'siblings': [{'name': 'Scott', 'age': 25, 'pet': 'Zuko'}, {'name': 'Katie', 'age': 33, 'pet': 'Cisco'}]}

{"name": "Wes", "places_lived": ["United States", "Spain", "Germany"], "pet": null, "siblings": [{"name": "Scott", "age": 25, "pet": "Zuko"}, {"name": "Katie", "age": 33, "pet": "Cisco"}]}

    name  age    pet
0  Scott   25   Zuko
1  Katie   33  Cisco
二进制数据格式
df = pd.read_csv('ex1.csv')
df.to_pickle('frame_pickle.bin')    # DataFrame -> 二进制格式
pickle = pd.read_pickle('frame_pickle.bin') # 二进制 -> DataFrame
print(pickle)

# 执行结果:
   a   b   c   d message
0  1   2   3   4   hello
1  5   6   7   8   world
2  9  10  11  12     foo
查看转换的frame_pickle.bin二进制文件内容:
HDF5格式(可压缩格式)
使用高性能HD5格式进行数据存储和访问,格式类似字典,适合存储格式统一的分层(hierarchical)数据
相关链接:
store = pd.HDFStore('mydata.h5')    # 生成存储文件
store['obj1'] = df          # 将数据保存在指定data_column下
store['obj1_col'] = df['a']
print(store)
print(store['obj1'])    # 使用data_column访问数据
store.close()   # 关闭文件,然后会将store中的数据实际写入本地文件

# 执行结果:
<class 'pandas.io.pytables.HDFStore'>
File path: mydata.h5
/obj1                frame        (shape->[3,5])
/obj1_col            series       (shape->[3])

   a   b   c   d message
0  1   2   3   4   hello
1  5   6   7   8   world
2  9  10  11  12     foo
关闭后在本地查看mydata.h5文件:

HDF5的压缩模式
data = pd.DataFrame(np.random.standard_normal((10000000, 10)))    # 使用标准正态分布生成一个较大数据量的DF进行对比
normal_store = pd.HDFStore('normal_store.h5')  # 普通方式
normal_store['data'] = data
normal_store.close()
# complevel指定压缩强度(0->9 数值越大,强度越高,0是不压缩)
# complib指定要使用的压缩库。可用的lib:
    # zlib: 默认lib
    # lzo: 压缩和解压都快
    # bzip2: 压缩率高
    # blosc: 压缩和解压都快
# pandas 0.20.2中又细分除了几种压缩lib,这里就不做详细介绍了
compress_store = pd.HDFStore('compress_store.h5', complevel=9, complib='bzip2') # 这里选择压缩率和强度较高的方式进行压缩
compress_store['data'] =  data
compress_store.close()
对比文件大小:


压缩了约144MB, 好像也不是特别明显,是不是数据量还不够大。。。 ):