“女朋友说想减肥了,该怎么回答她?”
有的男同胞饶有信心,认为这是一道送分题——当然是毫不迟疑地告诉女友:”不用减,你一点也不胖,仔细琢磨还有点瘦……”
No!还是太年轻,你们可能在一段感情的炙热里,但一看就不懂生活。答案早就更新n个版本了!我厂阿强近期也被提了此问,他给出了一个有技术含量的暖心答案——女友关心体态和体重器上的数量,阿强更关心她的身体健康。于是阿强发挥自己看家本事,写了个卡路里计数器,把对关怀女友精确到数字,用数字告诉她日常应该保持怎样的健康饮食和运动量,同时陪她一起践行健康生活。
阿强把整个开发过程分享出来,供广大男同胞学习和借鉴。以下便是如何通过Android Studio的Kotlin开发一个简单的卡路里计数器应用的全过程。
实现原理:
华为运动健康服务允许用户存储智能手机或其他设备收集的运动健康数据,如智能手表、智能手环和计步器上的数据。这些数据可以在生态系统中安全共享。
主要功能
· 数据存储:轻松存储你的运动与健康数据。
· 数据开放:除了提供许多运动和保健数据接口外,它还支持共享各种运动与健康数据,包括步数、体重和心率。
· 数据访问授权管理:用户可以管理开发人员对其运动与健康数据的访问,保障自身的数据隐私和合法权利。
· 设备访问:可以通过蓝牙测量硬件设备的数据,并允许我们上传这些数据。
应用功能
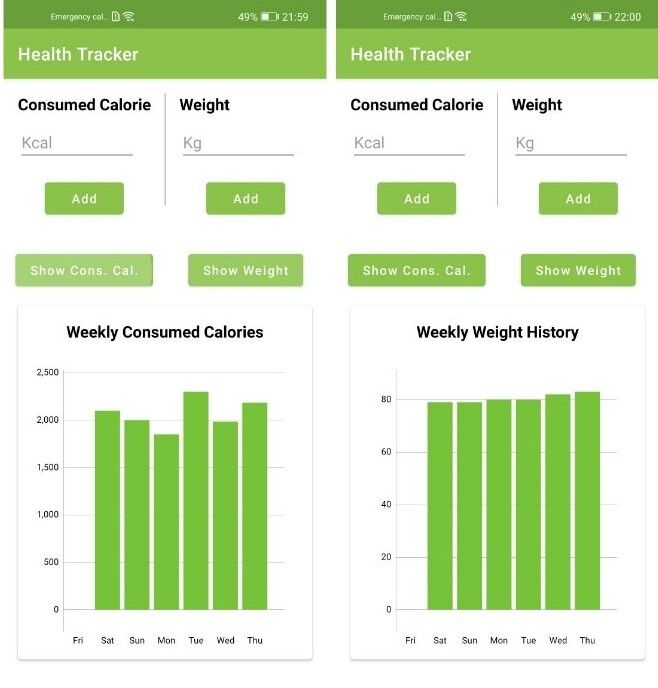
这个卡路里计数器应用包含两个界面。通过华为Account Kit的首页,点击“登录华为账号”按钮登录应用。登陆后进入下一个界面,在这个页面上,可添加“卡路里”和“体重”信息。信息以图形的方式显示,借助了MPAndroidChart的免费库。示例代码已在相关社区进行开源,欢迎开发者关注、下载并提供宝贵意见:
Github官方地址:https://github.com/HMS-Core/hms-health-demo-kotlin
Gitee官方地址:https://gitee.com/hms-core/hms-health-demo-kotlin
1. 集成HUAWEI HMS Core
首先,我们需要在Console上创建一个帐户,然后创建一个项目,并将其集成到应用中。可以按照此链接中概述的步骤快速完成此操作,也可以借助官方codelab来完成操作。
2. 集成华为运动健康服务
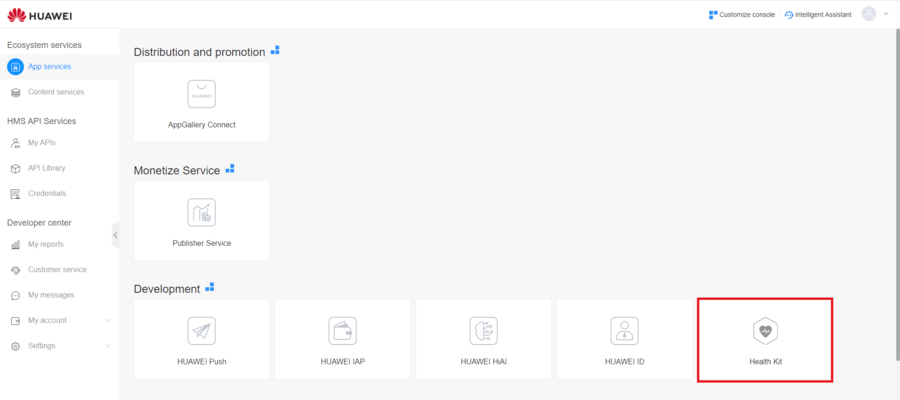
申请获取运动健康服务(Health Kit)。通过此链接登录Console后,单击下图中显示的“Health Kit”。
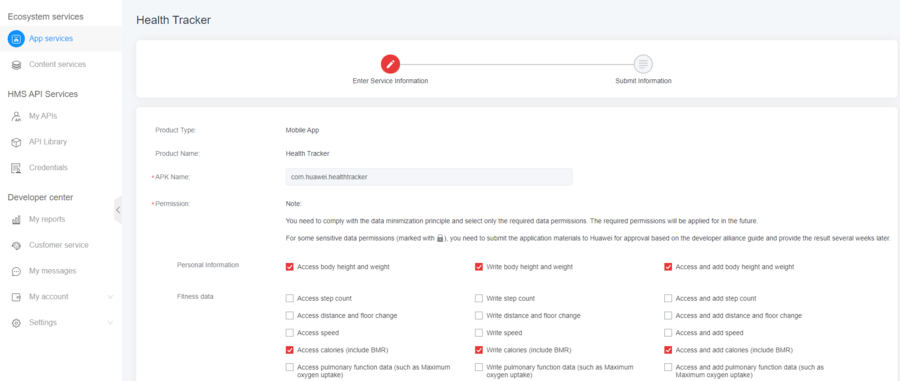
然后,单击“申请Health Kit”即可完成申请。

接下来需要请求应用使用数据的许可,包括“体重”和“卡路里”数据。只申请必要的数据权限,即“访问和添加身高和体重数据”和“访问和添加卡路里(包括基础代谢率BMR)数据”
然后单击“提交”按钮,完成所有流程。
需要注意的是,你会看到下图中的某些选项被锁定,因为它们是敏感数据。如果你想在应用中使用敏感数据,还需要发送电子邮件至hihealth@huawei.com邮箱,标题命名为“申请Health Kit开放权限”。对方会尽快回复。你可以从点击此链接获得更多详细信息。
在Console获得必要的权限后,打开Android Studio继续开发应用。
点击“build.gradle (工程级)”,然后将所需的依赖添加到项目级的“build.gradle”文件中。
注意:我们为图形库添加了jitpack链接。
maven {url ‘https://developer.huawei.com/repo/'}
maven { url ‘https://jitpack.io' }
点击打开“build.gradle(应用级)”文件。以下依赖关系对于运行Health Kit来说就足够了,但我们还将添加Account Kit和图形库的依赖关系。
 implementation 'com.huawei.agconnect:agconnect-core:1.4.2.301'
    implementation 'com.huawei.hms:hwid:5.1.0.301'
    implementation 'com.huawei.hms:health:5.1.0.301'
implementation 'com.github.PhilJay:MPAndroidChart:v3.1.0'
最后,打开“AndroidManifest.xml”文件,将App ID作为元数据信息添加到“Application”标签中。可以通过以下两种方法获取我们的应用ID:1. 进入Console,单击开发部分的“华为ID”,然后选择项目,查看应用ID。2. 在“agconnect-services.json”文件中找到应用ID。
        <meta-data
            android:name="com.huawei.hms.client.appid"
            android:value="您的应用 Id"/>
3. 开发应用
Health Kit为我们提供了3个API:
· DataController:添加、更新、删除和读取运动与健康数据。
· ActivityRecordsController:将活动记录写入平台并更新记录。
· AutoRecordController:读取实时运动与健康数据。
我们使用DataController在应用中处理卡路里和体重数据。Health Kit提供了安全可靠的数据服务,所以我们会请求用户允许使用他们的健康数据。
“activity_main.xml”文件包含logo、应用名、输入按钮等信息。
<?xml version="1.0" encoding="utf-8"?>
<androidx.constraintlayout.widget.ConstraintLayout xmlns:android="http://schemas.android.com/apk/res/android"
    xmlns:app="http://schemas.android.com/apk/res-auto"
    xmlns:tools="http://schemas.android.com/tools"
    android:layout_width="match_parent"
    android:layout_height="match_parent"
    tools:context=".MainActivity">
   <TextView
        android:id="@+id/tvAppName"
        android:layout_width="wrap_content"
        android:layout_height="wrap_content"
        android:layout_marginTop="8dp"
        android:text="@string/app_name"
        android:textColor="@color/colorPrimary"
        android:textSize="24sp"
        android:textStyle="bold"
        app:layout_constraintLeft_toLeftOf="parent"
        app:layout_constraintRight_toRightOf="parent"
        app:layout_constraintTop_toBottomOf="@+id/ivLogo" />
<com.huawei.hms.support.hwid.ui.HuaweiIdAuthButton
        android:id="@+id/btnLogin"
        android:layout_width="wrap_content"
        android:layout_height="wrap_content"
        app:layout_constraintBottom_toBottomOf="parent"
        app:layout_constraintEnd_toEndOf="parent"
        app:layout_constraintStart_toStartOf="parent"
        app:layout_constraintTop_toTopOf="parent"
        app:layout_constraintVertical_bias="0.7" />
<ImageView
        android:id="@+id/ivLogo"
        android:layout_width="172dp"
        android:layout_height="113dp"
        app:layout_constraintBottom_toBottomOf="parent"
        app:layout_constraintEnd_toEndOf="parent"
        app:layout_constraintHorizontal_bias="0.497"
        app:layout_constraintStart_toStartOf="parent"
        app:layout_constraintTop_toTopOf="parent"
        app:layout_constraintVertical_bias="0.3"
        app:srcCompat="@drawable/ic_logo" />
        </androidx.constraintlayout.widget.ConstraintLayout>
MainActivity.kt包含登录过程所需的代码。
package com.huawei.healthtracker

import android.content.Intent
import android.os.Bundle
import android.util.Log
import androidx.appcompat.app.AppCompatActivity
import com.huawei.hms.common.ApiException
import com.huawei.hms.hihealth.data.Scopes
import com.huawei.hms.support.api.entity.auth.Scope
import com.huawei.hms.support.hwid.HuaweiIdAuthManager
import com.huawei.hms.support.hwid.request.HuaweiIdAuthParams
import com.huawei.hms.support.hwid.request.HuaweiIdAuthParamsHelper
import com.huawei.hms.support.hwid.service.HuaweiIdAuthService
import com.huawei.hms.support.hwid.ui.HuaweiIdAuthButton

class MainActivity : AppCompatActivity() {

    private val TAG = "MainActivity"

    private lateinit var btnLogin: HuaweiIdAuthButton
    private lateinit var mAuthParam: HuaweiIdAuthParams
    private lateinit var mAuthService: HuaweiIdAuthService

    private val REQUEST_SIGN_IN_LOGIN = 1001


    override fun onCreate(savedInstanceState: Bundle?) {

        super.onCreate(savedInstanceState)
        setContentView(R.layout.activity_main)

        btnLogin = findViewById(R.id.btnLogin)

        btnLogin.setOnClickListener {
            signIn()
        }

    }

    private fun signIn() {

        val scopeList = listOf(
            Scope(Scopes.HEALTHKIT_CALORIES_BOTH),
            Scope(Scopes.HEALTHKIT_HEIGHTWEIGHT_BOTH),
        )

        mAuthParam =
            HuaweiIdAuthParamsHelper(HuaweiIdAuthParams.DEFAULT_AUTH_REQUEST_PARAM).apply {
                setIdToken()
                    .setAccessToken()
                    .setScopeList(scopeList)
            }.createParams()

        mAuthService = HuaweiIdAuthManager.getService(this, mAuthParam)

        val authHuaweiIdTask = mAuthService.silentSignIn()

        authHuaweiIdTask.addOnSuccessListener {
            val intent = Intent(this, CalorieTrackerActivity::class.java)
            startActivity(intent)
        }
            .addOnFailureListener {
                startActivityForResult(mAuthService.signInIntent, REQUEST_SIGN_IN_LOGIN)
            }
    }

    override fun onActivityResult(requestCode: Int, resultCode: Int, data: Intent?) {
        super.onActivityResult(requestCode, resultCode, data)

        when (requestCode) {
            REQUEST_SIGN_IN_LOGIN -> {

                val authHuaweiIdTask = HuaweiIdAuthManager.parseAuthResultFromIntent(data)
                if (authHuaweiIdTask.isSuccessful) {

                    val intent = Intent(this, CalorieTrackerActivity::class.java)
                    startActivity(intent)

                } else {
                    Log.i(
                        TAG,
                        "signIn failed: ${(authHuaweiIdTask.exception as ApiException).statusCode}"
                    )
                }
            }
        }
    }

}
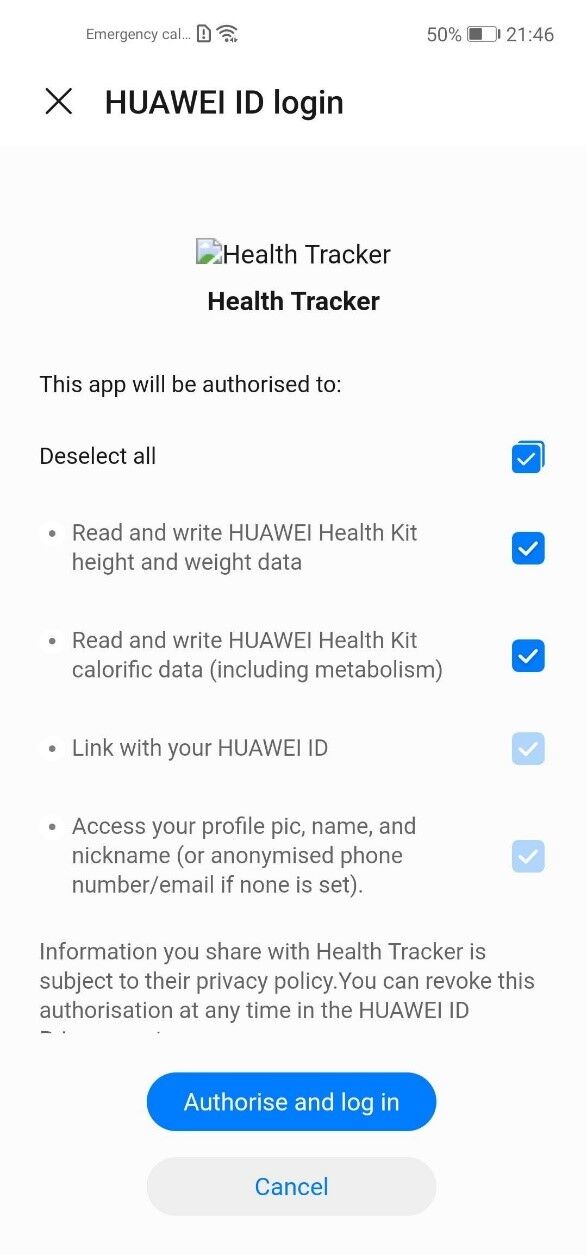
确保你已将数据的权限设置为“范围”。单击登录按钮时,用户将看到授权页面。并且,授权页面在“范围”字段中显示权限。默认情况下不标记这些权限,因此用户应标记它们。
在“CalorieTrackerActivity”页面上,可以添加和查看卡路里和体重信息。
“activity_calorie_tracker.xml”包含卡路里计数器页面的设计代码。
<?xml version="1.0" encoding="utf-8"?>
<androidx.constraintlayout.widget.ConstraintLayout xmlns:android="http://schemas.android.com/apk/res/android"
    xmlns:app="http://schemas.android.com/apk/res-auto"
    xmlns:tools="http://schemas.android.com/tools"
    android:layout_width="match_parent"
    android:layout_height="match_parent"
    tools:context=".CalorieTrackerActivity">
 <Button
        android:id="@+id/btnShowConsCal"
        android:layout_width="wrap_content"
        android:layout_height="wrap_content"
        android:layout_marginTop="32dp"
        android:text="Show Cons. Cal."
        android:textAllCaps="false"
        app:layout_constraintEnd_toStartOf="@+id/guideline"
        app:layout_constraintHorizontal_bias="0.5"
        app:layout_constraintStart_toStartOf="parent"
        app:layout_constraintTop_toBottomOf="@+id/btnAddConsumedCal" />
   <Button
        android:id="@+id/btnShowWeight"
        android:layout_width="wrap_content"
        android:layout_height="wrap_content"
        android:layout_marginTop="32dp"
        android:text="Show Weight"
        android:textAllCaps="false"
        app:layout_constraintEnd_toEndOf="parent"
        app:layout_constraintHorizontal_bias="0.5"
        app:layout_constraintStart_toStartOf="@+id/guideline"
        app:layout_constraintTop_toBottomOf="@+id/btnAddWeight" />
<Button
        android:id="@+id/btnAddConsumedCal"
        android:layout_width="wrap_content"
        android:layout_height="wrap_content"
        android:layout_marginTop="16dp"
        android:text="Add"
        android:textAllCaps="false"
        app:layout_constraintEnd_toStartOf="@+id/guideline"
        app:layout_constraintHorizontal_bias="0.5"
        app:layout_constraintStart_toStartOf="parent"
        app:layout_constraintTop_toBottomOf="@+id/etConsumedCal" />
    <Button
        android:id="@+id/btnAddWeight"
        android:layout_width="wrap_content"
        android:layout_height="wrap_content"
        android:layout_marginTop="16dp"
        android:text="Add"
        android:textAllCaps="false"
        app:layout_constraintEnd_toEndOf="parent"
        app:layout_constraintHorizontal_bias="0.5"
        app:layout_constraintStart_toStartOf="@+id/guideline"
        app:layout_constraintTop_toBottomOf="@+id/etBurntCal" />
  <TextView
        android:id="@+id/textView"
        android:layout_width="0dp"
        android:layout_height="wrap_content"
        android:layout_marginStart="16dp"
        android:layout_marginTop="16dp"
        android:text="Consumed Calorie"
        android:textColor="@color/black"
        android:textSize="18sp"
        android:textStyle="bold"
        app:layout_constraintEnd_toStartOf="@+id/guideline"
        app:layout_constraintStart_toStartOf="parent"
        app:layout_constraintTop_toTopOf="parent" />
<TextView
        android:id="@+id/textView2"
        android:layout_width="0dp"
        android:layout_height="wrap_content"
        android:layout_marginStart="16dp"
        android:layout_marginTop="16dp"
        android:text="Weight"
        android:textColor="@color/black"
        android:textSize="18sp"
        android:textStyle="bold"
        app:layout_constraintEnd_toEndOf="parent"
        app:layout_constraintStart_toStartOf="@+id/guideline"
        app:layout_constraintTop_toTopOf="parent" />
  <EditText
        android:id="@+id/etConsumedCal"
        android:layout_width="0dp"
        android:layout_height="wrap_content"
        android:layout_marginStart="16dp"
        android:layout_marginTop="8dp"
        android:layout_marginEnd="32dp"
        android:ems="10"
        android:hint="Kcal"
        android:inputType="number"
        android:maxLength="4"
        app:layout_constraintEnd_toStartOf="@+id/guideline"
        app:layout_constraintStart_toStartOf="parent"
        app:layout_constraintTop_toBottomOf="@+id/textView" />
  <EditText
        android:id="@+id/etBurntCal"
        android:layout_width="0dp"
        android:layout_height="wrap_content"
        android:layout_marginStart="16dp"
        android:layout_marginTop="8dp"
        android:layout_marginEnd="32dp"
        android:ems="10"
        android:hint="Kg"
        android:inputType="number"
        android:maxLength="3"
        app:layout_constraintEnd_toEndOf="parent"
        app:layout_constraintStart_toStartOf="@+id/guideline"
        app:layout_constraintTop_toBottomOf="@+id/textView2" />
  <androidx.constraintlayout.widget.Guideline
        android:id="@+id/guideline"
        android:layout_width="wrap_content"
        android:layout_height="wrap_content"
        android:orientation="vertical"
        app:layout_constraintGuide_percent="0.5"
        app:layout_constraintTop_toTopOf="parent" />
 <View
        android:id="@+id/view_vertical"
        android:layout_width="1dp"
        android:layout_height="0dp"
        android:layout_marginTop="16dp"
        android:layout_marginBottom="16dp"
        android:background="@android:color/darker_gray"
        app:layout_constraintBottom_toBottomOf="@+id/btnAddConsumedCal"
        app:layout_constraintEnd_toEndOf="parent"
        app:layout_constraintStart_toStartOf="parent"
        app:layout_constraintTop_toTopOf="parent" />
 <androidx.cardview.widget.CardView
        android:layout_width="0dp"
        android:layout_height="0dp"
        android:layout_marginStart="16dp"
        android:layout_marginTop="16dp"
        android:layout_marginEnd="16dp"
        android:layout_marginBottom="32dp"
        android:background="@color/colorCardBackground"
        app:cardCornerRadius="4dp"
        app:layout_constraintBottom_toBottomOf="parent"
        app:layout_constraintEnd_toEndOf="parent"
        app:layout_constraintStart_toStartOf="parent"
        app:layout_constraintTop_toBottomOf="@+id/btnShowWeight">
<LinearLayout
            android:layout_width="match_parent"
            android:layout_height="match_parent"
            android:orientation="vertical">
  <TextView
                android:id="@+id/tvChartHead"
                android:layout_width="match_parent"
                android:layout_height="wrap_content"
                android:layout_marginTop="16dp"
                android:gravity="center_horizontal"
                android:text="Weekly Consumed Calories"
                android:textColor="@color/black"
                android:textSize="18sp"
                android:textStyle="bold" />
   <com.github.mikephil.charting.charts.BarChart
                android:id="@+id/barchartWeeklyCal"
                android:layout_width="match_parent"
                android:layout_height="match_parent"
                android:layout_margin="16dp"
                android:background="@android:color/white" />
        </LinearLayout>
    </androidx.cardview.widget.CardView>
</androidx.constraintlayout.widget.ConstraintLayout>
刚刚我们介绍了Data Controllers,现在就来创建一个Data Controller,然后将要使用的数据写入权限。
class CalorieTrackerActivity : AppCompatActivity() {
  // ...
    private lateinit var dataController: DataController

    override fun onCreate(savedInstanceState: Bundle?) {
        super.onCreate(savedInstanceState)
        setContentView(R.layout.activity_calorie_tracker)

        initDataController()

        //...
    }

     private fun initDataController() {
        val hiHealthOptions = HiHealthOptions.builder()
            .addDataType(DataType.DT_CONTINUOUS_CALORIES_CONSUMED, HiHealthOptions.ACCESS_READ)
            .addDataType(DataType.DT_CONTINUOUS_CALORIES_CONSUMED, HiHealthOptions.ACCESS_WRITE)
            .addDataType(DataType.DT_INSTANTANEOUS_BODY_WEIGHT, HiHealthOptions.ACCESS_READ)
            .addDataType(DataType.DT_INSTANTANEOUS_BODY_WEIGHT, HiHealthOptions.ACCESS_WRITE)
            .build()

        val signInHuaweiId = HuaweiIdAuthManager.getExtendedAuthResult(hiHealthOptions)
        dataController = HuaweiHiHealth.getDataController(this, signInHuaweiId)
    }


}
通过addConsumedCalorie方法来记录数据。此前,需要设置一个时间间隔:将当前时间作为结束时间,并将其之前的一秒作为开始时间。
      private fun addConsumedCalorie(calorie: Float) {
      val dataCollector: DataCollector = DataCollector.Builder().setPackageName(this)
            .setDataType(DataType.DT_CONTINUOUS_CALORIES_CONSUMED)
            .setDataGenerateType(DataCollector.DATA_TYPE_RAW)
            .build()

        val sampleSet = SampleSet.create(dataCollector)

        val currentTime = System.currentTimeMillis()

        val samplePoint = sampleSet.createSamplePoint()
            .setTimeInterval(currentTime - 1, currentTime, TimeUnit.MILLISECONDS)
        samplePoint.getFieldValue(Field.FIELD_CALORIES).setFloatValue(calorie)
        sampleSet.addSample(samplePoint)

        val insertTask: Task<Void> = dataController.insert(sampleSet)

        insertTask.addOnSuccessListener {
            Toast.makeText(this, "Calorie added successfully", Toast.LENGTH_SHORT).show()
        }.addOnFailureListener { e ->
            Toast.makeText(this, e.message.toString(), Toast.LENGTH_LONG).show()
        }
    }
我们创建了一个名为addWightData的方法,类似于addConsumedCalori方法。但这一次,输入的开始时间和结束时间的值必须相同。否则,当输入重量信息时,应用将出现崩溃。我们还更改了数据类型。
    private fun addWeightData(weight: Float) {
        val dataCollector: DataCollector = DataCollector.Builder().setPackageName(this)
            .setDataType(DataType.DT_INSTANTANEOUS_BODY_WEIGHT)
            .setDataGenerateType(DataCollector.DATA_TYPE_RAW)
            .build()

        val sampleSet = SampleSet.create(dataCollector)

        val currentTime = System.currentTimeMillis()

        val samplePoint = sampleSet.createSamplePoint()
            .setTimeInterval(currentTime, currentTime, TimeUnit.MILLISECONDS)
        samplePoint.getFieldValue(Field.FIELD_BODY_WEIGHT).setFloatValue(weight)
        sampleSet.addSample(samplePoint)

        val insertTask: Task<Void> = dataController.insert(sampleSet)

        insertTask.addOnSuccessListener {
            Toast.makeText(this, "Weight added successfully", Toast.LENGTH_SHORT).show()
        }.addOnFailureListener { e ->
            Toast.makeText(this, e.message.toString(), Toast.LENGTH_SHORT).show()
        }
    }
接下来使用readConsumedData方法来读取消耗的卡路里数据。我们选择了一周前到当前的时间范围,然后检索了这个时间范围内的所有数据,并将其作为时间值放在Map上。最后,调用showCaloriesWeekly方法在条形图中显示这些数据。
   private fun readConsumedData() {

        val caloriesMap = mutableMapOf<Long, Float>()

        val endDate = System.currentTimeMillis()
        val startDate = endDate - SIX_DAY_MILLIS

        val readOptions = ReadOptions.Builder()
            .read(DataType.DT_CONTINUOUS_CALORIES_CONSUMED)
            .setTimeRange(startDate, endDate, TimeUnit.MILLISECONDS).build()

        val readReplyTask = dataController.read(readOptions)

        readReplyTask.addOnSuccessListener { readReply ->
            for (sampleSet in readReply.sampleSets) {
                if (sampleSet.isEmpty.not()) {
                    sampleSet.samplePoints.forEach {
                        caloriesMap.put(
                            it.getStartTime(TimeUnit.MILLISECONDS),
                            it.getFieldValue(Field.FIELD_CALORIES).asFloatValue()
                        )
                    }
                } else {
                    Toast.makeText(this, "No data to show", Toast.LENGTH_SHORT).show()
                }
            }

            showCaloriesWeekly(caloriesMap)

        }.addOnFailureListener {
            Log.i(TAG, it.message.toString())
        }
    }
使用readWightData方法来检索记录的体重信息。
    private fun readWeightData() {

        val weightsMap = mutableMapOf<Long, Float>()

        val endDate = System.currentTimeMillis()
        val startDate = endDate - SIX_DAY_MILLIS

        val readOptions = ReadOptions.Builder().read(DataType.DT_INSTANTANEOUS_BODY_WEIGHT)
            .setTimeRange(startDate, endDate, TimeUnit.MILLISECONDS).build()

        val readReplyTask = dataController.read(readOptions)

        readReplyTask.addOnSuccessListener { readReply ->

            for (sampleSet in readReply.sampleSets) {
                if (sampleSet.isEmpty.not()) {
                    sampleSet.samplePoints.forEach {
                        weightsMap.put(
                            it.getStartTime(TimeUnit.MILLISECONDS),
                            it.getFieldValue(Field.FIELD_BODY_WEIGHT).asFloatValue()
                        )
                    }
                } else {
                    Toast.makeText(this, "No data to show", Toast.LENGTH_SHORT).show()
                }
            }

            showWeightsWeekly(weightsMap)

        }.addOnFailureListener {
            Log.i(TAG, it.message.toString())
        }
    }
使用showCaloriesWeekly方法获取上周的数据作为时间值。在获取值后,将上周每天的数据相加。最后调用initBarChart方法在条形图上显示每日数据。
    private fun showCaloriesWeekly(dataList: Map<Long, Float>) {

        val arrangedValuesAsMap = mutableMapOf<Long, Float>()
        val currentTimeMillis = System.currentTimeMillis()

        var firstDayCal = 0f
        var secondDayCal = 0f
        var thirdDayCal = 0f
        var fourthDayCal = 0f
        var fifthDayCal = 0f
        var sixthDayCal = 0f
        var seventhDayCal = 0f

        dataList.forEach { (time, value) ->
            when (time) {
                in getTodayStartInMillis()..currentTimeMillis -> {
                    seventhDayCal += value
                }
                in getTodayStartInMillis() - ONE_DAY_MILLIS until getTodayStartInMillis() -> {
                    sixthDayCal += value
                }
                in getTodayStartInMillis() - ONE_DAY_MILLIS * 2 until
                        getTodayStartInMillis() - ONE_DAY_MILLIS -> {
                    fifthDayCal += value
                }
                in getTodayStartInMillis() - ONE_DAY_MILLIS * 3 until
                        getTodayStartInMillis() - ONE_DAY_MILLIS * 2 -> {
                    fourthDayCal += value
                }
                in getTodayStartInMillis() - ONE_DAY_MILLIS * 4 until
                        getTodayStartInMillis() - ONE_DAY_MILLIS * 3 -> {
                    thirdDayCal += value
                }
                in getTodayStartInMillis() - ONE_DAY_MILLIS * 5 until
                        getTodayStartInMillis() - ONE_DAY_MILLIS * 4 -> {
                    secondDayCal += value
                }
                in getTodayStartInMillis() - ONE_DAY_MILLIS * 6 until
                        getTodayStartInMillis() - ONE_DAY_MILLIS * 5 -> {
                    firstDayCal += value
                }
            }
        }

        arrangedValuesAsMap.put(getTodayStartInMillis() - ONE_DAY_MILLIS * 6, firstDayCal)
        arrangedValuesAsMap.put(getTodayStartInMillis() - ONE_DAY_MILLIS * 5, secondDayCal)
        arrangedValuesAsMap.put(getTodayStartInMillis() - ONE_DAY_MILLIS * 4, thirdDayCal)
        arrangedValuesAsMap.put(getTodayStartInMillis() - ONE_DAY_MILLIS * 3, fourthDayCal)
        arrangedValuesAsMap.put(getTodayStartInMillis() - ONE_DAY_MILLIS * 2, fifthDayCal)
        arrangedValuesAsMap.put(getTodayStartInMillis() - ONE_DAY_MILLIS, sixthDayCal)
        arrangedValuesAsMap.put(getTodayStartInMillis(), seventhDayCal)

        initBarChart(arrangedValuesAsMap)

    }
showWightWeekly的工作原理几乎与showCaloriesWeekly方法相似。它们之间唯一的区别是,我们不在showWightWeekly方法中求和每日值,而是只获得每日的一个最新值。
    private fun showWeightsWeekly(dataList: Map<Long, Float>) {

        val arrangedValuesAsMap = mutableMapOf<Long, Float>()
        val currentTimeMillis = System.currentTimeMillis()

        var firstDayWeight = 0f
        var secondDayWeight = 0f
        var thirdDayWeight = 0f
        var fourthDayWeight = 0f
        var fifthDayWeight = 0f
        var sixthDayWeight = 0f
        var seventhDayWeight = 0f

        dataList.forEach { (time, value) ->
            when (time) {
                in getTodayStartInMillis()..currentTimeMillis -> {
                    seventhDayWeight = value
                }
                in getTodayStartInMillis() - ONE_DAY_MILLIS until getTodayStartInMillis() -> {
                    sixthDayWeight = value
                }
                in getTodayStartInMillis() - ONE_DAY_MILLIS * 2 until
                        getTodayStartInMillis() - ONE_DAY_MILLIS -> {
                    fifthDayWeight = value
                }
                in getTodayStartInMillis() - ONE_DAY_MILLIS * 3 until
                        getTodayStartInMillis() - ONE_DAY_MILLIS * 2 -> {
                    fourthDayWeight = value
                }
                in getTodayStartInMillis() - ONE_DAY_MILLIS * 4 until
                        getTodayStartInMillis() - ONE_DAY_MILLIS * 3 -> {
                    thirdDayWeight = value
                }
                in getTodayStartInMillis() - ONE_DAY_MILLIS * 5 until
                        getTodayStartInMillis() - ONE_DAY_MILLIS * 4 -> {
                    secondDayWeight = value
                }
                in getTodayStartInMillis() - ONE_DAY_MILLIS * 6 until
                        getTodayStartInMillis() - ONE_DAY_MILLIS * 5 -> {
                    firstDayWeight = value
                }
            }
        }

        arrangedValuesAsMap.put(getTodayStartInMillis() - ONE_DAY_MILLIS * 6, firstDayWeight)
        arrangedValuesAsMap.put(getTodayStartInMillis() - ONE_DAY_MILLIS * 5, secondDayWeight)
        arrangedValuesAsMap.put(getTodayStartInMillis() - ONE_DAY_MILLIS * 4, thirdDayWeight)
        arrangedValuesAsMap.put(getTodayStartInMillis() - ONE_DAY_MILLIS * 3, fourthDayWeight)
        arrangedValuesAsMap.put(getTodayStartInMillis() - ONE_DAY_MILLIS * 2, fifthDayWeight)
        arrangedValuesAsMap.put(getTodayStartInMillis() - ONE_DAY_MILLIS, sixthDayWeight)
        arrangedValuesAsMap.put(getTodayStartInMillis(), seventhDayWeight)

        initBarChart(arrangedValuesAsMap)

    }
InitBarChart以图形形式显示数据。
    private fun initBarChart(values: MutableMap<Long, Float>) {

        var barIndex = 0f
        val labelWeekdayNames = arrayListOf<String>()
        val entries = ArrayList<BarEntry>()

        val simpleDateFormat = SimpleDateFormat("E", Locale.US)

        values.forEach { (time, value) ->
            labelWeekdayNames.add(simpleDateFormat.format(time))
            entries.add(BarEntry(barIndex, value))
            barIndex++
        }

        barChart.apply {
            setDrawBarShadow(false)
            setDrawValueAboveBar(false)
            description.isEnabled = false
            setDrawGridBackground(false)
            isDoubleTapToZoomEnabled = false
        }

        barChart.xAxis.apply {
            setDrawGridLines(false)
            position = XAxis.XAxisPosition.BOTTOM
            granularity = 1f
            setDrawLabels(true)
            setDrawAxisLine(false)
            valueFormatter = IndexAxisValueFormatter(labelWeekdayNames)
            axisMaximum = labelWeekdayNames.size.toFloat()
        }

        barChart.axisRight.isEnabled = false

        val legend = barChart.legend
        legend.isEnabled = false

        val dataSets = arrayListOf<IBarDataSet>()
        val barDataSet = BarDataSet(entries, " ")
        barDataSet.color = Color.parseColor("#76C33A")
        barDataSet.setDrawValues(false)
        dataSets.add(barDataSet)

        val data = BarData(dataSets)
        barChart.data = data
        barChart.invalidate()
        barChart.animateY(1500)

    }
此外
除了添加和读取运动与健康数据外,Health Kit还提供更新数据、删除数据和清除所有数据的功能。虽然我们没有在应用中使用这些功能,但也可以快速了解一下。
updateWight:可以在指定的时间范围内更新数据。如果想使用体重信息,那就需要将开始时间和结束时间设置为相同的时间值。但如果我们想更新卡路里值,就需要设置为一个稍长的时间范围。如果指定时间范围内没有要更新的值时,它将自动添加新的重量或卡路里值。
    private fun updateWeight(weight: Float, startTimeInMillis: Long, endTimeInMillis: Long) {

        val dataCollector: DataCollector = DataCollector.Builder().setPackageName(this)
            .setDataType(DataType.DT_INSTANTANEOUS_BODY_WEIGHT)
            .setDataGenerateType(DataCollector.DATA_TYPE_RAW)
            .build()

        val sampleSet = SampleSet.create(dataCollector)

        val samplePoint = sampleSet.createSamplePoint()
            .setTimeInterval(startTimeInMillis, endTimeInMillis, TimeUnit.MILLISECONDS)
        samplePoint.getFieldValue(Field.FIELD_BODY_WEIGHT).setFloatValue(weight)

        sampleSet.addSample(samplePoint)

        val updateOptions = UpdateOptions.Builder()
            .setTimeInterval(startTimeInMillis, endTimeInMillis, TimeUnit.MILLISECONDS)
            .setSampleSet(sampleSet)
            .build()

        dataController.update(updateOptions)
            .addOnSuccessListener {
                Toast.makeText(this, "Weight has been updated successfully", Toast.LENGTH_SHORT)
                    .show()
            }
            .addOnFailureListener { e ->
                Toast.makeText(this, e.message.toString(), Toast.LENGTH_SHORT).show()
            }

    }
deleteWight:删除指定范围内的值。
    private fun deleteWeight(startTimeInMillis: Long, endTimeInMillis: Long) {

        val dataCollector: DataCollector = DataCollector.Builder().setPackageName(this)
            .setDataType(DataType.DT_INSTANTANEOUS_BODY_WEIGHT)
            .setDataGenerateType(DataCollector.DATA_TYPE_RAW)
            .build()

        val deleteOptions = DeleteOptions.Builder()
            .addDataCollector(dataCollector)
            .setTimeInterval(startTimeInMillis, endTimeInMillis, TimeUnit.MILLISECONDS)
            .build()

        dataController.delete(deleteOptions).addOnSuccessListener {
            Toast.makeText(this, "Weight has been deleted successfully", Toast.LENGTH_SHORT)
                .show()
        }
            .addOnFailureListener { e ->
                Toast.makeText(this, e.message.toString(), Toast.LENGTH_SHORT).show()
            }

    }
clearHealthData:删除Health Kit中的所有数据。
   private fun clearHealthData() {

        dataController.clearAll()
            .addOnSuccessListener {
                Toast.makeText(this, "All Health Kit data has been deleted.", Toast.LENGTH_SHORT)
                    .show()
            }
            .addOnFailureListener { e ->
                Toast.makeText(this, e.message.toString(), Toast.LENGTH_SHORT).show()
            }

    }
提示和技巧
⚠️确保已将数据的权限设置为范围。否则,将返回错误代码50005。
⚠️使用data controller写入数据时,请确保使用正确的时间间隔。否则,当你尝试写入数据时,应用将发生崩溃。
欲了解HMS Core更多详情,请参阅:
>>华为开发者联盟官网
>>获取开发指导文档
>>参与开发者讨论请到CSDN社区或者Reddit社区
>>下载demo和示例代码请到Github或者Gitee
>>解决集成问题请到Stack Overflow
原作者:胡椒