关闭防火墙和selinux
[root@localhost ~]# systemctl stop firewalld
[root@localhost ~]# systemctl disable firewalld
Removed symlink /etc/systemd/system/multi-user.target.wants/firewalld.service.
Removed symlink /etc/systemd/system/dbus-org.fedoraproject.FirewallD1.service.
[root@localhost ~]# setenforce 0
[root@localhost ~]# sed -ri 's/^(SELINUX=).*/1disabled/g' /etc/selinux/config
[root@localhost ~]#  reboot

#安装epel源和一些常用工具
[root@localhost ~]# yum -y install epel-release vim wget net-tools unzip zip gcc gcc-c++
验证CPU是否支持KVM;如果结果中有vmx(Intel)或svm(AMD)字样,就说明CPU的支持的
[root@localhost ~]# egrep -o 'vmx|svm' /proc/cpuinfo
vmx

#kvm安装
[root@localhost ~]# yum -y install qemu-kvm qemu-kvm-tools qemu-img virt-manager libvirt libvirt-python libvirt-client virt-install virt-viewer bridge-utils libguestfs-tools
配置网卡
[root@localhost network-scripts]# cat ifcfg-br0
TYPE="Bridge"
NAME="br0"
DEVICE="br0"
IPADDR=192.168.248.135
GATEWAY=192.168.248.2
NETMASK=255.255.255.0
DNS1=114.114.114.114
[root@localhost network-scripts]# cat ifcfg-ens33
TYPE="Ethernet"
NAME="ens33"
DEVICE="ens33"
BRIDGE=br0
[root@localhost network-scripts]# systemctl restart network
启动服务
[root@localhost network-scripts]# systemctl start libvirtd
[root@localhost network-scripts]# systemctl enable libvirtd

[root@localhost network-scripts]# ln -s /usr/libexec/qemu-kvm /usr/bin/qemu-kvm
kvm web管理界面安装
#安装依赖
[root@localhost ~]# yum -y install git python-pip libvirt-python libxml2-python python-websockify supervisor nginx python-devel

#拉取代码
[root@localhost ~]# cd /usr/local/src/
[root@localhost src]# git clone git://github.com/retspen/webvirtmgr.git

#安装webvirtmgr
[root@localhost src]# cd webvirtmgr/
[root@localhost webvirtmgr]# pip install -r requirements.txt

#检查sqlite3是否安装
[root@localhost webvirtmgr]#  python
Python 2.7.5 (default, Nov 16 2020, 22:23:17)
[GCC 4.8.5 20150623 (Red Hat 4.8.5-44)] on linux2
Type "help", "copyright", "credits" or "license" for more information.
>>> import sqlite3
>>> exit()


#初始化账号信息
[root@localhost webvirtmgr]# ./manage.py syncdb

#cp网页到指定目录
[root@localhost webvirtmgr]#  mkdir /var/www
[root@localhost webvirtmgr]# cp -r /usr/local/src/webvirtmgr /var/www/
[root@localhost webvirtmgr]# chown -R nginx.nginx /var/www/webvirtmgr/

#生成密钥
[root@localhost ~]# ssh-keygen

#这里webvirtmgr和kvm服务部署在同一台机器,所以这里本地信任
[root@localhost ~]# ssh-copy-id  192.168.248.135

#配置端口转发
[root@localhost ~]# ssh 192.168.248.135 -L localhost:8000:localhost:8000 -L localhost:6080:localhost:60
Last login: Sat May 22 23:51:39 2021 from 192.168.248.1

#配置nginx
[root@localhost ~]# cp /etc/nginx/nginx.conf{,.bak}
[root@localhost ~]# vi /etc/nginx/nginx.conf
user nginx;
worker_processes auto;
error_log /var/log/nginx/error.log;
pid /run/nginx.pid;

include /usr/share/nginx/modules/*.conf;

events {
    worker_connections 1024;
}

http {
    log_format  main  '$remote_addr - $remote_user [$time_local] "$request" '
                      '$status $body_bytes_sent "$http_referer" '
                      '"$http_user_agent" "$http_x_forwarded_for"';

    access_log  /var/log/nginx/access.log  main;

    sendfile            on;
    tcp_nopush          on;
    tcp_nodelay         on;
    keepalive_timeout   65;
    types_hash_max_size 2048;

    include             /etc/nginx/mime.types;
    default_type        application/octet-stream;

    include /etc/nginx/conf.d/*.conf;

    server {
        listen       80;
        server_name  localhost;

        include /etc/nginx/default.d/*.conf;

        location / {
            root html;
            index index.html index.htm;
        }

        error_page 404 /404.html;
            location = /40x.html {
        }

        error_page 500 502 503 504 /50x.html;
            location = /50x.html {
        }
    }
}

[root@localhost ~]# vim /etc/nginx/conf.d/webvirtmgr.conf

server {
    listen 80 default_server;

    server_name $hostname;
    #access_log /var/log/nginx/webvirtmgr_access_log;

    location /static/ {
        root /var/www/webvirtmgr/webvirtmgr;
        expires max;
    }

    location / {
        proxy_pass http://127.0.0.1:8000;
        proxy_set_header X-Real-IP $remote_addr;
        proxy_set_header X-Forwarded-for $proxy_add_x_forwarded_for;
        proxy_set_header Host $host:$server_port;
        proxy_set_header X-Forwarded-Proto $remote_addr;
        proxy_connect_timeout 600;
        proxy_read_timeout 600;
        proxy_send_timeout 600;
        client_max_body_size 1024M;
    }
}

#确保bind绑定的是本机的8000端口
[root@localhost ~]# sed -n  '23p'  /var/www/webvirtmgr/conf/gunicorn.conf.py
bind = '127.0.0.1:8000'
重启nginx
[root@localhost ~]# systemctl restart nginx
设置supervisor
#文件尾部追加
[root@localhost ~]# vim /etc/supervisord.conf
............
[program:webvirtmgr]
command=/usr/bin/python2 /var/www/webvirtmgr/manage.py run_gunicorn -c /var/www/webvirtmgr/conf/gunicorn.conf.py
directory=/var/www/webvirtmgr
autostart=true
autorestart=true
logfile=/var/log/supervisor/webvirtmgr.log
log_stderr=true
user=nginx

[program:webvirtmgr-console]
command=/usr/bin/python2 /var/www/webvirtmgr/console/webvirtmgr-console
directory=/var/www/webvirtmgr
autostart=true
autorestart=true
stdout_logfile=/var/log/supervisor/webvirtmgr-console.log
redirect_stderr=true
user=nginx

#启动supervisor
[root@localhost ~]# systemctl enable --now supervisord
配置nginx用户
[root@localhost ~]# su - nginx -s /bin/bash
-bash-4.2$ ssh-keygen

-bash-4.2$ touch ~/.ssh/config && echo -e "StrictHostKeyChecking=no
UserKnownHostsFile=/dev/null" >> ~/.ssh/config
-bash-4.2$ chmod 0600 ~/.ssh/config

-bash-4.2$ ssh-copy-id root@192.168.248.135

-bash-4.2$ exit

[root@localhost ~]#  vim /etc/polkit-1/localauthority/50-local.d/50-libvirt-remote-access.pkla
[Remote libvirt SSH access]
Identity=unix-user:root
Action=org.libvirt.unix.manage
ResultAny=yes
ResultInactive=yes
ResultActive=yes

[root@localhost ~]# systemctl restart nginx
[root@localhost ~]# systemctl restart libvirtd
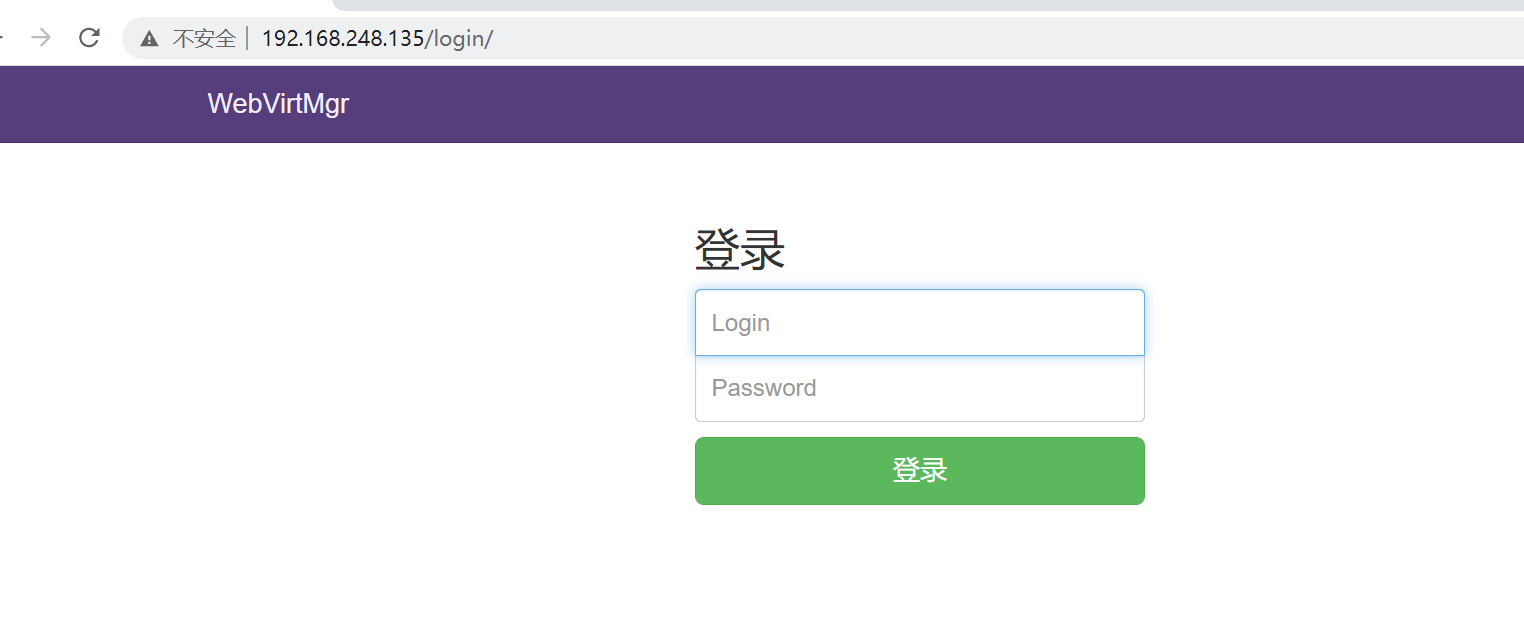
web上访问
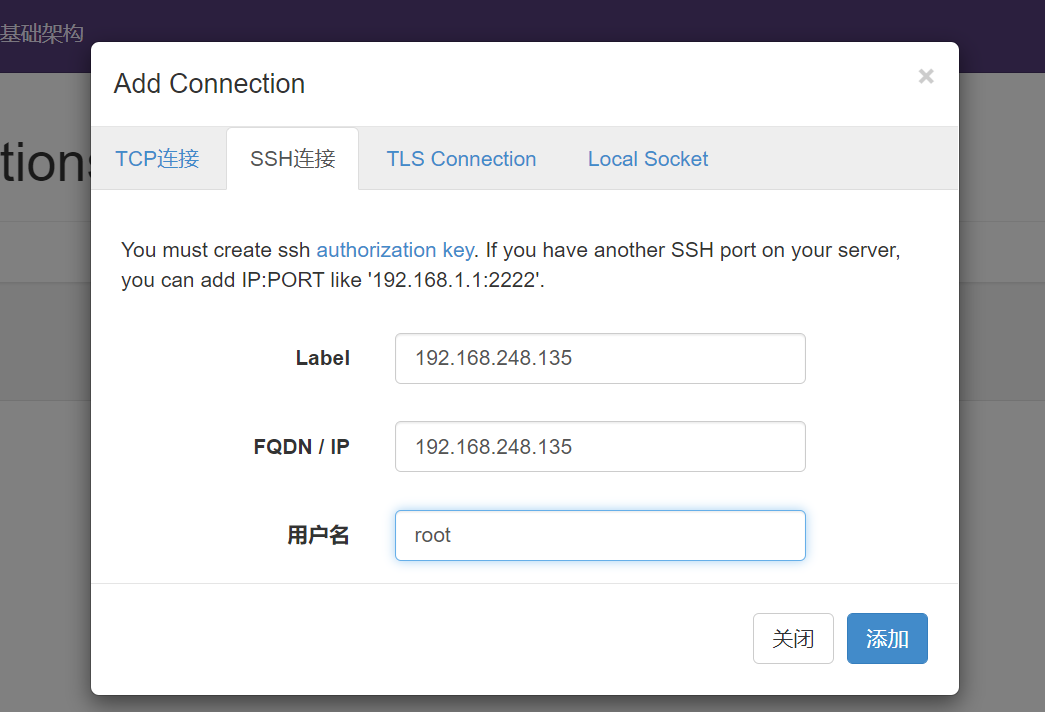
添加连接


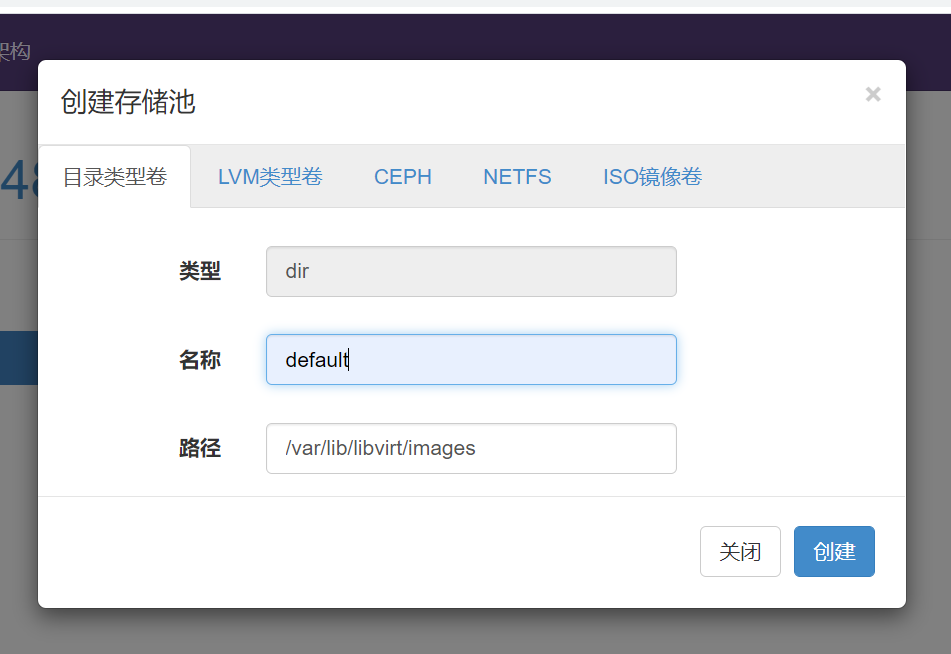
创建存储

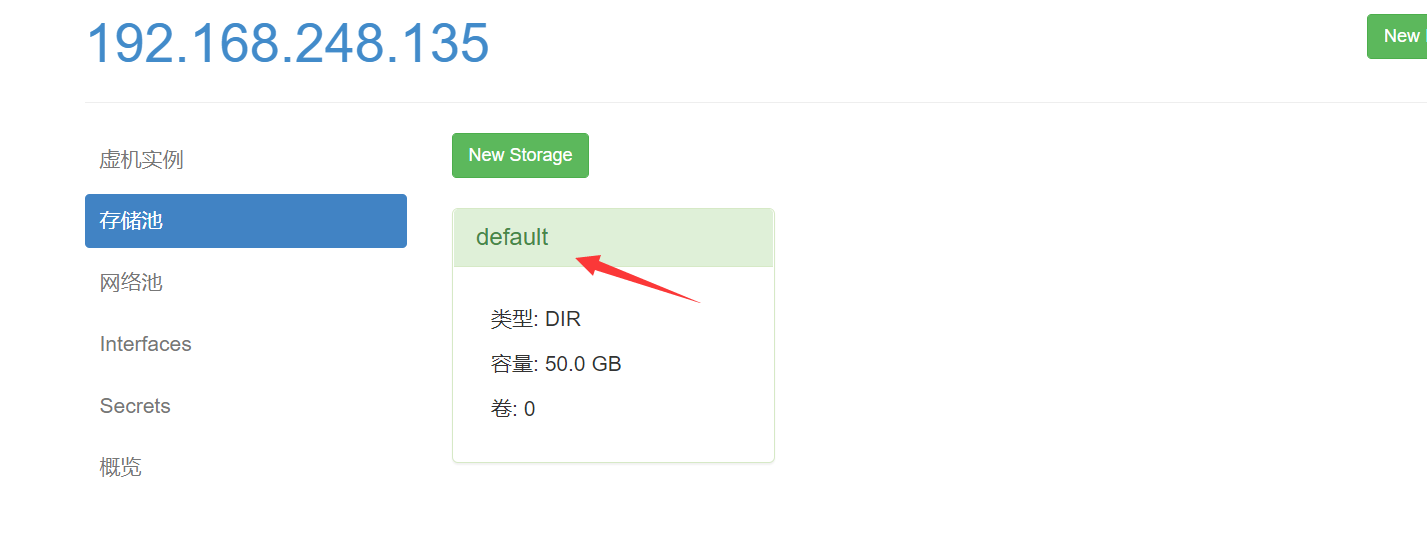
进入存储
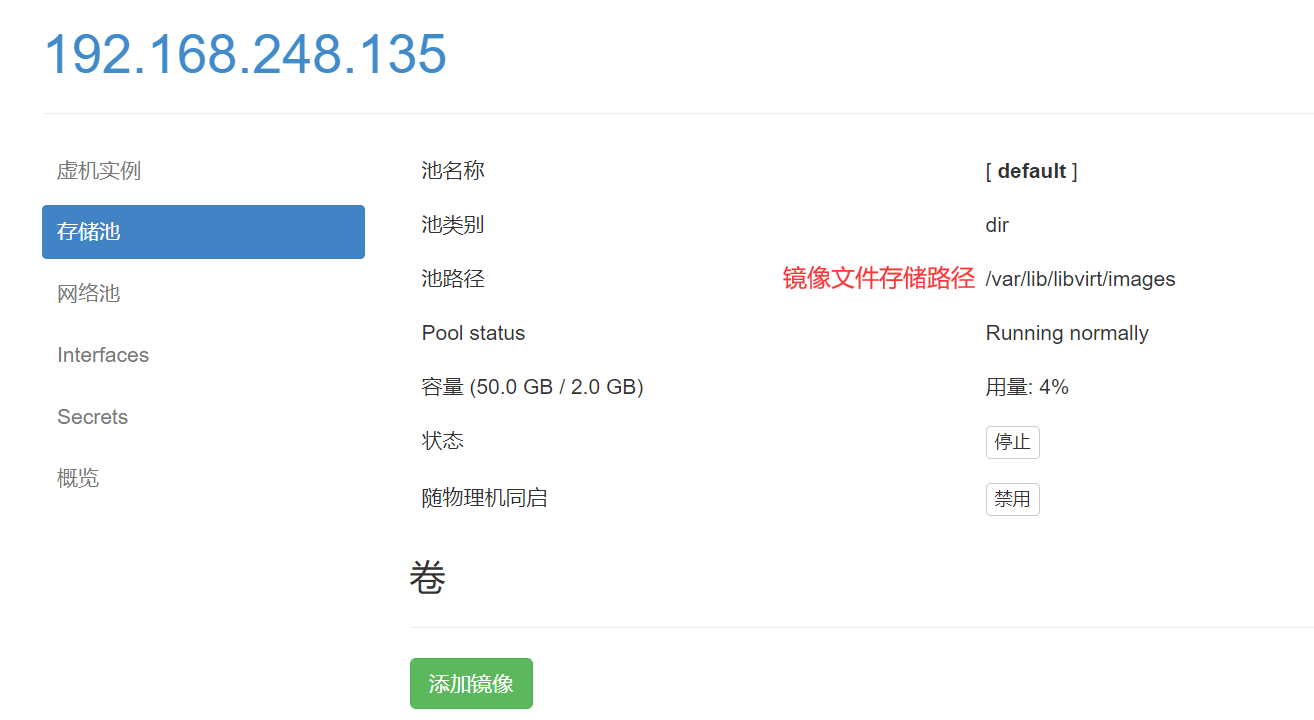
通过远程连接软件上传ISO镜像文件至存储目录/var/lib/libvirt/images/
[root@localhost ~]# ls  /var/lib/libvirt/images/
rhel-8.0-x86_64-dvd.iso
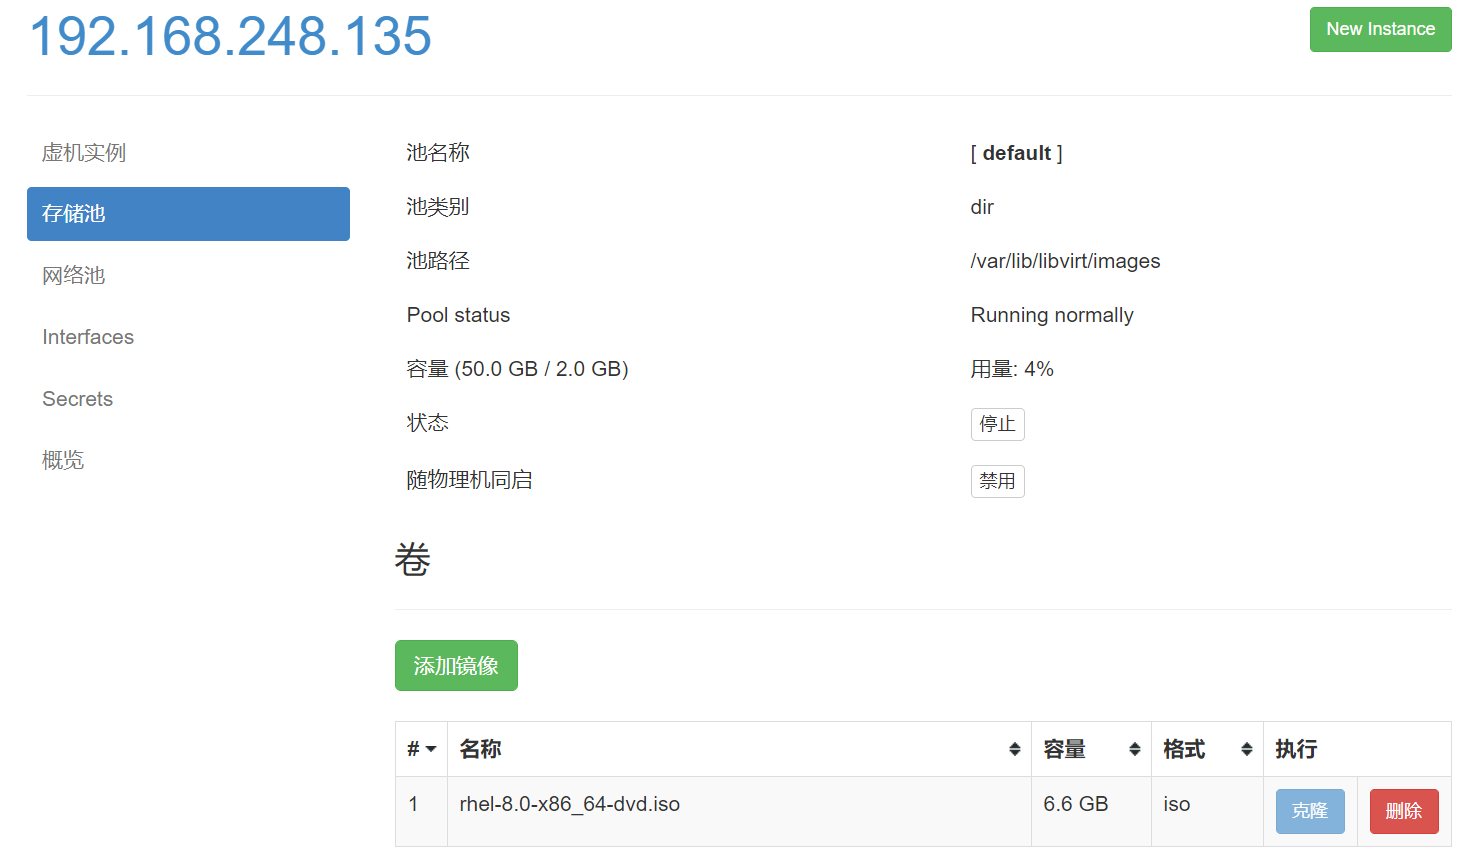
在web界面查看镜像
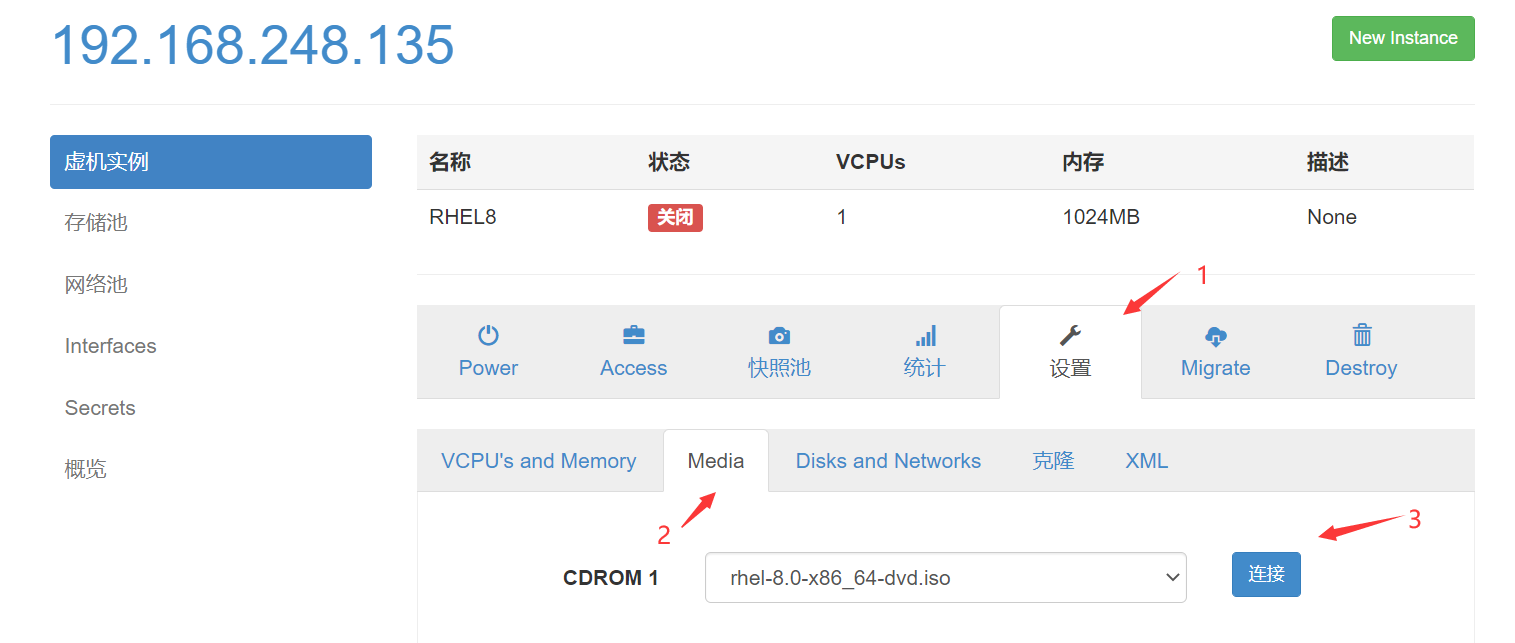
创建系统安装镜像


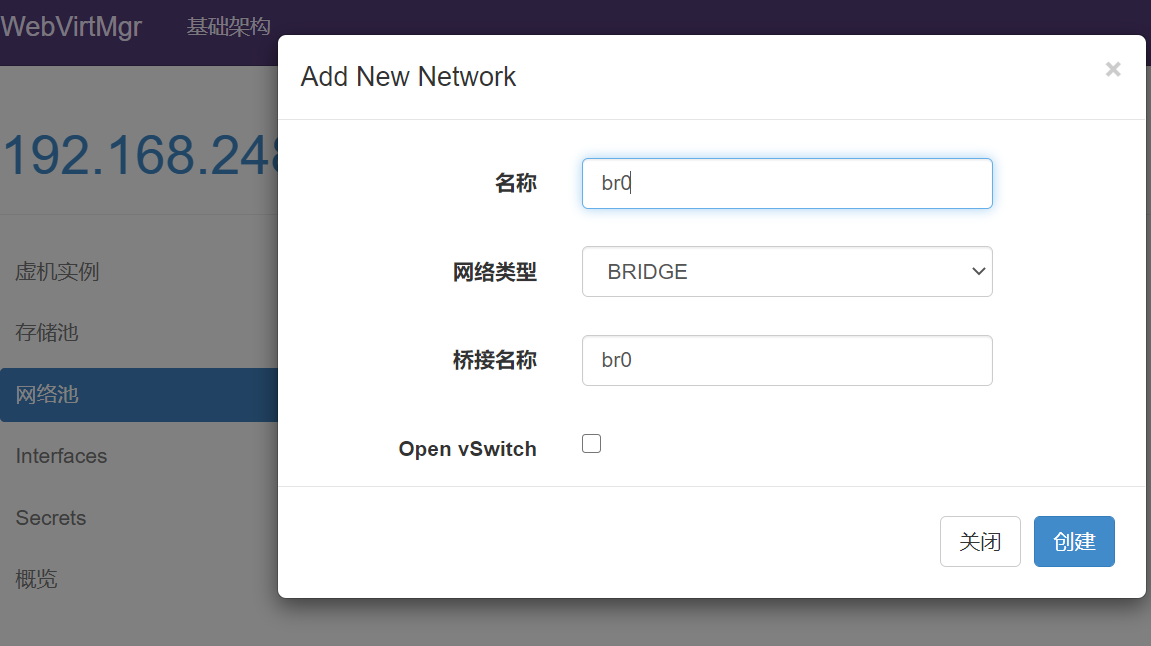
添加桥接网络
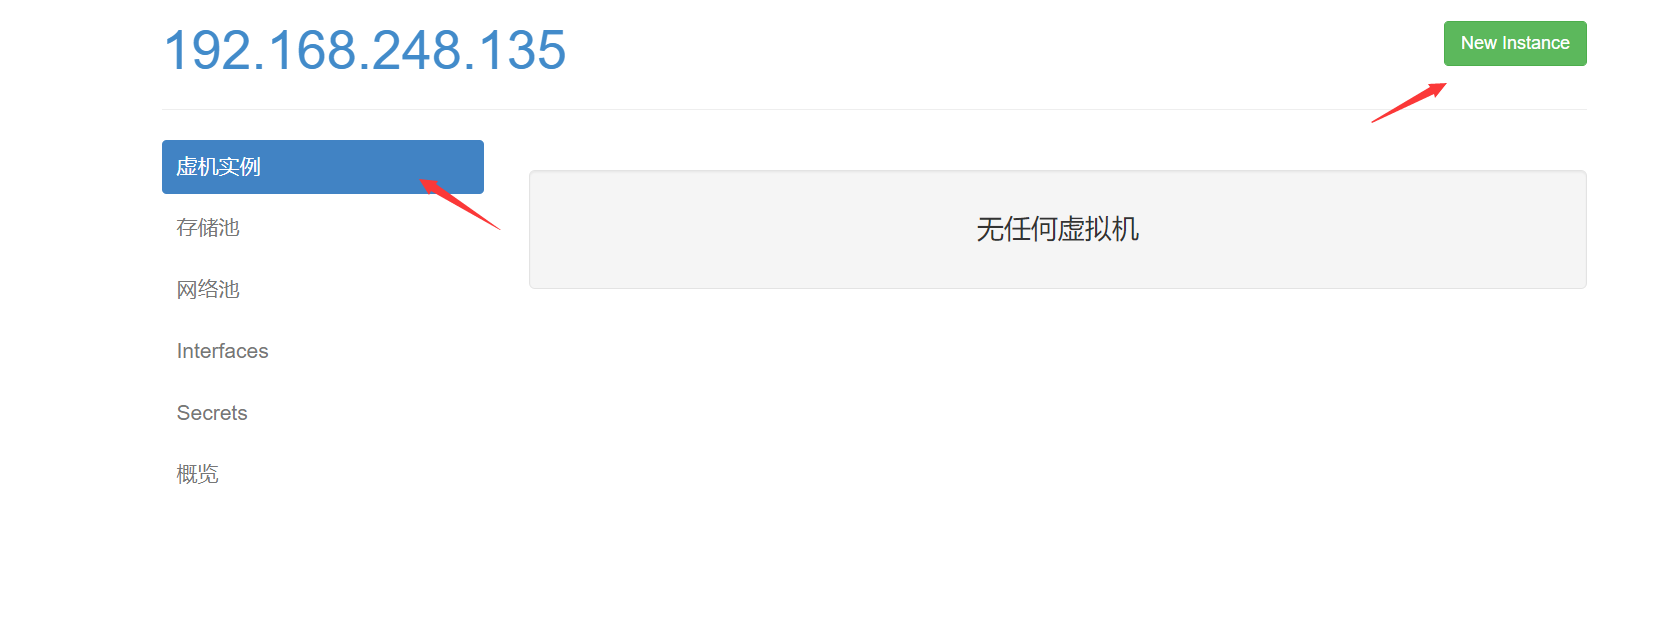
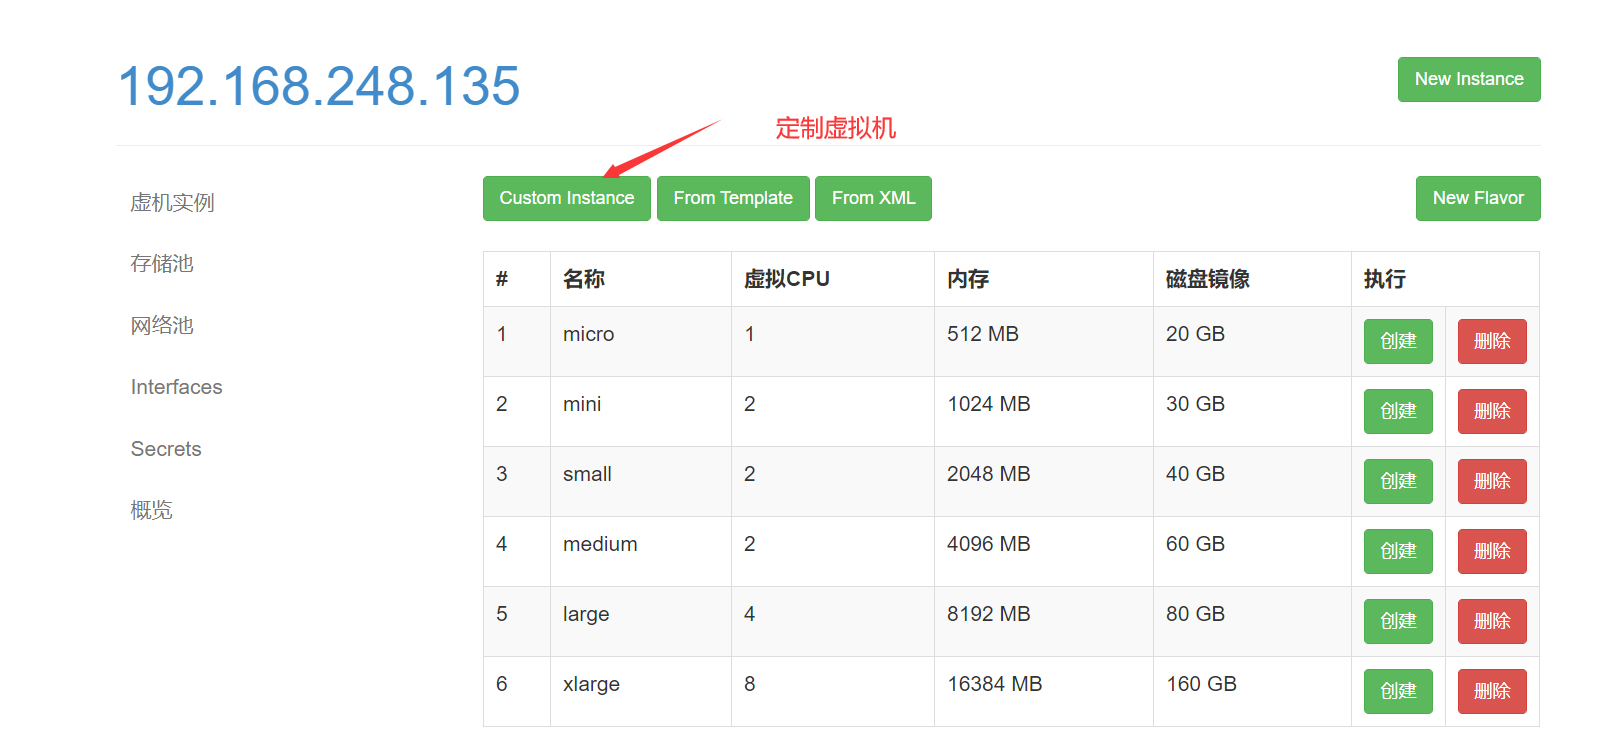
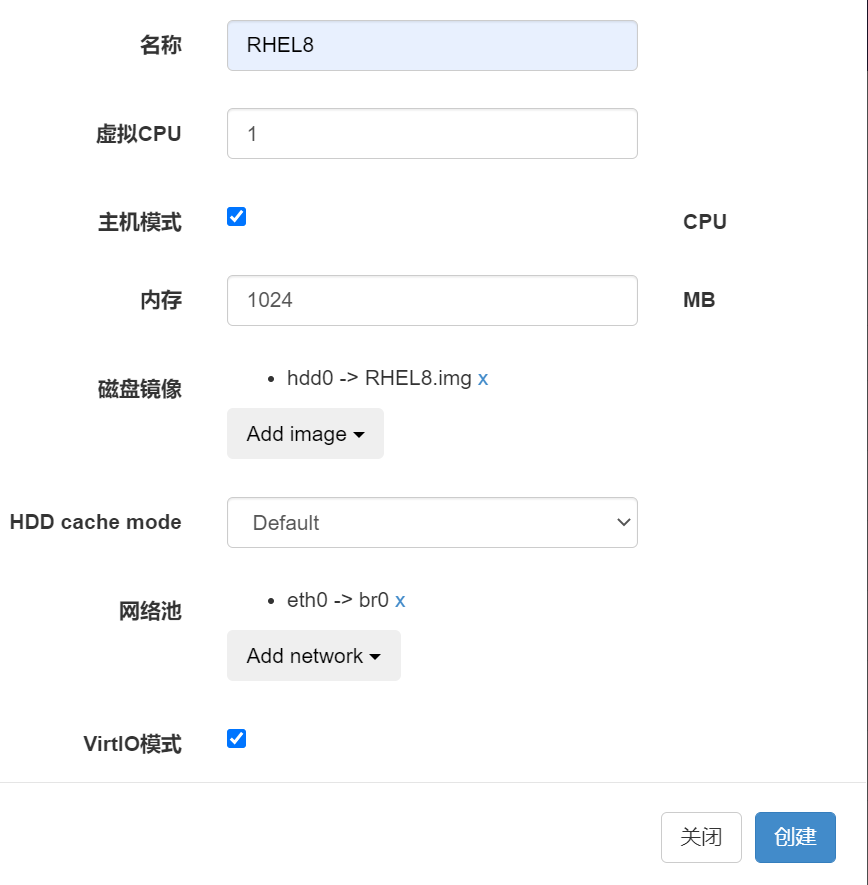
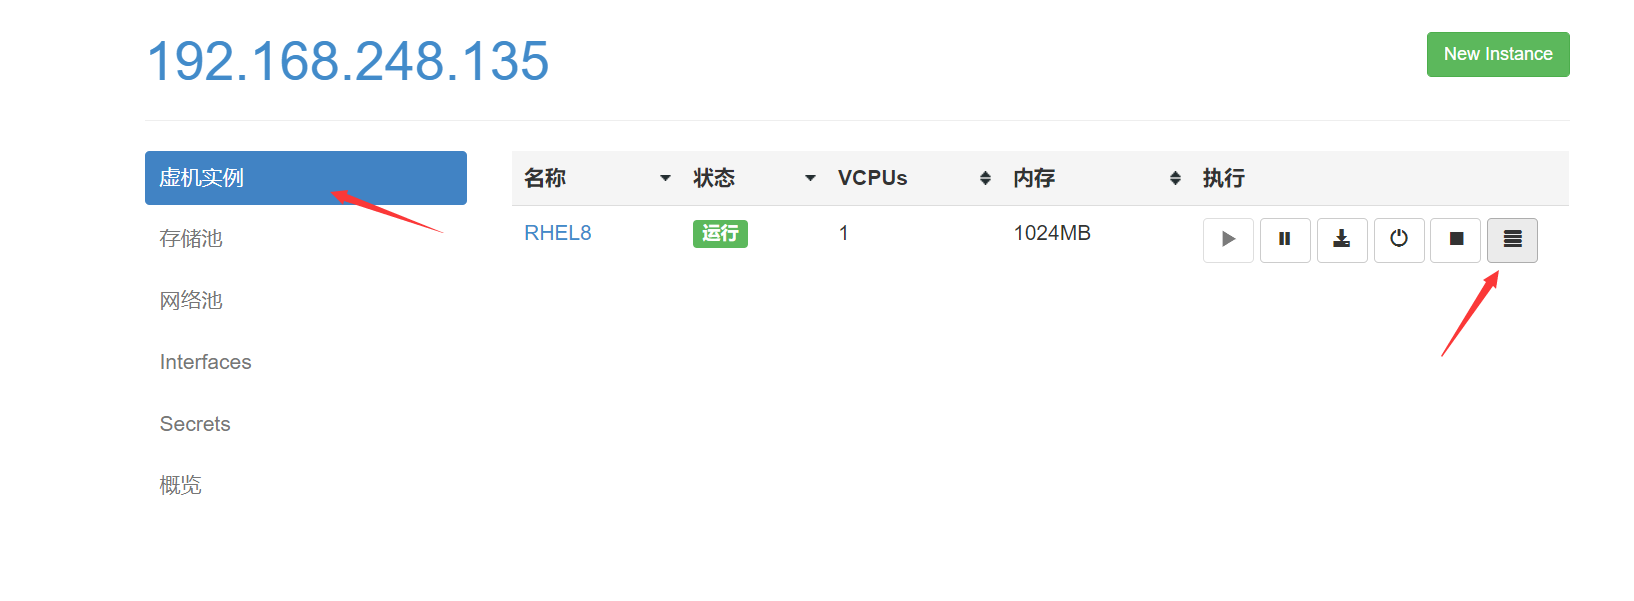
实例(虚拟机)创建
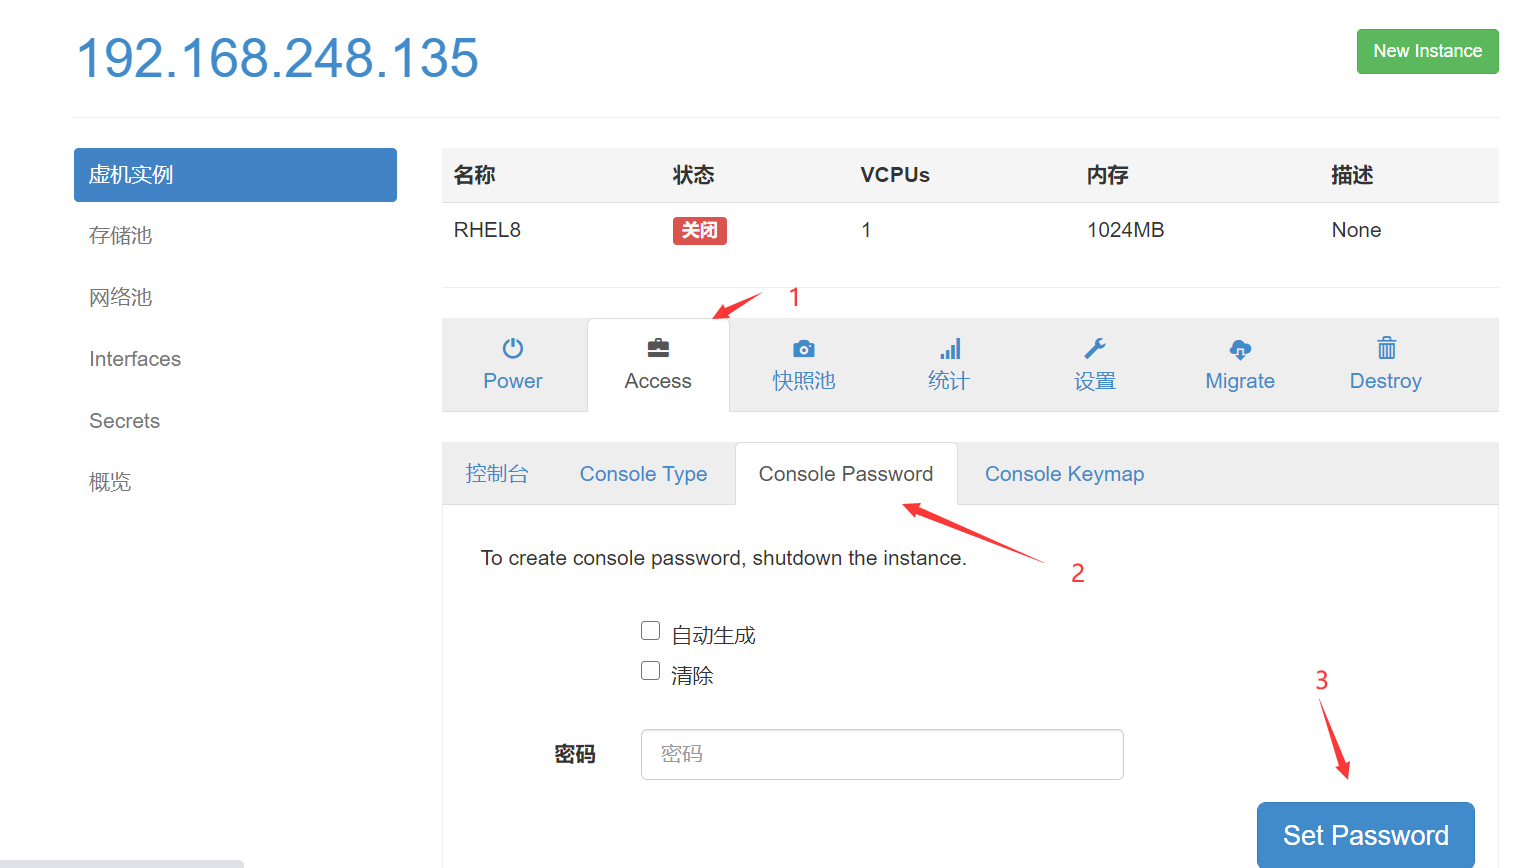
设置在 web 上访问虚拟机的密码
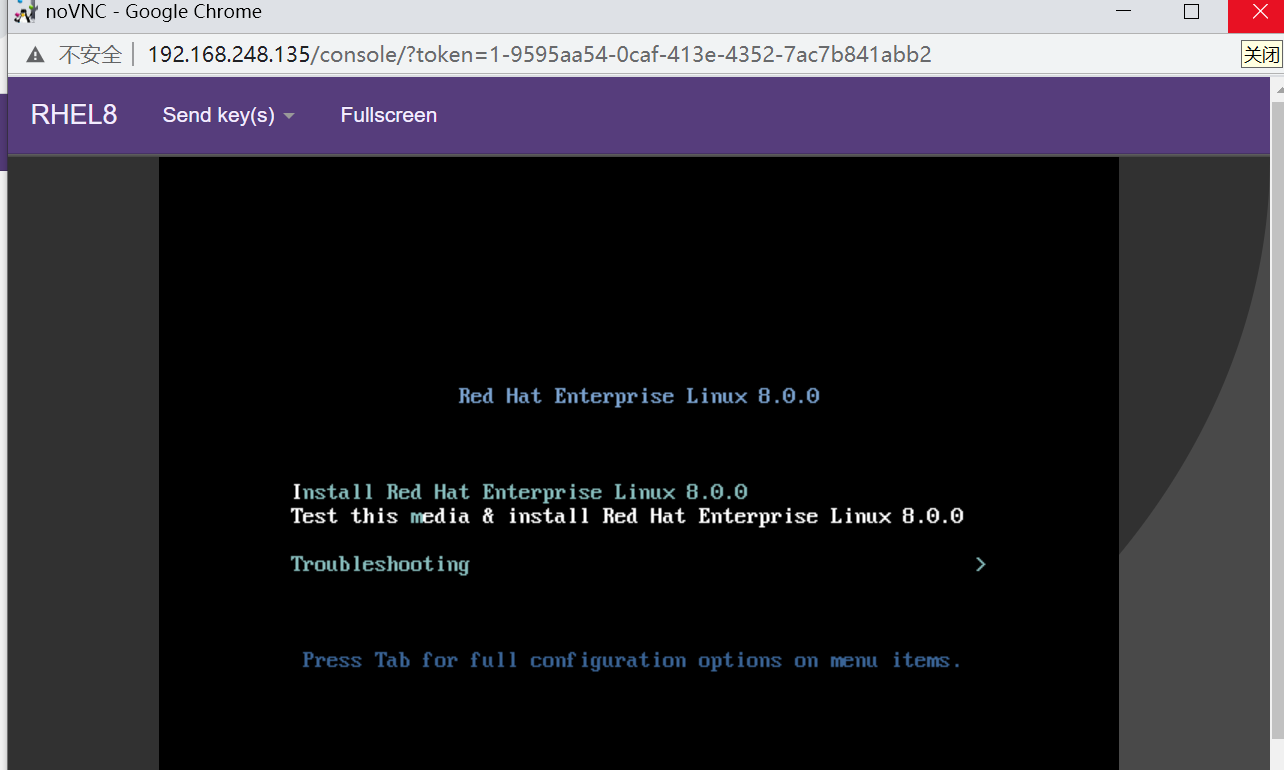
启动虚拟机

案例一
web界面配置完成后可能会出现以下错误界面
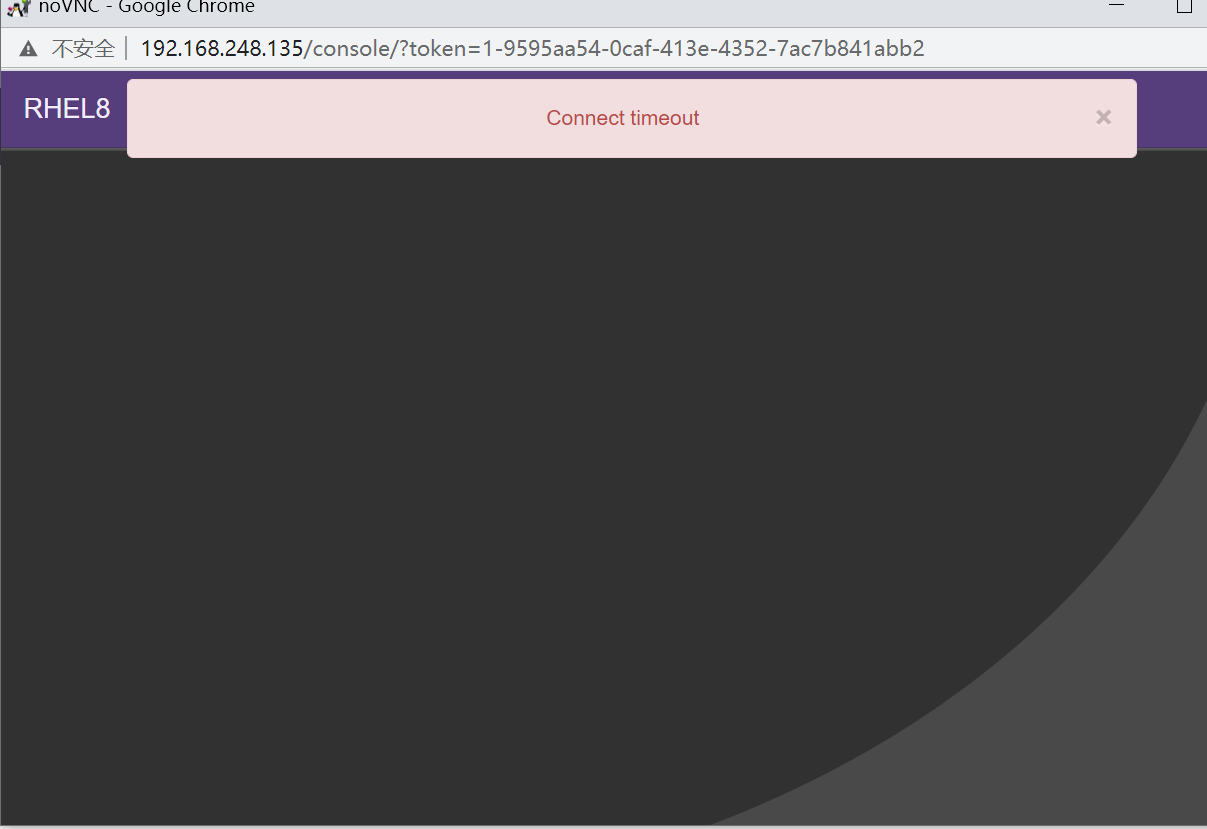
解决方法是安装novnc并通过novnc_server启动一个vnc
[root@localhost ~]# yum -y install novnc

[root@localhost ~]# chmod +x /etc/rc.d/rc.local
[root@localhost ~]# echo "nohup novnc_server 192.168.248.135:5920 &" >> /etc/rc.local

[root@localhost ~]# . /etc/rc.local
案例2
第一次通过web访问kvm时可能会一直访问不了,一直转圈,而命令行界面一直报错(too many open files)
此时需要对nginx进行配置
[root@localhost ~]# vim /etc/nginx/nginx.conf
....此处省略N行
user nginx;
worker_processes auto;
error_log /var/log/nginx/error.log;
pid /run/nginx.pid;
worker_rlimit_nofile 655350;    #添加此行配置

....此处省略N行

#然后对系统参数进行设置
[root@localhost ~]#  vim /etc/security/limits.conf
....此处省略N行
# End of file
* soft nofile 655350
* hard nofile 655350

[root@localhost ~]# sysctl -p
[root@localhost ~]#systemctl restart nginx


#关闭命令行界面报错(too many open files)终端,重新访问就行了