整体数据表结构示意图
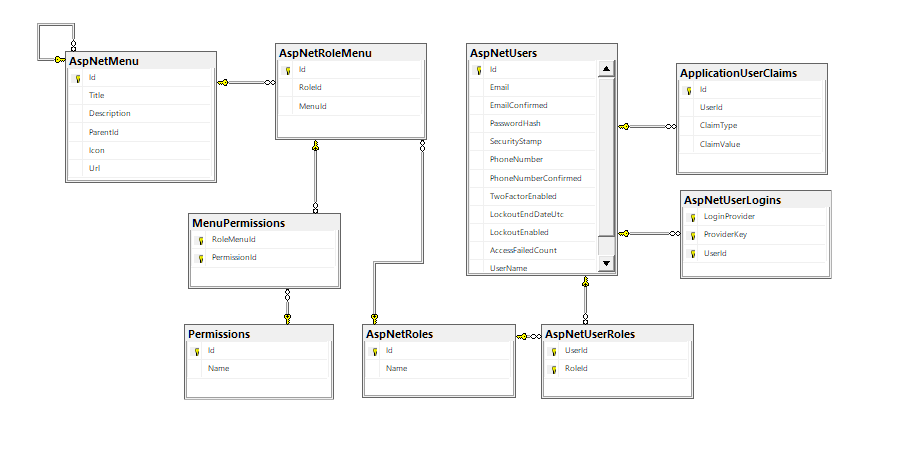
其中
AspNetUsers, AspNetUserLogins, AspNetRoles, AspNetUserRoles, and ApplicationUserClaims 是 Identity 中默认带的表结构
我们在这里增加
AspNetRoleMenu, MenuPermissions, Permissions, and AspNetMenu 4个数据表
why traverse the whole menu and permission tree when we haven't even used the most obvious choice.
当我们还没有使用最明显的选择时,为什么要遍历整个菜单和权限树呢?
用这种方法时间菜单访问控制,有一个表很重要就是ApplicationUserClaims!
Identity中的Claims有两个好处:
1.加载用户时,会自动加载Claims。
2.避免增加其他表。
Identity/MenuManager.cs
public ICollection<MenuPermission> GetMenuPermissionsByUser(ApplicationUser user)
{
    if (user == null)
    {
        return new Collection<MenuPermission>();
    }

    return _context.Roles
        .Include(role => role.MenuItems.Select(menu => menu.Permissions))
        .Where(role => role.Users.Any(tableUser => tableUser.UserId == user.Id))
        .SelectMany(role => role.MenuItems.SelectMany(roleMenu => roleMenu.Permissions))
        .ToList();
}


public ICollection<MenuItem> GetMenuByUser(ApplicationUser user,
    Func<MenuPermission, bool> filterFunc = null)
{
    var items = GetMenuPermissionsByUser(user);

    var records = filterFunc == null
        ? items.ToList()
        : items.Where(filterFunc).ToList();

    return records
        .GroupBy(menuPermission => menuPermission.RoleMenu.MenuItem)
        .Select(grouping => grouping.Key)
        .ToList();
}
Identity/ApplicationDbInitializer.cs
.
.
// Let's get our updated Ids
var menuManager = new MenuManager(context);

// DevPerms - No, it's not a new developer hairstyle. :-p
var devPerms = menuManager.GetMenuPermissionsByUser(devUser);

// Add our claims to each role.

// Developer
foreach (var menuPermission in devPerms)
{
    devUser.Claims.Add(new ApplicationUserClaim
    {
        UserId = devUser.Id,
        ClaimType = menuPermission.RoleMenu.MenuId.ToString(),
        ClaimValue = menuPermission.Permission.Name
    });
}
context.SaveChanges();


// Administrator
var adminPerms = menuManager.GetMenuPermissionsByUser(adminUser);

foreach (var menuPermission in adminPerms)
{
    adminUser.Claims.Add(new ApplicationUserClaim
    {
        UserId = adminUser.Id,
        ClaimType = menuPermission.RoleMenu.MenuId.ToString(),
        ClaimValue = menuPermission.Permission.Name
    });
}
context.SaveChanges();
Our goal here was to add Claims to each user based on their roles so we have an easy way to reference what they can and can't do.
The ApplicationUserClaim is made up of the following properties:
- UserId - Who is the owner of this Claim?
- ClaimType - This will be the MenuItem's Id.
- ClaimValue - What do they have permission to do on this menu item?
This makes our menu system even easier.
Here's the good news:
- We don't need to change anything in the controller
- This makes our Menu System even more flexible by adding any permission we want and we merely check the user's claim instead of hitting the database.
Minimal changes for a maximum impact.
If we run our application and log in as Frank, you can see we now have claims to check against our application as to what Frank can and can't do.
