一、BlueZ在ubuntu PC上的基础应用
1、bluez的安装及基本功能
dong@ubuntu:~/bluez$ ls
bluez-5.47.tar.xz SPP-loopback.py
dong@ubuntu:~/bluez$ tar xvf bluez-5.47.tar.xz
dong@ubuntu:~/bluez/bluez-5.47$ ./configure --prefix=/usr --mandir=/usr/share/man --sysconfdir=/etc --localstatedir=/var
make
make install
装完bluez,然后插上蓝牙适配器就可以测试了,如果不能启动就注销或者重启一下电脑。
2、bluez配对
dong@ubuntu:~/bluez/bluez-5.47$ cd test/
dong@ubuntu:~/bluez/bluez-5.47/test$ python simple-agent
Agent registered
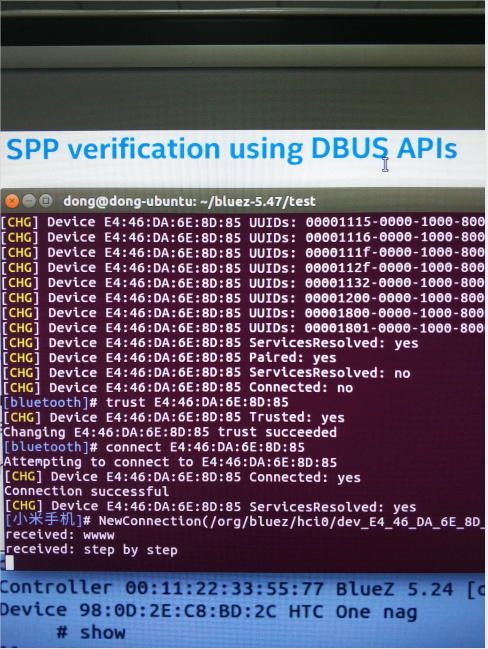
然后可以用手机蓝牙助手(Bluetooth spp pro/蓝牙串口助手 Pro)来扫描配对蓝牙适配器,ubuntu上的simple-agent会弹出配对确认信息,输入yes回车完成配对
simple-agent是通过主从机之间的交互来实现的,可以实现加密配对。
3、bluez spp蓝牙透传demo
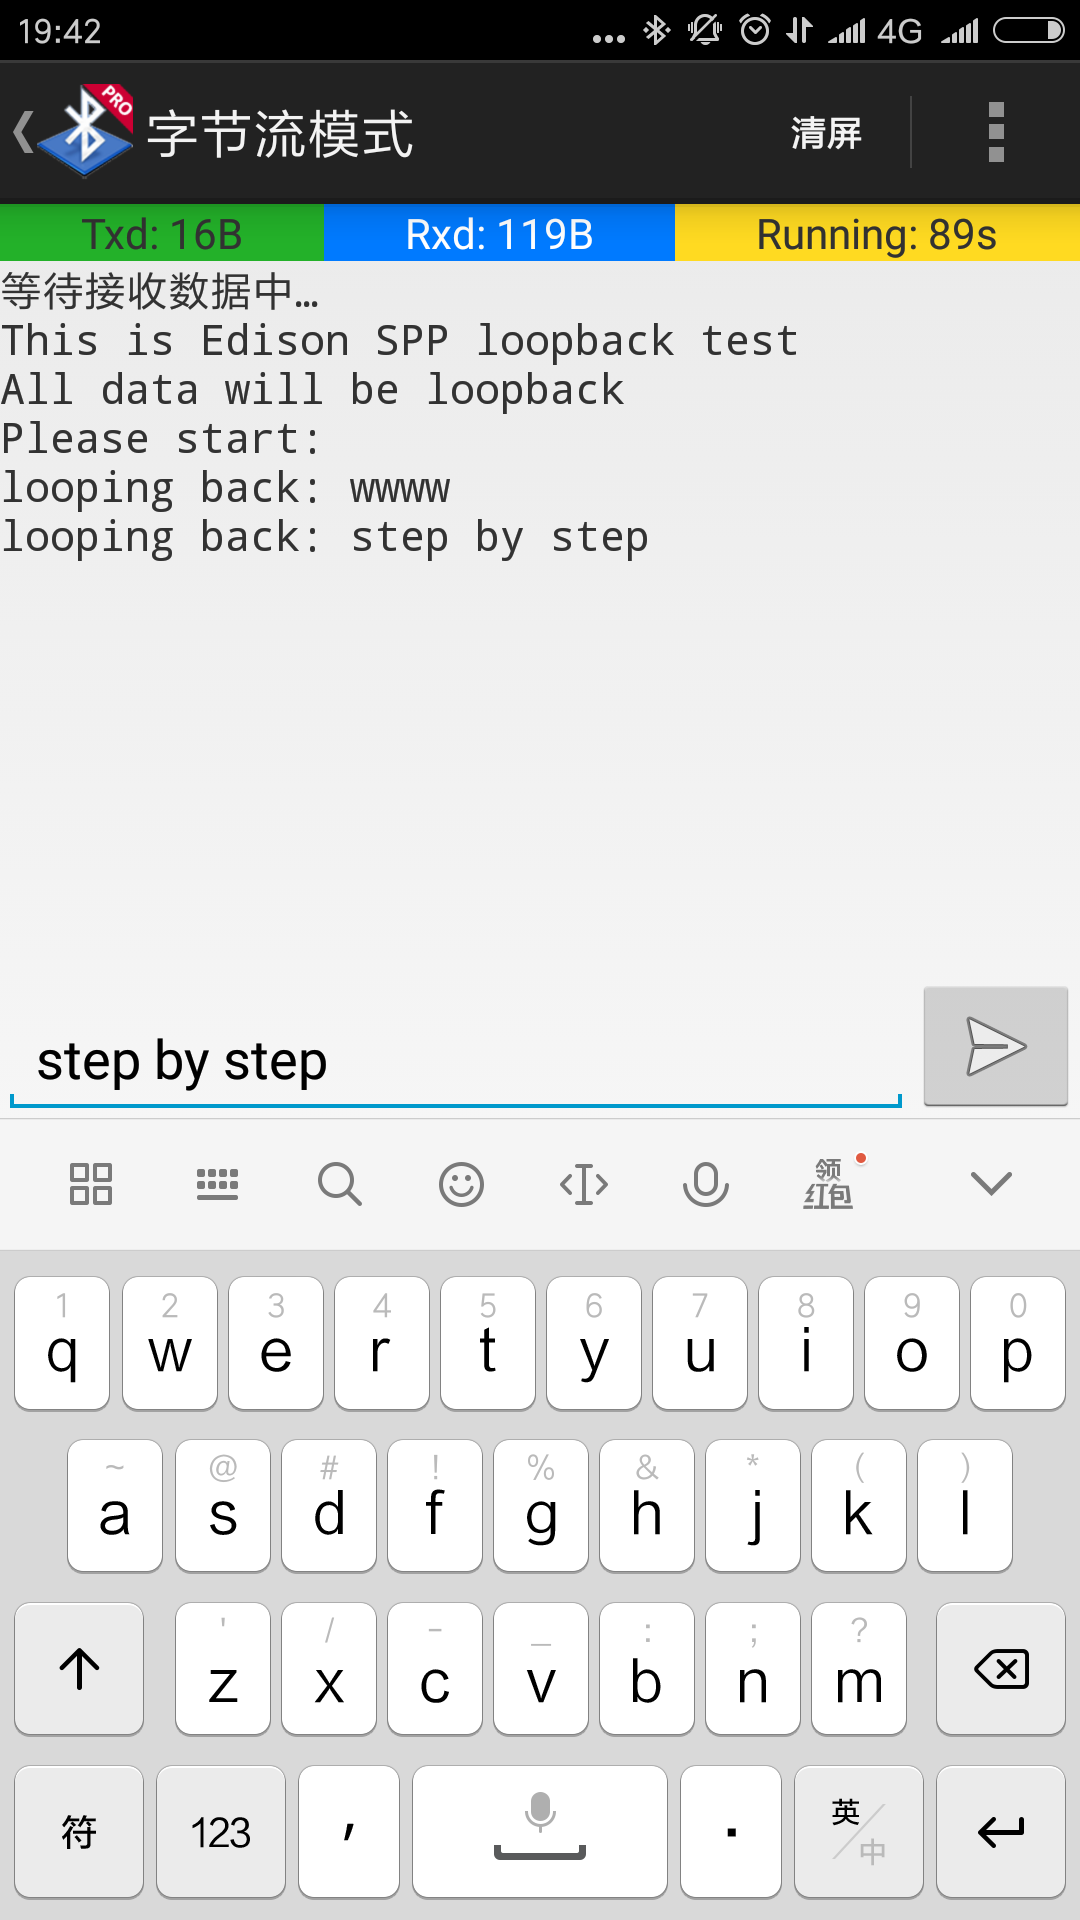
SPP-loopback.py和bluez5-spp-example分别是用python和c语言实现的SPP Demo,SPP-loopback.py更简单一些,运行即可透传与手机交互。
如果是ubuntu版本太低,安装bluez可能会缺一些库文件,装上库文件即可,可以参考http://blog.csdn.net/twy76/article/details/23851587
过了几年了,还有人看,刚好整理手机,补两张图上来。
PC上也可以用图形工具来配置蓝牙,blueman-applet比较方便。
4、BlueZ文件共享
示例:BlueZ设备(这里是ubuntu PC)与手机之间的文件收发
dong@dong-ubuntu:~$ lsusb
Bus 002 Device 001: ID 1d6b:0003 Linux Foundation 3.0 root hub
Bus 001 Device 004: ID 0a12:0001 Cambridge Silicon Radio, Ltd Bluetooth Dongle (HCI mode)
Bus 001 Device 002: ID 17ef:6019 Lenovo
Bus 001 Device 001: ID 1d6b:0002 Linux Foundation 2.0 root hub
dong@dong-ubuntu:~$ hciconfig -a
hci0:    Type: BR/EDR  Bus: USB
    BD Address: 00:1A:7D:DA:71:13  ACL MTU: 310:10  SCO MTU: 64:8
    UP RUNNING PSCAN ISCAN
    RX bytes:1932 acl:0 sco:0 events:125 errors:0
    TX bytes:4107 acl:0 sco:0 commands:125 errors:0
    Features: 0xff 0xff 0x8f 0xfe 0xdb 0xff 0x5b 0x87
    Packet type: DM1 DM3 DM5 DH1 DH3 DH5 HV1 HV2 HV3
    Link policy: RSWITCH HOLD SNIFF PARK
    Link mode: SLAVE ACCEPT
    Name: 'BlueZ 5.47'
    Class: 0x0c0104
    Service Classes: Rendering, Capturing
    Device Class: Computer, Desktop workstation
    HCI Version: 4.0 (0x6)  Revision: 0x22bb
    LMP Version: 4.0 (0x6)  Subversion: 0x22bb
    Manufacturer: Cambridge Silicon Radio (10)

dong@dong-ubuntu:~$ hcitool scan
Scanning ...
    00:19:86:00:12:12    ZHDZXD
    00:90:A2:CC:57:D8    ZHDGIS
    50:68:0A:42:C5:67    wifitest
    E4:46:DA:6E:8D:85    小米手机
    44:C3:46:56:2E:50    Honor 8 Lite
dong@dong-ubuntu:~$ sdptool browse E4:46:DA:6E:8D:85
Browsing E4:46:DA:6E:8D:85 ...
Service RecHandle: 0x10000
Service Class ID List:
  "Generic Attribute" (0x1801)
Protocol Descriptor List:
  "L2CAP" (0x0100)
    PSM: 31
  "ATT" (0x0007)
    uint16: 0x0001
    uint16: 0x0005
...
...

Browsing E4:46:DA:6E:8D:85 ...
Service Search failed: Invalid argument
Service Name: OBEX Object Push
Service RecHandle: 0x1000b
Service Class ID List:
  "OBEX Object Push" (0x1105)
Protocol Descriptor List:
  "L2CAP" (0x0100)
  "RFCOMM" (0x0003)
    Channel: 6
  "OBEX" (0x0008)
Profile Descriptor List:
  "OBEX Object Push" (0x1105)
    Version: 0x0102
Browsing E4:46:DA:6E:8D:85 ...
Service Search failed: Invalid argument

//send file to moble
dong@dong-ubuntu:~$ obex_test -b E4:46:DA:6E:8D:85 6
Using Bluetooth RFCOMM transport
OBEX Interactive test client/server.
> c
Made some progress...
Connect OK!
Version: 0x10. Flags: 0x00
> x
PUSH file> test.txt
name=test.txt, size=5
Going to send test.txt(test.txt), 5 bytes
Filling stream!
Filling stream!
Made some progress...
Made some progress...
PUT successful!
> q

dong@dong-ubuntu:~$ sudo sdptool add OPUSH
OBEX Object Push service registered
dong@dong-ubuntu:~$ sudo sdptool browse local
Browsing FF:FF:FF:00:00:00 ...
Service RecHandle: 0x10000
Service Class ID List:
  "PnP Information" (0x1200)
Profile Descriptor List:
  "PnP Information" (0x1200)
    Version: 0x0103
...
...

Service Name: OBEX Object Push
Service RecHandle: 0x10008
Service Class ID List:
  "OBEX Object Push" (0x1105)
Protocol Descriptor List:
  "L2CAP" (0x0100)
  "RFCOMM" (0x0003)
    Channel: 9
  "OBEX" (0x0008)
Profile Descriptor List:
  "OBEX Object Push" (0x1105)
    Version: 0x0100

//receive file from moble
dong@dong-ubuntu:~$ obex_test -b local 9
Using Bluetooth RFCOMM transport
OBEX Interactive test client/server.
> s
OBEX_HandleInput() returned 1
Unknown event 0b!
connect_server()
connect_server() Skipped header c0
Made some progress...
Server request finished!
server_done() Command (00) has now finished
OBEX_HandleInput() returned 1
Made some progress...
OBEX_HandleInput() returned 1
Made some progress...
OBEX_HandleInput() returned 1
Made some progress...
OBEX_HandleInput() returned 1
...
...
Made some progress...
OBEX_HandleInput() returned 1
put_server()
put_server() Found name
put_server() Skipped header 42
put_server() Skipped header c3
put_server() Found body
Filename = Screenshot_2017-12-19-15-44-49-059_com.baidu.searchbox.png
Wrote Screenshot_2017-12-19-15-44-49-059_com.baidu.searchbox.png (257776 bytes)
Made some progress...
Server request finished!
server_done() Command (02) has now finished
OBEX_HandleInput() returned 1
Unknown event 0b!
We got a disconnect-request
Made some progress...
Server request finished!
Disconnect done!
OBEX_HandleInput() returned 1
>
二、BlueZ在ARM上的基础应用
1、BlueZ移植
BlueZ依赖的第三方库比较多,编译起来很繁琐,给每个库都创建一个config.sh文件,并设置777权限,
创建安装目录/usr/local/bluez,也设置777权限,
如下依次运行每个库的配置文件./config.sh可完整的编译出ARM的可执行文件。
编译环境
ubuntu + linaro gcc
gcc编译器https://www.linaro.org/downloads/
硬件环境
CPU: Cortex A5
Bluetooth: wg7813(bluetooth和wifi的复合模块,芯片是TI的wl18xx)
移植主要参考这个wiki,依赖库的版本最好也按wiki里的版本,一堆开源库,不同版本会有冲突,wiki里的版本是一次编译通过,配合如下脚本。
http://wiki.beyondlogic.org/index.php?title=Cross_Compiling_BlueZ_Bluetooth_tools_for_ARM
1) zlib-1.2.8
#!/bin/bash
cd /home/dong/bluez/zlib-1.2.8
CC=arm-linux-gnueabihf-gcc
AR=arm-linux-gnueabihf-ar
RANLIB=arm-linux-gnueabihf-ranlib
./configure --prefix=/usr/local/bluez

make
if [ $? == 0 ]; then
    make install
else
    echo -e "
	make fail
"
fi
zlib第一次还不能运行脚本,一步一步来,其他库都能通过脚本自动化编译,安装。
Download, cross compile and install the zlib compression libraries. Configure doesn't accept the --host parameter (reports unknown option), so you need to hack the makefile.
wget http://zlib.net/zlib-1.2.8.tar.gz
tar -xzf zlib-1.2.8.tar.gz
cd zlib-1.2.8/
./configure --prefix=/usr/local/bluez
Edit the makefile and prefix the build tools with arm-linux-gnueabi-.
CC=arm-linux-gnueabihf-gcc
LDSHARED=arm-linux-gnueabihf-gcc -shared -Wl,-soname,libz.so.1,--version-script,zlib.map
CPP=arm-linux-gnueabihf-gcc -E
AR=arm-linux-gnueabihf-ar
RANLIB=arm-linux-gnueabihf-ranlib
Make and install:
make
make install
2) libffi-3.0.13
#!/bin/bash
./configure --host=arm-linux-gnueabihf --prefix=/usr/local/bluez

make
if [ $? == 0 ]; then
    make install
else
    echo -e "
	make fail
"
fi
3) glib-2.40.0
#!/bin/bash
./configure --host=arm-linux-gnueabihf
LIBFFI_CFLAGS="-I/usr/local/bluez/lib/libffi-3.0.13/include"
LIBFFI_LIBS="-lffi -L/usr/local/bluez/lib"
ZLIB_CFLAGS="-I/usr/local/bluez/include"
ZLIB_LIBS="-lz -L/usr/local/bluez/lib"
--prefix=/usr/local/bluez PKG_CONFIG_PATH=/usr/local/bluez/lib/pkgconfig  glib_cv_stack_grows=no glib_cv_uscore=yes ac_cv_func_posix_getpwuid_r=yes ac_cv_func_posix_getgrgid_r=yes

make
if [ $? == 0 ]; then
    make install
else
    echo -e "
	make fail
"
fi
报错configure: error: Could not find a glib-genmarshal in your PATH,缺了libglib2.0-dev
sudo apt-get install libglib2.0-dev
4) expat-2.1.0
#!/bin/bash
./configure --host=arm-linux-gnueabihf --prefix=/usr/local/bluez

make
if [ $? == 0 ]; then
    make install
else
    echo -e "
	make fail
"
fi
5) dbus-1.8.0
#!/bin/bash
./configure --host=arm-linux-gnueabihf --prefix=/usr/local/bluez PKG_CONFIG_PATH=/usr/local/bluez/lib/pkgconfig
--disable-tests
--sysconfdir=/usr/local/bluez/etc
--localstatedir=/usr/local/bluez/var
--enable-user-session
--disable-doxygen-docs
--disable-xml-docs
--disable-static
--docdir=/usr/local/bluez/share/doc/dbus-1.8.0
--with-console-auth-dir=/usr/local/bluez/var/run/console
--with-system-pid-file=/usr/local/bluez/var/run/dbus/pid
--with-system-socket=/usr/local/bluez/var/run/dbus/system_bus_socket
CPPFLAGS='-I/usr/local/bluez/include/'
CFLAGS='-I/usr/local/bluez/include/'
LDFLAGS='-L/usr/local/bluez/lib'

make
if [ $? == 0 ]; then
    make install
else
    echo -e "
	make fail
"
fi
6) libical-1.0
#!/bin/bash
export CC=arm-linux-gnueabihf-gcc
export CXX=arm-linux-gnueabihf-g++
cmake -DCMAKE_INSTALL_PREFIX=/usr/local/bluez

make
if [ $? == 0 ]; then
    make install
else
    echo -e "
	make fail
"
fi
7) ncurses-5.9
#!/bin/bash
cd /home/dong/bluez/ncurses-5.9
./configure --prefix=/usr/local/bluez --with-shared
CC=arm-linux-gnueabihf-gcc
CXX=arm-linux-gnueabihf-g++
--host=arm-linux-gnueabihf

make
if [ $? == 0 ]; then
    make install
else
    echo -e "
	make fail
"
fi
8) readline-6.3
#!/bin/bash
./configure --host=arm-linux-gnueabihf --prefix=/usr/local/bluez bash_cv_wcwidth_broken=yes
PKG_CONFIG_PATH=/usr/local/bluez/lib/pkgconfig
CPPFLAGS='-I/usr/local/bluez/include/'
CFLAGS='-I/usr/local/bluez/include/'
LDFLAGS='-lncurses -L/usr/local/bluez/lib'

#make SHLIB_LIBS=-lncurses
make
if [ $? == 0 ]; then
    make install
else
    echo -e "
	make fail
"
fi
9) bluez-5.18
#!/bin/bash
./configure --host=arm-linux-gnueabihf
--prefix=/usr/local/bluez
CC="arm-linux-gnueabihf-gcc
-L/usr/local/bluez/lib
-I/usr/local/bluez/include
-I/usr/local/bluez/include/glib-2.0
-I/usr/local/bluez/include/dbus-1.0
-I/usr/local/bluez/lib/glib-2.0/include
-I/usr/local/bluez/lib/dbus-1.0/include
-I/usr/local/bluez/lib/libffi-3.0.13/include "
PKG_CONFIG_PATH=/usr/local/bluez/lib/pkgconfig
CPPFLAGS='-I/usr/local/bluez/include/'
CFLAGS='-I/usr/local/bluez/include/'
LDFLAGS='-lrt -lreadline -lncurses -L/usr/local/bluez/lib'
--disable-systemd --disable-udev --disable-cups --enable-library

make
if [ $? == 0 ]; then
    make install
else
    echo -e "
	make fail
"
fi
再次说明版本务必要匹配,否则会冲突,怎么检查版本匹配,暂时不清楚,新版本库匹配在下面这网站去找,下面两个版本都有匹配好的BlueZ Dependencies
BlueZ-5.46
http://www.linuxfromscratch.org/blfs/view/stable/general/bluez.html
BlueZ-5.48
http://www.linuxfromscratch.org/blfs/view/svn/general/bluez.html
2、板载bluez调试
1)linux内核配置bluetooth驱动参考 http://blog.csdn.net/new_abc/article/details/7639326 (bluetooth和wifi)
[*]Networking support --->
<*> Bluetooth subsystem support ---> //蓝牙子系统必须选择
<*> L2CAP protocol suppor //逻辑链路控制和适配协议。
<*> SCO links support //蓝牙语音和耳机支持
<*> RFCOMM protocol suppor //面向流的传输协议,支持拨号网络等
[*] RFCOMM TTY support
<*> BNEP protocol support //蓝牙网络封装协议,自组网支持
[*] Multicast filter support //蓝牙多播,支持支持BNEP
[*] Protocol filter support //蓝牙多播,支持支持支持BNEP
<*> HIDP protocol support //基本支持协议
Bluetoothdevice drivers --->
<*>HCI USB driver //USB蓝牙模块支持
<*>HCIUART driver //基于串口,CF卡或PCMCIA的蓝牙
<*>HCI BlueFRITZ! USB driver
<*>HCI VHCI (Virtual HCI device) driver
其余的选项,根据自己的蓝牙设备进行调整。
2)移植完的bluez,把安装文件拷贝到板子上,只需要dbus和bluez的安装文件,总共应该不超过5M,我的在/usr/local/bluez,然后添加环境变量。
拷贝几个库文件,添加messagebus用户,还是参考刚才的wiki
addgroup -S messagebus
adduser -S messagebus -G messagebus
http://wiki.beyondlogic.org/index.php?title=Cross_Compiling_BlueZ_Bluetooth_tools_for_ARM
可以试试hciconfig, hcitool, dbus-deamon等工具是否正常,正常了就移植成功了。
板子内存紧张可以用nfs挂载的方式来调试,挂载好了,环境变量设置到挂载的路径就可以了。
先安装好nfs服务器
https://jingyan.baidu.com/article/e5c39bf5abc8f739d76033be.html
开发板挂载ubuntu,在ubuntu用户目录下的nfs目录中准备好文件
在开发板上挂载ubuntu
mkdir /mnt/bluez
#在开发板端挂载板子网卡,这里用的USB模拟的网卡,挂载到usb0,真实的网卡就不需要模拟这一步了。
modprobe g_multi.ko file=/dev/mmcblk0p5,/dev/mmcblk0p6 ro=0,0 luns=2 stall=0 removable=1,1 iSerialNumber=3000111
ifconfig usb0 192.168.10.2
在ubuntu端打开网卡
ifconfig enp0s20f0u2 192.168.10.6 netmask 255.255.255.0
ifconfig enp0s20f0u2 up 192.168.10.6
#在开发板端挂载ubuntu上的nfs服务器
mount -t nfs -o nolock 192.168.10.6:/home/dong/nfs /mnt
#umount -t nfs -a nolock 192.168.10.6:/home/dong/nfs /mnt
开发板添加环境变量
#add path
export PATH=/mnt/bluez/bin:$PATH
export LD_LIBRARY_PATH=/mnt/bluez/lib:$LD_LIBRARY_PATH
或者在/etc/profile里添加环境变量永久生效
export PATH=
/bin:
/sbin:
/usr/bin:
/usr/sbin:
/usr/bin/X11:
/usr/local/bin:
/mnt/bluez/bin:
export LD_LIBRARY_PATH=/mnt/bluez/lib:$LD_LIBRARY_PATH
source /etc/profile
创建并运行脚本文件bluez.init.sh,运行成功就可以用手机搜到BlueZ-5.18的蓝牙设备
#power on
echo 49 > /sys/class/gpio/export
echo out > /sys/class/gpio/gpio49/direction
echo 0 > /sys/class/gpio/gpio49/value
sleep 0.2
echo 1 > /sys/class/gpio/gpio49/value
sleep 0.2

#load firmware
hciattach -s 115200 /dev/ttyS2 texas 115200 flow

hciconfig hci0 up
sleep 0.1
hciconfig hci0 iscan
sleep 0.1

rm -rf /usr/local/bluez/var/run/dbus/pid

dbus-daemon --system
sleep 0.2
bluetoothd &
sleep 1
hciconfig hci0 iscan
有时候环境变量写到配置文件会失效,程序运行会从系统库目录/lib /usr/lib查找库文件,不从我们配置的/mnt/bluez/lib目录里找
运行临时环境变量配置指令即可生效
export PATH=/mnt/bluez/bin:$PATH
export LD_LIBRARY_PATH=/mnt/bluez/lib:$LD_LIBRARY_PATH
3、python移植
新版本bluez的demo都是python写的,所以还需要把python也移植到板子上。
1)下载好Python-2.7.2.tgz和补丁文件Python-2.7.2-xcompile.patch
2)编译PC上运行的pgen
./configure
make python Parser/pgen
mv python hostpython
mv Parser/pgen Parser/hostpgen
make distclean
3)给Python-2.7.2打补丁
patch -p1 < Python-2.7.2-xcompile.patch
4)交叉编译,编译器arm-linux-gnueabihf-
CC=arm-linux-gnueabihf-gcc
CXX=arm-linux-gnueabihf-g++ AR=arm-linux-gnueabihf-ar
RANLIB=arm-linux-gnueabihf-ranlib ./configure --host=arm-linux-gnueabihf
--build=x86_64-linux-gnu --prefix=/home/dong/_install
chmod 777 ./setup.py
如果空间紧张,可以更改Makefile,不需要debug,去掉-g,优化等级调成-o2
#OPT= -DNDEBUG -g -fwrapv -O3 -Wall -Wstrict-prototypes
OPT= -DNDEBUG -fwrapv -O2 -Wall -Wstrict-prototypes
make
HOSTPYTHON=./hostpython HOSTPGEN=./Parser/hostpgen
BLDSHARED="arm-linux-gnueabihf-gcc -shared"
CROSS_COMPILE=arm-linux-gnueabihf- CROSS_COMPILE_TARGET=yes
HOSTARCH=arm-linux-gnueabihf BUILDARCH=x86_64-linux-gnu
make
install HOSTPYTHON=./hostpython BLDSHARED="arm-linux-gnueabihf-gcc
-shared" CROSS_COMPILE=arm-linux-gnueabihf- CROSS_COMPILE_TARGET=yes
prefix=/home/dong/_install
如果安装报错
python: Syntax error: word unexpected (expecting ")")
将install-sh文件第一行#!/bin/sh改成#!/bin/bash
5)把安装目录下的文件复制到arm设备上,并吧Python路径添加到PATH中,然后执行测试
python /usr/local/python/lib/python2.7/test/test___all__.py
我的板内存空间紧张,先用nfs挂载来调试
转自
http://blog.csdn.net/xiwenfuor/article/details/38384687
http://blog.sina.com.cn/s/blog_609b4c0d01012j5q.html
我移植完了,发现这个blog写得很简洁。
https://blog.csdn.net/qq_28351465/article/details/54406180
4、板载python调试
python的库文件很大,还是跟上面调试bluez一样,采用nfs来调试
开发板添加环境变量
#add path
export PATH=/mnt/python/bin:$PATH
export LD_LIBRARY_PATH=/mnt/python/lib:$LD_LIBRARY_PATH
或者在/etc/profile里添加环境变量永久生效
export PATH=
/bin:
/sbin:
/usr/bin:
/usr/sbin:
/usr/bin/X11:
/usr/local/bin:
/mnt/bluez/bin:
/mnt/python/bin:
export LD_LIBRARY_PATH=/mnt/bluez/lib:$LD_LIBRARY_PATH
export LD_LIBRARY_PATH=/mnt/python/lib:$LD_LIBRARY_PATH
source /etc/profile
挂载后运行python –V就可以看到python的版本信息了。
python /mnt/python/lib/python2.7/test/test___all__.py
运行结果
Following
modules have no __all__ and have been ignored: ['DocXMLRPCServer',
'HTMLParser', 'SimpleXMLRPCServer', 'UserDict', 'UserList',
'_LWPCookieJar', '_MozillaCookieJar', '__phello__.foo', 'abc', 'an]
Following modules failed to be imported: ['ctypes.wintypes', 'dbhash', 'gzip', 'idlelib.AutoComplete']
ok
----------------------------------------------------------------------
Ran 1 test in 48.532s
OK
5、运行simple-agent 或者 BlueZ SPP Demo
[root@sama5d3x /mnt]# python simple-agent
Traceback (most recent call last):
File "simple-agent", line 7, in <module>
import dbus
ImportError: No module named dbus
缺了dbus模块
交叉编译dbus-python-1.2.4
折腾一天看见这个心碎了
https://www.zhihu.com/question/34573048
找了一圈,只能用buildroot来制作支持python的文件系统
http://www.at91.com/linux4sam/bin/view/Linux4SAM/BuildRootBuild
https://www.cnblogs.com/chencanjian/p/6060448.html
6、buildroot编译dbus-python库
dbus-python
gobject
其实不用像上面那样单独移植python也可以,就在buildroot里把python和需要的库都选上更方便,
buildroot还可以压缩库文件,还更省空间。
用yocto或者 OpenEmbedded来构建文件系统貌似也行,没有验证
[root@sama5d3x /mnt]# python
Python 2.7.2 (default, Jan 20 2018, 15:29:23)
[GCC 4.7.3 20121205 (prerelease)] on linux4
Type "help", "copyright", "credits" or "license" for more information.
>>> from __future__ import absolute_import, print_function, unicode_literals
>>> import gobject as GObject
>>> import sys
>>> import dbus
>>> import dbus.service
>>> import dbus.mainloop.glib
>>> from optparse import OptionParser
>>> dbus.mainloop.glib.DBusGMainLoop(set_as_default=True)
<dbus.mainloop.NativeMainLoop object at 0x2ecc08>
>>> bus = dbus.SystemBus()
Traceback (most recent call last):
  File "<stdin>", line 1, in <module>
  File "/usr/lib/python2.7/site-packages/dbus/_dbus.py", line 194, in __new__
  File "/usr/lib/python2.7/site-packages/dbus/_dbus.py", line 100, in __new__
  File "/usr/lib/python2.7/site-packages/dbus/bus.py", line 122, in __new__
dbus.exceptions.DBusException: org.freedesktop.DBus.Error.FileNotFound: Failed to connect to socket /var/run/dbus/system_bus_socket: No such file or directory
连不上dbus的socket,就差一口气了......
突然发现dbus-1.8.0库编译的时候没打开--with-system-socket
参考http://www.linuxfromscratch.org/blfs/view/svn/general/dbus.html
./configure --prefix=/usr
            --sysconfdir=/etc
            --localstatedir=/var
            --disable-doxygen-docs
            --disable-xml-docs
            --disable-static
            --docdir=/usr/share/doc/dbus-1.8.0
            --with-console-auth-dir=/run/console
            --with-system-pid-file=/run/dbus/pid
            --with-system-socket=/run/dbus/system_bus_socket &&
make
更改上面dbus-1.8.0的编译配置,上面已经改过来了,重新编译,再运行配对例子
[root@sama5d3x test]# hciconfig hci0 pscan
[root@sama5d3x test]# hciconfig hci0 noauth
[root@sama5d3x test]# python simple-agent
Agent registered
RequestConfirmation (/org/bluez/hci0/dev_E4_46_DA_6E_8D_85, 565038)
Confirm passkey (yes/no): yes
[root@sama5d3x test]# cd ..
[root@sama5d3x /mnt]# python SPP-loopback.py
NewConnection(/org/bluez/hci0/dev_E4_46_DA_6E_8D_85, 9)
received: aaa
received: step by step
received: BlueZ SPP OK !
配对simple-agent和蓝牙透传SPP-loopback.py都正常,再把bluez和python库裁剪,整理好就可以植入产品里了。
SPP-loopback.py蓝牙串口透传例子是intel的Edison模块的,也可以用在这里。
intel edison bluetooth guide 这个文档比较完整。
http://download.intel.com/support/edison/sb/edisonbluetooth_331704004.pdf
我整理的启动脚本 bluez_init.sh
#power on
echo 49 > /sys/class/gpio/export
echo out > /sys/class/gpio/gpio49/direction
echo 0 > /sys/class/gpio/gpio49/value
sleep 0.2
echo 1 > /sys/class/gpio/gpio49/value
sleep 0.2

#load firmware
hciattach -s 115200 /dev/ttyS2 texas 115200 flow
sleep 1
hciconfig hci0 up
sleep 0.1
hciconfig hci0 iscan
sleep 0.1

#add dbus dir
rm -r /usr/local/bluez/var/run/dbus
ln -s /run/dbus/ /usr/local/bluez/var/run/
rm -rf /usr/local/bluez/var/run/dbus/pid
mkdir /run/dbus

#boot bluez process
dbus-daemon --system
sleep 1
bluetoothd &
sleep 1

#run user app
python simple-agent &
sleep 0.1
python SPP-loopback.py &
sleep 0.1
hciconfig hci0 name "bluez_test"
hciconfig hci0 piscan
将bluez-5.18的simple-agent文件中配对认证注释掉,设备就不认证了
    def AuthorizeService(self, device, uuid):
        print("AuthorizeService (%s, %s)" % (device, uuid))
        #authorize = ask("Authorize connection (yes/no): ")
        #if (authorize == "yes"):
        #    return
        #raise Rejected("Connection rejected by user")
...
...

    def RequestConfirmation(self, device, passkey):
        print("RequestConfirmation (%s, %06d)" % (device, passkey))
        #confirm = ask("Confirm passkey (yes/no): ")
        #if (confirm == "yes"):
        set_trusted(device)
        #    return
        #raise Rejected("Passkey doesn't match")

    @dbus.service.method(AGENT_INTERFACE,
                    in_signature="o", out_signature="")
    def RequestAuthorization(self, device):
        print("RequestAuthorization (%s)" % (device))
        #auth = ask("Authorize? (yes/no): ")
        #if (auth == "yes"):
        #    return
        #raise Rejected("Pairing rejected")
给板子上电,挂载好bluez和python的库文件,然后运行上面的启动脚本 ./bluez.init.sh
[root@sama5d3x /root]# mount -t nfs -o nolock 192.168.10.6:/home/dong/nfs /mnt
[root@sama5d3x /root]# cd /mnt/
[root@sama5d3x /mnt]# ./bluez.init.sh
Found a Texas Instruments' chip!
Firmware file : /lib/firmware/ti-connectivity/TIInit_11.8.32.bts
Loaded BTS script version 1
Device setup complete
[root@sama5d3x /mnt]# Agent registered
RequestConfirmation (/org/bluez/hci0/dev_E4_46_DA_6E_8D_85, 345760)
NewConnection(/org/bluez/hci0/dev_E4_46_DA_6E_8D_85, 9)
received: step by step
received: step by step
received: step by step
7、python与c之间的交互
可以用的方式很多,共享内存,消息队列,管道,进程池或者直接封装接口互相调用函数。
搜一下就有了.下面是我找的共享内存机制
1) Python读取c语言进程的内存块
http://chl0000.iteye.com/blog/1915303
http://www.linuxidc.com/Linux/2012-03/57430.htm
2) python和c语言参数传递
c--->python
http://blog.csdn.net/JoeBlackzqq/article/details/10441017
http://blog.csdn.net/chenyulancn/article/details/8158168
python--->c
http://blog.csdn.net/mrcheny/article/details/79022973
3) 实例:导出python进程的数据
我这个项目需要导出python进程的数据给c进程处理
给c语言进程提供一个数据结构
bluetooth_data.c
#include <stdio.h>

struct bluetooth_t{
    int status;
    char *buf;
};

int bluetooth_cb(struct bluetooth_t bluetooth)
{
        printf("bluetooth status:%d, bluetooth buf:%s
", bluetooth.status,bluetooth.buf);
        return 0;
}
编译成so库文件
gcc/arm-linux-gnueabihf-gcc -o bluetooth_data.so -shared -fPIC bluetooth_data.c
然后python进程把需要的数据写到上面的数据结构
data_test.py
#!/usr/bin/python
import ctypes
from ctypes import *

class bluetooth(Structure):
        _fields_=[('status',c_int),('buf',c_char_p)]

if __name__ == "__main__":

    func = ctypes.cdll.LoadLibrary("./bluetooth_data.so")

    s = bluetooth()
    s.status = 1
    s.buf = bytes('hello,world')
    func.bluetooth_cb(s)
运行python data_test.py就可以打印出导出的数据
bluetooth status:1, bluetooth buf:hello,world.
8、bluez的BLE工作模式
只有bluez-5.xx以上版本才支持低功耗模式,配置跟普通模式有细微差别
我配置的BLE模式启动脚本 bluez_le_init.sh
#power on
echo 49 > /sys/class/gpio/export
echo out > /sys/class/gpio/gpio49/direction
echo 0 > /sys/class/gpio/gpio49/value
sleep 0.2
echo 1 > /sys/class/gpio/gpio49/value
sleep 0.2

#load firmware
hciattach -s 115200 /dev/ttyS2 texas 115200 flow
sleep 1
hciconfig hci0 up
sleep 0.1
hciconfig hci0 iscan
sleep 0.1

#add dbus dir
rm -r /usr/local/bluez/var/run/dbus
ln -s /run/dbus/ /usr/local/bluez/var/run/
rm -rf /usr/local/bluez/var/run/dbus/pid
mkdir /run/dbus


#boot bluez process
dbus-daemon --system
sleep 1
bluetoothd &
sleep 1

#run user app
python simple-agent &
sleep 0.1

if false ; then
#Bluetooth SPP
python SPP-loopback.py &
else
#Bluetooth profile
hciconfig hci0 up
sleep 0.1
hciconfig hci0 leadv
fi

sleep 0.1
hciconfig hci0 name "bluez_test"
hciconfig hci0 piscan
用了个
if false ; then
...
else
...
fi
把普通模式和BLE模式分开
给板子上电后运行./bluez.le.init.sh
找个蓝牙4.0的工具( 我用的BLE Tool )就能扫到BlueZ-5.18的设备, 读几个自带的特征值profile都正常。
9、蓝牙NFS挂载模式应用(nfs_debug)
首次运行需要配置相关系统参数
1)#配置内核蓝牙选项
2)#添加进程消息通道
addgroup -S messagebus
adduser -S messagebus -G messagebus
3#添加lp
vi /etc/group
lp:x:7:
4)#配置网卡
modprobe g_multi.ko file=/dev/mmcblk0p5,/dev/mmcblk0p6 ro=0,0 luns=2 stall=0 removable=1,1 iSerialNumber=3000111
ifconfig usb0 192.168.10.2
5)在ubuntu端打开网卡
不同主机生成的网卡名称可能不一样,ifconfig查看,这个是我的台式机,下面那个是我的笔记本
sudo ifconfig enp0s20f0u2 192.168.10.6 netmask 255.255.255.0
sudo ifconfig enp0s20f0u2 up 192.168.10.6
sudo ifconfig enp0s20f0u4 192.168.10.6 netmask 255.255.255.0
sudo ifconfig enp0s20f0u4 up 192.168.10.6
6)#在开发板端挂载ubuntu上的nfs服务器
mount -t nfs -o nolock 192.168.10.6:/home/dong/nfs /mnt/nfs
#umount -t nfs -a nolock 192.168.10.6:/home/dong/nfs /mnt/nfs
7)#添加环境变量
export PATH=
/bin:
/sbin:
/usr/bin:
/usr/sbin:
/usr/bin/X11:
/usr/local/bin:
/mnt/nfs/bluez/bin:
/mnt/nfs/python/bin:
...
export LD_LIBRARY_PATH=/mnt/nfs/bluez/lib:$LD_LIBRARY_PATH
export LD_LIBRARY_PATH=/mnt/nfs/python/lib:$LD_LIBRARY_PATH
source /etc/profile
8)添加bluez配置文件
#cp -r /mnt/bluez /usr/local/
#cp -r /mnt/python /usr/local/
cp -r config/bluez /usr/local/
9) 启动蓝牙应用
./bluez.init.sh
10、蓝牙正式应用(readme)
蓝牙文件系统构建:
1) 配置内核蓝牙选项
2) 添加进程消息通道
addgroup -S messagebus
adduser -S messagebus -G messagebus
3) 添加lp
vi /etc/group
lp:x:7:
4) 拷贝库文件
cp -r bluez /usr/local/
cp -r python /usr/local/
5)拷贝应用程序
cp bluez.init.sh SPP-loopback.py /usr/local/project/
cp -r test /usr/local/project/
6)添加dbus软链接
rm -r /usr/local/bluez/var/run/dbus
ln -s /run/dbus/ /usr/local/bluez/var/run/
7)启动蓝牙进程bluez_init.sh
三、Bluetooth Audio ALSA Backend
https://github.com/Arkq/bluez-alsa
四、BLE4.0 Gatt-server
除了bluez的test目录python脚本 example-gatt-server(依赖的组件比较多,可能运行起来有点困难)
还有两种方案添加gatt自定义服务,都是开源的
一种是用bleno库,一种是go-server
我用的芯片不支持完整的BLE4.0,不能自定义用户profile 和 gatt service
一般完整支持BLE4.0或以上的芯片都是带flash的,需要更改蓝牙协议栈固件,能够作为IoT场景应用的蓝牙IC除了少部分通用芯片,大部分都是定制的专用芯片,像csr1000系列,TI的cc25xx cc26xx系列,nordic的rf51xx rf52xx系列等,都需要用厂商的专用工具来配置profile和gatt service.
下面参考文献是我收集的蓝牙自定义gatt-server方案和应用实例。
参考文献
2)用树莓派玩转蓝牙
3)A Node.js module for implementing BLE (Bluetooth Low Energy) peripherals
4)Package gatt provides a Bluetooth Low Energy GATT implementation
6)Implementation of BLE peripheral using bleno
7)Python BLE GATT Server (peripheral)
越折腾越深入,工作上做的产品最多也就用到这些内容,你愿意将业余时间花在蓝牙协议栈上面,深挖到底吗?对不起,我不舍得,就此打住!
最后总结:从0到调试完成,整个过程需要点耐心,我前面因为太急躁导致多做了不少无用功,欲速则不达。
end