OpenGL: Configuring GLFW and GLEW in Visual C++ Express
Posted by Dimitri | Aug 14th, 2013 | Filed under Featured, Programming

This post shows how to configure Visual C++ Express 2010 with GLFW (version 3.0.1) and GLEW (version 1.9.0)[1].
There are many tutorials on the internet that explains how to configure Visual C++ Express with those exact same libraries[2]. However, this one focus on how to proceed with this setup while avoiding copying any of the header and library files to the Visual C++ Express installation folders, system folders or the Windows SDK folder.
To put it into a summarized manner, all you have to do is to download and install the Visual C++ Express; download and extract the GLFW and GLEW binaries; create a project; configure the project so it can locate the GLFW and GLEW header and lib files; and initialize and use both libraries in your application.
Therefore, this tutorial is divided into 8 parts:
- Download the required files
- Install and extract
- Create a project and a solution
- Configuring the project
- Building the project
- Troubleshooting
- Additional Notes
- References
1. Download the required files
The first thing that has to be done is to download GLFW, GLEW and Visual C++ Express 2010 from the following URLs:
- GLFW: http://www.glfw.org/download.html (File: glfw-3.0.1.bin.WIN32.zip, regardless whether using Windows 64 bits or not)[3].
- GLEW: http://sourceforge.net/projects/glew/files/glew/1.9.0/ (File: glew-1.9.0-win32.zip, regardless whether using Windows 64 bits or not)[4].
- Visual C++ Express 2010: https://www.microsoft.com/visualstudio/eng/downloads#d-2010-express (This application needs to be registered after 30 days. It’s free).
2. Install and extract
Now, install Visual C++ Express 2010. During installation, you will be prompted to install Microsoft SQL Server 2008 Express. This isn’t necessary for building OpenGL applications, so installing it is optional, in this case. Just make sure that the .NET Framework (version 4.x)[5] gets installed along with Visual C++ Express 2010.
If your user has access to the root of the system drive (normally C:), just create a folder there and name it opengl-wrappers or whatever other name you want to. Just keep the name short and avoid using characters such as spaces and capital letters.
If you don’t have access to the root of the system drive, just create the opengl-wrappers folderelsewhere. Just make sure that it’s created at the shortest possible path.
This folder will hold both GLEW and GLFW files, so place both glfw-3.0.1.bin.WIN32.zip and glew-1.9.0-win32.zip files there and extract them:
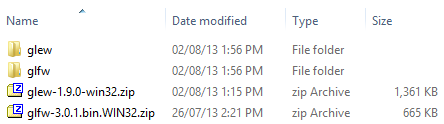
Notice that I’ve stripped the version identifier from both glfw and glew folders. This isn’t necessary. I did that to simplify the folder paths to be referenced later on the Visual Express project configuration (explained in detail at part 4).
Now, launch Visual C++ Express 2010.
3. Create a project and a solution
If you are opening Visual C++ Express 2010 for the first time, you may have to wait for it to complete its initial configuration. After that, close any open solution that might be open (File → Close Solution), since we are going to create one from scratch.
To create a project and a solution, just select File → New → Project. This will open the New Project dialog. There, fill in the project Name and the Solution Name fields. Also, select the Win32 Console Application as the project template[6]. Make sure that the checkbox Create directory for solution is selected:
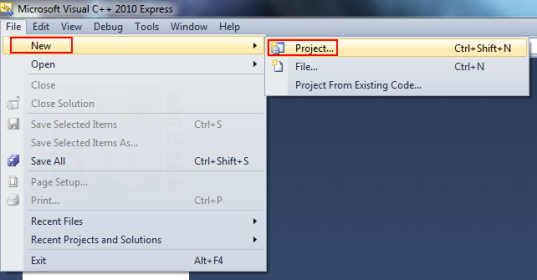
Select File → New → Project.
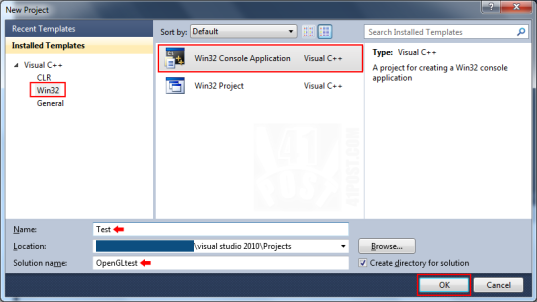
Then, give the project and the solution a name. For this tutorial, the project will be named ‘Test’ and the solution, ‘OpenGLtest’. Leave the option Create directory for solutionchecked.
Another dialog will appear. This one is the Win32 Application Wizard dialog, where further configurations to the project can be set. Just click on Next:
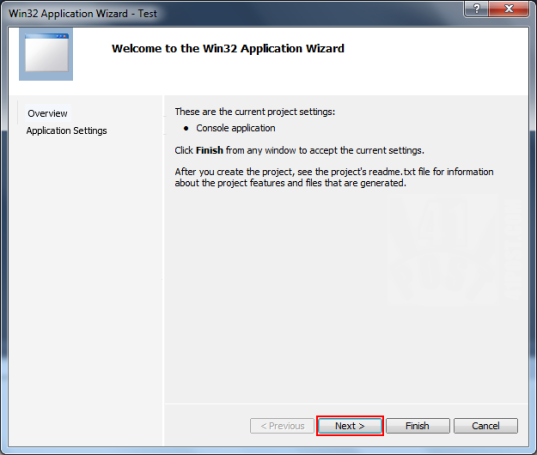
Simply press the Next button.
At the next dialog, select Console Application as the Application Type. Also, deselect the Precompiled header checkbox and tick the Empty Project checkbox. So, it will look like this:
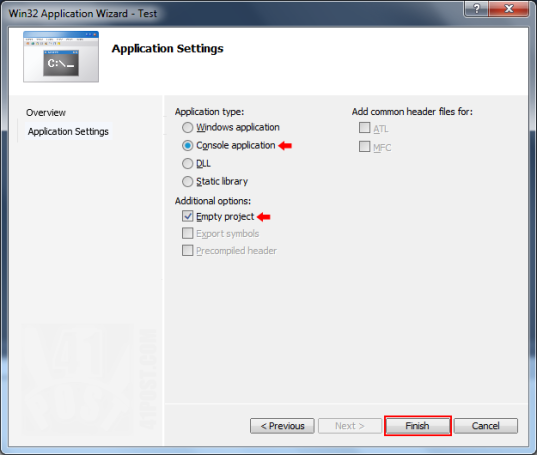
Choose Console Application as the ‘Application Type’. At ‘Application Options’ Deselect the Precompiled Header box and mark the Empty Project option.
Press the Finish button.
4. Configuring the project
This part shows how to configure the project so that Visual C++ Express 2010 can find the GLFW and GLEW headers and libraries to link with when building the ‘Test.exe’ application.
However, before opening the project’s configuration, at least a single .cpp file must be added to the project, so that the C++ options inside the project’s Properties can be edited. This is done by right clicking the Source Files folder and selecting Add → New Item. Like this:
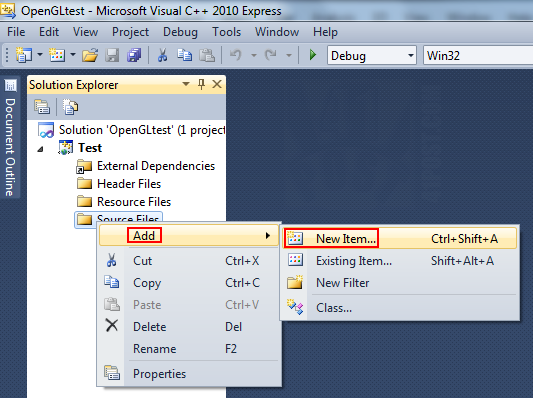
Right-click the Source Files folder and select Add → New Item
A dialog will pop-up. There, select the C++ File (.cpp) as the file type and type main at the Namefield:
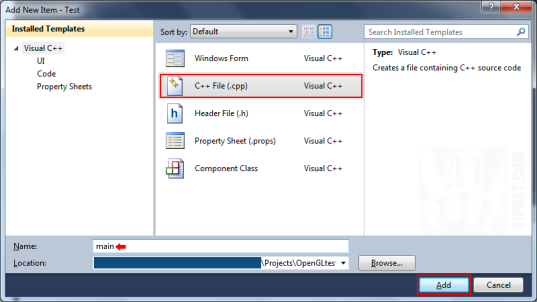
Name it main. Select .cpp as the file extension.
Click on the Add button to confirm. Just leave the main.cpp file empty, for now.
Finally, right-click on the ‘Test’ project and select Properties:
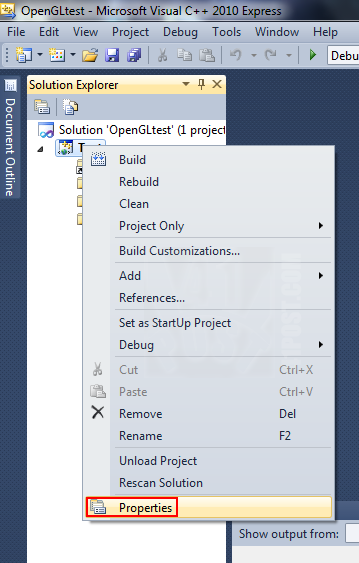
Right-click the project and select Properties.
This will open the project’s properties, which is where the paths to the headers and library files for both GLEW and GLFW are configured. At the Configuration drop-down menu, select All Configurations. Also, make sure that the selected Platform is set to Win32.
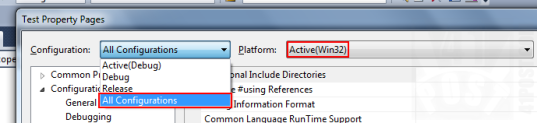
Select All Configurations and Win32 on the drop down selectors located at the top of the dialog.
After that, select C/C++ → General. Click on the Additional Include Directories drop-down menu and select <Edit…>:
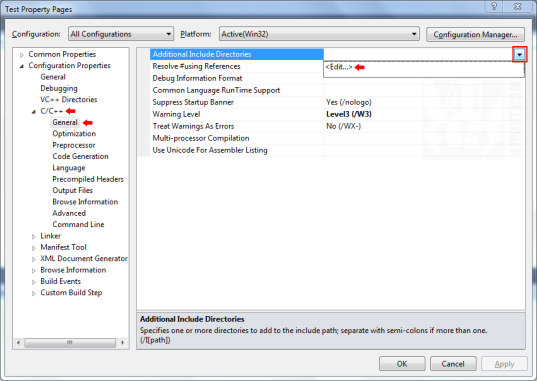
Select C/C++ → General → Additional Include Directories. Then click on <Edit…>.
A dialog will open, where you can add directories that contains the GLEW and GLFW headers. The following directories have to be added:
- C:opengl-wrappersglewinclude
- C:opengl-wrappersglfwinclude
The Additional Include Directories should look like this:
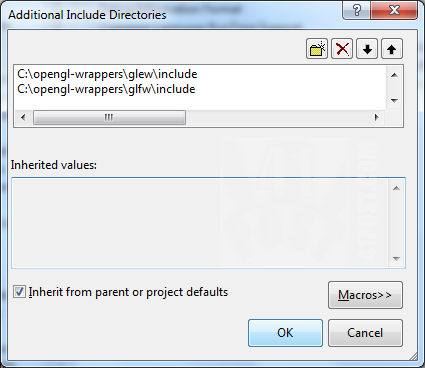
Click on the yellow folder icon and then on the button with the ellipsis to browse to the desired directory instead of manually typing the folder path.
To confirm, just press the OK button.
Now that Visual C++ Express 2010 can find the GLFW and GLEW headers, it needs to find their corresponding library files. In order to do so, select Linker → General → Additional Library Directories. Again, select the drop-down menu and click on <Edit…>:
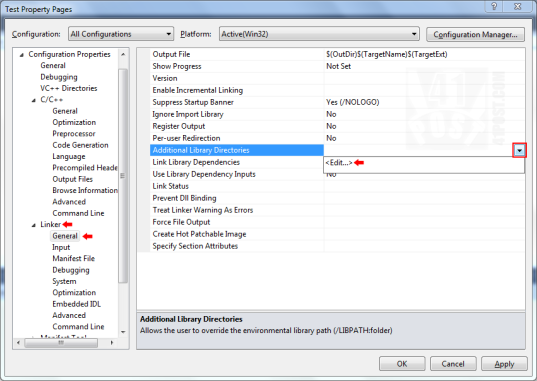
Select Linker → General → Additional Library Directories. Then click on <Edit…>.
A dialog just about the same as the previous one will be presented. Add the following directories:
- C:opengl-wrappersglewlib[7]
- C:opengl-wrappersglfwlib-msvc100 (or lib-mscv110 if you are using Visual Studio Express 2011).
The Additional Library Directories will look like this:
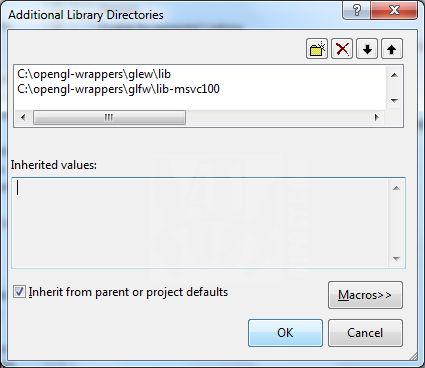
Click on the yellow folder icon and then on the button with the ellipsis to browse to the desired directory instead of manually typing the folder path.
Again, click on the OK button.
Next, navigate to Linker → Input → Additional Dependencies. One last time, click on the drop-down menu to the far right and select <Edit…>:
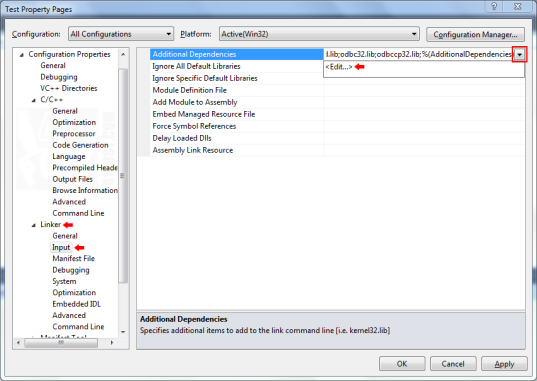
Select Linker → Input → Additional Dependencies. Then click on <Edit…>.
A dialog with a text field will open. There, add the following library files, one per line:
- opengl32.lib
- glu32.lib
- glew32.lib
- glfw3.lib
After adding the libraries, the Additional Dependencies dialog will look like this:
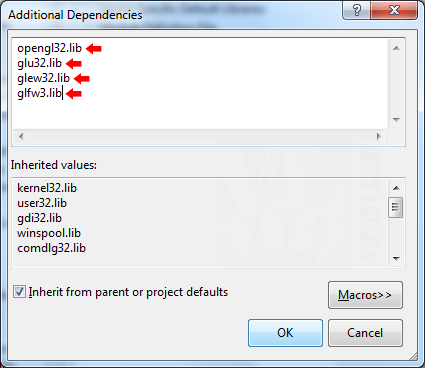
Add the following libraries: opengl32.lib, glu32.lib, glew32.lib and glfw3.lib.
Click on the OK button to confirm and dismiss the Additional Dependencies dialog. Finally, hit Applyand them OK to dismiss the Project Property Pages dialog:
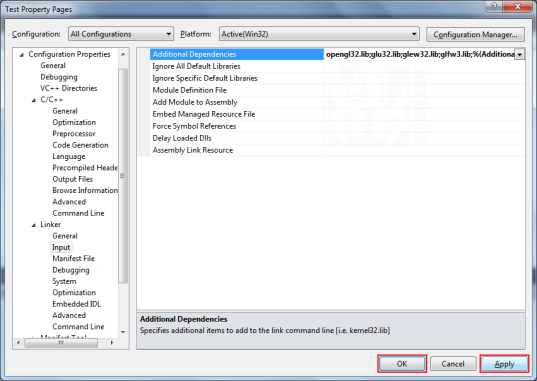
Select Apply and then OK to confirm and dismiss the project’s Property Pages dialog.
One last thing: copy the glew32.dll file located at opengl-wrappers/glew/bin to the Testproject folder[8]:
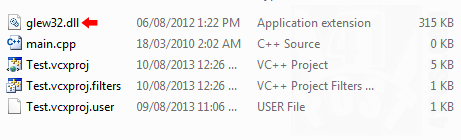
Screenshot showing the glew32.dll file copied to the ‘Test’ project folder.
All Visual C++ Express 2010 configurations are now completed! Let’s try to build the project.
5. Building the project
At this point, we have to somehow verify whether the project configurations were successful and if the libraries are being correctly referenced and linked. Therefore, copy and paste the following code into the main.cpp file:
- //Include GLEW
- #include <GL/glew.h>
- //Include GLFW
- #include <GLFW/glfw3.h>
- //Include the standard C++ headers
- #include <stdio.h>
- #include <stdlib.h>
- //Define an error callback
- static void error_callback(int error, const char* description)
- {
- fputs(description, stderr);
- _fgetchar();
- }
- //Define the key input callback
- static void key_callback(GLFWwindow* window, int key, int scancode, int action, int mods)
- {
- if (key == GLFW_KEY_ESCAPE && action == GLFW_PRESS)
- glfwSetWindowShouldClose(window, GL_TRUE);
- }
- int main( void )
- {
- //Set the error callback
- glfwSetErrorCallback(error_callback);
- //Initialize GLFW
- if (!glfwInit())
- {
- exit(EXIT_FAILURE);
- }
- //Set the GLFW window creation hints - these are optional
- //glfwWindowHint(GLFW_CONTEXT_VERSION_MAJOR, 3); //Request a specific OpenGL version
- //glfwWindowHint(GLFW_CONTEXT_VERSION_MINOR, 3); //Request a specific OpenGL version
- //glfwWindowHint(GLFW_SAMPLES, 4); //Request 4x antialiasing
- //glfwWindowHint(GLFW_OPENGL_PROFILE, GLFW_OPENGL_CORE_PROFILE);
- //Declare a window object
- GLFWwindow* window;
- //Create a window and create its OpenGL context
- window = glfwCreateWindow(640, 480, "Test Window", NULL, NULL);
- //If the window couldn't be created
- if (!window)
- {
- fprintf( stderr, "Failed to open GLFW window. " );
- glfwTerminate();
- exit(EXIT_FAILURE);
- }
- //This function makes the context of the specified window current on the calling thread.
- glfwMakeContextCurrent(window);
- //Sets the key callback
- glfwSetKeyCallback(window, key_callback);
- //Initialize GLEW
- GLenum err = glewInit();
- //If GLEW hasn't initialized
- if (err != GLEW_OK)
- {
- fprintf(stderr, "Error: %s ", glewGetErrorString(err));
- return -1;
- }
- //Set a background color
- glClearColor(0.0f, 0.0f, 1.0f, 0.0f);
- //Main Loop
- do
- {
- //Clear color buffer
- glClear(GL_COLOR_BUFFER_BIT);
- //Swap buffers
- glfwSwapBuffers(window);
- //Get and organize events, like keyboard and mouse input, window resizing, etc...
- glfwPollEvents();
- } //Check if the ESC key had been pressed or if the window had been closed
- while (!glfwWindowShouldClose(window));
- //Close OpenGL window and terminate GLFW
- glfwDestroyWindow(window);
- //Finalize and clean up GLFW
- glfwTerminate();
- exit(EXIT_SUCCESS);
- }
After copying the code and waiting for a few seconds, if the include or the GLFW and GLEW function calls have a red underline beneath them, there’s a problem with the project configuration. Return to the fourth part of the tutorial. Case everything looks fine, continue reading this section.
Right at the start of the above code, some headers are being included. The include order matters! To use GLEW with GLFW, the GLEW header must be included before the GLFW header. Then, after that, include any other library that may be required (lines 1 through 10).
Moving on, two static functions that are later set as GLFW callbacks are defined: the error and keyboard callbacks. They are just like the ones found at the official GLFW documentation (lines 12 through 23). The first one prints any initialization errors to the console and the second one makes the application close if the escape key is pressed.
Finally, the main() function is being defined. The first line of code inside it assigns the error callback (line 28), again just as stated on GLFW’s official documentation.
Lines 31 through 34 simply initialize GLFW. If a problem takes place, the application exits.
The next set of lines are purely optional, however it’s highly likely that you are going to be using them (lines 36 through 40). They set some request for specific features to the GLFW window. The first and second ones, if uncommented, will request a window to be created with a OpenGL context greater than 3.0 (3.1, 3.2 or 3.3, depending on the hardware)[9] (lines 37 and 38).
The last of this set of lines, if uncommented, simply request the correct OpenGL profile (line 40). Some problems might arise if setting this incorrectly. Read the Troubleshooting section of this tutorial.
After all those verifications, it’s safe to try to create a window. This is done by declaring a GLFWwindow object at line 43 and at the following line, where a 640 by 480 pixels window with the title “Test Window” is created (line 46)[10].
With some luck, a GLFW window gets created. So, the next if statement on the code checks whether everything went as expected. In case something goes wrong while creating the window, GLFW terminates and closes the application (lines 49 through 53).
Afterwards, the window is associated with the current OpenGL context (line 57). Please make sure that the glwfMakeContextCurrent() method call is made before initializing GLEW. Another GLFW function call assigns the key callback to be used (line 60).
With that, GLEW is initialized and the following if statement just checks whether it was successful, closing the application if it wasn’t. This part of the code has been extracted from GLEW’s documentation (line 63 through 70).
A blue color is set as the background’s clear color. Although it has nothing to do with GLFW or GLEW initialization, it’s an easy way to tell if everything has initialized correctly, including the association of the correct OpenGL context with the GLFW window (line 73).
At the end of the main function declaration, a do-while loop is set to run indefinitely until the GLFW needs to close due to an error, or if the window is closed by the user (line 87).
Inside the loop, the color buffer is cleared, the render buffers are swapped, making the window constantly render its contents, giving the illusion of animation (line 79 and 82). All rendering code should be placed at line 80, just before the glfwSwapBuffers() method call. The last bit of code inside the loop is a method call for GLFW to process its events, like inputs and window events (line 84).
Outside the loop, at the bottom of the main() method declaration, the opened window is closed and GLFW is terminated (cleaned up) (lines 90 and 92). The main function returns zero (line 98).
All of this will create a window that renders a solid blue color:
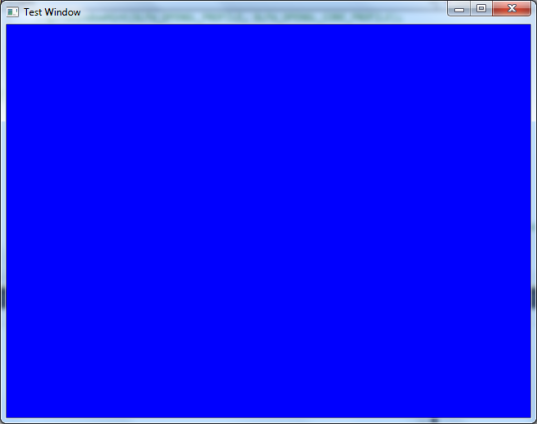
After successfully building the project, a blue window will open, like this one.
6. Troubleshooting
These are solutions to some of the errors that you may encounter while trying to build the application:
Error Description:
The application fails to build and the following error is outputted:
LINK : warning LNK4098: defaultlib ‘MSVCRT’ conflicts with use of other libs; use /NODEFAULTLIB:library
LINK : fatal error LNK1123: failure during conversion to COFF: file invalid or corrupt
Solution:
Just navigate to the project’s Properties and then Linker → General, at the field Enable Incremental Linking select ‘No (/INCREMENTAL: NO)‘, like so:
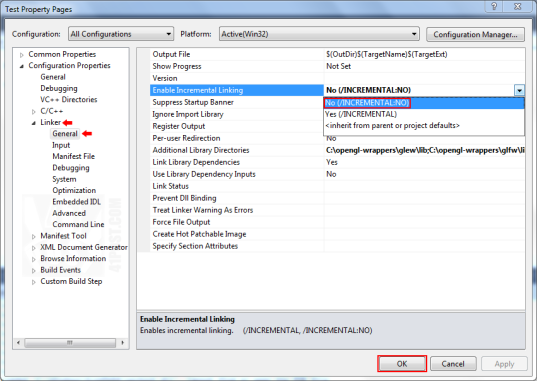
At the project’s properties, select Linker → General → Enable Incremental Linking. Set it to NO.
Error Description:
The application builds and runs fine, but there is a series of “<insert system dll name here>.dll’Cannot find or open PDB file” right at the beginning of the output such as:
‘Test.exe’: Loaded ‘C:WindowsSysWOW64 tdll.dll’, Cannot find or open the PDB file
‘Test.exe’: Loaded ‘C:WindowsSysWOW64kernel32.dll’, Cannot find or open the PDB file
‘Test.exe’: Loaded ‘C:WindowsSysWOW64KernelBase.dll’, Cannot find or open the PDB file
‘Test.exe’: Loaded ‘C:WindowsSysWOW64opengl32.dll’, Cannot find or open the PDB file
‘Test.exe’: Loaded ‘C:WindowsSysWOW64msvcrt.dll’, Cannot find or open the PDB file
‘Test.exe’: Loaded ‘C:WindowsSysWOW64advapi32.dll’, Cannot find or open the PDB file
…
Solution:
This isn’t actually an error. It’s just a warning, telling that Visual Studio couldn’t find the files that contain the symbols for debugging the system libraries. To “fix” that, just navigate to: Tools → Options → Debugging → Symbols and check the Microsoft Symbol Servers option, like this:
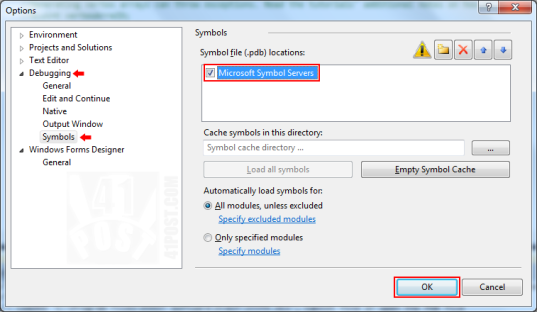
Simply enable that checkbox, click on OK and build the application (F7).
You will be presented with a warning message that explains that the building process might take longer when this option is enabled. Press the OK button and OK once more, then rebuild the project (F7). Now, it will take much longer for the application to build, because Visual Studio C++ Express will download the missing PDB symbols.
However, you don’t have to leave this option enabled as Visual Studio C++ Express will save the downloaded PDB files on disk, meaning that this option can be disabled after fetching the PDB symbols from the server and after successfully building the application at least once.
Error Description:
Calling the function glGenVertexArrays() throws an exception, so the following code:
- GLuint vertexArrayID;
- glGenVertexArrays(1, &vertexArrayID);
Throws an exception, like this one:
Unhandled exception at 0x00000000 in Test.exe: 0xC0000005: Access violation.
Solution:
Maybe, the OpenGL implementation being requested and created for the GLFW isn’t compatible with the called function on that specific hardware. Or probably, you have the following code:
- glfwWindowHint(GLFW_OPENGL_PROFILE, GLFW_OPENGL_CORE_PROFILE);
So, change it to:
- glfwWindowHint(GLFW_OPENGL_PROFILE, GLFW_OPENGL_COMPAT_PROFILE);
Error Description
Created window closes right after its creation.
Solution:
This is probably happening because GLEW is being initialized ( glewInit() ) before assigning the created OpenGL context as the current one for the window. Therefore, you have to place the call to the glewInit() function after the calling glfwMakeContextCurrent().
Error Description
Right after the application starts, an error message appears stating that glew32.dll isn’t present on the computer.
Solution:
Copy the glew32.dll file from C:opengl-wrappersglewbin[8] to the target folder where the application executable is being built.
7. Additional Notes
[1] This tutorial has been tested on a Windows 7 64 bit machine with Intel HD 4000 integrated graphics GPU and on a Windows 8 64 bit machine with a NVIDIA GTX 260 GPU. It should work most recent Visual Studio versions.
[2] GLFW is being statically linked, at this tutorial. GLEW is being dynamically linked, meaning you have to copy its dll to the output folder. By the time this text is being written (Aug. 12th, 2013), there’s a newer GLEW version, which is number 1.10.0. The folder structure in this version differs from version 1.9.0 (featured in the tutorial). But with some small adaptations, this tutorial still works. Take a look at items #7 and #8.
[3] Download the package with precompiled libraries, not the one with the source code.
[4] The guidelines on this tutorial haven’t been tested for 64 bit applications. I’m not sure if the process shown on this tutorial can be applied for building 64 bit applications.
[5] If your user has the privileges to access the Program Files folder, after installing Visual C++ Express 2010 or any variation Visual Studio Express, please navigate to C:Program Files (x86)Microsoft SDKsWindowsv7.0ALib (Windows 64 bits) or C:Program FilesMicrosoft SDKsWindowsv7.0ALib (Windows 32 bits). Verify if the following files are at the aforementioned folder: OpenGL32.Lib and GLU32.Lib.
[6] Creating a Windows Console Application isn’t a requirement in order to make an OpenGL application using GLEW and GLFW. This is being done so in this tutorial just because it’s convenient to have a dedicated window where errors are displayed, specially errors regarding window creation and OpenGL initialization errors. At the projection creation wizard, an Empty Project can also be selected.
[7] If you are using GLEW version 1.10.0 and up, the folder path should be replaced with something like C:opengl-wrappersglewlibReleaseWin32.
[8] Since GLEW is being dynamically linked, you also need to copy the file glew32.dll to your Release directory and also bundle this DLL with the application (.exe file). If you are using GLEW version 1.10.0 and up, the glew32.dll file you will need to bundle with your application is located at: C:opengl-wrappersglewbinReleaseWin32 .
[9] Please refer to the GLFW documentation to see how the numbers associated with the GLFW_CONTEXT_MAJOR and GLFW_CONTEXT_MINOR work. Also, see this link: http://www.opengl.org/registry/specs/ARB/glx_create_context.txt .
[10] This defines the size of the rendering area of the window, without taking into the account its borders and controls. On Windows 7, a 640×480 GLFW window is going to occupy approximately 656×518 px if all the borders and controls are taken in account.
8. References
Other build errors might take place. But since this tutorial will definitively require future revisions and some other types errors might occur, here are some of the links I’ve found that were really helpful while writing this article:
- “The OpenGL Extension Wrangler Library – Installation” at SourceForge.net:http://glew.sourceforge.net/install.html
- “GLFW – Documentation – Example Code” at GLFW.org: http://www.glfw.org/documentation.html
- “Tutorial 1 – Opening a Window” at OpenGL-Tutorials.org: http://www.opengl-tutorial.org/beginners-tutorials/tutorial-1-opening-a-window/
- “Setting Up GLFW” at Shawn Deprey’s Blog: http://shawndeprey.blogspot.com.br/2012/02/setting-up-glfw-in-visual-studio-2010.html
- “Static Compile GLFW and GLEW” at pHacks, written by Pietra Arumaga: http://www.phacks.net/static-compile-glfw-and-glew/
- “GLFW:Tutorials:Basics” at The Game Programming Wiki: http://content.gpwiki.org/index.php?title=GLFW:Tutorials:Basics
- “Setting up OpenGL, GLEW, and FreeGLUT in Visual C++” at OpenGLBook.com, written by Eddy Luten: http://openglbook.com/setting-up-opengl-glew-and-freeglut-in-visual-c/
- “CS175, Visual Studio Setup” at CS 175 Computer Graphics course website hosted at FAS (Faculty of Arts & Sciences) IT servers, written by Prof. Steven Gortler: http://sites.fas.harvard.edu/~lib175/pages/visstudio.html
- “Why is Visual Studio 2010 not able to find/open PDB files?” at Stack Overflow: http://stackoverflow.com/questions/4813975/why-is-visual-studio-2010-not-able-to-find-open-pdb-files
- “Error ‘LINK : fatal error LNK1123: failure during conversion to COFF: file invalid or corrupt’ after installing Visual Studio 2012 Release Preview” at Stack Overflow: http://stackoverflow.com/questions/10888391/error-link-fatal-error-lnk1123-failure-during-conversion-to-coff-file-inval
*The Visual C++ Express 2010, OpenGL, GLFW and GLEW logos are copyrighted to their respective owners.
Want to see more posts like this more often? Please donate by clicking at the button below:
Don't feel like donating? Alternatively, you can support the site by purchasing the FULL version of the Arrows Live Wallpaper app at the Google Play Store™:

Thanks a lot!
I remember those day’s 2 years ago I tried but failed to do, I had ton’s of pressure then I went to code block to complete the project . thx a bunch
I have been looking everywhere for instructions this pedantic.
What a life-saver. Getting OpenGL, GLEW and GLFW setup in Express 2010/2012 is exhausting. I didn’t realise I would be spending 3 days just to get a context up and running.
These instructions are so complete.
Thank you!
I agree, it’s exhausting.
Can you post tutorial on modern OpenGL,bro ? That would be great !
You are awesome!!!
Thanks a lot.
After days and days loosing my hairs, your tuto show me the good way.
work fine with Visual Studio 2015 community on Windows 7 sp1 x64 : no more compile error, but…
“unable to find the exe file” ! that is my next step…
that works now.
there was some tweaks to do in visual studio 2015.
Thanks for your accurate explanations that helps me a lot. :)