一、基本选择器
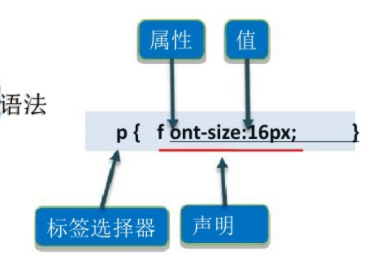
1、标签选择器
HTML标签作为标签选择器的名称,例如<h1>~<h6>、<p>等。
语法:
p{font-size: 16px;}
p:标签选择器。
font-size: 16px; 声明。
font-size:属性。
16px 属性值。
示例:
 1 <!DOCTYPE>
 2 <html>
 3 <head>
 4   <meta charset="utf-8" />
 5   <title>基本选择器</title>
 6   <style type="text/css">
 7      /*多行注释:标签选择器*/
 8      p{
 9           color: red;
10      }
11      h1{
12           font-weight: normal;
13           font-size: 12px;
14      }
15   </style>
16 </head>
17 <body>
18     <p>我是p标签</p>
19     <h1>我是h1标签</h1>
20 </body>
21 </html>
效果:

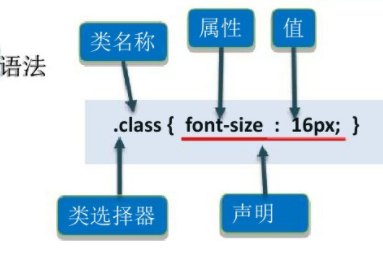
2、类选择器
语法:
.class {font-size:16px;}
.class:类选择器。
class:类名称。
font-size:16px;声明。
font-size:属性。
16px:属性值。
注意:
类选择器一定以"."开头,后面跟类名。
使用类选择器:
<标签名 class="类名称">标签内容</标签名称>
注意:
网页中可给不同标签使用相同的class。
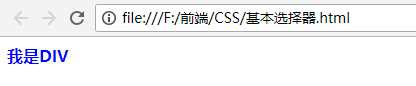
示例:
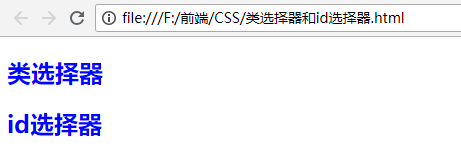
<!DOCTYPE>
<html>
<head>
  <meta charset="utf-8" />
  <title>类选择器</title>
  <style type="text/css">
     /*类选择器:.class*/
     .box{
      font-weight: bold;
      font-size: 16px;
      color: blue;
     }
  </style>
</head>
<body>
    <div class="box">我是DIV</div>
</body>
</html>
效果:
3、ID选择器
id选择器可以为标有特定id的HTML元素指定特定的样式。
语法:
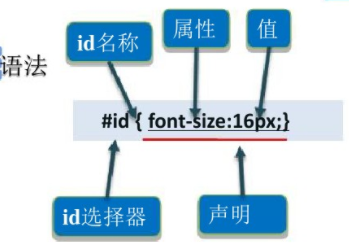
#id名称{声明}
注意:
ID选择器以“#”开头,后面跟选择器名称.
#id {font-size:16px;}
#id:ID选择器。
id:id名称。
font-size:16px;声明。
font-size:属性。
16px:属性值。
使用ID选择器:
<标签名 id="ID选择器名称">标签内容</标签名>
注意:
网页中标签的ID不能重复,唯一存在。
<!DOCTYPE>
<html>
<head>
  <meta charset="utf-8" />
  <title>类选择器</title>
  <style type="text/css">
     /*ID选择器:.#ID名称*/
     #small{
         background: red;
         font-size: 20px;
     }
  </style>
</head>
<body>
    <span id="small">我是span标签</span>
</body>
</html>
效果:

在现代布局中,id选择器常常用于建立派生选择器
例如:
#sidebar p{
    font-style: italic;
    text-align: right;
    margin-top: 1em;
}
上面的样式只会应用于出现在id是sidebar的元素内的段落。
即使被标注为sidebar的元素只能在文档中出现一次,这个id选择器作为派生选择器也可以被使用很多次。
例如:
#sidebar p{
    font-style: italic;
    text-align: right;
    margin-top: 1em;
}

#sidebar h2{
    font-size: 1em;
    font-weight: normal;
    font-style: italic;
    margin: 0;
    line-height: 1.5;
    text-align: center;
}
在这里,与页面中的其他 p 元素明显不同的是,sidebar 内的 p 元素得到了特殊的处理,同时,与页面中其他所有 h2 元素明显不同的是,sidebar 中的 h2 元素也得到了不同的特殊处理。
二、复合选择器
1、并集选择器(又称群组选择器)
示例
p,#id,.class{
font-weight: normal;
font-size: 12px;
}
经验:
1、多个选择器之间可以是多个不同或相同的类型。
2、多个选择器之间必须使用英文半角输入法逗号","隔开。
示例:
<!DOCTYPE>
<html>
<head>
  <meta charset="utf-8" />
  <title>类选择器</title>
  <style type="text/css">
  /* 实现效果:文字都是红色*/
  /* 实现方式1:使用各自的选择器实现*/
     /* h3{
          color: red;
      }
      .two{
          color: red;
      }
      p{
          color: red;
      }
      #four{
          color: red;
      }*/
     /*实现方式2:使用并集选择器,可以减少代码的书写*/
     h3,.two,p,#four{
         color: red;
     }
     /*使用了并集选择器之后,还可以在单独设置p标签*/
     p{
         font-size: 50px;
     }
  </style>
</head>
<body>
    <h3>第一个标题</h3>
    <h2 class="two">第二个标题</h2>
    <p>第二段文字内容</p>
    <h1 id="four">第三个标题</h1>
</body>
</html>
效果:

2、交集选择器(指定标签选择器)
语法:
h3.second{
font-size:14px;
color:green;
}
经验:
1、格式为:标签+类选择器 或 标签+ID选择器。
2、选择器之间不能有空格。
示例:
<!DOCTYPE>
<html>
<head>
  <meta charset="utf-8" />
  <title>交集选择器(指定标签选择器)</title>
</head>
<body>
    <h3>第一个标题</h3>
    <h3 class="two">第二个标题</h3>
    <p class="two">第二段文字内容</p>
    <h1 id="four">第三个标题</h1>
</body>
</html>
a、先定义一个h3选择器,字体颜色为blue:
h3{
     color: blue;
}
这是查看效果:

这是所有的h3标签的字体颜色都会变成蓝色,这并不是我们想要的效果。
b、定义类选择器:
.two{
        color: blue;
}
这是在查看网页效果:

这是所有class为two的标签的字体颜色都变为了蓝色。
c、定义交集选择器
h3.two{
        color: blue;
}
这是在查看网页的效果:
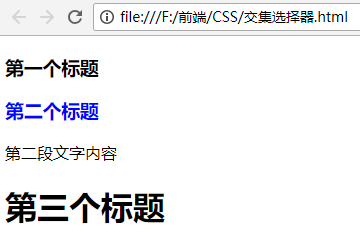
这时会发现,只有第二个h3标签的字体颜色变成了蓝色,其他标签的字体颜色不会变。
完整示例:
<!DOCTYPE html>
<html lang="en">
<head>
    <meta charset="UTF-8">
    <meta name="viewport" content="width=device-width, initial-scale=1.0">
    <meta http-equiv="X-UA-Compatible" content="ie=edge">
    <title>交集选择器(指定标签选择器)</title>
    <style type="text/css">
    /*所有h3标签的文字都会变成蓝色*/
    /*  h3{
        color: blue;
    } */
    /*所有class为two的标签的字体颜色都变成了蓝色*/
    /*   .two{
        color: blue;
    } */
    /*读法:名字为two的h3标签
      只有第二个h3标签的字体颜色才会变成蓝色,p标签的颜色不会变
      写法:标签+类选择器
    */
    h3.two{
        color: blue;
    }
    /*
    读法:名字为two的p标签
    只有p标签的字体颜色才会变成黄色,h3标签的颜色不会变
    */
    p.two{
        color: yellow;
    }
    /*
    写法:标签+ID选择器
    */
    h1#four{
        color: green;
    }
    </style>
</head>
<body>
    <h3>第一个标题</h3>
    <h3 class="two">第二个标题</h3>
    <p class="two">第二段文字内容</p>
    <h1 id="four">第三个标题</h1>
</body>
</html>
效果:

3、后代选择器
语法:
p a{
font-size:14px;
color:green;
}
经验
1、选择器之间可以是多个不同或相同类型并有层级关系的;
2、选择器之间用空格隔开;
3、格式:标签 标签选择器或标签 类选择器或标签 ID选择器。
示例:
先定义如下的HTML结构:
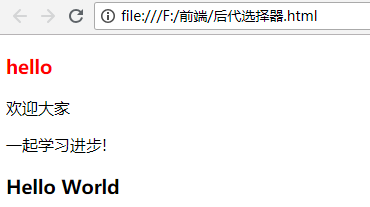
<!DOCTYPE html>
<html lang="en">
<head>
    <meta charset="UTF-8">
    <meta name="viewport" content="width=device-width, initial-scale=1.0">
    <meta http-equiv="X-UA-Compatible" content="ie=edge">
    <title>后代选择器</title>
</head>
<body>
    <div class="box">
        <h3>hello</h3>
        <p>欢迎大家</p>
        <p>一起学习进步!</p>
    </div>
    <h3>Hello World</h3>
</body>
</html>
效果:

要实现的效果:Div里面的h3标签的字体变为红色,和DIV平级的h3标签的字体颜色不变。
如果定义h3标签字体样式为红色:
h3{
     color: red;
}
效果:
这时会发现所有的h3标签的字体颜色都变为了红色。
这时可以使用下面的样式:
div h3{
       color: red;
}
效果:
这样就只有DIV里面的h3标签的字体颜色变成红色。
如果在DIV的p标签里面又添加了一个h3标签会是什么效果呢?HTML结构如下:
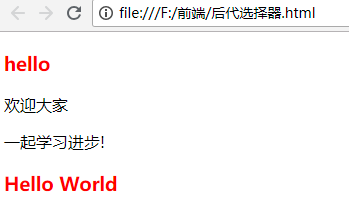
<div class="box">
        <h3>hello</h3>
        <p>欢迎大家</p>
        <p>一起学习进步!
            <h3>我的p标签下面的h3</h3>
        </p>
</div>
<h3>Hello World</h3>
效果:

说明:
只要h3在DIV里面,无论是直属的子级,或者是子级的子级,都会应用该样式。
在看下面的例子:
<!DOCTYPE html>
<html lang="en">
<head>
    <meta charset="UTF-8">
    <meta name="viewport" content="width=device-width, initial-scale=1.0">
    <meta http-equiv="X-UA-Compatible" content="ie=edge">
    <title>后代选择器</title>
    <style type="text/css">
        /* 所有的h3标签的字体都会变成红色 */
       /*  h3{
            color: red;
        } */
        div h3{
            color: red;
        }
        div .first{
            font-weight: bold;
            color: yellow;
        }
    </style>
</head>
<body>
    <div class="box">
        <h3>hello</h3>
        <p class="first">欢迎大家</p>
        <p>一起学习进步!
            <h3>我的p标签下面的h3</h3>
        </p>
    </div>
    <h3>Hello World</h3>
</body>
</html>
效果:
 .
.
三、通配选择器
使用*表示通配选择器,表示所有标签都应用该样式。
例如:
<!DOCTYPE html>
<html lang="en">
<head>
    <meta charset="UTF-8">
    <meta name="viewport" content="width=device-width, initial-scale=1.0">
    <meta http-equiv="X-UA-Compatible" content="ie=edge">
    <title>通配选择器</title>
    <style type="text/css">
       *{
           color: red;
       }
    </style>
</head>
<body>
    <div class="box">
        <h3>hello</h3>
        <p class="first">欢迎大家</p>
        <p>一起学习进步!
            <h3>我的p标签下面的h3</h3>
        </p>
    </div>
    <h3>Hello World</h3>
</body>
</html>
效果:

练习:
实现如下的网页样式:

HTML代码结构如下:
“如梦令”为h3标签且class为title。
“译文”为h3标签且id为translation。
诗词和翻译段落都为p标签,但翻译段落的class为second。
要去:
1、“如梦令”和“译文”字体大小为20px;
2、“译文”字体颜色为蓝色。
3、翻译段落的字体颜色为绿色。
代码如下:
<!DOCTYPE html>
<html lang="en">
<head>
    <meta charset="UTF-8">
    <meta name="viewport" content="width=device-width, initial-scale=1.0">
    <meta http-equiv="X-UA-Compatible" content="ie=edge">
    <title>CSS练习</title>
    <style type="text/css">
        h3{
            font-size: 20px;
        }
        /*交集选择器(指定标签选择器)*/
        /*id为translation的h3标签的字体颜色为蓝色*/
        h3#translation{
            color: blue;
        }
        /*class为second的p标签的字体颜色为绿色*/
        p.second{
            color: green;
        }
    </style>
</head>
<body>
    <h3 class="title">如梦令</h3>
    <hr />
    <p>
        昨夜雨疏风骤,浓睡不消残酒。<br />
        试问卷帘人,却道"海棠依旧"。<br />
        "知否?知否?应为绿肥红瘦"
    </p>
    <h3 id="translation">译文</h3>
    <p class="second">
        昨夜雨点稀疏,晚风急猛,我虽然睡了一夜,<br />
        扔有余罪未消。试问卷帘的侍女:海棠花怎么<br/>
        样?她说海棠花依然如旧。知道吗?知道吗?<br />
        应是绿叶繁茂,红花凋零。
    </p>
</body>
</html>
效果:

三、选择器优先级
1、标签选择器和类选择器比较
看下面的示例代码:
<!DOCTYPE html>
<html lang="en">
<head>
    <meta charset="UTF-8">
    <meta name="viewport" content="width=device-width, initial-scale=1.0">
    <meta http-equiv="X-UA-Compatible" content="ie=edge">
    <title>标签选择器和类选择器优先级比较</title>
    <style type="text/css">
       /*标签选择器*/
       h2{
           color: red;
       }
       /*类选择器*/
       .first{
           color: blue;
       }

    </style>
</head>
<body>
    <h2>标签选择器</h2>
    <h2 class="first">类选择器</h2>
</body>
</html>
效果:

从截图中可以看出:类选择器的优先级高于标签选择器。
注意:
更换<style>标签中标签选择器和类选择器的先后顺序得到的结果也是一样的。
2、标签选择器和ID选择器的比较
<!DOCTYPE html>
<html lang="en">
<head>
    <meta charset="UTF-8">
    <meta name="viewport" content="width=device-width, initial-scale=1.0">
    <meta http-equiv="X-UA-Compatible" content="ie=edge">
    <title>标签选择器和ID选择器的比较</title>
    <style type="text/css">
        /*标签选择器*/
        h2{
            color: red;
        }
        /*id选择器*/
        #first{
            color: blue;
        }
     </style>
</head>
<body>
        <h2>标签选择器</h2>
        <h2 id="first">id选择器</h2>
</body>
</html>
效果:

从图中可以看出:id选择器的优先级高于标签选择器。
3、类选择器和id选择器的比较
看下面的代码:
<!DOCTYPE html>
<html lang="en">
<head>
    <meta charset="UTF-8">
    <meta name="viewport" content="width=device-width, initial-scale=1.0">
    <meta http-equiv="X-UA-Compatible" content="ie=edge">
    <title>类选择器和ID选择器的比较</title>
    <style type="text/css">
        /*类选择器*/
        .first{
            color: red;
        }
        /*id选择器*/
        #second{
            color: blue;
        }
     </style>
</head>
<body>
        <h2 class="first" id="second">类选择器和id选择器优先级比较</h2>
</body>
</html>
效果:
从截图中可以看出:id选择器的优先级高于类选择器。
总结:
基本选择器的优先级:ID选择器>类选择器>标签选择器。