https://blog.csdn.net/hitwengqi/article/details/8015646
先是c++11之前的
1.最基础,进程同时创建5个线程,各自调用同一个函数
#include <iostream>
#include <pthread.h> //多线程相关操作头文件,可移植众多平台

using namespace std;

#define NUM_THREADS 5 //线程数

void* say_hello( void* args )
{
    cout << "hello..." << endl;
} //函数返回的是函数指针,便于后面作为参数

int main()
{
    pthread_t tids[NUM_THREADS]; //线程id
    for( int i = 0; i < NUM_THREADS; ++i )
    {
        int ret = pthread_create( &tids[i], NULL, say_hello, NULL ); //参数:创建的线程id,线程参数,线程运行函数的起始地址,运行函数的参数
        if( ret != 0 ) //创建线程成功返回0
        {
            cout << "pthread_create error:error_code=" << ret << endl;
        }
    }
    pthread_exit( NULL ); //等待各个线程退出后,进程才结束,否则进程强制结束,线程处于未终止的状态
}
输入命令:g++ -o muti_thread_test_1 muti_thread_test_1.cpp -lpthread linux下编译。
wq@wq-desktop:~/coding/muti_thread$ ./muti_thread_test_1
hello...hello...
hello...
hello...

hello...
运行结果运行顺序是乱的。
2.线程调用到函数在一个类中,那必须将该函数声明为静态函数函数
因为静态成员函数属于静态全局区,线程可以共享这个区域,故可以各自调用。
#include <iostream>
#include <pthread.h>

using namespace std;

#define NUM_THREADS 5

class Hello
{
public:
    static void* say_hello( void* args )
    {
        cout << "hello..." << endl;
    }
};

int main()
{
    pthread_t tids[NUM_THREADS];
    for( int i = 0; i < NUM_THREADS; ++i )
    {
        int ret = pthread_create( &tids[i], NULL, Hello::say_hello, NULL );
        if( ret != 0 )
        {
            cout << "pthread_create error:error_code" << ret << endl;
        }
    }
    pthread_exit( NULL );
}
wq@wq-desktop:~/coding/muti_thread$ ./muti_thread_test_2
hello...
hello...
hello...
hello...
hello...
顺序也是乱的。
3.如何在线程调用函数时传入参数呢?

先看下面修改的代码,传入线程编号作为参数:
#include <iostream>
#include <pthread.h> //多线程相关操作头文件,可移植众多平台

using namespace std;

#define NUM_THREADS 5 //线程数

void* say_hello( void* args )
{
    int i = *( (int*)args ); //对传入的参数进行强制类型转换,由无类型指针转变为整形指针,再用*读取其指向到内容
    cout << "hello in " << i <<  endl;
} //函数返回的是函数指针,便于后面作为参数

int main()
{
    pthread_t tids[NUM_THREADS]; //线程id
    cout << "hello in main.." << endl;
    for( int i = 0; i < NUM_THREADS; ++i )
    {
        int ret = pthread_create( &tids[i], NULL, say_hello, (void*)&i ); //传入到参数必须强转为void*类型,即无类型指针,&i表示取i的地址,即指向i的指针
        cout << "Current pthread id = " << tids[i] << endl; //用tids数组打印创建的进程id信息
        if( ret != 0 ) //创建线程成功返回0
        {
            cout << "pthread_create error:error_code=" << ret << endl;
        }
    }
    pthread_exit( NULL ); //等待各个线程退出后,进程才结束,否则进程强制结束,线程处于未终止的状态
}
wq@wq-desktop:~/coding/muti_thread$ ./muti_thread_test_3
hello in main..
Current pthread id = 3078458224
Current pthread id = 3070065520
hello in hello in 2
1
Current pthread id = hello in 2
3061672816
Current pthread id = 3053280112
hello in 4
Current pthread id = hello in 4
3044887408
显然不是想要的结果,调用顺序很乱,这是为什么呢?
这是因为多线程到缘故,主进程还没开始对i赋值,线程已经开始跑了...?
#include <iostream>
#include <pthread.h> //多线程相关操作头文件,可移植众多平台

using namespace std;

#define NUM_THREADS 5 //线程数

void* say_hello( void* args )
{
    cout << "hello in thread " << *( (int *)args ) <<  endl;
} //函数返回的是函数指针,便于后面作为参数

int main()
{
    pthread_t tids[NUM_THREADS]; //线程id
    int indexes[NUM_THREADS]; //用来保存i的值避免被修改

    for( int i = 0; i < NUM_THREADS; ++i )
    {
        indexes[i] = i;
        int ret = pthread_create( &tids[i], NULL, say_hello, (void*)&(indexes[i]) );
        if( ret != 0 ) //创建线程成功返回0
        {
            cout << "pthread_create error:error_code=" << ret << endl;
        }
    }
    for( int i = 0; i < NUM_THREADS; ++i )
        pthread_join( tids[i], NULL ); //pthread_join用来等待一个线程的结束,是一个线程阻塞的函数
}
wq@wq-desktop:~/coding/muti_thread$ ./muti_thread_test_3
hello in thread hello in thread hello in thread hello in thread hello in thread 30124
这是正常的吗?感觉还是有问题...待续
代码中如果没有pthread_join主线程会很快结束从而使整个进程结束,从而使创建的线程没有机会开始执行就结束了。加入pthread_join后,主线程会一直等待直到等待的线程结束自己才结束,使创建的线程有机会执行。
4.线程创建时属性参数的设置pthread_attr_t及join功能的使用

线程的属性由结构体pthread_attr_t进行管理。

typedef struct
{
    int                           detachstate;     线程的分离状态
    int                          schedpolicy;   线程调度策略
    struct sched_param      schedparam;   线程的调度参数
    int inheritsched; 线程的继承性
    int scope; 线程的作用域
    size_t guardsize; 线程栈末尾的警戒缓冲区大小
    int stackaddr_set; void * stackaddr; 线程栈的位置
    size_t stacksize; 线程栈的大小
}pthread_attr_t;
#include <iostream>
#include <pthread.h>

using namespace std;

#define NUM_THREADS 5

void* say_hello( void* args )
{
    cout << "hello in thread " << *(( int * )args) << endl;
    int status = 10 + *(( int * )args); //线程退出时添加退出的信息,status供主程序提取该线程的结束信息
    pthread_exit( ( void* )status );
}

int main()
{
    pthread_t tids[NUM_THREADS];
    int indexes[NUM_THREADS];

    pthread_attr_t attr; //线程属性结构体,创建线程时加入的参数
    pthread_attr_init( &attr ); //初始化
    pthread_attr_setdetachstate( &attr, PTHREAD_CREATE_JOINABLE ); //是设置你想要指定线程属性参数,这个参数表明这个线程是可以join连接的,join功能表示主程序可以等线程结束后再去做某事,实现了主程序和线程同步功能
    for( int i = 0; i < NUM_THREADS; ++i )
    {
        indexes[i] = i;
        int ret = pthread_create( &tids[i], &attr, say_hello, ( void* )&( indexes[i] ) );
        if( ret != 0 )
        {
        cout << "pthread_create error:error_code=" << ret << endl;
    }
    }
    pthread_attr_destroy( &attr ); //释放内存
    void *status;
    for( int i = 0; i < NUM_THREADS; ++i )
    {
    int ret = pthread_join( tids[i], &status ); //主程序join每个线程后取得每个线程的退出信息status
    if( ret != 0 )
    {
        cout << "pthread_join error:error_code=" << ret << endl;
    }
    else
    {
        cout << "pthread_join get status:" << (long)status << endl;
    }
    }
}
wq@wq-desktop:~/coding/muti_thread$ ./muti_thread_test_4
hello in thread hello in thread hello in thread hello in thread 0hello in thread 321


4
pthread_join get status:10
pthread_join get status:11
pthread_join get status:12
pthread_join get status:13
pthread_join get status:14
5.互斥锁的实现
互斥锁是实现线程同步的一种机制,只要在临界区前后对资源加锁就能阻塞其他进程的访问。
#include <iostream>
#include <pthread.h>

using namespace std;

#define NUM_THREADS 5

int sum = 0; //定义全局变量,让所有线程同时写,这样就需要锁机制
pthread_mutex_t sum_mutex; //互斥锁

void* say_hello( void* args )
{
    cout << "hello in thread " << *(( int * )args) << endl;
    pthread_mutex_lock( &sum_mutex ); //先加锁,再修改sum的值,锁被占用就阻塞,直到拿到锁再修改sum;
    cout << "before sum is " << sum << " in thread " << *( ( int* )args ) << endl;
    sum += *( ( int* )args );
    cout << "after sum is " << sum << " in thread " << *( ( int* )args ) << endl;
    pthread_mutex_unlock( &sum_mutex ); //释放锁,供其他线程使用
    pthread_exit( 0 );
}

int main()
{
    pthread_t tids[NUM_THREADS];
    int indexes[NUM_THREADS];

    pthread_attr_t attr; //线程属性结构体,创建线程时加入的参数
    pthread_attr_init( &attr ); //初始化
    pthread_attr_setdetachstate( &attr, PTHREAD_CREATE_JOINABLE ); //是设置你想要指定线程属性参数,这个参数表明这个线程是可以join连接的,join功能表示主程序可以等线程结束后再去做某事,实现了主程序和线程同步功能
    pthread_mutex_init( &sum_mutex, NULL ); //对锁进行初始化

    for( int i = 0; i < NUM_THREADS; ++i )
    {
        indexes[i] = i;
        int ret = pthread_create( &tids[i], &attr, say_hello, ( void* )&( indexes[i] ) ); //5个进程同时去修改sum
        if( ret != 0 )
        {
        cout << "pthread_create error:error_code=" << ret << endl;
    }
    }
    pthread_attr_destroy( &attr ); //释放内存
    void *status;
    for( int i = 0; i < NUM_THREADS; ++i )
    {
    int ret = pthread_join( tids[i], &status ); //主程序join每个线程后取得每个线程的退出信息status
    if( ret != 0 )
    {
        cout << "pthread_join error:error_code=" << ret << endl;
    }
    }
    cout << "finally sum is " << sum << endl;
    pthread_mutex_destroy( &sum_mutex ); //注销锁
}
wq@wq-desktop:~/coding/muti_thread$ ./muti_thread_test_5
hello in thread hello in thread hello in thread 410
before sum is hello in thread 0 in thread 4
after sum is 4 in thread 4hello in thread


2
3
before sum is 4 in thread 1
after sum is 5 in thread 1
before sum is 5 in thread 0
after sum is 5 in thread 0
before sum is 5 in thread 2
after sum is 7 in thread 2
before sum is 7 in thread 3
after sum is 10 in thread 3
finally sum is 10
可知,sum的访问和修改顺序是正常的,这就达到了多线程的目的了,但是线程的运行顺序是混乱的,混乱就是正常?
6.信号量的实现
信号量是线程同步的另一种实现机制,信号量的操作有signal和wait,本例子采用条件信号变量pthread_cond_t tasks_cond;
信号量的实现也要给予锁机制。
#include <iostream>
#include <pthread.h>
#include <stdio.h>

using namespace std;

#define BOUNDARY 5

int tasks = 10;
pthread_mutex_t tasks_mutex; //互斥锁
pthread_cond_t tasks_cond; //条件信号变量,处理两个线程间的条件关系,当task>5,hello2处理,反之hello1处理,直到task减为0

void* say_hello2( void* args )
{
    pthread_t pid = pthread_self(); //获取当前线程id
    cout << "[" << pid << "] hello in thread " <<  *( ( int* )args ) << endl;

    bool is_signaled = false; //sign
    while(1)
    {
    pthread_mutex_lock( &tasks_mutex ); //加锁
    if( tasks > BOUNDARY )
    {
        cout << "[" << pid << "] take task: " << tasks << " in thread " << *( (int*)args ) << endl;
         --tasks; //modify
    }
    else if( !is_signaled )
    {
        cout << "[" << pid << "] pthread_cond_signal in thread " << *( ( int* )args ) << endl;
        pthread_cond_signal( &tasks_cond ); //signal:向hello1发送信号,表明已经>5
        is_signaled = true; //表明信号已发送,退出此线程
    }
    pthread_mutex_unlock( &tasks_mutex ); //解锁
    if( tasks == 0 )
        break;
    }
}

void* say_hello1( void* args )
{
    pthread_t pid = pthread_self(); //获取当前线程id
    cout << "[" << pid << "] hello in thread " <<  *( ( int* )args ) << endl;

    while(1)
    {
        pthread_mutex_lock( &tasks_mutex ); //加锁
        if( tasks > BOUNDARY )
        {
        cout << "[" << pid << "] pthread_cond_signal in thread " << *( ( int* )args ) << endl;
        pthread_cond_wait( &tasks_cond, &tasks_mutex ); //wait:等待信号量生效,接收到信号,向hello2发出信号,跳出wait,执行后续
        }
        else
        {
        cout << "[" << pid << "] take task: " << tasks << " in thread " << *( (int*)args ) << endl;
            --tasks;
    }
        pthread_mutex_unlock( &tasks_mutex ); //解锁
        if( tasks == 0 )
            break;
    }
}


int main()
{
    pthread_attr_t attr; //线程属性结构体,创建线程时加入的参数
    pthread_attr_init( &attr ); //初始化
    pthread_attr_setdetachstate( &attr, PTHREAD_CREATE_JOINABLE ); //是设置你想要指定线程属性参数,这个参数表明这个线程是可以join连接的,join功能表示主程序可以等线程结束后再去做某事,实现了主程序和线程同步功能
    pthread_cond_init( &tasks_cond, NULL ); //初始化条件信号量
    pthread_mutex_init( &tasks_mutex, NULL ); //初始化互斥量
    pthread_t tid1, tid2; //保存两个线程id
    int index1 = 1;
    int ret = pthread_create( &tid1, &attr, say_hello1, ( void* )&index1 );
    if( ret != 0 )
    {
        cout << "pthread_create error:error_code=" << ret << endl;
    }
    int index2 = 2;
    ret = pthread_create( &tid2, &attr, say_hello2, ( void* )&index2 );
    if( ret != 0 )
    {
        cout << "pthread_create error:error_code=" << ret << endl;
    }
    pthread_join( tid1, NULL ); //连接两个线程
    pthread_join( tid2, NULL );

    pthread_attr_destroy( &attr ); //释放内存
    pthread_mutex_destroy( &tasks_mutex ); //注销锁
    pthread_cond_destroy( &tasks_cond ); //正常退出
}
测试结果:
先在线程2中执行say_hello2,再跳转到线程1中执行say_hello1,直到tasks减到0为止。
wq@wq-desktop:~/coding/muti_thread$ ./muti_thread_test_6
[3069823856] hello in thread 2
[3078216560] hello in thread 1[3069823856] take task: 10 in thread 2

[3069823856] take task: 9 in thread 2
[3069823856] take task: 8 in thread 2
[3069823856] take task: 7 in thread 2
[3069823856] take task: 6 in thread 2
[3069823856] pthread_cond_signal in thread 2
[3078216560] take task: 5 in thread 1
[3078216560] take task: 4 in thread 1
[3078216560] take task: 3 in thread 1
[3078216560] take task: 2 in thread 1
[3078216560] take task: 1 in thread 1
传多个指针的
涉及多参数传递给线程的,都需要使用结构体将参数封装后,将结构体指针传给线程
定义一个结构体
struct mypara
{
    var para1;//参数1
    var para2;//参数2
}
将这个结构体指针,作为void *形参的实际参数传递
struct mypara pstru;
pthread_create(&ntid, NULL, thr_fn,& (pstru));
函数中需要定义一个mypara类型的结构指针来引用这个参数

void *thr_fn(void *arg)
{
    mypara *pstru;
    pstru = (struct mypara *) arg;
    pstru->para1;//参数1
    pstru->para2;//参数2
}
pthread_create函数接受的参数只有一个void
*型的指针,这就意味着你只能通过结构体封装超过一个以上的参数作为一个整体传递。这是pthread_create函数的接口限定的,别人已经明确表明
我只接受一个参数,你硬要塞给他两个肯定会出错了。所以通过结构体这种组合结构变通一下,同样实现了只通过一个参数传递,但通过结构指针对结构数据成员的
引用实现多参数的传递
这种用结构体封装多参数的用法不仅仅用在pthread_create函数中,如果你自己设计的函数需要的参数很多〉=5个以上,都可以考虑使用结构体封
装,这样对外你的接口很简洁清晰,你的函数的消费者使用起来也很方便,只需要对结构体各个成员赋值即可,避免了参数很多时漏传、误传(参数串位)的问题


https://blog.csdn.net/ouyangfushu/article/details/80199140
c++11之后
C++多线程类Thread(C++11)
#include <thread>
#include <condition_variable>
#include <mutex>
C++11中std命名空间将Boost库中的Thread加入,Boost的多线程从准标准变为标准,在深度学习以及应用程序开发中经常用到多线程,这里将其用法整理复习,以demo的形式复习,每次遇到问题或者忘记了总是百度,用完了就是忘记,好记性不如烂笔头,Go ahead!
头文件为#include<thread>,通过std::thread应用。就以Hello thread开始吧,需要注意的是join()函数和detach()函数的区别,数据同步操作mutex(需包含include<mutex>):互斥锁
1、 普通函数多线程调用
thread.get_id()可以获得线程的id.
#include <iostream>

#include <thread>

std::thread::id main_thread_id = std::this_thread::get_id();

void hello()
{
    std::cout << "Hello Concurrent World
";
    if (main_thread_id == std::this_thread::get_id())
        std::cout << "This is the main thread.
";
    else
        std::cout << "This is not the main thread.
";
}

void pause_thread(int n) {
    std::this_thread::sleep_for(std::chrono::seconds(n));
    std::cout << "pause of " << n << " seconds ended
";
}

int main() {
    std::thread t(hello);
    std::cout << t.hardware_concurrency() << std::endl;//可以并发执行多少个(不准确)
    std::cout << "native_handle " << t.native_handle() << std::endl;//可以并发执行多少个(不准确)
    t.join();
    std::thread a(hello);
    a.detach();
    std::thread threads[5];                         // 默认构造线程

    std::cout << "Spawning 5 threads...
";
    for (int i = 0; i < 5; ++i)
        threads[i] = std::thread(pause_thread, i + 1);   // move-assign threads
    std::cout << "Done spawning threads. Now waiting for them to join:
";
    for (auto &thread : threads)
        thread.join();
    std::cout << "All threads joined!
";
}
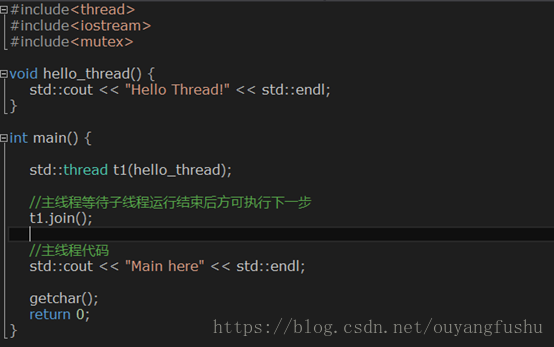
(1)无参数函数
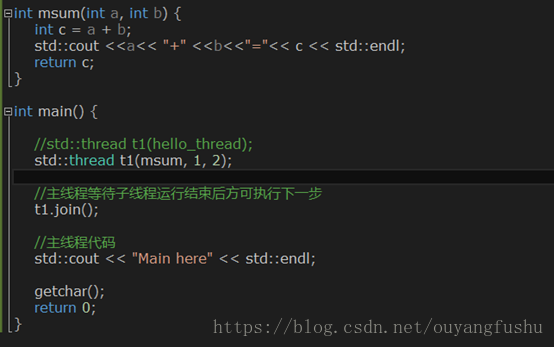
(2)有参数函数
2、 在类内部创建线程
(1)类内部函数为静态函数
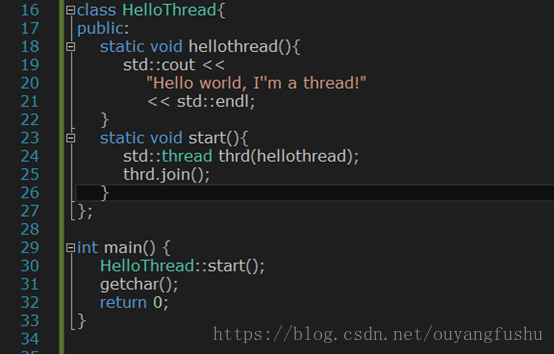
在这里start()和hellothread()方法都必须是static方法。
(2)在Singleton模式内部创建线程:
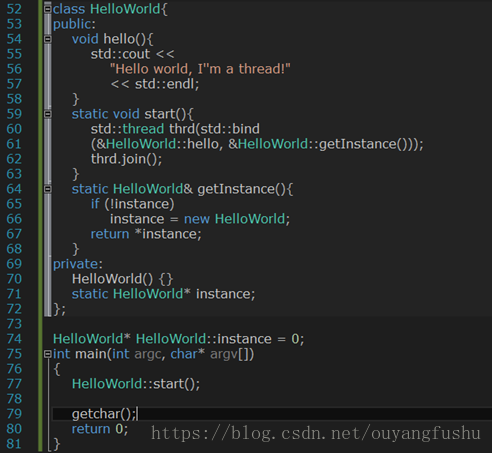
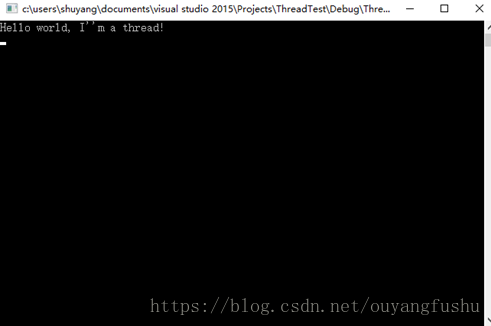
3 、用类内部函数在类外部创建线程:
非常普通的类,只是用多线程调用其内部的函数
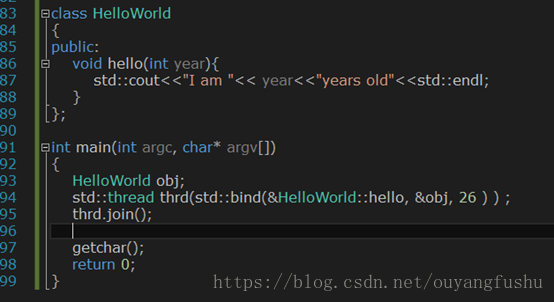
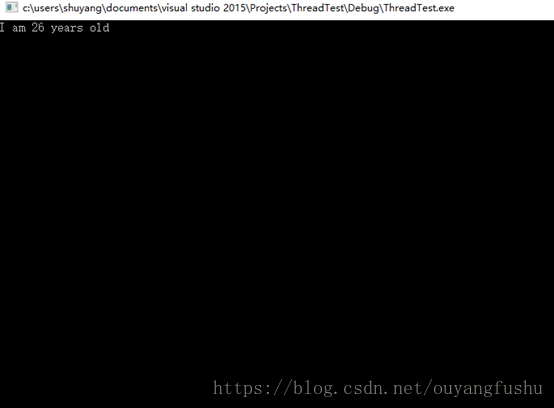
4、 join()和detach()的区别:
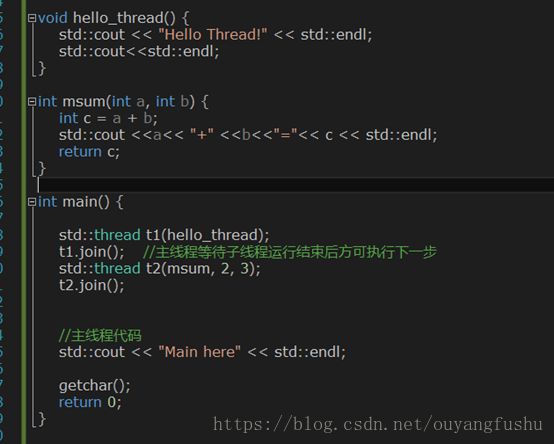
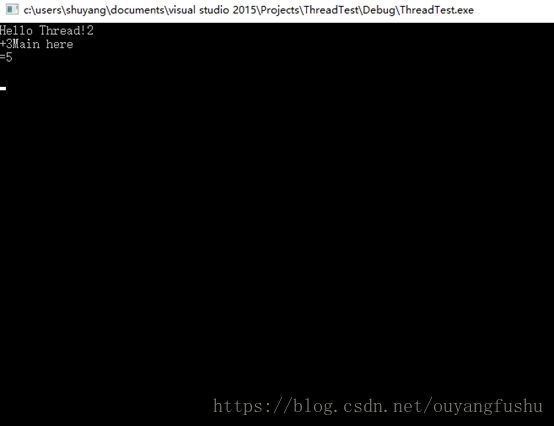
join()的作用前面已经提到,主线程等待子线程结束方可执行下一步(串行),detach()是的子线程放飞自我,独立于主线程并发执行,主线程后续代码段无需等待。看看效果:
(1)join()
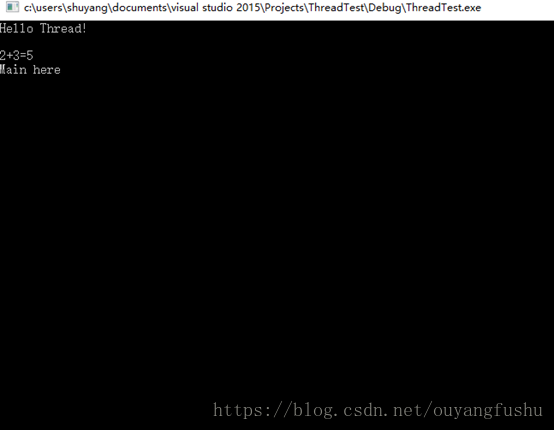
(2)detach()

5、 数据同步(线程同时操作一个数据的安全性):

