Sometimes you just can’t use multicast. Some cloud providers just do not provide it. In that scenario, you need to configure your vxlan layer using unicast addresses. This is done easily using iproute2.
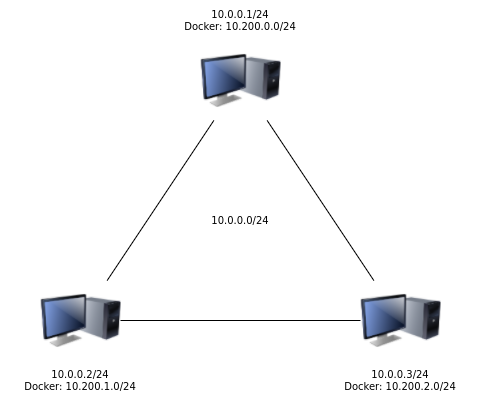
With the preceding layout, we need the docker instances to be able to communicate with each other. We cannot use L3 routes because the provider will not route any thing that’s not on the 10.0.0.0/24 network, so we need to set up our own L2 network layer over which we can establish our L3 routes. For this we’ll use a Virtual Extensible LAN ( VXLAN ).
Linux has all the tools for setting up these VXLANS and the most common method is to use multicasting. This network doesn’t support multicast routing so it’s not a possibility. We must use unicast addressing.
We’ll start by creating a vxlan interface on the first node.
10.0.0.1
ip link add vxlan0 type vxlan id 42 dev enp1s0 dstport 0
This creates the vxlan0 device, attaches it to enp1s0 listening on the iana default port. This does not assign any endpoints, so we’ll create connections to 10.0.0.2 and 10.0.0.3.
bridge fdb append to 00:00:00:00:00:00 dst 10.0.0.2 dev vxlan0
bridge fdb append to 00:00:00:00:00:00 dst 10.0.0.3 dev vxlan0
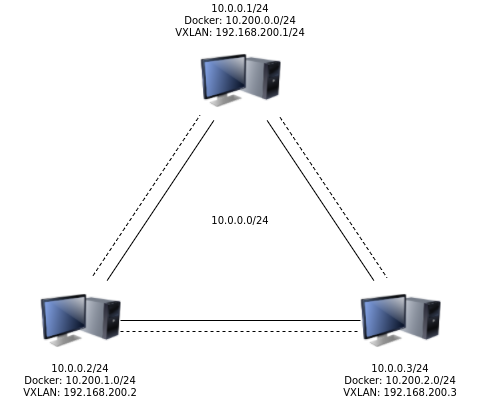
Assign an address and turn up the interface
ip addr add 192.168.200.1/24 dev vxlan0
ip link set up dev vxlan0
Do the same on each of the other nodes.
10.0.0.2
ip link add vxlan0 type vxlan id 42 dev emp1s0 dstport 0
bridge fdb append to 00:00:00:00:00:00 dst 10.0.0.1 dev vxlan0
bridge fdb append to 00:00:00:00:00:00 dst 10.0.0.3 dev vxlan0
ip addr add 192.168.200.2/24 dev vxlan0
ip link set up dev vxlan0
10.0.0.3
ip link add vxlan0 type vxlan id 42 dev emp1s0 dstport 0
bridge fdb append to 00:00:00:00:00:00 dst 10.0.0.1 dev vxlan0
bridge fdb append to 00:00:00:00:00:00 dst 10.0.0.3 dev vxlan0
ip addr add 192.168.200.2/24 dev vxlan0
ip link set up dev vxlan0
Confirm you can ping via the vxlan.
ping -c4 192.168.200.1 ; ping -c4 102.168.200.2


PING 192.168.200.1 (192.168.200.1) 56(84) bytes of data.
64 bytes from 192.168.200.1: icmp_seq=1 ttl=64 time=0.072 ms
64 bytes from 192.168.200.1: icmp_seq=2 ttl=64 time=0.092 ms
64 bytes from 192.168.200.1: icmp_seq=3 ttl=64 time=0.089 ms
64 bytes from 192.168.200.1: icmp_seq=4 ttl=64 time=0.061 ms

--- 192.168.200.1 ping statistics ---
4 packets transmitted, 4 received, 0% packet loss, time 2999ms
rtt min/avg/max/mdev = 0.061/0.078/0.092/0.015 ms
PING 192.168.200.2 (192.168.200.2) 56(84) bytes of data.
64 bytes from 192.168.200.2: icmp_seq=1 ttl=64 time=2.01 ms
64 bytes from 192.168.200.2: icmp_seq=2 ttl=64 time=1.64 ms
64 bytes from 192.168.200.2: icmp_seq=3 ttl=64 time=1.02 ms
64 bytes from 192.168.200.2: icmp_seq=4 ttl=64 time=1.79 ms

--- 192.168.200.2 ping statistics ---
4 packets transmitted, 4 received, 0% packet loss, time 3004ms
rtt min/avg/max/mdev = 1.027/1.619/2.015/0.367 ms
Your new vxlan network is now ready for adding your l3 routes.
Add your docker l3 routes.
10.0.0.1
ip route add 10.200.1.0/24 via 192.168.200.2
ip route add 10.200.2.0/24 via 192.168.200.3
10.0.0.2
ip route add 10.200.0.0/24 via 192.168.200.1
ip route add 10.200.2.0/24 via 192.168.200.3
10.0.0.3
ip route add 10.200.0.0/24 via 192.168.200.1
ip route add 10.200.1.0/24 via 192.168.200.2
Now your docker containers can reach each other.
NOTE: This is not yet something that can be configured via systemd- networkd.https://github.com/systemd/systemd/issues/5145