NAT Lookback Introduction
其實網路上關於 NAT Loopback 的文章到處都有,從原理,到如何在Linux實作等網路上各種資源都有,那這篇文章跟網路上的教學又有什麼不同?
我唯一能夠貢獻的是 NAT Loopback 關於 Linux Kernel 的問題,在某些情況下,NATLoop Back 會因為 Linux Kernel Network Stack 的關係導致無法運作。當初我遇到這個問題時也是百思不得其解,於 google 世界到處尋找,都沒有看到任何線索。
最後只好自己深入 kernel 內找尋原因,從 Linux Kernel Network Stack 開始翻找。
經過一些時間的研究與証實後,也終於確認了某個原因,然後將這個問題的關鍵字轉換後,也有找到一個沒有上到 upstream 的 kernel patch 針對此問題處理。
在真正踏入核心問題以前,還是要來說明一下什麼是 NAT Loopback,對於這個概念有基本的認知與瞭解後,再來實際看看 kernel 上面出現了什麼問題,以及那個 patch 是如何解決這個問題
Introduction
首先,假設有一個以下的網路環境,我們在 Router 後面設置了兩台 機器,一台是 Web Server,另外一台則是一般的 PC。
由於該 PC 跟該 Web Server 都屬於同一個網域且都在 Router 底下,因此兩台機器之間若要透過 IP addresss 來傳輸基本上沒有太多問題。

但是外網的機器想要存取該 Web Server 的話,由於 Web Server 本身的 IP address 屬於 Private Network,譬如192.168.0.0/16這個範圍內。
因此外網的機器本身並沒有辦法直接存取到該 Web Server,但是若我們能夠將封包送到前面的 Router,再透過某種方式告訴 Router 說這個封包不是給你的,請幫我往下轉發給底下的 Web Server,則封包就可以很順利的到達 Web Server 去,一切的連線就順利完成。
上述行為裡面最重要的部分就是如何讓 Router 知道什麼樣的封包要送給底下的 Web Server,一般來說都會採用 DNAT (Destination NAT)的做法。Router 本身指定一個 Port Number,當看到封包是這個 Port 的時候,就會將封包轉送到底下的 Web Server,並且將封包內容修改讓 Web Server 能夠處理該封包。
舉例來說,假設我們在 Router 上面放一條 DNAT 的規則
1
|
1.2.3.4:8001 ---> 192.168.1.5:80
|
對於 Router 來說,當看到封包的 ip:port 是 1.2.3.4:8001,則會將封包標頭改成 192.168.1.5:80,然後依照本機端內的 route rules 將其轉發到底下的 Web Server 去。
所以假設今天外網的機器(9.8.7.6)發送了一個封包,其流向是9.8.7.6:1234 ---> 1.2.3.4:8001
當 Router 收到此封包後,就會將其轉換成9.8.7.6:1234 ---> 192.168.1.5:80
當 Web Server 收到此封包後,會有一個回應的封包,此封包的流向是192.168.1.5:80 --> 9.8.7.6:1234
當此封包到達 Router 後, Router 會先查詢看看這個封包是不是經過上述規則轉換的,若是的話就將封包內容重新轉成(進來的封包轉換其 Destination, 回去的封包轉換其 Source)1.2.3.4:8001 --> 9.8.7.6:1234
這樣外網的機器 (9.8.7.6) 就可以很順利跟內網內的 Web Server 溝通了。
上述的這個行為有些會稱 Port Forwarding,有些會稱 Virtual Server,不論怎麼稱呼,其背後的意義都相同。
然而在真實的環境中,我們通常不會去死記這些 IP address,我們會使用 DNS 的服務來幫這些 IP address 設定一組好記的名稱,舉例來說可以設定 webserver.com 指向 1.2.3.4。
在這種情況下,外面機器想要存取該 webserver 的流程就會是
- 外網機器(9.8.7.6)想要存取 webserver.com,因此向 DNS server 詢問其對應的 IP address
- DNS server 回應 webserver.com 就是 1.2.3.4,因此外網機器接下來會發送封包到 1.2.3.4
- 封包到達 1.2.3.4 後,根據 DNAT 的規則轉送到底下真正的 web server。
- 底下的 web server 回送封包,透過 1.2.3.4 送回到外網機器(9.8.7.6)
其流程可以用下列兩張圖來說明

NAT Loopback
假設我們都已經瞭解上述的概念後,接下來我們將該外網電腦()的角色給放到同樣區網內(192.168.1.6)來看,基本上 NAT Loopback 代表的涵意就是讓內網的機器能夠遵循原本的流程去存取內網的機器。
在這種情況下,若內網的機器想要依循上述的流程運行
- 首先內網機器 (192.168.1.6) 透過 DNS 的服務,得到 webserver.com 指向 1.2.3.4
- 接下來將封包送往到 1.2.3.4,遇到 DNAT 後將封包轉換
所以假設今天內部機器(192.168.1.6)發送了一個封包,其流向是192.168.1.6:1234 ---> 1.2.3.4:8001
當 Router 收到此封包後,就會將其轉換成192.168.1.6:1234 ---> 192.168.1.5:80 - 當 web server 收到封包後就會回應一個封包,該封包透過 Router 就會依循上述的模式回到內網的機器(192.168.1.6)。
上述的流程看起來是順利也沒有問題的,但是有時候實體網路環境中,可能這些機器(PC,Server)是接在同一台 switch 底下,譬如下列這種情況,
或是 Router 內含 Hardware L2 switch。
(只做DNAT,不做snat)
在這種環境下,上述的流程會變成下列情況,並且產生一個問題
- DNS 的部分沒有問題,可以正常運作
- 內網的機器封包可以順利到達 web server
- 當 web server 收到請求並且將封包送回去時
這時候的封包標頭檔可能是192.168.1.5:80 ---> 192.168.1.6:1234
4.當封包到達switch時,就會發現這是個同網段的封包,所以就直接幫他回傳給內網機器 192.168.1.6了
5.當內網機器收到這個封包時,就會感受到一臉困惑。
一開始送出去的封包是192.168.1.6:1234---> 1.2.3.4:8001
所以期望收回到的封包應該是1.2.3.4:8001 ---> 192.168.1.6:1234
所以當他看到不符合期望的封包標頭時,就會將其丟棄192.168.1.5:80 ---> 192.168.1.6:1234
整個流程如下圖所示
這邊最大的問題就是 web server 送回去的封包必須要先給 Router 將其根據 DNAT 的規則給重新反轉一次。
但是在此環境下,因為中間有一台 switch 存在,所以封包就沒有送回到 router 那邊去處理而是直接送回去給內網機器了。
若要能夠處理上述的情況,我們就必須要想辦法將封包也送回到 router 端去處理,為了達到這個目的我們可以在 router 也採用 SNAT (Source NAT)
規則大概如下,只要是從某個 interface 近來的,就將此封包標頭內的 Source IP Address 變成 192.168.1.1。
1
|
in_interface = xxxx, source ip = 192.168.1.1:xxxx
|
至於實際上要採用 Masquerade 或是 SNAT 來決定怎麼轉換 Source IP 都可以。
因此,目前的設定中,Router同時會進行 SNAT 以及 DNAT,因此假設內網機器(192.168.1.6)要對 1.2.3.4:80進行存取。
接下來以下圖來解釋每個步驟中封包的變化。
( DNAT, snat, 从192)
藍色區域
1,2: 192.168.1.6:1234 -> 1.2.3.4:8001
接下來封包會進入 router,執行 SNAT/DNAT
3,4: 192.168.1.1:5678 -> 192.168.1.5:80
當封包到達 web server後,接下來 web server 會回傳一個封包回去
1,2: 192.168.1.5:80 --> 192.168.1.1:5678
當封包到達 switch 時,查了一下目的地是 192.168.1.1,因此就會幾該封包送回到 router 去處理。
當封包到達 router 時,會根據之前的記錄瞭解該封包有使用過 SNAT 以及 DNAT,因此會將封包標頭給重新修改
3,4: 1.2.3.4:8001 --> 192.168.1.6:1234
當內網機器(192.168.1.6)收到此封包後因為與預期的相同,所以就可以正確地建立起連線並且開始傳輸。
到這邊我們已經完成了最基本的 NAT Loopback,基本上大部分的情況都可以依照這種思路來完成。
當然若是你網路中間有遇到一些 Hardware 會幫你偷偷做事情的,那你的封包可能就會被影響導致整個傳輸都出問題,這邊要特別小心。
Linux Kernel trobule shooting
前面講了這麼多話之後,我們來看看實際操作上可能會遇到的問題。
以下列這張圖為範例
為了簡化問題,我們假設 router 含有八個實體連接埠,其中第一個連接埠跟底下的switch有連結。
假設這一台 Router 我們系統中有透過 Linux bridge 創建了一個 bridge br0,然後我們幫八個連接埠都接到該 br0底下,其中第一個連接埠對應到系統上的 interface 是 eth0
所以這時候大概可以看到如下面的架構
1
|
br0:
|
从eth0收到包,又要从eth0发出
在這種情況下,剛剛上述 NAT Loopback 的封包會遇到一問題。
當內網機器的封包送到 router時,會先透過 eth0進入到系統後到達 br0,接下來進行 SNAT 以及 DNAT 的處理。
然後最後封包又要從 br0 往 eth0 出去,一切的料想都是如此美好。
然而實際上就會發現封包不見了!!
根據 Linux kernel 3.6 source code,當系統底下的 bridge 再轉發封包的時候,會呼叫到 br_forward 去處理。
1
|
/* called with rcu_read_lock */
|
1
|
/* Don't forward packets to originating port or forwarding diasabled */
|
上面程式碼有一個最重要的地方
skb->dev != p->dev,如果當前封包進入的 bridge port 跟出去的 bridge port 是一樣的話,那就不會轉發,導致這個封包被丟棄了…
可是在當前的網路拓墣中你就是要這個封包去轉發,所以可以觀察到上述程式碼還有一個關鍵點
(p->flags & BR_HAIRPIN_MODE),
根據這篇 patch, 只要針對 interface 去啟用 hairpin_mode 就可以讓封包順利從同個點進出來回了。
但是事情依然沒有這樣簡單,這樣完畢後封包的 IP 的確都有正確的修改了,但是在 MAC Address 的部分有點問題,Source MAC沒有如預期的被修改,所以這邊又要依賴另外一個工具 ebtables 來進行 MAC 的修改,再者種情況下,封包就可以順利通過了。
因此我們的 Router 就有三種設定
1.打開 hairpin mode
2.執行 iptables 的 SNAT/DNAT(改 IP)
3.透過 ebtables 的 SNAT (改 MAC)
後來發現網路上也有其他人遇到一樣的問題,該使用者因為沒有辦法針對 user-space 去進行修改,所以只能從 kernel 內進行一些小部分的修改,希望可以處理這個問題
這邊可以參考這個 patch
在這個 patch 中,該程式碼會先針對有進行 DNAT 的封包進行標記,然後在 bridge forward 的過程中,將該封包的 Source MAC 進行修改,最後再讓該封包通過往下轉發。
Summary
其實上述的問題一些家用 router 不會遇到的一個原因是 kernel 太舊了,就如同該 patch 所說, 於 2.6.35 後的系統就會有這樣的問題存在,有些家用 router 的 kernel 還在 2.6.x 然後沒有追上新的,因此剛好逃過此問題。
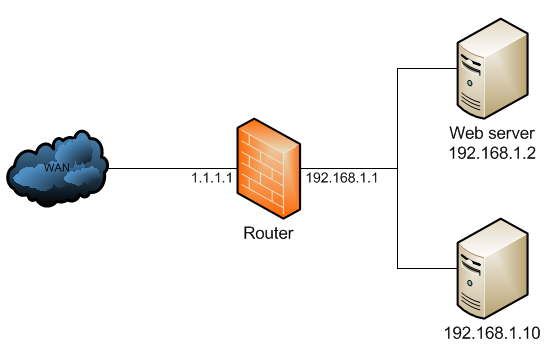
In the below network topology a web server behind a router is on private IP address space, and the router performs NAT to forward traffic to its public IP address to the web server behind it.
The NAT configuration would look like below:
/ip firewall nat
add chain=dstnat dst-address=1.1.1.1 protocol=tcp dst-port=80
  action=dst-nat to-address=192.168.1.2
add chain=srcnat out-interface=WAN action=masquerade
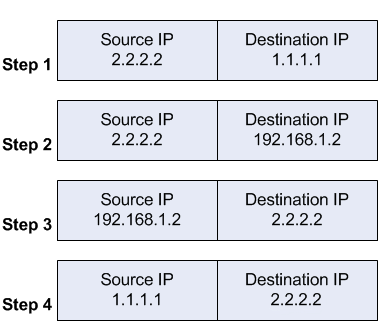
When a client out on the Internet with IP address 2.2.2.2 establishes a connection to the web server, the router performs NAT as configured.
- the client sends a packet with a source IP address of 2.2.2.2 to a destination IP address of 1.1.1.1 on port tcp/80 to request some web resource.
- the router destination NATs the packet to 192.168.1.2 and replaces the destination IP address in the packet accordingly. The source IP address stays the same: 2.2.2.2.
- the server replies to the client's request and the reply packet has a source IP address of 192.168.1.2 and a destination IP address of 2.2.2.2.
- the router determines that the packet is part of a previous connection and undoes the destination NAT, and puts the original destination IP address into the source IP address field. The destination IP address is 2.2.2.2, and the source IP address is 1.1.1.1.
The client receives the reply packet it expects, and the connection is established.
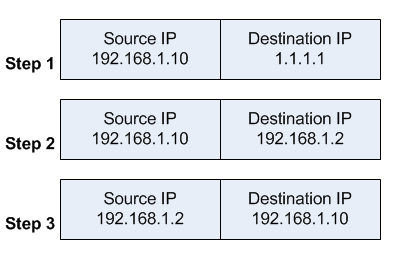
When a client on the same internal network as the web server requests a connection to the web server's public IP address, the connection breaks.
- the client sends a packet with a source IP address of 192.168.1.10 to a destination IP address of 1.1.1.1 on port tcp/80 to request some web resource.
- the router destination NATs the packet to 192.168.1.2 and replaces the destination IP address in the packet accordingly. The source IP address stays the same: 192.168.1.10.
- the server replies to the client's request. However, the source IP address of the request is on the same subnet as the web server. The web server does not send the reply back to the router, but sends it back directly to 192.168.1.10 with a source IP address in the reply of 192.168.1.2.
The client receives the reply packet, but it discards it because it expects a packet back from 1.1.1.1, and not from 192.168.1.2. As far as the client is concerned the packet is invalid and not related to any connection the client previously attempted to establish.
To fix the issue, an additional NAT rule needs to be introduced on the router to enforce that all reply traffic flows through the router, despite the client and server being on the same subnet. The rule below is very specific to only apply to the traffic that the issue could occur with - if there are many servers the issue occurs with, the rule could be made broader to save having one such exception per forwarded service.
/ip firewall nat
add chain=srcnat src-address=192.168.1.0/24
  dst-address=192.168.1.2 protocol=tcp dst-port=80
  out-interface=LAN action=masquerade
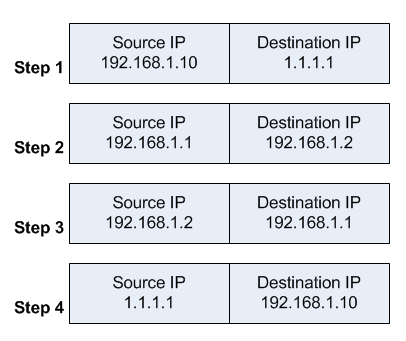
With that additional rule, the flow now changes:
- the client sends a packet with a source IP address of 192.168.1.10 to a destination IP address of 1.1.1.1 on port tcp/80 to request some web resource.
- the router destination NATs the packet to 192.168.1.2 and replaces the destination IP address in the packet accordingly. It also source NATs the packet and replaces the source IP address in the packet with the IP address on its LAN interface. The destination IP address is 192.168.1.2, and the source IP address is 192.168.1.1.
- the web server replies to the request and sends the reply with a source IP address of 192.168.1.2 back to the router's LAN interface IP address of 192.168.1.1.
- the router determines that the packet is part of a previous connection and undoes both the source and destination NAT, and puts the original destination IP address of 1.1.1.1 into the source IP address field, and the original source IP address of 192.168.1.10 into the destination IP address field.
The client receives the reply packet it expects, and the connection is established.
However, the web server only ever sees a source IP address of 192.168.1.1 for all requests from internal clients regardless of the internal client's real IP address. There is no way to avoid this without either using a router that can do application level DNS inspection and can rewrite A records accordingly, or a split DNS server that serves the internal clients the internal server IP address and external clients the external server IP address.
This is called - among other terms - hair pin NAT because the traffic flow has clients enter the router through the same interface it leaves through, which when drawn looks like a hair pin.
http://chenchun.github.io/network/2017/10/09/hairpin


