CAS类
CAS 即 compare-and-swap ,
下面这两个函数提供原子的比较和交换,如果 *ptr == oldval,就将 newval 写入 *ptr
-
此函数在相等并写入的情况下返回 true
bool __sync_bool_compare_and_swap (type *ptr, type oldval, type newval, ...)
/* 对应的伪代码 */
{ if (*ptr == oldval) { *ptr = newval; return true; } else { return false; } }
-
此函数在返回
oldvaltype __sync_val_compare_and_swap (type *ptr, type oldval, type newval, ...) /* 对应的伪代码 */ { if (*ptr == oldval) { *ptr = newval; } return oldval; }
其他原子操作
type __sync_lock_test_and_set (type *ptr, type value, ...)
将 *ptr 设为value并返回 *ptr 操作之前的值。
void __sync_lock_release (type *ptr, ...)
将 *ptr 置 0
内存栅障
内存栅障主要是处理不同cpu运作时(主要是执行不同线程代码时),一个cpu对内存的操作的原子性,也就保证其他cpu见到的内存单元数据的正确性。
内存栅障介绍
如果有对某一变量上写锁, 就不能在不获得相应的锁时对其进行读取操作。
内存栅的作用在于保证内存操作的相对顺序, 但并不保证内存操作的严格时序。
内存栅并不保证 CPU 将本地快取缓存或存储缓冲的内容刷写回内存, 而是在锁释放时确保其所保护的数据, 对于能看到刚释放的那个锁的 CPU 或设备可见。
持有内存栅的 CPU 可以在其快取缓存或存储缓冲中将数据保持其所希望的、 任意长的时间, 但如果其它 CPU 在同一数据元上执行原子操作,
则第一个 CPU 必须保证, 其所更新的数据值, 以及内存栅所要求的任何其它操作, 对第二个 CPU 可见。
__sync_synchronize (...)
发出一个full barrier.
内存栅障应用
对于执行一条指令,操作到4个寄存器时,如:
write1(dev.register_size,size);
write1(dev.register_addr,addr);
write1(dev.register_cmd,READ);
write1(dev.register_control,GO);
最后一个寄存器是控制寄存器,在所有的参数都设置好之后向其发出指令,设备开始读取参数.
如果最后一条write1被换到了前几条语句之前,那么肯定不是我们所期望的,这时候我们可以在最后一条语句之前加入一个memory barrier,强制cpu执行完前面的写入以后再执行最后一条:
write1(dev.register_size,size);
write1(dev.register_addr,addr);
write1(dev.register_cmd,READ);
__sync_synchronize();
write1(dev.register_control,GO);
memory barrier有几种类型:
- acquire barrier : 不允许将barrier之后的内存读取指令移到barrier之前(linux kernel中的wmb())。
- release barrier : 不允许将barrier之前的内存读取指令移到barrier之后 (linux kernel中的rmb())。
- full barrier : 以上两种barrier的合集(linux kernel中的mb())。
#include <stdio.h>
#include <pthread.h>
#include <stdlib.h>

static int count = 0;

void *test_func(void *arg)
{
        int i=0;
        for(i=0;i<20000;++i){
                __sync_fetch_and_add(&count,1);
        }
        return NULL;
}

int main(int argc, const char *argv[])
{
        pthread_t id[20];
        int i = 0;

        for(i=0;i<20;++i){
                pthread_create(&id[i],NULL,test_func,NULL);
        }

        for(i=0;i<20;++i){
                pthread_join(id[i],NULL);
        }
        printf("%d
",count);
        return 0;
}
root@ubuntu:/data1# gcc test2.c -lpthread  -o test2

root@ubuntu:/data1# ./test2
400000
root@ubuntu:/data1#
#include <stdio.h>
#include <pthread.h>
#include <stdlib.h>

static int count = 0;

void *test_func(void *arg)
{
        int i=0;
        for(i=0;i<20000;++i){
                ++count;
        }
        return NULL;
}

int main(int argc, const char *argv[])
{
        pthread_t id[20];
        int i = 0;

        for(i=0;i<20;++i){
                pthread_create(&id[i],NULL,test_func,NULL);
        }

        for(i=0;i<20;++i){
                pthread_join(id[i],NULL);
        }
        printf("%d
",count);
        return 0;
}
root@ubuntu:/data1# gcc test3.c -lpthread  -o test3
root@ubuntu:/data1# ./test3
164596
Compiler Fence
GCC的compiler fence有一个众所周知的写法:
asm volatile("": : :"memory")那么这句话是什么意思呢?它只是插入了一个空指令"",什么也没做。其实不然,这句话的关键在最后的"memory" clobber,它告诉编译器:这条指令(其实是空的)可能会读取任何内存地址,也可能会改写任何内存地址。那么编译器会变得保守起来,它会防止这条fence命令上方的内存访问操作移到下方,同时防止下方的操作移到上面,也就是防止了乱序,是我们想要的结果。
但这还没完,这条命令还有另外一个副作用:它会让编译器把所有缓存在寄存器中的内存变量flush到内存中,然后重新从内存中读取这些值。这并不一定是我们想要的结果,比如有些变量只在当前线程中使用,留在寄存器中很好,多了一对写/读内存操作是不必要的开销。
那么有没有办法避免这种副作用呢?我们可以通过gcc内联汇编命令的input和output操作符明确指定哪些内存操作不能乱序,如这个例子:
WRITE(x)
asm volatile("": "=m"(y) : "m"(x):) // memory fence
READ(y)
这里先对变量x进行写操作,后对变量y进行读操作,中间的内联汇编告诉编译器插入一条指令(其实是空的),它可能会读x的内存,会写y的内存,因此编译器不会把这两个操作乱序。这种明确的memory fence的好处是:使编译器尽量少的对其他不相关的变量造成影响,避免了额外开销。
还有个完整的例子:单生产者单消费者队列的C++模板库
CPU Fence
X86属于strong memory model,这意味着在大多数情况下cpu会保证内存访问指令有序执行。具体的说,如果对内存读(Load)和写(Store)操作进行两两组合:LoadLoad, LoadStore, StoreLoad, StoreStore,只有StoreLoad组合可能乱序,而且Store和Load的内存地址必须是不一样的。在上面的队列模板库的例子中,由于只使用了StoreStore(对应C++11的Release memory order)和LoadLoad(对应C++11的Acquire memory order),因此不需要额外的CPU fence。
对于可能出问题的StoreLoad操作,有如下例子说明:
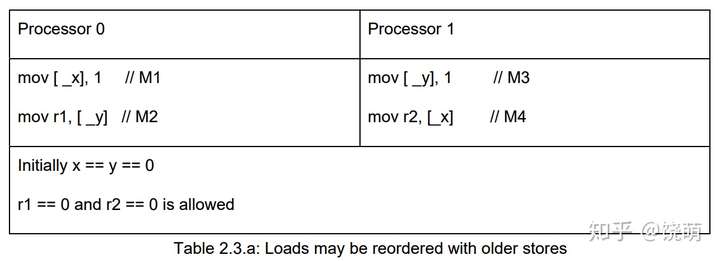
有两个变量x = 0, y = 0,两个cpu分别把x,y设1,并读取y和x的值,如果不存在乱序的话我们期望读取的结果不会全为0。不幸的是,全为0的情况可能发生。我写了个测试这种情况的代码:
#include <bits/stdc++.h>
using namespace std;

inline void nocpufence(volatile int& x, volatile int& y, volatile int& r) {
    x = 1;
    asm volatile("" ::: "memory");
    r = y;
}

inline void mfence(volatile int& x, volatile int& y, volatile int& r) {
    x = 1;
    asm volatile("mfence" ::: "memory");
    r = y;
}

inline void lockadd(volatile int& x, volatile int& y, volatile int& r) {
    x = 1;
    asm volatile("lock; addl $0,0(%%rsp)" ::: "memory", "cc");
    r = y;
}

inline void xchg(volatile int& x, volatile int& y, volatile int& r) {
    int tmp = 1;
    asm volatile("xchgl %0, %1" : "+r"(tmp), "+m"(x)::"memory", "cc"); // swap(x, tmp)
    r = y;
}

volatile int g_cnt = 0;
void threadfun(volatile int& loop_cnt, volatile int& x, volatile int& y, volatile int& r) {
    while(true) {
        while(g_cnt == loop_cnt) ;

        asm volatile("" ::: "memory");

        nocpufence(x, y, r);

        asm volatile("" ::: "memory");
        loop_cnt++;
    }
}

int main() {
    alignas(64) volatile int cnt1 = 0;
    alignas(64) volatile int cnt2 = 0;
    alignas(64) volatile int x = 0;
    alignas(64) volatile int y = 0;
    alignas(64) volatile int r1 = 0;
    alignas(64) volatile int r2 = 0;
    thread thr1(threadfun, ref(cnt1), ref(x), ref(y), ref(r1));
    thread thr2(threadfun, ref(cnt2), ref(y), ref(x), ref(r2));

    int detected = 0;
    while(true) {
        x = y = 0;
        asm volatile("" ::: "memory");
        g_cnt++;
        while(cnt1 != g_cnt || cnt2 != g_cnt)
            ;

        asm volatile("" ::: "memory");
        if(r1 == 0 && r2 == 0) {
            detected++;
            cout << "bad, g_cnt: " << g_cnt << " detected: " << detected << endl;
        }
    }
    return 0;
}
root@ubuntu:/data1# g++ -g -Wall -std=c++11  -pthread test6.cpp -o test6
root@ubuntu:/data1#
root@ubuntu:/data1# g++ -g -Wall -std=c++11  -lpthread test6.cpp -o test6
/tmp/ccWTHmTa.o: In function `std::thread::thread<void (&)(int volatile&, int volatile&, int volatile&, int volatile&), std::reference_wrapper<int volatile>, std::reference_wrapper<int volatile>, std::reference_wrapper<int volatile>, std::reference_wrapper<int volatile> >(void (&)(int volatile&, int volatile&, int volatile&, int volatile&), std::reference_wrapper<int volatile>&&, std::reference_wrapper<int volatile>&&, std::reference_wrapper<int volatile>&&, std::reference_wrapper<int volatile>&&)':
/usr/include/c++/5/thread:138: undefined reference to `pthread_create'
/usr/include/c++/5/thread:138: undefined reference to `pthread_create'
collect2: error: ld returned 1 exit status
root@ubuntu:/data1#
为了防止这种CPU乱序,我们需要添加CPU memory fence。X86专门的memory fence指令是"mfence";另外还可以使用"lock add"指令起到相同的效果,后者开销更小,kernel的smp_mb宏就是用"lock add"实现。
另外,我们还可以把Store和memory fence组合在一起,用一个指令实现:"xchg",kernel的smp_store_mb宏就是这样实现的。
在上面的测试代码中,用mfence/lockadd/xchg函数替换nocpufence即可解决问题。
__thread
__thread是gcc内置的用于多线程编程的基础设施。用__thread修饰的变量,每个线程都拥有一份实体,相互独立,互不干扰。举个例子:
#include<iostream>
#include<pthread.h>
#include<unistd.h>
using namespace std;
__thread int i = 1;
void* thread1(void* arg);
void* thread2(void* arg);
int main()
{
  pthread_t pthread1;
  pthread_t pthread2;
  pthread_create(&pthread1, NULL, thread1, NULL);
  pthread_create(&pthread2, NULL, thread2, NULL);
  pthread_join(pthread1, NULL);
  pthread_join(pthread2, NULL);
  return 0;
}
void* thread1(void* arg)
{
  cout<<++i<<endl;//输出 2
  return NULL;
}
void* thread2(void* arg)
{
  sleep(1); //等待thread1完成更新
  cout<<++i<<endl;//输出 2,而不是3
  return NULL;
}
需要注意的是:
1,__thread可以修饰全局变量、函数的静态变量,但是无法修饰函数的局部变量。
2,被__thread修饰的变量只能在编译期初始化,且只能通过常量表达式来初始化。
root@ubuntu:/data1# g++ test4.c -lpthread -o test4
root@ubuntu:/data1# ./test4
2
2
root@ubuntroot@ubuntu:/data1# ./test4
2
2
root@ubuntu:/data1#u:/data1#