目录:
1、安装指定的jar包命令
mvn install:install-file -Dfile=sqljdbc4.jar -DgroupId=com.microsoft.sqlserver -DartifactId=sqljdbc4 -Dversion=4.0 -Dpackaging=jar
按照自己需要的,分别替换:文件名(-Dfile=?),组名(-DgroupId=?), jar包名(-DartifactId=?),jar包版本(-Dversion=?)
2、清理命令 clean
找到需要清理的项目文件路径,然后打开dos窗口,输入:mvn clean执行清理
3、编译 mvn compile
4、打包 mvn package
5、测试 mvn test
6、发布 mvn deploy。可以发布到自己定义的私服
1、Eclipse无法修改Dynamic Web Module的版本
到项目目录/.settings下面去修改相关文件的版本,详见:http://blog.csdn.net/steveguoshao/article/details/38414145
2、无法检索到本地仓库的jar包
打开视图:Windows/Show View/Other-Maven Repositories。然后找到Local Repository,点击鼠标右键Rebuild index(重建索引)
3、通过右键-Maven-Update Project之后JDK版本又自动还原到1.5了
找到pom.xml,在顶级目录下增加如下代码xml代码即可:

<build>
    <finalName>MySpringMVC</finalName>
    <plugins>
        <plugin>
            <groupId>org.apache.maven.plugins</groupId>
            <artifactId>maven-compiler-plugin</artifactId>
            <configuration>
                <source>1.8</source>
                <target>1.8</target>
            </configuration>
        </plugin>
    </plugins>
</build>
4、打包为jar包时,出现jar中没有主清单属性(即没有把第三方包打进来),修改pom.xml即可

<build>
    <finalName>ser_json</finalName>
    <plugins>
        <!-- 这个插件是解决jdk1.8的问题,和该问题没直接关系-->
        <plugin>
            <groupId>org.apache.maven.plugins</groupId>
            <artifactId>maven-compiler-plugin</artifactId>
            <configuration>
                <source>1.8</source>
                <target>1.8</target>
            </configuration>
        </plugin>
        <!-- 这个插件才是我们需要配置的重点-->
        <plugin>
            <groupId>org.apache.maven.plugins</groupId>
            <artifactId>maven-shade-plugin</artifactId><!-- 注意插件名-->
            <version>1.2.1</version>
            <executions>
                <execution>
                    <phase>package</phase>
                    <goals>
                        <goal>shade</goal>
                    </goals>
                    <configuration>
                        <transformers>
                            <transformer implementation="org.apache.maven.plugins.shade.resource.ManifestResourceTransformer">
                                <mainClass>cn.zdsoft.App</mainClass><!-- 这里配置主方法的类全路径-->
                            </transformer>
                        </transformers>
                        <filters>
                            <filter>
                                <artifact>*:*</artifact>
                                <excludes>
                                    <exclude>META-INF/*.SF</exclude>
                                    <exclude>META-INF/*.DSA</exclude>
                                    <exclude>META-INF/*.RSA</exclude>
                                </excludes>
                            </filter>
                        </filters>
                    </configuration>
                </execution>
            </executions>
        </plugin>
    </plugins>
</build>
说明:
1.finalName表示打包后的jar包的名称
2.filters的作用。有些Jar包会在Manifest里包含一个.SF:包含原Jar包内的class文件和资源文件的Hash, 用来校验文件的完整度等验证。但是在maven打包的时候,我们是把很多jar包合成了一个,这样最终jar包下就会存在各个jar包中的签名文件,但是他们显然无法跟最终的jar包作校验。解决方法就是打包时把签名文件全都去掉。
5、如果提示错误:Cannot change version of project facet Dynamic Web Module to 2.3.。修改web.xml的第一句如下:

<!-- 注意:第一句很重要,修改动态web项目为3.0版本 -->
<web-app
    version="3.0"
    xmlns:xsi="http://www.w3.org/2001/XMLSchema-instance"
    xsi:schemaLocation="http://java.sun.com/xml/ns/javaee http://java.sun.com/xml/ns/javaee/web-app_3_0.xsd">
</web-app>
6、将JDK版本修改为1.8的另一种方式,和第三种二选一
<properties>
    <maven.compiler.source>1.8</maven.compiler.source>
    <project.build.sourceEncoding>UTF-8</project.build.sourceEncoding>
    <maven.compiler.target>1.8</maven.compiler.target>
</properties>
1、首先需要配置MAVEN_HOME为Maven的路径
2、然后需要配置Path,在后面增加%MAVEN_HOME%bin
3、通过Dos窗口输入命令mvn -v验证是否配置成功
1、找到配置文件setting.xml(可以在Maven安装路径下找到该文件,然后拷贝到其它地方,通过Eclipse指定这个位置的配置),然后修改里面的内容如下:
<mirrors>
    <mirror>
      <id>alimaven</id>
      <name>aliyun maven</name>
      <url>http://maven.aliyun.com/nexus/content/groups/public/</url>
      <mirrorOf>central</mirrorOf>
    </mirror>
  </mirrors>
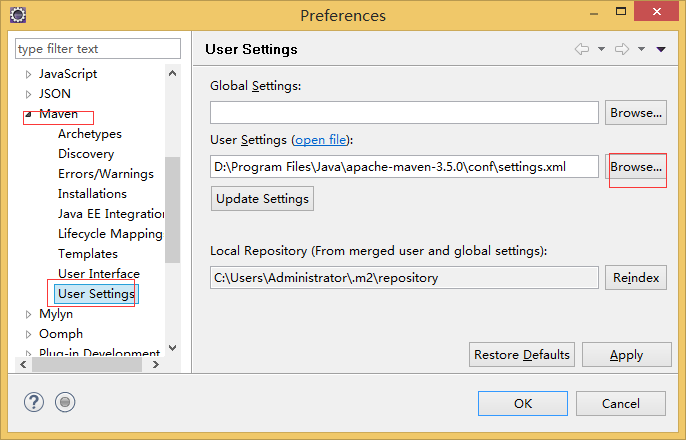
2、通过Eclipse指定位置菜单-Window-Preferences-Maven-User Settings,指定路径即可:

3、参考地址http://www.cnblogs.com/charlesblc/p/6104804.html
1、参照第四点,然后在配置文件里面搜索关键字“localRepository”修改路径即可
具体参考如图:

原文参考:http://blog.csdn.net/lastsweetop/article/details/8493475
