前面讲到bloomfilter的原理及guava实现的bloomfilter的用法,现在看看redis如何实现:
一、bitmaps
我们知道计算机是以二进制位作为底层存储的基础单位,一个字节等于8位。
比如“big”字符串是由三个字符组成的,这三个字符对应的ASCII码分为是98、105、103,对应的二进制存储如下:

在Redis中,Bitmaps 提供了一套命令用来操作类似上面字符串中的每一个位,这种位存储可以极大的降低redis的内存。位操作常用的命令为:
SETBIT KEY OFFSET VALUE
GETBIT KEY OFFSET
一、设置值
setbit key offset value
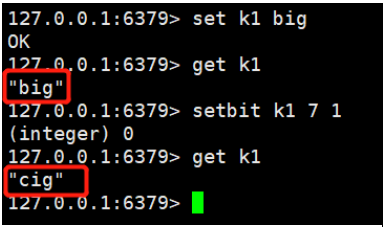
我们知道"b"的二进制表示为0110 0010,我们将第7位(从0开始)设置为1,那0110 0011 表示的就是字符“c”,所以最后的字符 “big”变成了“cig”。
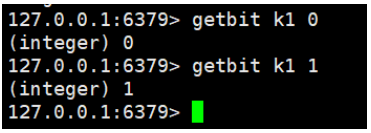
二、获取值
gitbit key offset
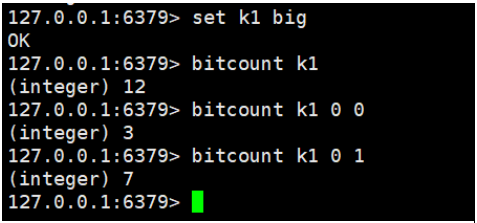
三、获取位图指定范围值为1的个数
bitcount key [start end]
如果不指定,那就是获取全部值为1的个数。
注意:start和end指定的是字节的个数,而不是位数组下标。
二、redis中实现bloomfilter方式
这种结构如果和BloomFilter 结合起来就可以实现分布式的布隆过滤器了。
2.1、Redisson
Redis 实现布隆过滤器的底层就是通过 bitmap 这种数据结构,至于如何实现,这里就不重复造轮子了,介绍业界比较好用的一个客户端工具——Redisson。
Redisson 是用于在 Java 程序中操作 Redis 的库,利用Redisson 我们可以在程序中轻松地使用 Redis。
下面我们就通过 Redisson 来构造布隆过滤器。
import org.redisson.Redisson;
import org.redisson.api.RBloomFilter;
import org.redisson.api.RedissonClient;
import org.redisson.config.Config;

public class RedissonBloomFilter {

    public static void main(String[] args) {
        Config config = new Config();
        config.useSingleServer().setAddress("redis://192.168.14.104:6379");
        config.useSingleServer().setPassword("123");
        //构造Redisson
        RedissonClient redisson = Redisson.create(config);

        RBloomFilter<String> bloomFilter = redisson.getBloomFilter("phoneList");
        //初始化布隆过滤器:预计元素为100000000L,误差率为3%
        bloomFilter.tryInit(100000000L,0.03);
        //将号码10086插入到布隆过滤器中
        bloomFilter.add("10086");

        //判断下面号码是否在布隆过滤器中
        System.out.println(bloomFilter.contains("123456"));//false
        System.out.println(bloomFilter.contains("10086"));//true
    }
}
这是单节点的Redis实现方式,如果数据量比较大,期望的误差率又很低,那单节点所提供的内存是无法满足的,这时候可以使用分布式布隆过滤器,同样也可以用 Redisson 来实现,这里我就不做代码演示了,大家有兴趣可以试试。
springboot使用bloomfilter的方法:
2.2、redisTemplate + Lua(redis4.0)
步骤一:编写两个 Lua 脚本
bloomFilterAdd.lua
local bloomName = KEYS[1]
local value = KEYS[2]

-- bloomFilter
local result_1 = redis.call('BF.ADD', bloomName, value)
return result_1
bloomFilterExist.lua
local bloomName = KEYS[1]
local value = KEYS[2]

-- bloomFilter
local result_1 = redis.call('BF.EXISTS', bloomName, value)
return result_1
步骤二:新建两个方法
1)添加数据到指定名称的布隆过滤器(bloomFilterAdd)
2)从指定名称的布隆过滤器获取 key 是否存在的脚本(bloomFilterExists)
java封装:
    public Boolean bloomFilterAdd(int value){
        DefaultRedisScript<Boolean> bloomAdd = new DefaultRedisScript<>();
        bloomAdd.setScriptSource(new ResourceScriptSource(new ClassPathResource("bloomFilterAdd.lua")));
        bloomAdd.setResultType(Boolean.class);
        List<Object> keyList= new ArrayList<>();
        keyList.add(bloomFilterName);
        keyList.add(value+"");
        Boolean result = (Boolean) redisTemplate.execute(bloomAdd,keyList);
        return result;
    }
    public Boolean bloomFilterAdd(String bloomName,int value){
        DefaultRedisScript<Boolean> bloomAdd = new DefaultRedisScript<>();
        bloomAdd.setScriptSource(new ResourceScriptSource(new ClassPathResource("bloomFilterAdd.lua")));
        bloomAdd.setResultType(Boolean.class);
        List<Object> keyList= new ArrayList<>();
        keyList.add(bloomName);
        keyList.add(value+"");
        Boolean result = (Boolean) redisTemplate.execute(bloomAdd,keyList);
        return result;
    }


    public Boolean bloomFilterExists(int value) {
        DefaultRedisScript<Boolean> bloomExists = new DefaultRedisScript<>();
        bloomExists.setScriptSource(new ResourceScriptSource(new ClassPathResource("bloomFilterExist.lua")));
        bloomExists.setResultType(Boolean.class);
        List<Object> keyList = new ArrayList<>();
        keyList.add(bloomFilterName);
        keyList.add(value + "");
        Boolean result = (Boolean) redisTemplate.execute(bloomExists, keyList);
        return result;
    }

    public Boolean bloomFilterExists(String bloomName,int value) {
        DefaultRedisScript<Boolean> bloomExists = new DefaultRedisScript<>();
        bloomExists.setScriptSource(new ResourceScriptSource(new ClassPathResource("bloomFilterExist.lua")));
        bloomExists.setResultType(Boolean.class);
        List<Object> keyList = new ArrayList<>();
        keyList.add(bloomName);
        keyList.add(value + "");
        Boolean result = (Boolean) redisTemplate.execute(bloomExists, keyList);
        return result;
    }
步骤三:进行测试
@RestController
public class BloomFilterController {
    @Resource
    private RedisService redisService;

    @RequestMapping("/bloom/redisIdExists")
    public boolean redisidExists(int id){
        return redisService.bloomFilterExists(id);
    }

    @RequestMapping("/bloom/redisIdAdd")
    public boolean redisidAdd(int id){
        return redisService.bloomFilterAdd(id);
    }
}
2.3、通过JedisCluster(集群)或redisTemplate的setbit/getbit来操作bitmap 模拟guava的bloomfilter实现
如果自己实现的话,借鉴guava的bloomfilter思路为:
- 对校验的对象做K次hash得到位移offset
- 调用getbit 命令检查是不是每次返回的值都是1
- 如果返回K个1表示这个对象已经被存储过
- 如果没有的话, 可以对该对象进行存储
经过上述讲解, 流程和逻辑基本都差不多了,万事俱备开始撸码:
因为我们在使用布隆过滤器之前, 我们可以预先预估误判率P和想要插入的个数n
2.3.1、关键方法说明
2.3.1.1、计算获bitMap预分配的长度
从《Bloom Filter(布隆过滤器)的概念和原理》中公式可以推算bit 的长度, 但是需要注意的是公式计算出来的是浮点数:
    /**
     * 计算bit数组的长度,
     * m = -n * Math.log(p)/Math.pow(ln2,2)
     * @param n 插入条数
     * @param p 误判概率
     */
    private int numOfBits(int n, double p) {
        if (p == 0) {
            p = Double.MIN_VALUE;
        }
        int sizeOfBitArray = (int) (-n * Math.log(p) / (Math.log(2) * Math.log(2)));
        return sizeOfBitArray;
    }
2.3.1.2、计算hash的次数
    /**
     * 计算hash方法执行次数
     * k = m/n*ln2
     * @param n 插入的数据条数
     * @param m 数据位数
     */
    private int numberOfHashFunctions(long n, long m) {
        int countOfHash = Math.max(1, (int) Math.round((double) m / n * Math.log(2)));
        return countOfHash;
    }
2.3.1.3、获取hash函数计算之后的位移集合
这个hash函数采用的是guava中的murmur函数
    public int[] murmurHashOffset(T value) {
        int[] offset = new int[numHashFunctions];

        long hash64 = Hashing.murmur3_128().hashObject(value, funnel).asLong();
        int hash1 = (int) hash64;
        int hash2 = (int) (hash64 >>> 32);
        for (int i = 1; i <= numHashFunctions; i++) {
            int nextHash = hash1 + i * hash2;
            if (nextHash < 0) {
                nextHash = ~nextHash;
            }
            offset[i - 1] = nextHash % bitSize;
        }

        return offset;
    }
2.3.2、完整代码
完整的bloomfilter的封装如下:
import com.google.common.base.Preconditions;
import com.google.common.hash.Funnel;
import com.google.common.hash.Hashing;
import org.springframework.beans.factory.annotation.Configurable;

@Configurable
public class BloomFilterHelper<T> {
    // hash函数的次数
    private int numHashFunctions;
    // bit长度
    private int bitSize;
    private Funnel<T> funnel;

    public BloomFilterHelper(Funnel<T> funnel, int expectedInsertions, double fpp) {
        Preconditions.checkArgument(funnel != null, "funnel不能为空");
        this.funnel = funnel;
        bitSize = optimalNumOfBits(expectedInsertions, fpp);
        numHashFunctions = optimalNumOfHashFunctions(expectedInsertions, bitSize);
    }

    public int[] murmurHashOffset(T value) {
        int[] offset = new int[numHashFunctions];

        long hash64 = Hashing.murmur3_128().hashObject(value, funnel).asLong();
        int hash1 = (int) hash64;
        int hash2 = (int) (hash64 >>> 32);
        for (int i = 1; i <= numHashFunctions; i++) {
            int nextHash = hash1 + i * hash2;
            if (nextHash < 0) {
                nextHash = ~nextHash;
            }
            offset[i - 1] = nextHash % bitSize;
        }

        return offset;
    }

    /**
     * 计算bit数组的长度, m = -n * Math.log(p)/Math.pow(ln2,2)
     *
     * @param n
     *            插入条数
     * @param p
     *            误判概率
     */
    private int optimalNumOfBits(int n, double p) {
        if (p == 0) {
            p = Double.MIN_VALUE;
        }
        // sizeOfBitArray
        return (int) (-n * Math.log(p) / (Math.log(2) * Math.log(2)));
    }

    /**
     * 计算hash方法执行次数 k = m/n*ln2
     *
     * @param n
     *            插入的数据条数
     * @param m
     *            数据位数
     */
    private int optimalNumOfHashFunctions(long n, long m) {
        // countOfHash
        return Math.max(1, (int) Math.round((double) m / n * Math.log(2)));
    }

}
单机的布隆过滤器已经建好了, 接下来就是和redis整合了,
先看不用lua的封装的类:
import com.config.BloomFilterHelper;
import com.google.common.base.Preconditions;
import org.springframework.stereotype.Component;
import redis.clients.jedis.JedisCluster;

@Component
public class RedisBloomFilter<T> {
    private JedisCluster cluster;

    public RedisBloomFilter(JedisCluster jedisCluster) {
        this.cluster = jedisCluster;
    }

    /**
     * 根据给定的布隆过滤器添加值
     */
    public <T> void addByBloomFilter(BloomFilterHelper<T> bloomFilterHelper, String key, T value) {
        Preconditions.checkArgument(bloomFilterHelper != null, "bloomFilterHelper不能为空");
        int[] offset = bloomFilterHelper.murmurHashOffset(value);
        for (int i : offset) {
            //redisTemplate.opsForValue().setBit(key, i, true);
            cluster.setbit(key, i, true);
        }
    }

    /**
     * 根据给定的布隆过滤器判断值是否存在
     */
    public <T> boolean includeByBloomFilter(BloomFilterHelper<T> bloomFilterHelper, String key, T value) {
        Preconditions.checkArgument(bloomFilterHelper != null, "bloomFilterHelper不能为空");
        int[] offset = bloomFilterHelper.murmurHashOffset(value);
        for (int i : offset) {
            //if (!redisTemplate.opsForValue().getBit(key, i)) {
            if (!cluster.getbit(key, i)) {
                return false;
            }
        }

        return true;
    }
}
原子性问题,上面的红色代码段 由于可能会有多次的setbit操作,这样可能会发生多次的网络请求, 不一定执行成功。
所以考虑的是用lua脚本来执行:
  private static final String GET_BIT_LUA = "for i=1,#ARGV
" +
            "do
" +
            "    local value =  redis.call("GETBIT", KEYS[1], ARGV[i])
" +
            "    if value == 0
" +
            "    then
" +
            "        return 0
" +
            "    end
" +
            "end
" +
            "return 1";

    private static final String SET_BIT_LUA = "for i=1, #ARGV
" +
            "do
" +
            "    redis.call("SETBIT",KEYS[1], ARGV[i],1)
" +
            "end
";
布隆过滤器的插入和判断操作分别如下:
public static <T> void addByBloomFilter(IRedisHelper redisHelper, BloomFilterHelper<T> bloomFilterHelper, Object key, T value) {
        Preconditions.checkArgument(bloomFilterHelper != null, "bloomFilterHelper不能为空");
        List<Long> offsetList = bloomFilterHelper.murmurHashOffset(value);
        if(CollectionUtils.isEmpty(offsetList)){
            return ;
        }
       redisHelper.eval(routeKey, SET_BIT_LUA, Lists.newArrayList(key.getRawKey()), offsetList);
    }

    /**
     * 根据给定的布隆过滤器判断值是否存在
     */
    public static <T> boolean includeByBloomFilter(IRedisHelper redisHelper, BloomFilterHelper<T> bloomFilterHelper, Object key, T value) {
        Preconditions.checkArgument(bloomFilterHelper != null, "bloomFilterHelper不能为空");
        List<Long> offsetList = bloomFilterHelper.murmurHashOffset(value);
        if(CollectionUtils.isEmpty(offsetList)){
            return false;
        }

      String result = String.valueOf(eval);
      if("1".equalsIgnoreCase(result)){
        return true;
       }
    return false;
    }
对于redis的bitmap 存在一个问题,就是内存初始化的问题,
下面是来自官方的原话:
 When setting the last possible bit (offset equal to 2^32 -1) and the string value stored at key does not yet
hold a string value, or holds a small string value, Redis needs to allocate all intermediate memory which can
 block the server for some time. On a 2010 MacBook Pro, setting bit number 2^32 -1 (512MB allocation)
takes ~300ms, setting bit number 2^30 -1 (128MB allocation) takes ~80ms,
setting bit number 2^28 -1 (32MB allocation) takes ~30ms and setting bit number 2^26 -1 (8MB allocation) takes ~8ms.
redis集群配置:
spring.redis.cluster.nodes=127.0.0.1:7000,127.0.0.1:7001,127.0.0.1:7002,127.0.0.1:7003,127.0.0.1:7004,127.0.0.1:7005
spring.redis.password=
#连接池最大连接数(使用负值表示没有限制)
spring.redis.pool.max-active=8
#连接池最大阻塞等待时间(使用负值表示没有限制)
spring.redis.pool.max-wait=-1
#连接池中的最大空闲连接
spring.redis.pool.max-idle=8
#连接池中的最小空闲连接
spring.redis.pool.min-idle=0
#连接超时时间(毫秒)
spring.redis.timeout=0
@Configuration
public class RedisConfig {
    private Logger logger = LoggerFactory.getLogger(RedisConfig.class);

    @Value("${spring.redis.cluster.nodes}")
    private String clusterNodes;
    @Value("${spring.redis.timeout}")
    private int timeout;
    @Value("${spring.redis.pool.max-idle}")
    private int maxIdle;
    @Value("${spring.redis.pool.max-wait}")
    private long maxWaitMillis;
    @Value("${spring.redis.commandTimeout}")
    private int commandTimeout;

    @Bean
    public JedisCluster getJedisCluster() {
        String[] cNodes = clusterNodes.split(",");
        Set<HostAndPort> nodes = new HashSet<>();
        // 分割出集群节点
        for (String node : cNodes) {
            String[] hp = node.split(":");
            nodes.add(new HostAndPort(hp[0], Integer.parseInt(hp[1])));
        }
        JedisPoolConfig jedisPoolConfig = new JedisPoolConfig();
        jedisPoolConfig.setMaxIdle(maxIdle);
        jedisPoolConfig.setMaxWaitMillis(maxWaitMillis);
        return new JedisCluster(nodes, commandTimeout, jedisPoolConfig);

    }


    /**
     * redis序列化
     *
     * @param connectionFactory
     * @return
     */
    @Bean
    public RedisTemplate<String, Serializable> redisTemplate(LettuceConnectionFactory connectionFactory) {
        RedisTemplate<String, Serializable> redisTemplate = new RedisTemplate<>();
        redisTemplate.setKeySerializer(new StringRedisSerializer());
        redisTemplate.setValueSerializer(new GenericJackson2JsonRedisSerializer());
        redisTemplate.setConnectionFactory(connectionFactory);
        return redisTemplate;
    }

}
测试
@SpringBootApplication
@EnableDiscoveryClient
@ComponentScan(value = {"com.annotaion", "cn.springcloud", "com.config", "com.redislock"})
public class Ch34EurekaClientApplication implements ApplicationRunner {

    private static BloomFilterHelper<CharSequence> bloomFilterHelper;

    @Autowired
    RedisBloomFilter redisBloomFilter;

    public static void main(String[] args) {
        SpringApplication.run(Ch34EurekaClientApplication.class, args);

    }

    @PostConstruct
    public void init() {
        bloomFilterHelper = new BloomFilterHelper<>(Funnels.stringFunnel(Charset.defaultCharset()), 1000, 0.1);
    }

    @Override
    public void run(ApplicationArguments args) throws Exception {


        //******* Redis集群测试布隆方法*********
        int j = 0;
        for (int i = 0; i < 100; i++) {
            redisBloomFilter.addByBloomFilter(bloomFilterHelper, "bloom", i+"");
        }
        for (int i = 0; i < 1000; i++) {
            boolean result = redisBloomFilter.includeByBloomFilter(bloomFilterHelper, "bloom", i+"");
            if (!result) {
                j++;
            }
        }
        System.out.println("漏掉了" + j + "个");
    }
}
完全符合我上面测试的预期结果,大家可以可以自行调节数量进行测试,另外实际生产中声明过滤器的时候 size 设置大一点,一般一百万,错误率设置 0.001。
三、总结
布隆过滤器
巧妙的使用hash算法和bitmap位存储的方式,极大的节约了空间。
由于主要用的是hash算法的特点,所有满足和hash算法相同的规则:当过滤器返回 true时(表示很有可能该值是存在的),有一定概率是误判的,即可能不存在;当过滤器返回false时(表示确定不存在),是可以完全相信的。
我们换个数据的角度来看规则:当数据添加到布隆过滤器中时,对该数据的查询一定会返回true;当数据没有插入过滤器时,对该数据的查询大部分情况返回false,但有小概率返回true,也就是误判。
我们知道它最终满足的规则和hash的规则是一致的,只是组合了多个hash,使用了bitmap来存储,大大优化了存储的空间和判断的效率。
参考:
https://www.cnblogs.com/jwen1994/p/12264717.html
https://blog.csdn.net/weixin_38003389/article/details/89918747
https://www.jianshu.com/p/550278d10546