主机环境要求
硬件Hardware
|
|
|
|
|
|
|
|
|
|
|
|
|
|
|
|
软件Software
|
|
|
|
|
|
|
|
|
|
|
|
|
|
|
|
|
|
|
|
网络端口Network ports
|
|
|
|
|
|
|
|
|
|
|
|
|
|
|
|
安装harbor
安装docker
安装docker-compose
curl -L https://github.com/docker/compose/releases/download/1.18.0/docker-compose-`uname -s`-`uname -m` -o /usr/local/bin/docker-compose
chmod +x /usr/local/bin/docker-compose

docker-compose version
#------------------------------------------------------------
docker-compose version 1.18.0, build 8dd22a9
docker-py version: 2.6.1
CPython version: 2.7.13
OpenSSL version: OpenSSL 1.0.1t  3 May 2016
#------------------------------------------------------------
下载harbor离线包
wget http://harbor.orientsoft.cn/harbor-v1.3.0/harbor-offline-installer-v1.3.0.tgz
tar xvf harbor-offline-installer-v1.3.0.tgz
配置HTTPS所需证书
mkdir /data
mkdir /root/data
cd /root/data

# 创建自已的CA证书
openssl req -newkey rsa:4096 -nodes -sha256 -keyout ca.key -x509 -days 3650 -out ca.crt
#------------------------------------------------------------
Country Name (2 letter code) [AU]:CN
State or Province Name (full name) [Some-State]:Harbin
Locality Name (eg, city) []:Harbin
Organization Name (eg, company) [Internet Widgits Pty Ltd]:ydgw
Organizational Unit Name (eg, section) []:ydgw
Common Name (e.g. server FQDN or YOUR name) []:10.240.4.159
Email Address []:liuyajun@ydgw.cn
#------------------------------------------------------------

# 生成一个证书签名请求
openssl req  -newkey rsa:4096 -nodes -sha256 -keyout 10.240.4.159.key -out 10.240.4.159.csr
#------------------------------------------------------------
Country Name (2 letter code) [AU]:CN
State or Province Name (full name) [Some-State]:Harbin
Locality Name (eg, city) []:Harbin
Organization Name (eg, company) [Internet Widgits Pty Ltd]:ydgw
Organizational Unit Name (eg, section) []:ydgw
Common Name (e.g. server FQDN or YOUR name) []:10.240.4.159
Email Address []:liuyajun@ydgw.cn

Please enter the following 'extra' attributes
to be sent with your certificate request
A challenge password []:   #密码留空即可
An optional company name []:
#------------------------------------------------------------

# 创建文件夹和辅助内容
mkdir demoCA
cd demoCA
touch index.txt
echo '01' > serial
cd ..

ll
#------------------------------------------------------------
total 28
drwxr-xr-x 3 root root 4096 Jan 30 22:11 ./
drwx------ 5 root root 4096 Jan 30 22:09 ../
-rw-r--r-- 1 root root 1740 Jan 31 01:38 10.240.4.159.csr
-rw-r--r-- 1 root root 3272 Jan 31 01:38 10.240.4.159.key
-rw-r--r-- 1 root root 2098 Jan 31 01:37 ca.crt
-rw-r--r-- 1 root root 3272 Jan 31 01:37 ca.key
drwxr-xr-x 2 root root 4096 Jan 31 01:39 demoCA/
#------------------------------------------------------------

# 签名证书
echo subjectAltName = IP:10.240.4.159 > extfile.cnf
openssl ca -in 10.240.4.159.csr -out 10.240.4.159.crt -cert ca.crt -keyfile ca.key -extfile extfile.cnf -days 3650 -outdir .

#------------------------------------------------------------
Using configuration from /usr/lib/ssl/openssl.cnf
Check that the request matches the signature
Signature ok
Certificate Details:
        Serial Number: 1 (0x1)
        Validity
            Not Before: Jan 31 06:39:39 2018 GMT
            Not After : Jan 31 06:39:39 2019 GMT
        Subject:
            countryName               = CN
            stateOrProvinceName       = Harbin
            organizationName          = ydgw
            organizationalUnitName    = ydgw
            commonName                = 10.240.4.159
            emailAddress              = liuyajun@ydgw.cn
        X509v3 extensions:
            X509v3 Subject Alternative Name:
                IP Address:10.240.4.159
Certificate is to be certified until Jan 31 06:39:39 2019 GMT (365 days)
Sign the certificate? [y/n]:y


1 out of 1 certificate requests certified, commit? [y/n]y
Write out database with 1 new entries
Data Base Updated
#------------------------------------------------------------

ll
#------------------------------------------------------------
total 48
drwxr-xr-x 3 root root 4096 Jan 30 22:20 ./
drwx------ 5 root root 4096 Jan 30 22:09 ../
-rw-r--r-- 1 root root 6873 Jan 31 01:39 01.pem
-rw-r--r-- 1 root root 6873 Jan 31 01:39 10.240.4.159.crt
-rw-r--r-- 1 root root 1740 Jan 31 01:38 10.240.4.159.csr
-rw-r--r-- 1 root root 3272 Jan 31 01:38 10.240.4.159.key
-rw-r--r-- 1 root root 2098 Jan 31 01:37 ca.crt
-rw-r--r-- 1 root root 3272 Jan 31 01:37 ca.key
drwxr-xr-x 2 root root 4096 Jan 31 01:39 demoCA/
-rw-r--r-- 1 root root   33 Jan 31 01:39 extfile.cnf
#------------------------------------------------------------

# 证书加入本机信任
cp 10.240.4.159.crt /usr/local/share/ca-certificates/
update-ca-certificates

# 重启docker使证书生效
systemctl daemon-reload
systemctl restart docker
上述安装使用的IP地址曾用域名配置,但启动harbor后,docker login总会报类似以下错误信息,调了两天也没有找到解决办法,最后只好放弃
docker login reg.ydgw.cn
Username: admin
Password:
Error response from daemon: Get https://reg.ydgw.cn/v2/: x509: certificate is not valid for any names, but wanted to match reg.ydgw.cn
配置安装启动harbor
# 进入harbor的触压后的目录
cd harbor
#------------------------------------------------------------
ll
total 934372
drwxr-xr-x 3 root root      4096 Jan 30 22:40 ./
drwx------ 6 root root      4096 Jan 30 22:40 ../
drwxr-xr-x 3 root root      4096 Jan 30 22:40 common/
-rw-r--r-- 1 root root      1119 Jan  4 05:33 docker-compose.clair.yml
-rw-r--r-- 1 root root      1702 Jan  4 05:33 docker-compose.notary.yml
-rw-r--r-- 1 root root      3303 Jan  4 05:33 docker-compose.yml
-rw-r--r-- 1 root root      4304 Jan  4 05:33 harbor_1_1_0_template
-rw-r--r-- 1 root root      5008 Jan  4 05:33 harbor.cfg
-rw-r--r-- 1 root root 955424047 Jan  4 05:39 harbor.v1.3.0.tar.gz
-rwxr-xr-x 1 root root      5332 Jan  4 05:33 install.sh*
-rw-r--r-- 1 root root   1284054 Jan  4 05:33 LICENSE
-rw-r--r-- 1 root root       481 Jan  4 05:33 NOTICE
-rwxr-xr-x 1 root root     18882 Jan  4 05:33 prepare*
-rwxr-xr-x 1 root root      4550 Jan  4 05:33 upgrade*
#------------------------------------------------------------

vi harbor.cfg
# 更改以下几项内容
#------------------------------------------------------------
hostname = reg.ydgw.cn
ui_url_protocol = https

ssl_cert = /root/data/10.240.4.159.crt
ssl_cert_key = /root/data/10.240.4.159.key

db_password = xxxxxxx    # MYSQL数据库密码,可以改复杂些的
harbor_admin_password = xxxxxxxx  # harbor admin用户密码,后在WEB界面也能改
#------------------------------------------------------------

# 生成配置文件
./prepare

# 启动harbor(第一次启动,需要pull一些镜像)
docker-compose up -d
持久性的数据和日志文件
默认情况下,注册表数据将保留在主机的/data目录中。即使拆除和或重建Harbor的集装箱,这些数据也保持不变。
ll /data
#------------------------------------------------------------
total 36
drwxr-xr-x  8 root  root  4096 Jan 31 01:42 ./
drwxr-xr-x 25 root  root  4096 Jan 30 21:02 ../
drwxr-xr-x  2 10000 10000 4096 Jan 31 01:42 ca_download/
drwxr-xr-x  2 10000 10000 4096 Jan 31 01:42 config/
drwxr-xr-x  5 10000 10000 4096 Jan 31 01:42 database/
drwxr-xr-x  2 10000 10000 4096 Jan 31 01:42 job_logs/
drwxr-xr-x  2 10000 10000 4096 Jan 31 01:42 psc/
drwxr-xr-x  2 10000 10000 4096 Jan 31 01:42 registry/
-rw-------  1 10000 10000   16 Jan 31 01:42 secretkey
#------------------------------------------------------------
Harbor的使用
web登陆
使用浏览器打开:https://10.240.4.159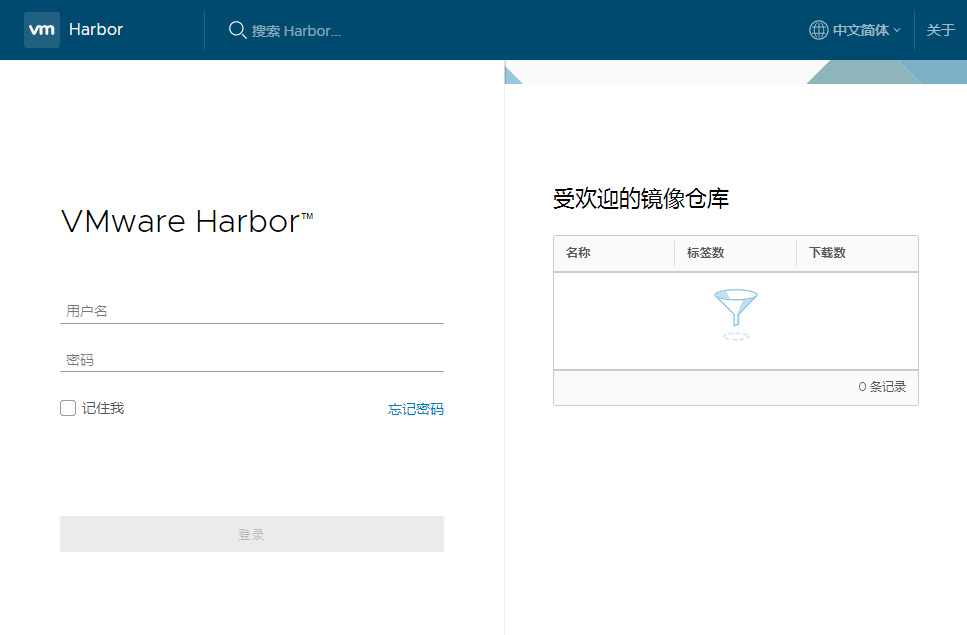
输入用户名和密码登陆
客户端docker login
# 客户端不安装证书直接登陆会报以下错误
docker login 10.240.4.159
Username: admin
Password:
Error response from daemon: Get https://10.240.4.159/v2/: x509: certificate signed by unknown authority

# 将证书拷贝到如10.240.4.160客户机上并信任
scp 10.240.4.159.crt 10.240.4.160:/usr/local/share/ca-certificates/

# 在10.240.4.160客户机上执行
update-ca-certificates

# 重启docker使证书生效
systemctl daemon-reload
systemctl restart docker

# 之后就可以正常登陆了
docker login 10.240.4.159
Username: admin
Password:
Login Succeeded
上传镜像到harbor
在harbor中新建一个os的项目,访问级别设置为公开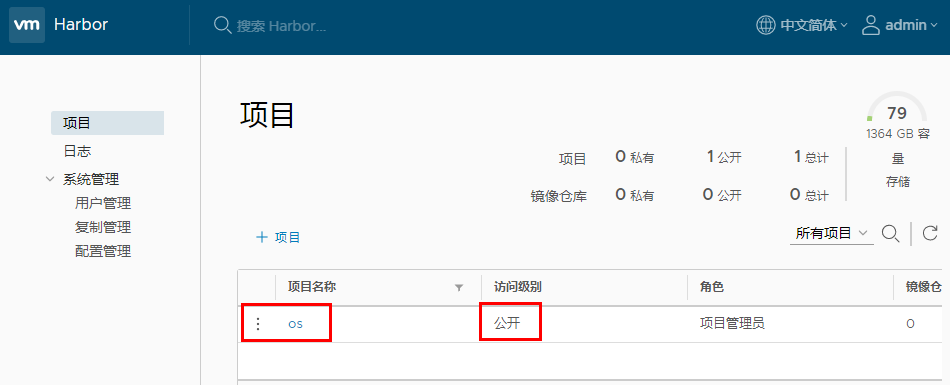
点击os项目,推送镜像可以看到命令提示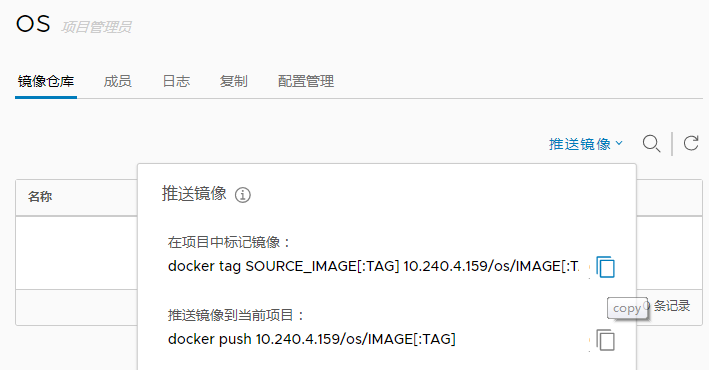
# 先下载官方的centos镜像
docker pull centos:7.4.1708

# 修改TAG标签
docker tag centos:7.4.1708 10.240.4.159/os/centos:7.4.1708

docker images | grep centos
10.240.4.159/os/centos           7.4.1708            3afd47092a0e        2 months ago        197MB
centos                           7.4.1708            3afd47092a0e        2 months ago        197MB

# 推送镜像(需要login)
docker push 10.240.4.159/os/centos:7.4.1708
重新刷新后,harbor中已经能看到推送的镜像了
Harbor的生命周期
cd harbor

# 停止和启动
docker-compose stop
docker-compose start

# 要更改Harbor的配置,请首先停止现有的Harbor实例并进行更新harbor.cfg。然后运行prepare脚本来填充配置。最后重新创建并启动Harbor的实例:
docker-compose down -v   # 删除Harbor 的容器,同时保留图像数据和Harbor的数据库文件在文件系统上
vi harbor.cfg
./prepare
docker-compose up -d
Harbor故障排除
docker-compose ps
#----------------------------------------------------------------------------------------------------------------------------
       Name                     Command               State                                Ports
------------------------------------------------------------------------------------------------------------------------------
harbor-adminserver   /harbor/start.sh                 Up
harbor-db            /usr/local/bin/docker-entr ...   Up      3306/tcp
harbor-jobservice    /harbor/start.sh                 Up
harbor-log           /bin/sh -c /usr/local/bin/ ...   Up      127.0.0.1:1514->10514/tcp
harbor-ui            /harbor/start.sh                 Up
nginx                nginx -g daemon off;             Up      0.0.0.0:443->443/tcp, 0.0.0.0:4443->4443/tcp, 0.0.0.0:80->80/tcp
registry             /entrypoint.sh serve /etc/ ...   Up      5000/tcp
#----------------------------------------------------------------------------------------------------------------------------
# 如果容器未处于UP状态,请检查目录中该容器的日志文件/var/log/harbor。例如,如果容器harbor-ui没有运行,则应该查看日志文件ui.log

netstat -tnulp
Active Internet connections (only servers)
Proto Recv-Q Send-Q Local Address           Foreign Address         State       PID/Program name
tcp        0      0 0.0.0.0:45512           0.0.0.0:*               LISTEN      27569/rpc.statd
tcp        0      0 127.0.0.1:1514          0.0.0.0:*               LISTEN      14876/docker-proxy
tcp        0      0 0.0.0.0:111             0.0.0.0:*               LISTEN      12897/rpcbind
tcp        0      0 0.0.0.0:22              0.0.0.0:*               LISTEN      13362/sshd
tcp6       0      0 :::111                  :::*                    LISTEN      12897/rpcbind
tcp6       0      0 :::80                   :::*                    LISTEN      15838/docker-proxy   # 80
tcp6       0      0 :::44851                :::*                    LISTEN      27569/rpc.statd
tcp6       0      0 :::22                   :::*                    LISTEN      13362/sshd
tcp6       0      0 :::443                  :::*                    LISTEN      15824/docker-proxy
tcp6       0      0 :::4443                 :::*                    LISTEN      15812/docker-proxy
udp        0      0 0.0.0.0:777             0.0.0.0:*                           12897/rpcbind
udp        0      0 0.0.0.0:60715           0.0.0.0:*                           27569/rpc.statd
udp        0      0 0.0.0.0:111             0.0.0.0:*                           12897/rpcbind
udp        0      0 127.0.0.1:609           0.0.0.0:*                           27569/rpc.statd
udp6       0      0 :::777                  :::*                                12897/rpcbind
udp6       0      0 :::111                  :::*                                12897/rpcbind
udp6       0      0 :::41485                :::*                                27569/rpc.statd