在项目中,我们通常会为项目添加多种多样的依赖包(jar包),去网上下载,然后引入到项目中,很是麻烦。
但是用maven后,这一切都将变得简单起来。由于我的MyEclipse已经集成了maven插件,这里我就不用去下载
maven然后添加到开发工具上了,一切准备就后,开始着手建立maven项目:
1.Maven项目的创建
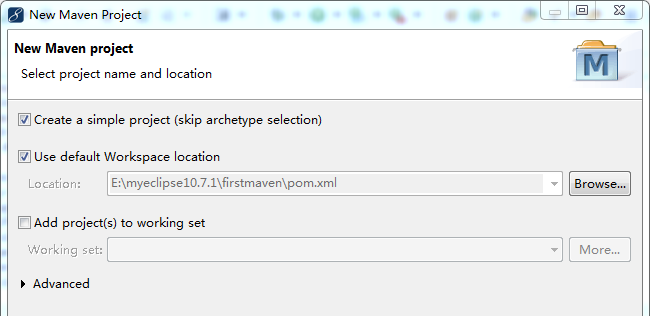
file--->new--->Other...--->Maven project--->next 得到如下界面:

为了方便,这里我们把第一个√选上,然后next:

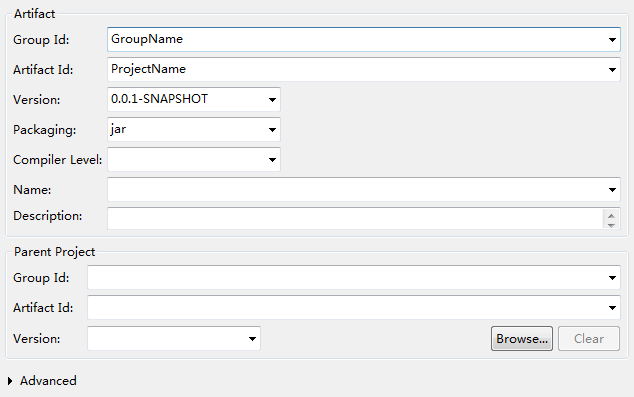
看上去这么多要的,这么多英文,好厉害的样子,其实我们要填的只有最上面四行(其中3、4已经默认填好)
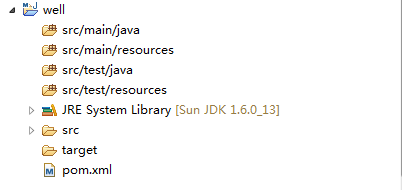
填完之后,finish!maven项目已然建立好了。项目结构如下:

2.xml配置
打开pom.xml文件,添加如下红色字段:
<project xmlns="http://maven.apache.org/POM/4.0.0" xmlns:xsi="http://www.w3.org/2001/XMLSchema-instance" xsi:schemaLocation="http://maven.apache.org/POM/4.0.0 http://maven.apache.org/xsd/maven-4.0.0.xsd">
  <modelVersion>4.0.0</modelVersion>
  <groupId>maven</groupId>
  <artifactId>firstmaven</artifactId>
  <version>0.0.1-SNAPSHOT</version>

 <dependencies>
  <dependency>
        <groupId>junit</groupId>
        <artifactId>junit</artifactId>
        <version>3.8.1</version>
        <scope>test</scope>
  </dependency>
 </dependencies>

  <build/>
</project>
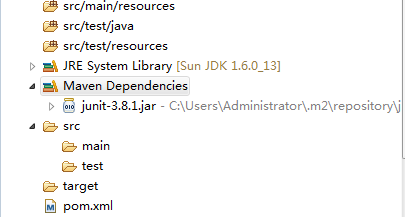
然后Ctrl+S(保存),这时,项目结构会多出一个包文件目录:

可以看到,它按照之前的操作为项目添加了一个单元测试的jar包junit。
如果还想为这个项目添加其他依赖包,只要继续在这个xml文件里面添加其他依赖子标签:
 <dependency>
        <groupId>junit</groupId>
        <artifactId>junit</artifactId>
        <version>3.8.1</version>
        <scope>test</scope>
 </dependency>
至于参数嘛,你可以到右边网站上面查询你需要的依赖包信息:http://mvnrepository.com/;
搜索框输入名称,找到你需要的包名,选择版本,接下来你会看见如下字段:

OK,复制下来,添加到maven项目的pom.xml文件的<dependencies>标签下,保存,这样就会将你所
需要的包自动下载到项目的Maven Dpendencies目录了,比起自己到处找依赖包,是不是很便捷呢。下图所示为
正在下载pom.xml刚添加的<dependency>标签下的依赖包(freemarker包):

3.下载提速
不过速度感觉有点慢,因为这是默认去maven的中央仓库下载的,由于服务器不在国内造成下载速度太慢,
然而我们可以修改setting.xml文件配置使得让它去指定的远程仓库下载,这里推荐阿里云的maven仓库,
Window--->Preferences--->MyEclipse--->Maven4MyEclipse--->User Settings--->显示有个settings.xml文件地址,
直接openfile,找到如下字段,将红字部分替换成如下所示:
<mirrors>
    <!-- mirror
     | Specifies a repository mirror site to use instead of a given repository. The repository that
     | this mirror serves has an ID that matches the mirrorOf element of this mirror. IDs are used
     | for inheritance and direct lookup purposes, and must be unique across the set of mirrors.
     |
     <mirror>
      <id>China</id>
      <mirrorOf>central</mirrorOf>
      <name>China Central</name>
      <url>http://maven.aliyun.com/nexus/content/groups/public/</url>
     </mirror>
     -->
</mirrors>
如此一来,它就会去阿里云下载依赖包,不会大老远跑去原本的中央仓库下载了,速度自然较之前提升不少。