1. 下载Maven并配置环境变量
设置变量名: M2_HOME=Maven安装目录
设置path: 把%M2_HOME%\bin添加到path变量中
2. 新建一个项目文件夹,eg. TestPro
3. 新建一个pom.xml文件并进行配置
<?xml version="1.0" encoding="UTF-8"?>
<project xmlns="http://maven.apache.org/POM/4.0.0"
                 xmlns:xsi="http://www.w3.org/2001/XMLSchema-instance"
                 xsi:schemaLocation="http://maven.apache.org/POM/4.0.0 http://maven.apache.org/xsd/maven-4.0.0.xsd">
        <modelVersion>4.0.0</modelVersion>
        <groupId>TestPro</groupId>
        <artifactId>TestPro</artifactId>
        <version>1.0</version>
        <dependencies>
            <dependency>
                <groupId>org.seleniumhq.selenium</groupId>
                <artifactId>selenium-java</artifactId>
                <version>2.25.0</version>
            </dependency>
            <dependency>
                <groupId>com.opera</groupId>
                <artifactId>operadriver</artifactId>
            </dependency>
        </dependencies>
        <dependencyManagement>
            <dependencies>
                <dependency>
                    <groupId>com.opera</groupId>
                    <artifactId>operadriver</artifactId>
                    <version>1.2</version>
                    <exclusions>
                        <exclusion>
                            <groupId>org.seleniumhq.selenium</groupId>
                            <artifactId>selenium-remote-driver</artifactId>
                        </exclusion>
                    </exclusions>
                </dependency>
            </dependencies>
        </dependencyManagement>
</project>
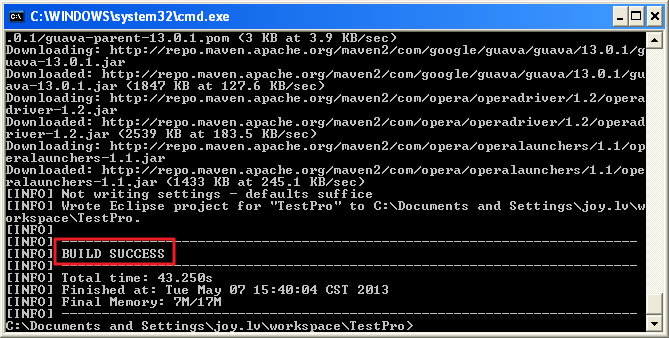
4. 打开cmd命令窗口,切换到TestPro文件夹,敲入命令:mvn eclipse:eclipse 回车
出现如下信息,则创建Selenium2项目成功。
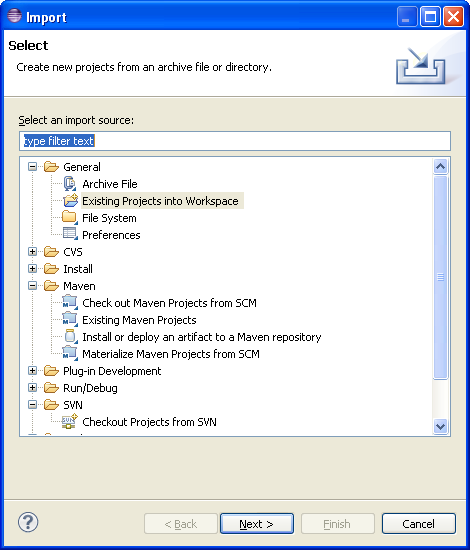
5. 在eclipse中导入所建文件夹
6. 在TestPro项目下新建Source Folder - src, 新建package - org.openqa.selenium.example
并在package “org.openqa.selenium.example”下新建Class (使用Selenium官网上的例子)
package org.openqa.selenium.example;

import org.openqa.selenium.By;
import org.openqa.selenium.WebDriver;
import org.openqa.selenium.WebElement;
import org.openqa.selenium.firefox.FirefoxDriver;
import org.openqa.selenium.support.ui.ExpectedCondition;
import org.openqa.selenium.support.ui.WebDriverWait;

public class Selenium2Example  {
    public static void main(String[] args) {
        // Create a new instance of the Firefox driver
        // Notice that the remainder of the code relies on the interface,
        // not the implementation.
        WebDriver driver = new FirefoxDriver();

        // And now use this to visit Google
        driver.get("http://www.google.com");
        // Alternatively the same thing can be done like this
        // driver.navigate().to("http://www.google.com");

        // Find the text input element by its name
        WebElement element = driver.findElement(By.name("q"));

        // Enter something to search for
        element.sendKeys("Cheese!");

        // Now submit the form. WebDriver will find the form for us from the element
        element.submit();

        // Check the title of the page
        System.out.println("Page title is: " + driver.getTitle());

        // Google's search is rendered dynamically with JavaScript.
        // Wait for the page to load, timeout after 10 seconds
        (new WebDriverWait(driver, 10)).until(new ExpectedCondition<Boolean>() {
            public Boolean apply(WebDriver d) {
                return d.getTitle().toLowerCase().startsWith("cheese!");
            }
        });

        // Should see: "cheese! - Google Search"
        System.out.println("Page title is: " + driver.getTitle());

        //Close the browser
        driver.quit();
    }
}
7. Run As Java Application. 运行成功!