资源文件结构图,
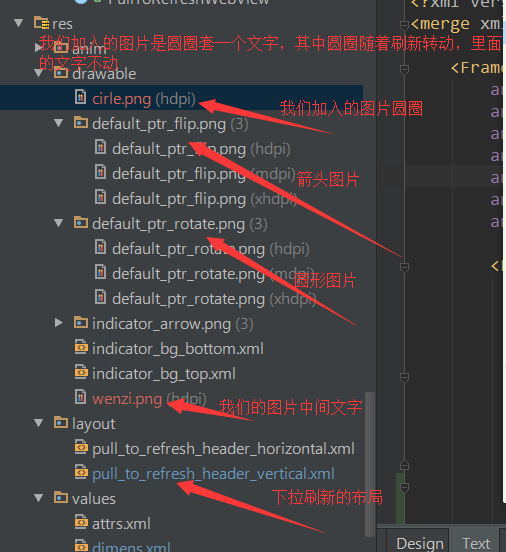
先看看下拉刷新头的布局,
<?xml version="1.0" encoding="utf-8"?>
<merge xmlns:android="http://schemas.android.com/apk/res/android" >
//我们在此处改变framelayout的padding值,可以控制图片跟文字的距离
    <FrameLayout
        android:id="@+id/fl_inner"
        android:layout_width="fill_parent"
        android:layout_height="wrap_content"
        android:paddingBottom="@dimen/header_footer_top_bottom_padding"
        android:paddingLeft="@dimen/header_footer_left_right_padding"
        android:paddingRight="@dimen/header_footer_left_right_padding"
        android:paddingTop="@dimen/header_footer_top_bottom_padding" >

        <FrameLayout
            android:layout_width="wrap_content"
            android:layout_height="wrap_content"
            android:layout_gravity="left|center_vertical" >
//使用这个imageview的id查询该控件使用的地方,可以发现 转动的图片就是设置在这个控件上。
            <ImageView
                android:id="@+id/pull_to_refresh_image"
                android:layout_width="wrap_content"
                android:layout_height="wrap_content"
                android:layout_gravity="center" />
            <ImageView   //这个是我们加的,放置固定的文字。由于是帧布局所以会跟上面的转动图标重叠显示,达到我们的效果。
                android:layout_width="wrap_content"
                android:layout_height="wrap_content"
                android:layout_gravity="center"
                android:src="@drawable/wenzi"
                />
//这个是android系统的圆型进度条,也会重叠到上面,默认是gone,可能就是为了迎合某些人需要使用系统原生进度条。具体用途没深究,望指正
            <ProgressBar
                android:id="@+id/pull_to_refresh_progress"
                style="?android:attr/progressBarStyleSmall"
                android:layout_width="wrap_content"
                android:layout_height="wrap_content"
                android:layout_gravity="center"
                android:indeterminate="true"
                android:visibility="gone"

                />
        </FrameLayout>
//以下为垂直显示两行文字信息,第一行是加粗的,应该是正在刷新的提示,第二个是默认gone,可用于显示时间等扩展信息
        <LinearLayout
            android:layout_width="wrap_content"
            android:layout_height="wrap_content"
            android:layout_gravity="center"
            android:gravity="center_horizontal"
            android:orientation="vertical" >

            <TextView
                android:id="@+id/pull_to_refresh_text"
                android:layout_width="wrap_content"
                android:layout_height="wrap_content"
                android:singleLine="true"
                android:textAppearance="?android:attr/textAppearance"
                android:textStyle="bold" />

            <TextView
                android:id="@+id/pull_to_refresh_sub_text"
                android:layout_width="wrap_content"
                android:layout_height="wrap_content"
                android:singleLine="true"
                android:textAppearance="?android:attr/textAppearanceSmall"
                android:visibility="gone" />
        </LinearLayout>
    </FrameLayout>

</merge>
来看看在怎么设置转动的图片,转动的图片为了扩展方法,原本就提供了可以在外面设置的属性,方式如下:
在我们自己项目中需要用到pulltofresh的布局里加入命名空间
xmlns:ptr="http://schemas.android.com/apk/res-auto"
然后再控件布局中直接添加:
ptr:ptrDrawable="@drawable/cirle"   //circle就是我们自己的图片
完整代码如下:
<LinearLayout
    xmlns:android="http://schemas.android.com/apk/res/android"
    xmlns:ptr="http://schemas.android.com/apk/res-auto"   //加入命名空间
    android:layout_width="match_parent"
    android:layout_height="match_parent"
    android:background="@color/bg_color"
    android:orientation="vertical">
    <com.handmark.pulltorefresh.library.PullToRefreshScrollView
        android:id="@+id/pull_refresh_scrollview"
        android:layout_width="match_parent"
        android:layout_height="match_parent"
        ptr:ptrDrawable="@drawable/cirle"   //设置我们需要转动的图片
        >
            <LinearLayout
                android:layout_width="match_parent"
                android:layout_height="wrap_content"
                android:orientation="vertical">
           //此处省略很多行。。。。
           </LinearLayout>

    </com.handmark.pulltorefresh.library.PullToRefreshScrollView>
</LinearLayout>
下来说说显示上次刷新的时间,上面有提到过下拉刷新布局中有一个textview是默认gone状态,一直没用,猜测可以用于显示上次刷新的时间等信息
在此介绍如何把时间显示在这个textview中,关于该textview的显示与隐藏系统已经判断,有值则显示,无值则隐藏。
查相关逻辑的方式,选中该textview的id 查询此id在那些地方用过,android studio使用 ctrl+alt+F7查看
//首先会跳转到LoadingLayout这个类中,里面主要判断它的隐藏和显示
关键代码:
private void setSubHeaderText(CharSequence label) {
        if (null != mSubHeaderText) {
            if (TextUtils.isEmpty(label)) {
                mSubHeaderText.setVisibility(View.GONE);
            } else {
                mSubHeaderText.setText(label);

可以看到使用了setSubHeaderText()方法,该方法中给textveiw设置了文字label,然后查询这个方法在那些地方使用,首先找到该类中的以下方法
@Override
    public void setLastUpdatedLabel(CharSequence label) {
        setSubHeaderText(label);
    }
接着查询setLastUpdatedLabel()会在LoadingLayoutProxy类中找到该方法,
我们只要在代码中能获取到这个类,就可以给这个textview设置文字显示,接着我们可以在PullToRefreshBase类中找到以下代码:
@Override
public final ILoadingLayout getLoadingLayoutProxy() {
   return getLoadingLayoutProxy(true, true);
}
而我们代码中使用的pulltorefresh正是此类的子类,所以我们的代码中可以用以下方式:
private void setListener() {
    final ILoadingLayout loadingLayoutProxy = mPullRefreshScrollView.getLoadingLayoutProxy(true, true);//获取对象
    mPullRefreshScrollView.setOnRefreshListener(new PullToRefreshBase.OnRefreshListener<ScrollView>() {

        @Override
        public void onRefresh(PullToRefreshBase<ScrollView> refreshView) {
            if(preTime==null){
                loadingLayoutProxy.setLastUpdatedLabel("");
            }else{
                loadingLayoutProxy.setLastUpdatedLabel(preTime);  //设置时间
            }
           long time =System.currentTimeMillis();
            SimpleDateFormat format=new SimpleDateFormat("yyyy-MM-dd HH:mm:ss");
            Date d1=new Date(time);
             preTime=format.format(d1);
            new GetDataTask().execute();
        }

    });