1.理解读写分离
面对日益增加的系统访问量,数据库的吞吐量面临着巨大瓶颈。 对于同一时刻有大量并发读操作和较少写操作类型的应用系统来说,将数据库拆分为主库和从库,主库负责处理事务性的增删改操作,从库负责处理查询操作,能够有效的避免由数据更新导致的行锁,使得整个系统的查询性能得到极大的改善。
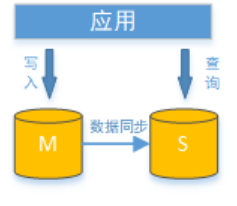
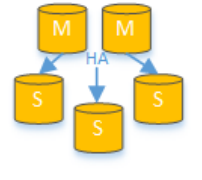
通过一主多从的配置方式,可以将查询请求均匀的分散到多个数据副本,能够进一步的提升系统的处理能力。 使用多主多从的方式,不但能够提升系统的吞吐量,还能够提升系统的可用性,可以达到在任何一个数据库宕机,甚至磁盘物理损坏的情况下仍然不影响系统的正常运行。
读写分离的数据节点中的数据内容是一致的,而水平分片的每个数据节点的数据内容却并不相同。将水平分片和读写分离联合使用,能够更加有效的提升系统的性能。
Sharding-JDBC读写分离则是根据SQL语义的分析,将读操作和写操作分别路由至主库与从库。它提供透明化读写分离,让使用方尽量像使用一个数据库一样使用主从数据库集群。
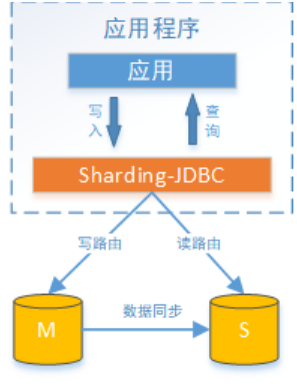
Sharding-JDBC提供一主多从的读写分离配置,可独立使用,也可配合分库分表使用,同一线程且同一数据库连接内,如有写入操作,以后的读操作均从主库读取,用于保证数据一致性。Sharding-JDBC不提供主从数据库的数据同步功能,需要采用其他机制支持。
接下来,咱们对上面例子中user_db进行读写分离实现。为了实现Sharding-JDBC的读写分离,首先,要进行mysql的主从同步配置。
2.mysql主从同步
参考:https://www.cnblogs.com/kevingrace/p/6256603.html
3.实现sharding-jdbc读写分离
(1)在Sharding-JDBC规则中修改
##水平分库+读写分离
#sharding-jdbc分片规则配置
#数据源
spring.shardingsphere.datasource.names = m0,s0

spring.shardingsphere.datasource.m0.type = com.alibaba.druid.pool.DruidDataSource
spring.shardingsphere.datasource.m0.driver-class-name = com.mysql.jdbc.Driver
spring.shardingsphere.datasource.m0.url = jdbc:mysql://192.168.0.114:3306/user_db?useUnicode=true
spring.shardingsphere.datasource.m0.username = root
spring.shardingsphere.datasource.m0.password = 123456

spring.shardingsphere.datasource.s0.type = com.alibaba.druid.pool.DruidDataSource
spring.shardingsphere.datasource.s0.driver-class-name = com.mysql.jdbc.Driver
spring.shardingsphere.datasource.s0.url = jdbc:mysql://192.168.0.115:3306/user_db?useUnicode=true
spring.shardingsphere.datasource.s0.username = root
spring.shardingsphere.datasource.s0.password = 123456

#?主库从库逻辑数据源定义?ds0为user_db
spring.shardingsphere.sharding.master-slave-rules.ds0.master-data-source-name=m0
spring.shardingsphere.sharding.master-slave-rules.ds0.slave-data-source-names=s0

#?t_user分表策略,固定分配至ds0的t_user真实表
spring.shardingsphere.sharding.tables.t_user.actual-data-nodes = ds0.t_user

# 打开sql输出日志
spring.shardingsphere.props.sql.show = true
(2)测试
执行testInsertUser单元测试:
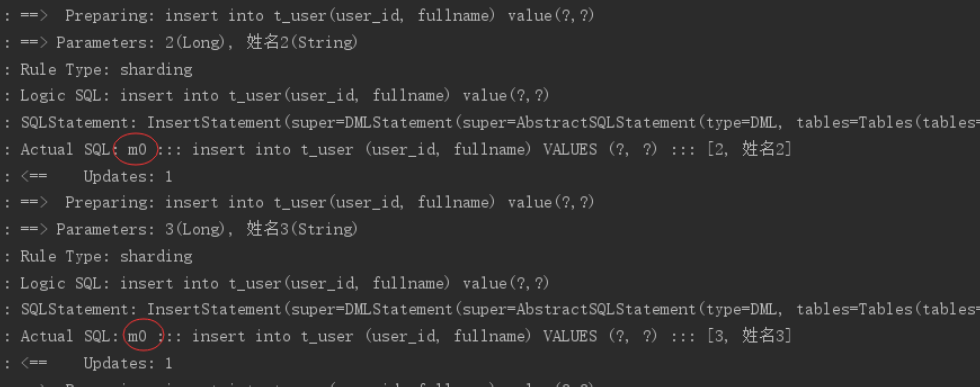
通过日志可以看出,所有写操作落入m0数据源。
执行testSelectUserbyIds单元测试:
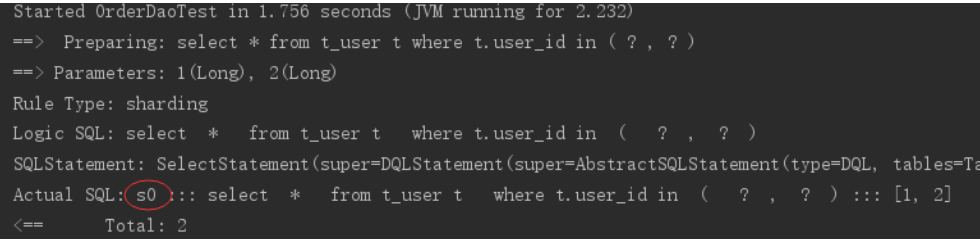
通过日志可以看出,所有写操作落入s0数据源,达到目标。