一、本章目录

二、用户界面概述
1,用户界面简介
(1)系统和用户之间进行信息交换的媒介
2,设计手机用户界面应解决的问题
(1)需要界面设计和逻辑代码完全分离(布局和逻辑代码分开放)
(2)根据不同型号手机的屏幕解析度,尺寸,纵横比各不相同,自动调增界面上部分的位置和尺寸,避免因为屏幕信息的变化出现显示错误
(3)能合理的利用较小的屏幕显示空间,构造符合人机交互规律的用户界面,避免出现凌乱,拥挤的用户界面
(4)Android已经解决了前两个问题,是用xml文件描述用户界面:资源文件独立保存在资源文件夹中;对界面用户的描述非常灵活,允许不明确定义界面元素的位置和尺寸,仅声明界面元素的相对位置和粗略的尺寸
3,Android用户界面框架
(1)Android用户界面框架采用了MVC模式
1)提供处理用户输入的控制器(Controller)
2)显示用户界面和图像的视图(View),以及保存数据和代码的模型(Model)
 _
_
M层:业务逻辑处理(例:数据库的存取操作,网络操作,复杂的算法,好耗时的任务都在M层处理)
V层:布局可以视为V层,显示Model层的数据结果
C层:在哪Android中,Activity处理用户交互问题,因此可以认为Activity是控制层,Activity读取V层的数据,控制用户输入,并向Model层发送数据请求
分析:
在MVC模式中我们发现,其实控制器Activity主要是起到解耦作用,将View视图和Model模型分离,虽然Activity起到交互作用,但是找Activity中有很多关于视图UI的显示代码,因此View视图和Activity控制器并不是完全分离的,也就是说一部分View视图和Contronller控制器Activity是绑定在一个类中的。
MVC的优点:
(1)耦合性低。所谓耦合性就是模块代码之间的关联程度。利用MVC框架使得View(视图)层和Model(模型)层可以很好的分离,这样就达到了解耦的目的,所以耦合性低,减少模块代码之间的相互影响。
(2)可扩展性好。由于耦合性低,添加需求,扩展代码就可以减少修改之前的代码,降低bug的出现率。
(3)模块职责划分明确。主要划分层M,V,C三个模块,利于代码的维护。
三、基本界面控件
1,界面控件简介
(1)Android中的界面控件分为定制控件和系统控件
1)定制控件:用户独立开发的控件,或通过继承并修改系统控件后所产生的心得控件。能够头为用户提供特殊的功能或与众不同的显示需求方式
2)系统控件:系统控件是Android系统提供给用户已经封装的用户界面,提供在应用程序开发过程中常见功能控件。系统控件更有利于帮助用户进行快速的开发,同时能够使Android系统中应用程序的界面保持一致性
(2)常见的系统控件:TextView,EditText,Button,ImagButton,checkbox,RadioButton,Spinner,ListView
2,TextView和EditText
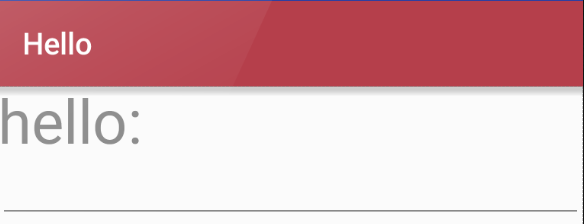
TextView是一种用于显示字符串的控件
EditText则是用来输入和编辑字符串的控件
public class MainActivity extends AppCompatActivity {
    private TextView tv;
    private EditText et;

    @Override
    protected void onCreate(Bundle savedInstanceState) {
        super.onCreate(savedInstanceState);
        setContentView(R.layout.activity_main);
        tv=(TextView)findViewById(R.id.tv);
        et=(EditText)findViewById(R.id.et);
    }
}
<?xml version="1.0" encoding="utf-8"?>
<LinearLayout xmlns:android="http://schemas.android.com/apk/res/android"
    android:orientation="vertical" android:layout_width="match_parent"
    android:layout_height="match_parent"
    android:stretchColumns="*"
    android:id="@+id/Tablelayout01">
<TextView
    android:id="@+id/tv"
    android:layout_width="wrap_content"
    android:layout_height="wrap_content"
    android:textSize="40dp"
    android:text="hello:"/>
<EditText
    android:id="@+id/et"
    android:layout_width="match_parent"
    android:layout_height="wrap_content" />
</LinearLayout>

3,Button和ImageView
Button是一种按钮控件,用户能够在该控件上点击,并后引发相应的事件处理函数
ImageButton用以实现能够显示图像功能的控件按钮
<?xml version="1.0" encoding="utf-8"?>
<LinearLayout xmlns:android="http://schemas.android.com/apk/res/android"
    android:orientation="vertical" android:layout_width="match_parent"
    android:layout_height="match_parent"
    android:stretchColumns="*"
    android:id="@+id/Tablelayout01">
<Button
    android:text="btn"
    android:layout_width="wrap_content"
    android:layout_height="wrap_content" />
    <ImageButton
        android:layout_width="wrap_content"
        android:layout_height="wrap_content"
        android:src="@drawable/plane"/>
</LinearLayout>

4,CheckBox和RadioButton
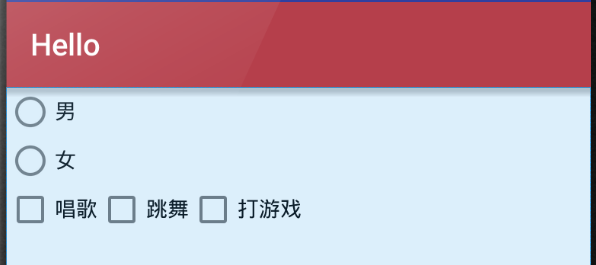
(1)CheckBox是一个同时可以选择多个选项的控件
(2)RadioButton则是仅可以选择一个选项的控件
(3)RadioGroup是RadioButton的承载体,程序运行时不可见,应用程序中可能包含一个或多个RadioGroup
(4)一个RadioGroup包含多个RadioButton,在每个RadioGroup中,用户仅能够选择其中一个RadioButton
***RadioButton必须配合RadioGroup使用***
<?xml version="1.0" encoding="utf-8"?>
<LinearLayout xmlns:android="http://schemas.android.com/apk/res/android"
    android:orientation="vertical" android:layout_width="match_parent"
    android:layout_height="match_parent"
    android:stretchColumns="*"
    android:id="@+id/Tablelayout01">
<RadioGroup
    android:layout_width="wrap_content"
    android:layout_height="wrap_content">
    <RadioButton
        android:layout_width="wrap_content"
        android:layout_height="wrap_content"
        android:text="男"/>
    <RadioButton
        android:layout_width="wrap_content"
        android:layout_height="wrap_content"
        android:text="女"/>
    <LinearLayout
        android:layout_width="wrap_content"
        android:orientation="horizontal"
        android:layout_height="wrap_content">
        <CheckBox
            android:id="@+id/cb1"
            android:layout_width="wrap_content"
            android:layout_height="wrap_content"
            android:text="唱歌"/>
        <CheckBox
            android:id="@+id/cb2"
            android:layout_width="wrap_content"
            android:layout_height="wrap_content"
            android:text="跳舞"/>
        <CheckBox
            android:id="@+id/cb3"
            android:layout_width="wrap_content"
            android:layout_height="wrap_content"
            android:text="打游戏"/>
    </LinearLayout>
</RadioGroup>
</LinearLayout>

5,ToggleButton(状态开关按钮)
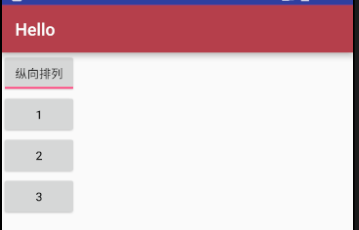
(1) ToggleButton有两种状态,开和关,通常用于切换程序中的某种状态。
(2) 常用属性:
1)android:checked 设置该按钮是否被选中
2)android:textOff 当按钮没被选中时显示的文本
3)android:textOn 当按钮被选中时显示的文本
关键代码:
这三行代码必须设置:
checked:默认的选中状态
textoff:关闭状态的文本信息
texton:开启状态的文本信息
android:checked="true"
android:textOff="横向排列"
android:textOn="纵向排列"
完整代码:
<?xml version="1.0" encoding="utf-8"?>
<LinearLayout xmlns:android="http://schemas.android.com/apk/res/android"
    android:orientation="vertical" android:layout_width="match_parent"
    android:layout_height="match_parent"
    android:stretchColumns="*"
    android:id="@+id/Tablelayout01">
<ToggleButton
    android:id="@+id/tb1"
    android:layout_width="wrap_content"
    android:layout_height="wrap_content"
    android:checked="true"
    android:textOff="横向排列"
    android:textOn="纵向排列"/>
    <LinearLayout
        android:id="@+id/ll"
        android:orientation="vertical"
        android:layout_width="wrap_content"
        android:layout_height="wrap_content">
        <Button
            android:layout_width="wrap_content"
            android:layout_height="wrap_content"
            android:id="@+id/bgtn1"
            android:text="1"/>
        <Button
            android:layout_width="wrap_content"
            android:layout_height="wrap_content"
            android:id="@+id/bgtn2"
            android:text="2"/>
        <Button
            android:layout_width="wrap_content"
            android:layout_height="wrap_content"
            android:id="@+id/bgtn3"
            android:text="3"/>
    </LinearLayout>
</LinearLayout>
package com.example.administrator.hello;

import android.support.v7.app.AppCompatActivity;
import android.os.Bundle;
import android.widget.CompoundButton;
import android.widget.LinearLayout;
import android.widget.ToggleButton;

public class MainActivity extends AppCompatActivity {
    private ToggleButton tb;
    private LinearLayout ll;
    @Override
    protected void onCreate(Bundle savedInstanceState) {
        super.onCreate(savedInstanceState);
        setContentView(R.layout.table);
        tb=(ToggleButton)findViewById(R.id.tb1);
        ll=(LinearLayout)findViewById(R.id.ll);
       tb.setOnCheckedChangeListener(new CompoundButton.OnCheckedChangeListener() {
            @Override
            public void onCheckedChanged(CompoundButton buttonView, boolean isChecked) {
                if(isChecked)
                {
                    //1表示垂直布局
                    ll.setOrientation(LinearLayout.VERTICAL);
                    tb.setChecked(true);
                }
                else
                {
                    ll.setOrientation(LinearLayout.HORIZONTAL);
                    tb.setChecked(false);
                }
            }
        });

    }
}


5,Spinner
6,ListView
(1) ListView是一种用于垂直显示的列表控件,如果显示内容过多,则会出现垂直滚动条
(2)ListView能够通过适配器将数据和自身绑定,在有限的屏幕上提供大量内容供用户选择,所以是经常使用的用户界面控件
(3)ListView支持点击事件处理,用户可以用少量的代码实现复杂的选择功能
(4)学会使用两种适配器:ArrayAdapter、SimpleAdapter
监听器:OnItemClickLister
(5)作用:Android系统中显示列表的控件,每一个ListView都可以包含多个列表项
(6)数据适配器:连接数据源和视图界面的桥梁
(7)实现步骤:新建数据源---新建适配器---添加数据源到适配器
1)新建数组适配器
arrayAdapter= new ArrayAdapter(Context,Resource,List);
参数信息(上下文信息,样式,数据源)
2)
A:ArrayAdapter
逻辑
package com.example.administrator.app1;

import android.support.v7.app.AppCompatActivity;
import android.os.Bundle;
import android.widget.ArrayAdapter;
import android.widget.ListView;
import java.util.ArrayList;
import java.util.List;

public class MainActivity extends AppCompatActivity {
    private ListView lv;
    private List<String> list;
    private ArrayAdapter aa;
    @Override
    protected void onCreate(Bundle savedInstanceState) {
        super.onCreate(savedInstanceState);
        setContentView(R.layout.activity_main);
        lv=(ListView) findViewById(R.id.lv);
        //新建数据源
        list=new ArrayList<String>();
        for(int i=0;i<=20;i++)
        {
            list.add("listview子项"+i);
        }
        //新建适配器,将数据绑定到适配器
        aa=new ArrayAdapter(MainActivity.this, android.R.layout.simple_list_item_1,list);
        //试图加载适配器
        lv.setAdapter(aa);

    }
    }
布局
<?xml version="1.0" encoding="utf-8"?>
<LinearLayout xmlns:android="http://schemas.android.com/apk/res/android"
    android:orientation="vertical" android:layout_width="match_parent"
    android:layout_height="match_parent"
    android:stretchColumns="*"
    android:layout_gravity="center"
    android:id="@+id/Tablelayout01">

   <ListView
       android:layout_width="match_parent"
       android:layout_height="match_parent"
       android:id="@+id/lv"></ListView>
</LinearLayout>
布局
<?xml version="1.0" encoding="utf-8"?>
<LinearLayout xmlns:android="http://schemas.android.com/apk/res/android"
    android:layout_width="wrap_content"
    android:orientation="vertical"
    android:layout_height="wrap_content"
    >
    <ImageView
        android:layout_width="wrap_content"
        android:layout_height="wrap_content"
        android:id="@+id/image"/>

</LinearLayout>
<?xml version="1.0" encoding="utf-8"?>
<LinearLayout xmlns:android="http://schemas.android.com/apk/res/android"
    xmlns:tools="http://schemas.android.com/tools"
    android:layout_width="match_parent"
    android:layout_height="match_parent"

    android:orientation="vertical"
    tools:context="com.example.administrator.app2.MainActivity">
  <GridView
      android:layout_width="wrap_content"
      android:layout_height="wrap_content"
      android:id="@+id/gv"
      android:horizontalSpacing="4dp"
      android:verticalSpacing="4dp"
      android:numColumns="4"
      >

  </GridView>
  <ImageView
      android:layout_width="150dp"
      android:layout_height="150dp"
      android:id="@+id/iv"

      />
</LinearLayout>
package com.example.administrator.app2;

import android.support.v7.app.AppCompatActivity;
import android.os.Bundle;
import android.view.View;
import android.widget.Adapter;
import android.widget.AdapterView;
import android.widget.GridView;
import android.widget.ImageView;
import android.widget.SimpleAdapter;

import java.util.ArrayList;
import java.util.HashMap;
import java.util.List;
import java.util.Map;

public class MainActivity extends AppCompatActivity {
private GridView gv;
    private ImageView iv;
    private int[] imgs={R.drawable.e1,R.drawable.e2,R.drawable.e3,R.drawable.e4,R.drawable.e5,R.drawable.e6,R.drawable.e7,R.drawable.e8};
    private List<Map<String,Object>> list;
   private SimpleAdapter simpleAdapter;
    private String[] str={"pics"};
    @Override
    protected void onCreate(Bundle savedInstanceState) {
        super.onCreate(savedInstanceState);
        setContentView(R.layout.activity_main);
        gv=(GridView)findViewById(R.id.gv);
        iv=(ImageView)findViewById(R.id.iv);
        //定义事件源
        list=new ArrayList<>();

        for(int i=0;i<imgs.length;i++)
        {
            Map map= new HashMap<>();
            map.put("pics",imgs[i]);
            list.add(map);
        }
        //定义监听
        simpleAdapter=new SimpleAdapter(MainActivity.this,list,R.layout.i,str,new int[]{R.id.image});
        gv.setAdapter(simpleAdapter);
        gv.setOnItemClickListener(new AdapterView.OnItemClickListener() {
            @Override
            public void onItemClick(AdapterView<?> parent, View view, int position, long id) {
                iv.setImageResource(imgs[position]);
            }
        });
        //定义监听器
    }
}