需求:
在ubuntu14.04机器上搭建ftp服务,ftp账号通过winscp软件登录后,仅可增删改/data/wwwroot目录。
一、安装步骤
1、apt 安装vsftpd
apt-get install vsftpd
2、设置ftp账号密码
passwd ftp -s "ftp passwd"
3、按需求更改/etc/vsftpd.conf
listen=YES  #被动模式
anonymous_enable=NO #不允许匿名用户登录FTP
local_enable=YES
write_enable=YES
local_umask=022
dirmessage_enable=YES
use_localtime=YES
xferlog_enable=YES
connect_from_port_20=YES
xferlog_file=/var/log/vsftpd.log
ftpd_banner=Welcome to blah FTP service.
chroot_local_user=YES
local_root=/data/wwwroot
chroot_list_file=/etc/vsftpd.chroot_list
secure_chroot_dir=/var/run/vsftpd/empty
pam_service_name=vsftpd
userlist_enable=YES
userlist_file=/etc/vsftpd.userlist  #仅供文件内的用户登录
userlist_deny=NO
pasv_enable=YES
pasv_min_port=40000  #最小端口
pasv_max_port=40050  #最大端口
port_enable=YES
#pasv_address=x.x.x.x
#pasv_addr_resolve=NO
allow_writeable_chroot=YES
4、设置开放目录的权限和属主
chown -R ftp:ftp /data/wwwroot
chmod 755 /data/wwwroot
5、重启vsftpd
service vsftpd start
6、本机测试

如果报错则根据报错信息进行检测
7、设置机器防火墙
开放端口: 21、20、pasv_min_port - pasv_max_port
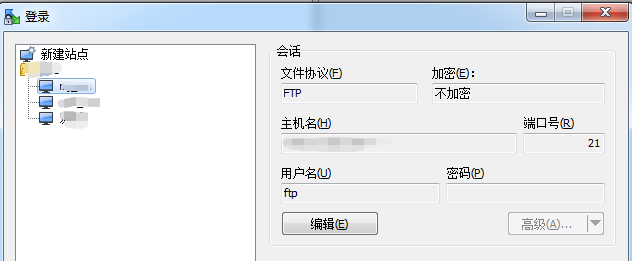
8、winscp测试
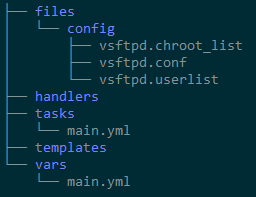
二、组织目录结构
三、写ansible yaml剧本
tasks/main.yaml
---
 - name: Apt-get vsftpd
   apt:
    name: vsftpd
    update_cache: yes

 - name: Change name of vsftpd.conf orignal
   shell: cp vsftpd.conf vsftpd.conf.orig -f
   args:
     chdir: /etc
     warn: no

 - name: Modify pam check mod
   shell: sed -i "s@pam_shells.so@pam_nologin.so@g" /etc/pam.d/vsftpd    #fix 503  Login incorrect

 - name: Copy configs
   copy: src=config/ dest=/etc/ owner=root group=root mode=644

 - name: Set ftp passwd
   user: name=ftp password={{ftp_pass | password_hash('sha512')}} update_password=always

 - name: Set dir mode
   file: path=/data/wwwroot/PapaSG2/  owner=ftp  group=ftp  mode='0644'

 - name: Start vsftpd
   service: name=vsftpd  state=started
vsftpd.userlist
ftp
四、报错和解决方案
1、无法登录
1)检查账号、密码、防火墙、主目录
防火墙需要将 21,asv_min_port - pasv_max_port 端口都开放
主目录的权限需要设为755
2、530 Login incorrect
1)/etc/vsftpd.conf文件 将pam_service_name=vsftpd 修改为 pam_service_name=ftp
绕过了PAM,其实并不对,同理是将/etc/pam.d/vdstpd重命名
2)/etc/pam.d/vsftpd分析
# Standard behaviour for ftpd(8).
auth   required        pam_listfile.so item=user sense=deny file=/etc/ftpusers   @1
onerr=succeed
# Note: vsftpd handles anonymous logins on its own. Do not enable pam_ftp.so.
# Standard pam includes
@include common-account
@include common-session
@include common-auth
auth   required        pam_shells.so  @2
@1:/etc/ftpusers 中的用户禁止登陆,如果文件不存在在默认所有用户均允许登录. 所以确保用户没在这个文件内
@2:仅允许用户的shell为 /etc/shells 文件内的shell命令时,才能够成功。而创建ftp用户时,为了禁止ssh登录,一般多为/bin/false 、/usr/sbin/nologin 等,显然不是一个有效的bash,也就无法登录了。
解决方案:
确认ftp不在/etc/ftpusers, sed -i "s@pam_shells.so@pam_nologin.so@g" /etc/pam.d/vsftpd, 重启vsftpd
3、vsftpd respawning too fast, stopped
环境: ubuntu 12.04 vsftpd v2.3.5
>service vsftpd start
vsftpd start/pre-start, process 19503 #启动失败
>tail /var/log/syslog -n 10

>vsftpd #不能启动的时候可以直接启动,方便定位原因
500 OOPS: unrecognised variable in config file: allow_writeable_chroot
>grep allow_writeable_chroot /etc/vsftpd.conf
allow_writeable_chroot=YES
>sed -i "@allow_writeable_chroot=YES@#allow_writeable_chroot=YES@g" /etc/vsftpd.conf
>service vsftpd start
vsftpd start/running, process 19652
4、500 OOPS: child died
500 OOPS: vsftpd: refusing to run with writable root inside chroot ()
前者是默认报错,后者是更具体的报错,意思是不能使用chroot限制可写的根目录
环境: ubuntu 12.04 vsftpd v2.3.5
>ftp localhost
Connected to localhost.
220 Welcome to blah FTP service.
Name (localhost:root):
本来以为这样就Ok了,然后使用winscp去连接,却报错:500 OOPS: child died
1)有的解决方案是说关闭selinux,或者是开启ftp_home_dir 或者 tftpd_disable_trans
但是我使用的是云主机,本身selinux就是关闭的,基础项check过都是ok的
2)vsftpd从v2.3.5版本开始,取消了根目录的可写权限
看了下vsftpd的更新日志:
Add stronger checks for the configuration error of running with a writeable root directory inside a chroot(). This may bite people who carelessly turned on chroot_local_user but such is life.
解决方案A: > chmod a - w /$local_root
解决方案B:> echo "allow_writeable_chroot=YES" >> /etc/vsftpd.conf
A方案可行,可以将根目录包一层,不影响具体的业务使用
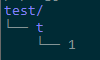
local_root设置为test, nginx root 设为t, t目录权限设为可写
B方案,vsftpd启动失败,会报3号错。
但是网上也有说以下方案是ok的,也许是我这里安装vsftpd的问题。因为当前只需要可读就成了,就没往下测试。有兴趣的可以尝试下。
$ apt-get install python-software-properties
$ sudo add-apt-repository ppa:thefrontiergroup/vsftpd
$ sudo apt-get update
$ sudo apt-get install vsftpd
$ vim /etc/vsftpd.conf and add the following
  chroot_local_user=YES
  allow_writeable_chroot=YES
$ sudo service vsftpd restart