yarn
初始化
yarn init yes
添加依赖
yarn add [package]
升级依赖
yarn upgrade [package]
移出依赖
yarn remove [package]
npm
npm i
npm init --yes
npm i gulp-pug gulp-debug gulp-sass
//生产依赖
npm i gulp -P
//开发依赖
npm i gulp -D
//不添加到package.json
npm i gulp --no-save
指定下载版本
npm i vue@2.5.15
卸载package包
npm uninstall vue  //可以使用rm  un   r
全局安装
-g
强制清除缓存
npm cache clean --fore
bower
它是从github下载的
初始化
bower init yes
更新
bower update  包名
卸载
bower uninstall 包名
删除缓存
bower cache clean
添加依赖
bower install 包名
webpack
初始化
npm init -y
    全局安装
    npm install webpack -g  //不推荐
本地安装
npm install webpack webpack-cli -D  //-D 开发依赖

执行webpack
npx webpack  //打包

npm install lodash -D

npm install webpack-dev-server -D
npm install html-webpack-plugin -D

//css
npm install style-loader css-loader -D
webpack.config.js
module: { // 所有 非.js 结尾的第三方文件类型,都可以在 module 节点中进行配置
    rules: [ // rules 是匹配规则,如果 webpack 在打包项目的时候,发现,某些 文件的后缀名是 非 .js 结尾的
      //  webpack 默认处理不了,此时,webpack 查找 配置文件中的 module -> rules 规则数组;
      { test: /.css$/, use: ['style-loader', 'css-loader'] }
    ]
  }
//less
npm install less-loader less -D
{ test: /.less$/, use: ['style-loader', 'css-loader', 'less-loader'] }

//sass
npm install sass-loader node-sass -D
{ test: /.scss$/, use: ['style-loader', 'css-loader', 'sass-loader'] }

//加载图片
npm install url-loader file-loader -D
{ test: /.jpg|png|gif|bmp$/, use: 'url-loader' }
vue指令
npm install webpack webpack-cli -g
npm install -g vue-cli
vue init webpack vue_demo
cd vue_demo
npm install
npm run dev
vue
beforeCreate      created  初始化后
beforeMounted		mounted  挂载后
ref  获取dom节点
    <p ref="myp">{{msg}}</p>
    this.$refs.myp获取这个div
由于dom的渲染是异步的 $nextTick 如果数据变化后想获取真实dom中内容,需要等待页面刷新后在去获取
所有的dom操作最后用$nextTick中

全局组件
   Vue.component('my-handsom',{
        template:'<div>{{msg}}</div>',
        data(){
          return {msg:'我很英剧'}
        },
    });
局部组件
	components
	三步取: 创建  注册  使用
	     let handsome={template:'<div>{{msg}}</div>',data(){
       			 return  {msg:'张三'}
        }};
		components:{
            handsome,
            methods:{

            }
        }
        在页面上使用这个标签

子传父
 let vm=new Vue({
        el:'#app',
        data:{
            money:400,
        },
        methods:{
          things(val){
            this.money=val;
          }
        },
        components:{
            child:{
                props:['m'],
                template:'<div>儿子{{m}} <button @click="getMoney">多要钱</button></div>',
                methods:{
                    getMoney(){
                        this.$emit('child-msg', 800);//触发自己的自定义事件,让父亲方法执行
                    }
                }
            }
        }
    })
    //儿子的自定义方法方法执行父亲的方法,
    <div id="app">
    父亲:{{money}}
    <child :m="money" @child-msg="things"></child>
	</div>
简单的理解子组件传递参数给父组件
    子组件
    <button @click.self="$emit('patch')">加一块钱</button>
	$emit()里面的第一个参数是传递给父组件的自定义方法,第二个参数是一个对象,可以是需要传递给父组件的对象
	父组件
    <User @patch="ttt"/>
        //methods 执行这个方法
        ttt() {
                this.money++
            }
slot

<div id="app">
    <modal>
        <a href='http://www.baidu.com'>去百度</a>
        <p slot="content">是否删除</p>
        <h1 slot="title" @click="fn">是否删除??</h1>
    </modal>
</div>
<!--slot作用 定制模板-->
<!--模板中只能有一个根元素,可以通过元素属性定制模板-->
<!--slot 中可以放置一些默认的内容,如果传递了内容则替换掉-->
<!--如果没有名字的标签默认会放置到default-->
<template id="modal">
    <!-- 这里放的内容属于父级当前模板的,只有属性名是属于组件的-->
    <div>
        <slot name="title">默认标题</slot>
        <slot name="content">这是一个默认标签</slot>
        <slot name="default">这是一个默认标签</slot>
    </div>
</template>
    let vm=new Vue({
        el:"#app",
        data:{

        },
        components:{
            modal
        },
        methods:{
            fn(){
                alert(1)
            }
        }
    })
操作挂载后组件的dom
    <loading ref="load"></loading>

mounted(){//ref 如果放在组件上,获取的是组建的实例,并不是组件的DOM元素
            // this.$refs.load.hide(); 想操作dom 就加一个$nextTick
            this.$refs.load.$el.style.backgroundColor = 'red';
        },

----------------
<div id="app">
    <input type="radio" v-model="radio" value="home">home
    <input type="radio" v-model="radio" value="list">list
    <!--一般用作缓存:为的是后面路由做准备-->
    <keep-alive>
        <component :is="radio"></component>
    </keep-alive>
</div>
    /* 子组件和父组件同时拥有mounted方法,会先走谁*/
    /*需要等待子组件挂载完成后在触发父组件的挂载*/
    let home = {template:"<div>home</div>"};
    let list = {template:"<div>list</div>"};
    let vm=new Vue({
        el:"#app",
        data:{
            radio:'home'
        },
        components:{
            home,list
        }
------------
向子组件传送数据是通过props实现的
     <foo-component :foo-message="fooMessage"></foo-component>
        fooMessage  是父组件的变量
     /*type  能够指定的类型
        String Number Boolean Function Object Array Symbol
        required 声明这个参数是否必须传入
        default 选项来指定当父组件未传入参数是props变量的默认值
        当type的类型为Array或者Object的时候default必须是一个函数
        自定义函数校对
        * */
      props:{
          fooMessage: {type:[Number,String],required:true}
      },
      template:'<div>{{fooMessage}}</div>'

//props总结
      props: {
    // fooA只接受数值类型的参数
    fooA: Number,
    // fooB可以接受字符串和数值类型的参数
    fooB: [String, Number],
    // fooC可以接受字符串类型的参数,并且这个参数必须传入
    fooC: {
        type: String,
        required: true
    },
    // fooD接受数值类型的参数,如果不传入的话默认就是100
    fooD: {
        type: Number,
        default: 100
    },
    // fooE接受对象类型的参数
    fooE: {
        type: Object,
        // 当为对象类型设置默认值时必须使用函数返回
        default: function(){
            return { message: 'Hello, world' }
        }
    },
    // fooF使用一个自定义的验证器
    fooF: {
        validator: function(value){
            return value>=0 && value<=100;
        }
    }
}
slot 绑定数据
父组件
因为组件中只能包一个div,所以可以用template包起来
slot-scope是让slot具有私有性
<div slot="wang" slot-scope="item">
            <div v-for="sex in item.data">
                {{sex}}
            </div>
</div>
子组件
<slot name="wang" :data="sexArr"></slot>
 data(){return { sexArr:['男','女']
                    }
                }
父组件与子组件的数据通信
    父组件
     <TodoFooter :class1="class1"/>
     data(){
         return{
             class1:'zhangsan'
         }
     }
     子组件
     props: ['class1']

子组件与父组件
$emit
父组件
<button-counter v-on:increment="incrementTotal"></button-counter>
  methods: {
            incrementTotal () {
                this.total++
            }
        }
子组件
   metheds: {
            incrementCounter () {
                this.$emit('increment')
                this.counter++
            }
        }

--------
    父组件
<custom @childByValue="childByValue"/>
 childByValue(childValue){
        console.log(childValue);
      }
	子组件
<button @click.self="childClick">点我触发</button>
 childClick(){
      this.$emit('childByValue',this.childValue)
     //第一个参数是 @父组件的方法,第二个参数是本组件的数据
      }
//非组件的传值
 注册一个空vue
 对象.$emit()
mounted(){
    对象.$on('方法',function(传的参数))
}
不建议,太复杂的建议用vuex


vue 消息订阅与发布

缓存路由
    <keep-alive>
            <router-view></router-view>
    </keep-alive>
向路由组件传递数据
$route.params.id
注意是route不是router不要写错了

编程式路由导航
this.$router.push(path) :想当于点击路由链接(可以返回到当前路由界面)
this.$router.replace(path):用新路由替换当前路由(不可以返回到当前路由界面)
this.$router.back() 请求(返回)上一个记录路由
this.$router.go(-1) 请求返回上一个记录路由
动态组件
vue 中 <component> 用 :is 来挂载不同的组件

   <component :is="currentView"></component>
  <button @click="handleChangeView('A')">A</button>
  <button @click="handleChangeView('B')">B</button>
   <button @click="handleChangeView('C')">C</button>

components:{
                comA:{
                    template:`
                        <div>组件A</div>
                    `
                },
                comB:{
                    template:`
                        <div>组件B</div>
                    `
                },
                comC:{
                    template:`
                        <div>组件C</div>
                    `
                }
            },
            data:{
                currentView:'comA'
            },
            methods:{
                handleChangeView:function(component){
                    this.currentView='com'+component;
                }
            }
向路由组件传递数据和编程式路由导航
父组件
<template>
<div>
  <!--<p>{{// $router.params.id}}</p>-->
  <ul>
    <li v-for="(message,index) in messages" :key="message.id">
      <router-link :to="`/home/message/detail/${message.id}`">{{message.title}}</router-link>
      <button @click="pushShow(message.id)">push查看</button>
      <button @click="reqplaceShow(message.id)">replace查看</button>
    </li>
  </ul>
  <button @click="$router.back()">回退</button>
  <hr>
  <router-view></router-view>
</div>

</template>

<script>
    export default {
        name: "Message",
      data(){
          return{
            messages:[],
          }
      },
      methods:{
        pushShow(id){
          this.$router.push(`/home/message/detail/${id}`)
        },
        reqplaceShow(id){
          this.$router.replace(`/home/message/detail/${id}`)
        },
      },
      mounted(){
          //模拟ajax请求从后台获取数据
        setTimeout(()=>{
          const messgesd=[
            {
              id:1,
              title:'message001',
              content:'message001 content...'
            },
            {
              id:2,
              title:'message002',
              content:'message002 content...'
            },
            {
              id:4,
              title:'message004',
              content:'message004 content...'

            }
          ];
          this.messages=messgesd;

        })
      }
    }
</script>

<style scoped>

</style>


子组件
    <template>
      <div>
        <p>{{$route.params.id}}</p>
        <ul>
          <li>id:{{messageDetail.id}}</li>
          <li>title:{{messageDetail.title}}</li>
          <li>content:{{messageDetail.content}}</li>
        </ul>
      </div>

    </template>

    <script>

        export default {
            name: "MessageDetail",
          data(){
              return{
                messageDetail:{
                }
              }
          },
          mounted(){
              setTimeout(()=>{
                const allMessageDetails=[
                  {
                    id:1,
                    title:'message001',
                    content:'message001 content...'
                  },
                  {
                    id:2,
                    title:'message002',
                    content:'message002 content...'
                  },
                  {
                    id:4,
                    title:'message004',
                    content:'message004 content...'

                  }
                ];
                this.allMessageDetails=allMessageDetails;
                const id=this.$route.params.id*1;
                this.messageDetail=allMessageDetails.find(detail=>detail.id===id)
              },1000)
          },
          watch:{
              $route:function (value) {
                const ids=value.params.id*1;
                this.messageDetail=this.allMessageDetails.find(detail=>detail.id===ids)
              }
          }
        }

vuex
npm install vuex -D
style中的scoped是限定样式的作用范围
JavaScript 风格指南
代码整洁的 JavaScript
JavaScript 代码简洁之道
vue-cli@3
yarn global add @vue/cli
vue create 项目名
cd 项目名
yarn serve
为什么data是一个函数:每一个实例的data属性都是独立的,不会相互影响的
.self修饰符
self是只执行子级本身的函数
.stop和.self的区别,前者是防止事件冒泡,后者则是忽略了事件冒泡和事件捕获的影响。只有直接作用在 该元素上的事件才会被调用
<div class="mid" @click.self="getTarget($event)">
去掉webstrom的单词波浪线
光标选中该单词,alt+enter,关闭相应选项即可。
vue编译报错
注意别再routes/index里面写内联组件const={template:'
这种会报错的'}在目录下新建一个
vue-config.jsmodule.exports={ runtimeCompiler: true };
vuex的流程
//store.js
import Vue from 'vue';
import Vuex from 'vuex';

Vue.use(Vuex);

const state={
    count:1
};
const mutations={
    increment(state) {
        state.count++
    },
    decrement(state) {
        state.count--
    }
};

const actions={
    increment:({commit})=>{
        commit('increment');
    },
    decrement:({commit})=>{
        commit('decrement');
    }
};
export default new Vuex.Store({
    state,
    mutations,
    actions,
})
//在mian.js导入
在实例上挂载
  <h1>vuex {{$store.state.count}}</h1>
  <button @click.self="increment">增加</button>
  <button @click.self="decrement">删减</button>

 import {mapActions} from 'vuex'
    export default {
        methods:mapActions([
            'increment',
            'decrement'
        ])
    }

====
state
在方法中通过 this.$store.state 获取
在计算属性中通过 this.$store.commit("方法函数")获取
辅助函数 mapState

 import {mapState} from 'vuex';

computed:mapState({
         count:'count',//第一种写法
         sex:(state)=>state.sex,//第二种写法
    	from: function (state) { // 用普通函数this指向vue实例,要注意,取得事data的属性或者computed里面的属性,因为箭头函数没有this
               return this.ddd + ':' + state.from
           },
    //简化
    	from(state) { // 用普通函数this指向vue实例,要注意
                return this.ddd + ':' + state.from
            },
       }),

computed: {
  localComputed () { /* ... */ },
  // 使用对象展开运算符将此对象混入到外部对象中
  ...mapState({
    // ...
  })
}
// 在 store 中定义“getter”(可以认为是 store 的计算属性)。就像计算属性一样
//自带的第一个参数是store,第二个参数是getters(是自己,可以访问自己的属性)
//mapGetters辅助函数
 computed: {
  // 使用对象展开运算符将 getter 混入 computed 对象中
    ...mapGetters({
           coneCount:'doneTodoss',
           doneTodo:'doneTodoCounts',
      // ...
    })
  }
可以用数组和对象的形式
    ...mapGetters([
      'doneTodosCount',
      'anotherGetter',
      // ...
    ])
======
更改Vuex的store中的状态唯一方法是提交mutation

Action
* Action提交的是mutation,而不是直接变更状态
* Action 可以包含任意异步操作
Action 是通过 store.dispatch('里面放着方法',{传入的对象})方法触发的

        methods: {
            ...mapActions([
                'increment',
                'decrement'
            ])
        },
        computed: {
            doneTodosCount() {
                return this.$store.state.arr.filter(todo => todo > 2);
            },
            ...mapGetters({
                coneCount: 'doneTodoss',
                doneTodo: 'doneTodoCounts',
            })

        }
    }

 ====
     import Vue from 'vue';
import Vuex from 'vuex';

Vue.use(Vuex);

const state = {
    count: 1,
    name: 'dkr',
    sex: '男',
    from: 'china',
    arr: [2, 3, 5, 6, 7],
    todos: [
        {id: 1, text: '...', done: true},
        {id: 2, text: '...', done: false}
    ]
};
const mutations = {
    //大多说第二个参数载荷是一个对象,也可以是一个数字
    increment(state, n) {
        console.log(state.count);
        state.count += n
    },
    decrement(state,payload) {
        state.count-=payload.amount
    }
};

const actions = {
    increment: ({commit}) => {
        commit('increment', 10);
    },
    decrement: ({commit}) => {
        // commit('decrement',{amount:10}); 也可以写成一个包含type属性的对象
        commit({type:'decrement', amount: 10});
    }
};
//getters  getters.js
export default new Vuex.Store({
    state,
    getters: {
        doneTodoss: state => {
            return state.todos.filter(todo => todo.done);
        },
        doneTodoCounts(state, getters) {
            return getters.doneTodoss.length
        }
    },
    mutations,
    actions,
})
vuex中的modules
目录结构
─ store
    ├── index.js          # 我们组装模块并导出 store 的地方
    ├── actions.js        # 根级别的 action
    ├── mutations.js      # 根级别的 mutation
    └── modules
        ├── cart.js       # 购物车模块
        └── products.js   # 产品模块


store/index.js

import Vue from 'vue'
import Vuex from 'vuex'

Vue.use(Vuex)

import login from './modules/login'
export default new Vuex.Store({
  modules:{
    login
  }
})

=====
store/modules/login.js

const state = {
  useName: "sam"
};
const mutations = {

};
const actions = {

};
const getters = {

};

// 不要忘记把state, mutations等暴露出去。
export default {
  namespaced: true,  //单词别写错了,记得一定要设置呀
  state,
  mutations,
  actions,
  getters
}

使用
         ...mapState('login',{
          useName:state=>state.useName
        })
		...mapGetters("login", ["localJobTitle"])
        ...mapState({
          useName:state=>state.login.useName
        })
		...mapActions('login', ['alertName'])
		...mapGetters({useName:'login/useName'})// 避免重名可以这样写
		this.$store.dispatch("login/alertName")
客户端的路由实现方式两种:基于hash和HTML5 history api
vue-router其本质就是:建立并管理url和对应组件之间的映射关系
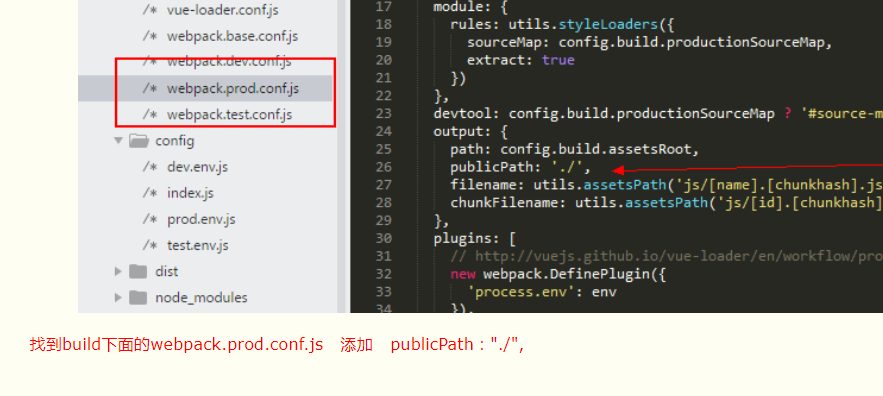
配置路由
yarn add vue-router
新建router/index.js
----
import Vue from 'vue'
import VueRouter from 'vue-router'

//导入自己的路由模块
import xxx from '../templates/xxx.vue'

Vue.use(VueRouter)
export default new VueRouter({
    routes:[
        {path:'/xxx',component:xxx,
         children:[{ //在子路由中父路由要有
             path:'/子路由',
             component:xxx,
             redirect:'/重定向'
         ]}
    ]
})
----
在main.js 导入
import router from './router'
new Vue({
    router
})

页面实现(html模板中)
<router-link to=""></router-link>
<router-view></router-view>
        //动态路径参数 以冒号开头,也就是只有传入动态参数才能进入子页面
        {path:'/user/:id',component:xxx}
        对应的值都会设置 $route.params={username:'event'}
        或者 $route.params={id:1}

命名路由,可以给router-link 的to 属性传递一个对象
     <router-link :to="{ name: 'user', params: { userId: 123 }}">User</router-link>
    	router.push({name:'user',params:{userID:123}})
        两种方法都会把路由导航到 /user/123 路径
命名视图
        有 sidebar (侧导航) 和 main (主内容) 两个视图
        <router-view class="view one"></router-view>
        <router-view class="view two" name="a"></router-view>
        <router-view class="view three" name="b"></router-view>
        对于同个路由,多个视图就需要多个组件,确保components配置记得加(s)
        const router = new VueRouter({
          routes: [
            {
              path: '/',
              components: {
                default: Foo,
                a: Bar,
                b: Baz
              }
            }
          ]
        })
	简写
         <div>
          <h1>User Settings</h1>
          <NavBar/>
          <router-view/>
          <router-view name="helper"/>
        </div>
重定向
    { path: '/a', redirect: '/b' }
	//命名路由
	{ path: '/a', redirect: { name: 'foo' }}
	//动态返回重定向目标的方法
    { path: '/dynamic-redirect/:id?',
          redirect: to => {
            const { hash, params, query } = to
            if (query.to === 'foo') {
              return { path: '/foo', query: null }
            }
            if (hash === '#baz') {
              return { name: 'baz', hash: '' }
            }
            if (params.id) {
              return '/with-params/:id'
            } else {
              return '/bar'
            }
          }
        }
	这里return的值是path值,必须是一个已经存在的path才能进行路由重定向。而且这个path不能使自身,如果是自身就变成的死循环了

<!-- 带查询参数,下面的结果为 /register?plan=private -->
<router-link :to="{ path: 'register', query: { plan: 'private' }}">Register</router-link>
比较好的vue-router的文档
import User from '@/components/User' //这里可以省略.vue
// 给路由命令,设置的name要唯一
{path:'/user',name:'user',component:User}
//路由懒加载:单页面应用,首页时,加载内容时间过长.运用懒加载对页面组件进行划分,减少首页加载时间
		{
			path:'/Page',
			name:'Page',
			component:resolve => require(['@/components/Page'],resolve)
			//此时component则不需要在第一步import}
           // 把组件按组分块
            component:() => import(/* webpackChunkName: "group-foo" */ './Foo.vue')
如果打包报错,就把
router,routes,route分不清楚
$router : 路由实例
routes : 指router路由实例的routes API,用来配置多个routes路由对象
$route : 当前路由对象
vue-router默认使用hash模式,使用url的hash来模拟一个完整的url
路由对象属性介绍this.$route 注意不是$router
$route.path: 类型string, 对应当前路由的路径,总是解析绝对路径,'/foo/bar'
$route.params: 类型Object ,一个key/value对象,包含动态片段和全匹配片段,如果没有路由,就是一个空对象
$route.query: 类型Object,一个key/value,表示url查询参数,对于路径
/foo?user=1则有$route.query.user==1,如果没有查询参数,则是个空对象$route.name 当前路由的名称,如果有,最好给每个路由对象命名,方便以后编程式导航,不过记住name必须唯一
$route.hash 类型:
string当前路由的 hash 值 (带#) ,如果没有 hash 值,则为空字符串。$route.fullPath 类型:
string完成解析后的 URL,包含查询参数和 hash 的完整路径。$route.matched 类型:
Array<RouteRecord>一个数组,包含当前路由的所有嵌套路径片段的路由记录 。路由记录就是routes配置数组中的对象副本 (还有在children数组)。$route.redirectedFrom 如果存在重定向,即为重定向来源的路由的名字。
别名
//这时,路径'/fxxksky'和'/two-dogs' 都会跳转到A
  routes: [
    { path: '/fxxksky', component: A, alias: '/two-dogs' }
	//当有多个别名时,alias也可以写成数组形式.  alias: ['/two-dogs', 'three-dogs','four-dogs','five-dogs']
  ]
params进行配置
- 一个路径参数使用':'冒号进行标记.
- 当匹配到一个路由时,参数就会被设置到
this.$route.params,可以在每个组件内使用.例如/user/foo在this.$route.params.id就为foo
| 模式 | 匹配路径 | $route.params |
|---|---|---|
| /user/:username | /user/evan | { username: 'evan' } |
| /user/:username/post/:post_id | /user/evan/post/123 | { username: 'evan', post_id: 123 } |
routes:[
   {path:'/user/:shot/foo/:id', component:shotCat}
]

<p>
   <router-link to="/user/shot/foo">/user/shot/foo</router-link>
   	<!--无法匹配到对应路由-->
   <router-link to="/user/shot/cat/foo">/user/shot/cat/foo</router-link>
   	<!--无法匹配到对应路由-->
   <router-link to="/user/foo/foo/foo">/user/foo/foo/foo</router-link>
   	<!--成功匹配,$route.params.shot为foo;$route.params.cat为foo;-->
   <router-link to="/user/shot/foo/cat">/user/shot/foo/cat</router-link>
   	<!--成功匹配,$route.params.shot为shot;$route.params.cat为cat;-->
</p>
<router-view></router-view>
vue路由导航
导航守卫主要用来通过跳转或取消的方式守卫导航
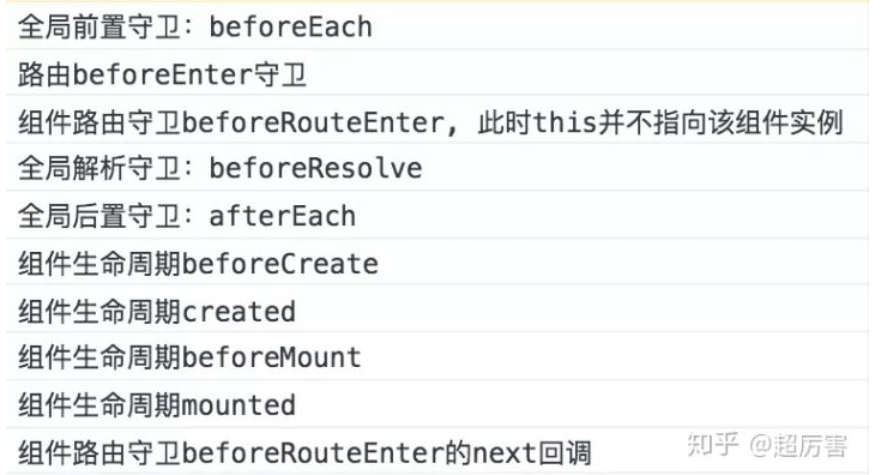
导航守卫分为: 全局的,单个路由独享的,组件内的三种
全局路由钩子:beforeEach(to,from, next)、beforeResolve(to,from, next)、afterEach(to,from);
独享路由钩子:beforeEnter(to,from, next);
组件内路由钩子:beforeRouteEnter(to,from, next)、beforeRouteUpdate(to,from, next)、beforeRouteLeave(to,from, next)
全局的:路由实例上直接操作的钩子函数
全局守卫又分全局前置守卫,全局解析守卫 和 全局后置钩子。
全局前置守卫
在一个导航被触发时调用,守卫异步解析执行,在所有守卫 resolve 前,导航一直处于等待状态。我们可以使用 router.beforeEach((to, from, next) => { //. . .}) 来注册一个全局前置守卫
// 全局路由守卫
router.beforeEach((to, from, next) => {
  console.log('navigation-guards');
  // to: Route: 即将要进入的目标 路由对象
  // from: Route: 当前导航正要离开的路由
  // next: Function: 一定要调用该方法来 resolve 这个钩子。执行效果依赖 next 方法的调用参数。
    	//首先to和from 其实是一个路由对象,所以路由对象的属性都是可以获取到的(具体可以查看官方路由对象的api文档).
	//例如:我想获取获取to的完整路径就是to.path.获取to的子路由to.matched[0].
    //  next();//使用时,千万不能漏写next!!!
	//next()  表示直接进入下一个钩子.
	//next(false)  中断当前导航
	//next('/path路径')或者对象形式next({path:'/path路径'})  跳转到path路由地址
	//next({path:'/shotcat',name:'shotCat',replace:true,query:{logoin:true}...})  这种对象的写法,可以往里面添加很多.router-link 的 to prop 和 router.push 中的选项(具体可以查看api的官方文档)全都是可以添加进去的,再说明下,replace:true表示替换当前路由地址,常用于权限判断后的路由修改.
	//next(error)的用法,(需2.4.0+)
  const nextRoute = ['home', 'good-list', 'good-detail', 'cart', 'profile'];
  let isLogin = global.isLogin;  // 是否登录
  // 未登录状态;当路由到nextRoute指定页时,跳转至login
  if (nextRoute.indexOf(to.name) >= 0) {
    if (!isLogin) {
      console.log('what fuck');
      router.push({ name: 'login' })
    }
  }
  // 已登录状态;当路由到login时,跳转至home
  if (to.name === 'login') {
    if (isLogin) {
      router.push({ name: 'home' });
    }
  }
  next();
});
.catch(()=>{
  //跳转失败页面
  next({ path: '/error', replace: true, query: { back: false }})
})
//如果你想跳转报错后,再回调做点其他的可以使用 router.onError()
router.onError(callback => {
      console.log('出错了!', callback);
    });
全局解析守卫
- 我们可以通过 router.beforeResolve 注册一个全局守卫。使用方法 router.beforeEach 类似,区别是在导航被确认之前,同时在所有组件内守卫和异步路由组件被解析之后,解析守卫就被调用。
全局后置钩子
全局后置钩子和全局前置守卫的区别在于没有 next,因此不会改变导航:router.afterEach((to, from, next) => { //. . .})
路由独享守卫
路由独享的守卫是在路由配置上定义 beforeEnter 的,用法与全局前置守卫一致
 {
 path: '/foo',
 component: Foo,
 beforeEnter: (to, from, next) => {
 // ...
 }
组件内的守卫
//在组件内部进行配置,这里的函数用法也是和beforeEach一毛一样
const Foo = {
  template: `...`,
  beforeRouteEnter (to, from, next) {
    // 在渲染该组件的对应路由被 confirm 前调用
    // 不!能!获取组件实例 `this`
    // 因为当守卫执行前,组件实例还没被创建
  },
  beforeRouteUpdate (to, from, next) {
    // 在当前路由改变,但是该组件被复用时调用
    // 举例来说,对于一个带有动态参数的路径 /foo/:id,在 /foo/1 和 /foo/2 之间跳转的时候,
    // 由于会渲染同样的 Foo 组件,因此组件实例会被复用。而这个钩子就会在这个情况下被调用。
    // 可以访问组件实例 `this`
  },
  beforeRouteLeave (to, from, next) {
    // 导航离开该组件的对应路由时调用
    // 可以访问组件实例 `this`
  }
}

vue-router meta
在路由列表中,每个路由都有一个 meta 元数据字段, 我们可以在这里设置一些自定义信息,供页面组件或者路由钩子函数中使用。
获取meta数据
- $route.meta 获取路由元信息中的数据
- 路由钩子中获取
//全局路由改变前钩子
router.beforeEach((to, from, next) => {
  window.document.title = to.meta.title;
  next();
})
//动态获取
this.$route.meta.title
还有一些太复杂我就不写了
编程式导航的写法
//字符串
this.$router.push('home')

//对象
this.$ruter.push({path:'home'})

//命名路由
this.$router.push({name:'user',params:{userId:2333}})

//带查询参数,变成/register?plan=private
this.$router.push({path:'register',query:{plan:'private'}})
注意:path和params是不能同时生效的 ,否则params会被忽略掉,使用对象写法进行params传参时,要么就是path加冒号:,要么就是像上例中的'命名路由'.通过name和params进行传参.
router.reqlace
- 用push方法,页面1跳转到页面2,你使用浏览器的后退可以回到页面1
- 用replace方法,页面1被替换成页面2,你使用浏览器的后退,此时你回不到页面1,只能回到页面1的前一页,页面0.
- 那什么时候会用到replace呢? 当你不想让用户回退到之前的页面时,常见于权限验证,验证后就不让用户回退到登录页重复验证
<router-link :to="{ name:'shotCat',params:{paramId:'hello'},query:{queryId:'world'}}">helloWorld</router-link>
<!--此时通过name匹配到路由对象shotCat.-->

<router-link :to="{ path:'/shotCat',params:{paramId:'hello'},query:{queryId:'world'}}">helloWorld</router-link>
<!--此时通过path匹配到路由对象shotCat.但是!!!!!此时`paramId`并不能添加到`$route.params`里,只有`queryId`成功添加到`$route.query`-->
{{$route.params}}和{{$route.query}}进行验证
路由嵌套和单组件多视图
嵌套路由:就是父路由嵌套子路由.url上就是/user嵌套两个子路由后就是/user/foo和/uer/bar.用一张图表示就是
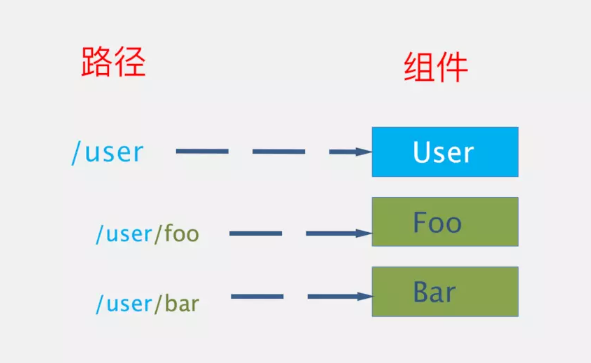
单组件多视图:就是一个组件里有多个视图进行展示.即包含有多个<router-view/>
axios
import axios from 'axios'
import VueAxios from 'vue-axios'
Vue.use(VueAxios,axios)
this.axios.get(api).then((response) => {
  console.log(response.data)
})
vue生命周期
beforeCreate
- el 没有
- data 没有
- 事件没有初始化
created
- el 没有
- data 数据有了
- 事件 也有了
beforeMount
- el 找到了
- data 数据有了
- 事件也有了
mounted
- el:找到了,并且数据渲染进标签了
- dta:数据有了,被监听
- 事件有了被监听了
beforeUpdate
updated
beforeDestory
VueRouter的实现原理:是通过监听a标签的描点值,来动态的显示页面的值
proxyTable
v-model.lazy
同步输出 简称 防抖
v-model.number 规定输出的数字
v-model.trim 去除空格
vue 项目问题
v-if 解决异步传参组件
` <mapBox v-if="mapData" :data="mapData"></mapBox>`

点击搜索的时候

let This=this
this.mapData=false; //重要
this.$http.post('/api/show..',{参数}).then(
response=>this.mapData=response.data;
)
还有一些强制刷新的
$forceUpdate()this.$nextTick(()=>{ }) this.$set()使用$refs调用子组件的方法
<Tree  ref="Tree"></Tree>
let rules = this.$refs.Tree.方法
setTimeout
$set()
组件递归实现多级菜单
父组件
`
  <div>
    <Items :msg="msg"></Items>
  </div>
 data () {
      return {
        msg: [{
          text: 1,
          next: [{
            text: '1-1',
            next: [{
              text: '1-1-1',
              next: [{
                text: '1-1-1-1',
              }],
            }],
          }, {
            text: '1-2', //1-2写在这儿,第二层数据数组中的a[1].text就是‘1-2’
          }],
        }, {
          text: 2,

        }, {
          text: 3,

        }],
      }
    },
    components: {
      Items,

    },
`
子组件
  <ul >
      <li v-for='(a,index) in msg' @click.stop.self='show=!show' :key="index">
        {{a.text}}
        <Items :msg='a.next' v-if='show' ></Items>
      </li>
    </ul>
  export default {
    name:'Items', //这个必须写
    props:['msg'],// 父组件传到子组件的数据
    data(){
      return {
        show:false
      }
    }
  }
使用watch监听路由参数重新获取数据
// 监听,当路由发生变化的时候执行
watch: {
  '$route':'getPath'
},
methods: {
  getPath(){
    console.log(this.$route.path);
  }
}

Vue 为你提供了一种方式来声明“这两个元素是完全独立的——不要复用它们”。只需添加一个具有唯一值的 key 属性
<router-view :key="key"></router-view>

computed: {
  key() {
    return this.$route.name !== undefined? this.$route.name +new Date(): this.$route +new Date()
  }
}
Vue.js 内置的通信手段一般有两种:
-
ref:给元素或组件注册引用信息;
-
$parent/$children:访问父 / 子实例。 -
this.$parent.属性或者方法
this.$children[0].属性或者方法
vue 组件传值provide/inject
以允许一个祖先组件向其所有子孙后代注入一个依赖,不论组件层次有多深,并在起上下游关系成立的时间里始终生效
跟react 上下文特性相似
// A.vue  父组件
export default {
  provide: {
    name: 'Aresn'
  }
}

// B.vue  子组件
export default {
  inject: ['name'],
  mounted () {
    console.log(this.name);  // Aresn
  }
}
实例还暴露了一些有用的实例属性与方法。它们都有前缀 `### ,以便与用户定义的属性区分开
通过$event 访问原始DOM事件
<button @click.self='warn($event)'>点击我</button>
methods:{
    warn(event){
        event.target.innerHTML
    }
}
prevent是拦截默认事件
@click.prevent.self  会阻止所有的点击
@click.self.prevent  只会阻止对元素自身的点击
按键修饰符
@keyup.enter="submit"
.enter
.tab
.delete (捕获“删除”和“退格”键)
.esc
.space
.up
.down
.left
.right
根实例可以通过 $root 属性进行访问
@click.native
监听根元素的原生事件,使用 .native 修饰符
是用来修饰点击组件的 @click.native
使用.native修饰符来操作普通HTML标签是会令事件失效的

父组件
<MyButton @click.native="equire"/>

 components:{
        'MyButton':{
          template:'<button>点我</button>'
        }
      },
   methods:{
        equire(){
          console.log(1);
        }
      }
如何在引用的外部js文件中获取vue页面实例
import houseColumn from '地址'
created(){
    this.houseColumn=houseColumn(this)
}
.stop 阻止事件冒泡
.prevent 阻止事件的默认行为
@submit.prevent='' 提交时间不在重载页面
.once 只有一次
passive
移动端的 onscroll 事件整了一个 .lazy修饰符
@scroll.passive=""
qs
进行传参格式化
slot 插槽的深入理解
父组件
<template>
    <div>
      <child>
        <div slot='zhangsan'>
          {{msg}} <br>
          <ul>
            <li v-for="(i,index) of arr" :key="index">{{i}}</li>
          </ul>
        </div>
      </child>
    </div>
</template>
  export default {
      components:{
        child,
      },
      data(){
        return {
          msg:'111',
          arr:[1,2,3,4,5,6]
        }
      }
子组件
      <slot name='zhangsan'></slot>
作用域插槽
先从子组件触发
<slot :data="data1"></slot>
data(){
    return {
        data1: ['zhangsan','lisi','wanwu','zhaoliu','tianqi','xiaoba']
    }
}
父组件
<template slot-scope="{data}">
          <li v-for="item in data">{{item}}</li>
 </template>
vue更新后生命周期被$nextTick替代
$set
this.$set(this.stu,'gender','male') //添加一个属性
this.stu=Object.assign({},this.stu, { genders: 'female', height: 180 })//添加多个属性
$ attrs 和 $listeners
子触发父亲的方法
v-bind=$attrs   属性(子组件获取父亲绑定子组件的属性)
$listeners  事件  绑定所有的方法(组组建获取父亲的绑定子组件的方法)
v-on=$listeners
组件的通信
props emit v-bind=
$attrsv-on="$listeners"$parent
$child
$refs
全局vue
npm install -g @vue/cli-service-global
vue serve  文件
异步加载
defer  有序加载js    async  异步  无序的
//webpack  懒加载
preload    prefetch
路由钩子函数
当组件切换时
会触发离开的钩子 beforeRouteLeave()
当进入新的页面里,组件内部会触发一个 beforeRouterEnter
当属性变化时  并没有重新加载组件  会触发 beforeRouteUpdate

组件渲染完成后, 会调用当前beforeRouteEnter