深入理解NIO(二)—— Tomcat中对NIO的应用
老哥行行好,转载和我说一声好吗,我不介意转载的,但是请把原文链接贴大点好吗
Tomcat大致架构
先贴两张图大致看一眼Tomcat的架构
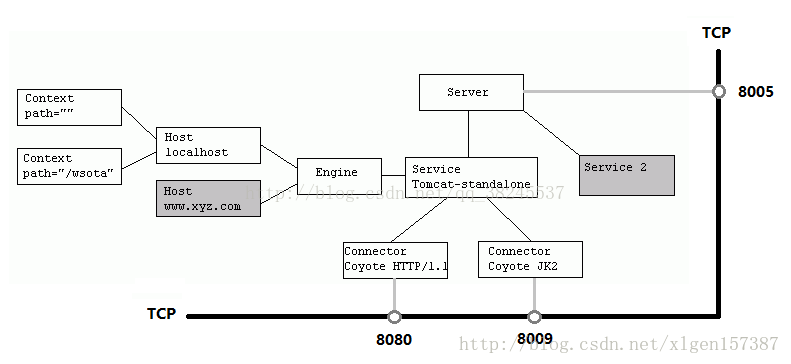

- Tomcat中只有一个Server,一个Server可以有多个Service,一个Service可以有多个Connector和一个Container;
- Service 是对外提供服务的;
- Connector用于接受请求并将请求封装成Request和Response来具体处理;
- Container用于封装和管理Servlet,以及具体处理request请求;
接下来我们只解析Connector部分的源码,因为它底层是NIO实现的
我们先启动一个Tomcat试试:
Tomcat tomcat = new Tomcat();

// 1.先分析这个
Connector connector = new Connector("HTTP/1.1");
connector.setPort(8080);
tomcat.setConnector(connector);

// 2.再分析这个
tomcat.start();
tomcat.getServer().await();
Connector初始化
在 Tomcat 中,使用 Connector 来处理连接,一个 Tomcat 可以配置多个 Connector,分别用于监听不同端口,或处理不同协议。
在 Connector 的构造方法中,我们可以传 HTTP/1.1 或 AJP/1.3 用于指定协议,也可以传入相应的协议处理类,org.apache.coyote.http11.Http11NioProtocol:对应非阻塞 IO。
public Connector(String protocol) {
    . . . . . . .
    ProtocolHandler p = null;
    try {
        // 前面我删了一部分代码,这里的protocolHandlerClassName其实就是传入的参数protocol
        // 所以下面这段代码会利用反射构造了一个Http11NioProtocol对象作为ProtocolHandler
        Class<?> clazz = Class.forName(protocolHandlerClassName);
        p = (ProtocolHandler) clazz.getConstructor().newInstance();
    } catch (Exception e) {
        log.error(sm.getString(
                "coyoteConnector.protocolHandlerInstantiationFailed"), e);
    } finally {
        this.protocolHandler = p;
    }
}
Connector就是使用ProtocolHandler来处理请求的,不同的ProtocolHandler代表不同的连接类型,其中ProtocolHandler包含了三个部件:Endpoint、Processor、Adapter。
下面是Http11NioProtocol类的构造方法,里面构造了一个NioEndpoint对象
public Http11NioProtocol() {
    super(new NioEndpoint());
}
当然这里只是构造了NioEndpoint,还没有用它去绑定某个端口,也就是还没开始初始化
在设置端口 connector.setPort(8080); 并调用 start() 之后,才正式开始绑定端口
start()
// Tomcat
public void start() throws LifecycleException {
    getServer();
    // 从这里进去
    server.start();
}

// LifecycleBase
public final synchronized void start() throws LifecycleException {
    // 这里省略其他代码,我们直接进到第173行的init方法
    if (state.equals(LifecycleState.NEW)) {
        init();
    }
    // 第183行,一会的第4小节我们会分析到
    startInternal();
}

// 还是LifecycleBase
public final synchronized void init() throws LifecycleException {
    // 第136行
    initInternal();
}

// 进到Connector中
protected void initInternal() throws LifecycleException {
    // 第932行有这样一行代码,它调用了AbstractProtocol的初始化init()方法
    protocolHandler.init();
}
// AbstractProtocol
public void init() throws Exception {
    ...
    String endpointName = getName();
    endpoint.setName(endpointName.substring(1, endpointName.length()-1));
    endpoint.setDomain(domain);
    // endpoint 的 name=http-nio-8089,domain=Tomcat
    endpoint.init();
}

// AbstractEndpoint
public final void init() throws Exception {
    if (bindOnInit) {
        bind(); // 这里对应的当然是子类 NioEndpoint 的 bind() 方法
        bindState = BindState.BOUND_ON_INIT;
    }
    ...
}
接下来终于进入正题了,也就是 NioEndpoint的绑定端口方法了
Endpoint
虽然Endpoint有多种,但是这里我们只讲NioEndpoint,Tomcat 使用不同的 Endpoint 来处理不同的协议请求
bind()
追随着Tomcat的start方法中的init()初始化部分,我们来到了属于NioEndpoint的init() 方法,也就是bind() 方法
// NioEndpoint
public void bind() throws Exception {
    // initServerSocket(); 原代码是这行,我们 “内联” 过来一起说

    // 开启 ServerSocketChannel
    serverSock = ServerSocketChannel.open();
    socketProperties.setProperties(serverSock.socket());

    // getPort() 会返回我们最开始设置的 8080,得到我们的 address 是 0.0.0.0:8080
    InetSocketAddress addr = (getAddress()!=null?new InetSocketAddress(getAddress(),getPort()):new InetSocketAddress(getPort()));

    // ServerSocketChannel 绑定地址、端口,
    // 第二个参数 backlog 默认为 100,超过 100 的时候,新连接会被拒绝(不过源码注释也说了,这个值的真实语义取决于具体实现)
    serverSock.socket().bind(addr,getAcceptCount());

    // ※※※ 设置 ServerSocketChannel 为阻塞模式 ※※※
    serverSock.configureBlocking(true);

    // 设置 acceptor 和 poller 的数量,至于它们是什么角色,待会说
    // acceptorThreadCount 默认为 1
    if (acceptorThreadCount == 0) {
        // FIXME: Doesn't seem to work that well with multiple accept threads
        // 作者想表达的意思应该是:使用多个 acceptor 线程并不见得性能会更好
        acceptorThreadCount = 1;
    }

    // poller 线程数,默认值定义如下,所以在多核模式下,默认为 2
    // pollerThreadCount = Math.min(2,Runtime.getRuntime().availableProcessors());
    if (pollerThreadCount <= 0) {
        pollerThreadCount = 1;
    }

    //
    setStopLatch(new CountDownLatch(pollerThreadCount));

    // 初始化 ssl,我们忽略 ssl
    initialiseSsl();

    // 打开 NioSelectorPool,先忽略它
    selectorPool.open();
}
- ServerSocketChannel 已经打开,并且绑定要了之前指定的 8080 端口,设置成了阻塞模式。
- 设置了 acceptor 的线程数为 1
- 设置了 poller 的线程数,单核 CPU 为 1,多核为 2
到这里我们就正式 init() 结束了,接下来我们就该分析刚刚提到的 startInternal(); 方法了
// LifecycleBase
public final synchronized void start() throws LifecycleException {
    // 这里省略其他代码,我们直接进到第173行的init方法
    if (state.equals(LifecycleState.NEW)) {
        init();
    }
    // 第183行,一会的第4小节我们会分析到
    startInternal();
}

// Connector
protected void startInternal() throws LifecycleException {
    // 第957行
    protocolHandler.start();
}

// AbstractProtocol
public void start() throws Exception {
    ...
    // 调用 endpoint 的 start 方法
    endpoint.start();
}

// AbstractEndpoint
public final void start() throws Exception {
    // 按照我们的流程,刚刚 init 的时候,已经把 bindState 改为 BindState.BOUND_ON_INIT 了,
    // 所以下面的 if 分支我们就不进去了
    if (bindState == BindState.UNBOUND) {
        bind();
        bindState = BindState.BOUND_ON_START;
    }
    // 往里看 NioEndpoint 的实现
    startInternal();
}
startInternal
// NioEndpoint
public void startInternal() throws Exception {

    if (!running) {
        running = true;
        paused = false;

        // 以下几个是缓存用的,之后我们也会看到很多这样的代码,为了减少 new 很多对象出来
        processorCache = new SynchronizedStack<>(SynchronizedStack.DEFAULT_SIZE,
                socketProperties.getProcessorCache());
        eventCache = new SynchronizedStack<>(SynchronizedStack.DEFAULT_SIZE,
                        socketProperties.getEventCache());
        nioChannels = new SynchronizedStack<>(SynchronizedStack.DEFAULT_SIZE,
                socketProperties.getBufferPool());

        // 创建【工作线程池】,Tomcat 自己包装了一下 ThreadPoolExecutor,
        // 1. 为了在创建线程池以后,先启动 corePoolSize 个线程
        // 2. 自己管理线程池的增长方式(默认 corePoolSize 10, maxPoolSize 200),keepAliveTime是60秒,workQueue是LinkBlockingQueue
        if ( getExecutor() == null ) {
            createExecutor();
        }

        // 设置一个栅栏(tomcat 自定义了类 LimitLatch),控制最大的连接数,默认是 10000
        initializeConnectionLatch();

        // 开启 poller 线程
        // 还记得之前 init 的时候,默认地设置了 poller 的数量为 2,所以这里启动 2 个 poller 线程
        pollers = new Poller[getPollerThreadCount()];
        for (int i=0; i<pollers.length; i++) {
            pollers[i] = new Poller();
            Thread pollerThread = new Thread(pollers[i], getName() + "-ClientPoller-"+i);
            pollerThread.setPriority(threadPriority);
            pollerThread.setDaemon(true);
            pollerThread.start();
        }

        // 开启 acceptor 线程,和开启 poller 线程组差不多。
        // init 的时候,默认地,acceptor 的线程数是 1
        startAcceptorThreads();
    }
}
- Tomcat自己管理线程池的增长方式(默认 corePoolSize 10, maxPoolSize 200),keepAliveTime是60秒,workQueue是LinkBlockingQueue
- 该创建的工作线程池、 poller 线程组、acceptor 线程组这里都创建完毕
- 设置一个栅栏(tomcat 自定义了类 LimitLatch),控制最大的连接数,默认是 10000
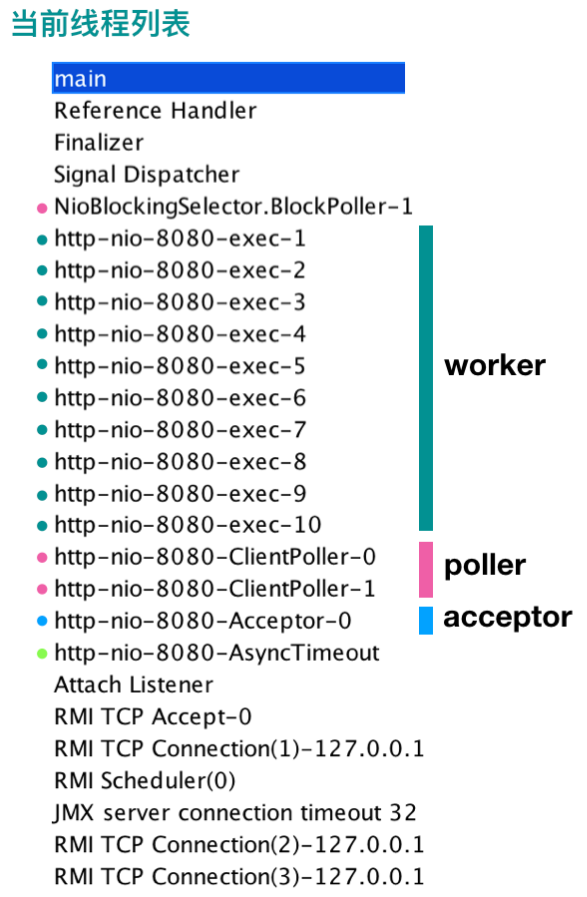
线程模型图
在开始讲这几个线程之前,我们先看一下这张线程模型图,有个大概的印象。
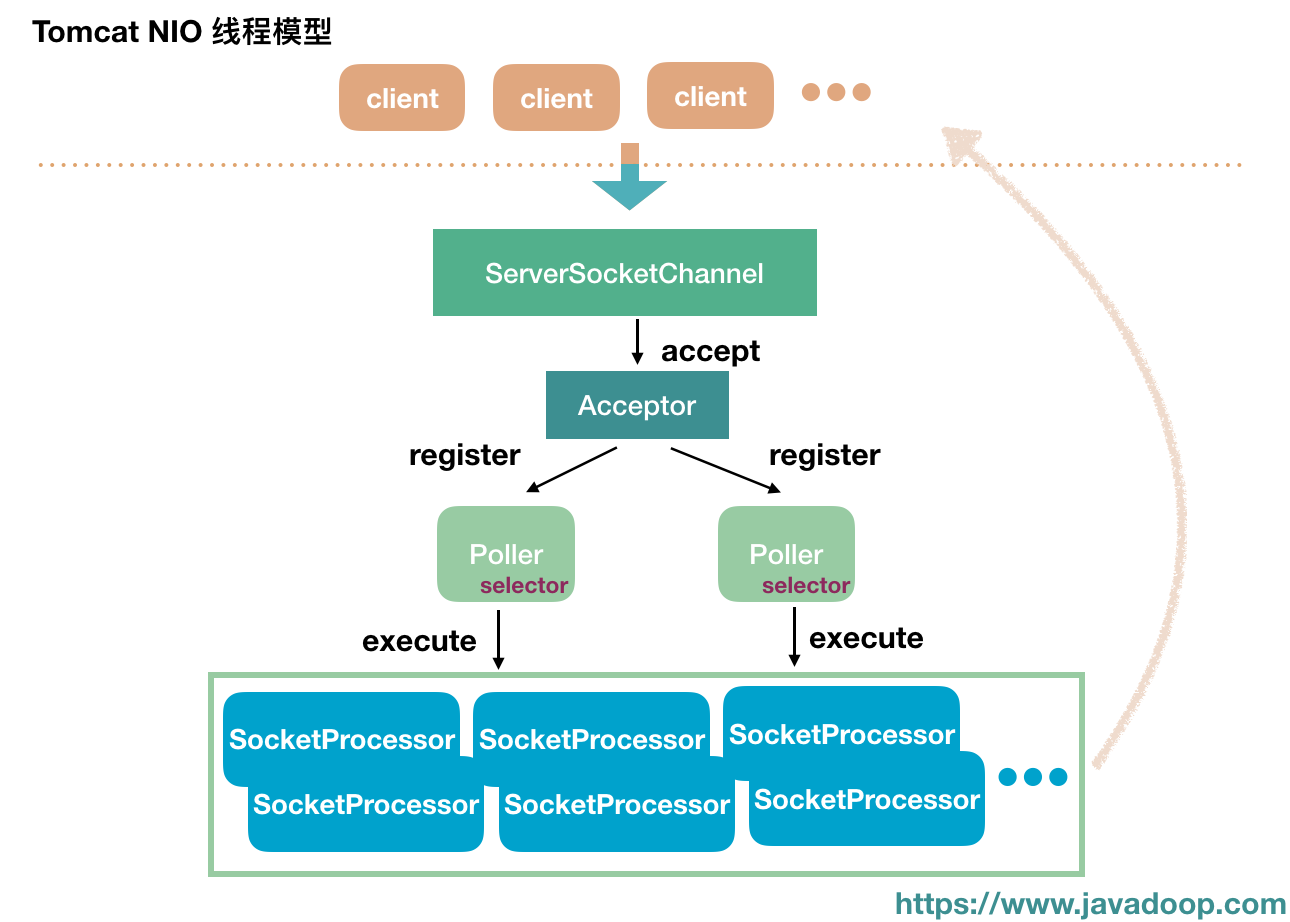
Acceptor
它的结构非常简单,在构造函数中,已经把 endpoint 传进来了,此外就只有 threadName 和 state 两个简单的属性。
private final AbstractEndpoint<?,U> endpoint;
private String threadName;
protected volatile AcceptorState state = AcceptorState.NEW;

public Acceptor(AbstractEndpoint<?,U> endpoint) {
    this.endpoint = endpoint;
}
threadName 就是一个线程名字而已,Acceptor 的状态 state 主要是随着 endpoint 来的。
public enum AcceptorState {
    NEW, RUNNING, PAUSED, ENDED
}
接下来我们直接来看 acceptor 的 run 方法吧:
run()
public void run() {

    int errorDelay = 0;

    // 只要 endpoint 处于 running,这里就一直循环
    while (endpoint.isRunning()) {

        // 如果 endpoint 处于 pause 状态,这边 Acceptor 用一个 while 循环将自己也挂起
        while (endpoint.isPaused() && endpoint.isRunning()) {
            state = AcceptorState.PAUSED;
            try {
                Thread.sleep(50);
            } catch (InterruptedException e) {
            }
        }
        // endpoint 结束了,Acceptor 自然也要结束嘛
        if (!endpoint.isRunning()) {
            break;
        }
        state = AcceptorState.RUNNING;

        try {
            // 如果此时达到了最大连接数(之前我们说过,默认是10000),就等待
            endpoint.countUpOrAwaitConnection();

            if (endpoint.isPaused()) {
                continue;
            }

            U socket = null;
            try {
                // 这里就是接收下一个进来的 SocketChannel
                // 之前我们设置了 ServerSocketChannel 为阻塞模式,所以这边的 accept 是阻塞的
                // 这里的实现是return serverSock.accept();  返回的是一个SocketChannel
                socket = endpoint.serverSocketAccept();
            } catch (Exception ioe) {
                endpoint.countDownConnection();
                if (endpoint.isRunning()) {
                    errorDelay = handleExceptionWithDelay(errorDelay);
                    throw ioe;
                } else {
                    break;
                }
            }
            // accept 成功,将 errorDelay 设置为 0
            errorDelay = 0;

            if (endpoint.isRunning() && !endpoint.isPaused()) {
                // setSocketOptions() 是这里的关键方法,也就是说前面千辛万苦都是为了能到这里进行处理
                if (!endpoint.setSocketOptions(socket)) {
                    // 如果上面的方法返回 false,关闭 SocketChannel
                    endpoint.closeSocket(socket);
                }
            } else {
                // 由于 endpoint 不 running 了,或者处于 pause 了,将此 SocketChannel 关闭
                endpoint.destroySocket(socket);
            }
        } catch (Throwable t) {
            ExceptionUtils.handleThrowable(t);
            String msg = sm.getString("endpoint.accept.fail");
            if (t instanceof Error) {
                Error e = (Error) t;
                if (e.getError() == 233) {
                    log.warn(msg, t);
                } else {
                    log.error(msg, t);
                }
            } else {
                    log.error(msg, t);
            }
        }
    }
    state = AcceptorState.ENDED;
}
- 大家应该发现了,Acceptor 绕来绕去,都是在调用 NioEndpoint 的方法
- acceptor 启动以后就开始循环调用 ServerSocketChannel 的 accept() 方法获取新的连接,然后调用 endpoint.setSocketOptions(socket) 处理新的连接,之后再进入循环 accept 下一个连接。
setSocketOptions
protected boolean setSocketOptions(SocketChannel socket) {
    try {
        // 设置该 SocketChannel 为非阻塞模式
        socket.configureBlocking(false);
        Socket sock = socket.socket();
        // 设置 socket 的一些属性
        socketProperties.setProperties(sock);

        // 还记得 startInternal 的时候,说过了 nioChannels 是缓存用的。
        // 限于篇幅,这里的 NioChannel 就不展开了,它包括了 socket 和 buffer
        NioChannel channel = nioChannels.pop();
        if (channel == null) {
            // 主要是创建读和写的两个 buffer,默认地,读和写 buffer 都是 8192 字节,8k(名字叫handler哦handler,是不是突然就懂了呢,写出见名知意的代码是真的很重要)
            SocketBufferHandler bufhandler = new SocketBufferHandler(
                    socketProperties.getAppReadBufSize(),
                    socketProperties.getAppWriteBufSize(),
                    socketProperties.getDirectBuffer());
            if (isSSLEnabled()) {
                channel = new SecureNioChannel(socket, bufhandler, selectorPool, this);
            } else {
                channel = new NioChannel(socket, bufhandler);
            }
        } else {
            channel.setIOChannel(socket);
            channel.reset();
        }

        // getPoller0() 会选取所有 poller 中的一个 poller
        getPoller0().register(channel);
    } catch (Throwable t) {
        ExceptionUtils.handleThrowable(t);
        try {
            log.error("",t);
        } catch (Throwable tt) {
            ExceptionUtils.handleThrowable(tt);
        }
        // Tell to close the socket
        return false;
    }
    return true;
}
- 这里创建了一个包着SocketChannel和BufferHandler的NioChannel
- 之后往 poller 中注册了这个 NioChannel 实例
Poller
之前我们看到 acceptor 将一个 NioChannel 实例 register 到了一个 poller 中。在看 register 方法之前,我们需要先对 poller 要有个简单的认识。(虽然你有打开源码就会知道,但我还是提一下,这里的Poller其实还是NioEnpoint的内部类哦!)
public class Poller implements Runnable {

    public Poller() throws IOException {
        // 每个 poller 开启一个 Selector
        this.selector = Selector.open();
    }
    private Selector selector;
    // events 队列,此类的核心
    private final SynchronizedQueue<PollerEvent> events =
            new SynchronizedQueue<>();

    private volatile boolean close = false;
    private long nextExpiration = 0;// 这个值后面有用,记住它的初始值为 0
    private AtomicLong wakeupCounter = new AtomicLong(0);

    private volatile int keyCount = 0;

    ...
}
每个 poller 关联了一个 Selector。
register()
回来看看刚刚Acceptor类中把NioChannel注册到Poller中的register方法
public void register(final NioChannel socket) {
    socket.setPoller(this);
    NioSocketWrapper ka = new NioSocketWrapper(socket, NioEndpoint.this);
    socket.setSocketWrapper(ka);
    ka.setPoller(this);
    ka.setReadTimeout(getConnectionTimeout());
    ka.setWriteTimeout(getConnectionTimeout());
    ka.setKeepAliveLeft(NioEndpoint.this.getMaxKeepAliveRequests());
    ka.setSecure(isSSLEnabled());

    PollerEvent r = eventCache.pop();
    ka.interestOps(SelectionKey.OP_READ);//this is what OP_REGISTER turns into.

    // 注意第三个参数值 OP_REGISTER
    if ( r==null) r = new PollerEvent(socket,ka,OP_REGISTER);
    else r.reset(socket,ka,OP_REGISTER);

    // 添加 event 到 poller 中
    addEvent(r);
}
这里将这个 socket(包含 socket 和 buffer 的 NioChannel 实例) 包装为一个 PollerEvent,然后添加到 events 队列中
将NioChannel注册进Poller之后,Acceptor的任务完成,之后的事情都交给这个作为Selector的Poller线程了
之后我们就来看看Poller线程是怎么工作的吧:
Poller.run ()
public void run() {
    while (true) {

        boolean hasEvents = false;

        try {
            if (!close) {
                // 执行 events 队列中每个 event 的 run() 方法
                // events() 方法比较简单,就是取出当前队列中的 PollerEvent 对象,逐个执行 event.run() 方法。
                hasEvents = events();
                // wakeupCounter 的初始值为 0,这里设置为 -1
                if (wakeupCounter.getAndSet(-1) > 0) {
                    keyCount = selector.selectNow();
                } else {
                    // timeout 默认值 1 秒
                    keyCount = selector.select(selectorTimeout);
                }
                wakeupCounter.set(0);
            }
            // 篇幅所限,我们就不说 close 的情况了
            if (close) {
                events();
                timeout(0, false);
                try {
                    selector.close();
                } catch (IOException ioe) {
                    log.error(sm.getString("endpoint.nio.selectorCloseFail"), ioe);
                }
                break;
            }
        } catch (Throwable x) {
            ExceptionUtils.handleThrowable(x);
            log.error("",x);
            continue;
        }
        // 这里没什么好说的,顶多就再执行一次 events() 方法
        if ( keyCount == 0 ) hasEvents = (hasEvents | events());

        // 如果刚刚 select 有返回 ready keys,进行处理
        Iterator<SelectionKey> iterator =
            keyCount > 0 ? selector.selectedKeys().iterator() : null;
        while (iterator != null && iterator.hasNext()) {
            SelectionKey sk = iterator.next();
            NioSocketWrapper attachment = (NioSocketWrapper)sk.attachment();
            if (attachment == null) {
                iterator.remove();
            } else {
                iterator.remove();
                // ※※※※※ 处理 ready key ※※※※※
                processKey(sk, attachment);
            }
        }//while

        //process timeouts
        timeout(keyCount,hasEvents);
    }//while

    getStopLatch().countDown();
}
- 大概就是调用 events() 方法调用每个刚刚注册到events队列中的PollerEvent类的run方法
- 处理注册到 Selector 上的 ready key
events()方法比较简单,就是调用每个刚刚注册到events队列中的PollerEvent类的run方法,所以这里就不再分析
我们直接来看PollerEvent类的run方法(注意,在调用PollerEvent类的run方法之前,虽然NioChannel已经注册给Poller,但是并没有真的注册到Selector里面)
PollerEvent.run()
public void run() {
    // 对于新来的连接,前面我们说过,interestOps == OP_REGISTER
    if (interestOps == OP_REGISTER) {
        try {
            // 将这个新连接 SocketChannel 注册到该 poller 的 Selector 中,
            // 设置监听 OP_READ 事件,
            // 将 socketWrapper 设置为 attachment 进行传递(这个对象可是什么鬼都有,往上看就知道了)
            socket.getIOChannel().register(
                    socket.getPoller().getSelector(), SelectionKey.OP_READ, socketWrapper);
        } catch (Exception x) {
            log.error(sm.getString("endpoint.nio.registerFail"), x);
        }
    } else {
        /* else 这块不介绍*/
    }
}
SocketChannel 注册到了 Poller 内部的 Selector 中,监听 OP_READ 事件
刚刚Poller方法的run中,除了调用events()以外,它的主要职责就是对是 readable 状态的SocketChannel调用processKey方法
所以接下来我们来看看processKey方法
processKey()
protected void processKey(SelectionKey sk, NioSocketWrapper attachment) {
    try {
        if ( close ) {
            cancelledKey(sk);
        } else if ( sk.isValid() && attachment != null ) {
            if (sk.isReadable() || sk.isWritable() ) {
                // 忽略 sendfile
                if ( attachment.getSendfileData() != null ) {
                    processSendfile(sk,attachment, false);
                } else {
                    // unregister 相应的 interest set,
                    // 如接下来是处理 SocketChannel 进来的数据,那么就不再监听该 channel 的 OP_READ 事件
                    unreg(sk, attachment, sk.readyOps());
                    boolean closeSocket = false;
                    // Read goes before write
                    if (sk.isReadable()) {
                        // 处理读
                        if (!processSocket(attachment, SocketEvent.OPEN_READ, true)) {
                            closeSocket = true;
                        }
                    }
                    if (!closeSocket && sk.isWritable()) {
                        // 处理写
                        if (!processSocket(attachment, SocketEvent.OPEN_WRITE, true)) {
                            closeSocket = true;
                        }
                    }
                    if (closeSocket) {
                        cancelledKey(sk);
                    }
                }
            }
        } else {
            cancelledKey(sk);
        }
    } catch ( CancelledKeyException ckx ) {
        cancelledKey(sk);
    } catch (Throwable t) {
        ExceptionUtils.handleThrowable(t);
        log.error("",t);
    }
}
public boolean processSocket(SocketWrapperBase<S> socketWrapper,
        SocketEvent event, boolean dispatch) {
    try {
        if (socketWrapper == null) {
            return false;
        }
        SocketProcessorBase<S> sc = processorCache.pop();
        if (sc == null) {
            // 创建一个 SocketProcessorBase 的实例
            sc = createSocketProcessor(socketWrapper, event);
        } else {
            sc.reset(socketWrapper, event);
        }
        Executor executor = getExecutor();
        if (dispatch && executor != null) {
            // 将任务放到之前建立的 worker 线程池中执行
            executor.execute(sc);
        } else {
            sc.run(); // ps: 如果 dispatch 为 false,那么就当前线程自己执行
        }
    } catch (RejectedExecutionException ree) {
        getLog().warn(sm.getString("endpoint.executor.fail", socketWrapper) , ree);
        return false;
    } catch (Throwable t) {
        ExceptionUtils.handleThrowable(t);
        getLog().error(sm.getString("endpoint.process.fail"), t);
        return false;
    }
    return true;
}
上面两段代码,大概是创建了一个SocketProcessorBase类后交给之前的worker线程池中去执行
本来想分析一下SocketProcessorBase类的run方法的,看了一下,好长,算了,主题也不是Tomcat源码分析,只是看一下其中NIO的应用而已,就到此为止吧。
PS:管 ™ 的找不找得到工作,管 ™ 的面试会不会问,老子的原则是:淦 ™ 的源码看爆,水文水爆。

下一篇:NIO原理及部分源码的解析
参考资料:
https://javadoop.com/post/tomcat-nio 大量搬运自此文章
https://blog.csdn.net/qq_38245537/article/details/79009448 参考图片