一、vgg16介绍
VGGNet是牛津大学视觉几何组(Visual Geometry Group)提出的模型,该模型在2014ImageNet图像分类与定位挑战赛 ILSVRC-2014中取得在分类任务第二,定位任务第一的优异成绩。VGGNet突出的贡献是证明了很小的卷积,通过增加网络深度可以有效提高性能。
VGGNet结构
VGGNet模型有A-E五种结构网络,深度分别为11,11,13,16,19.实际使用的网络包括VGG16和VGG19.本篇文章主要介绍VGG16,并分享VGG16的Keras实现。下图为VGGNet的结构说明。
 VGGNet架构图
从图中可以看出VGGNet的一个特点就是简单,通过对卷积的堆叠,在卷积之后进行pooling处理构成一个block,共5个block.
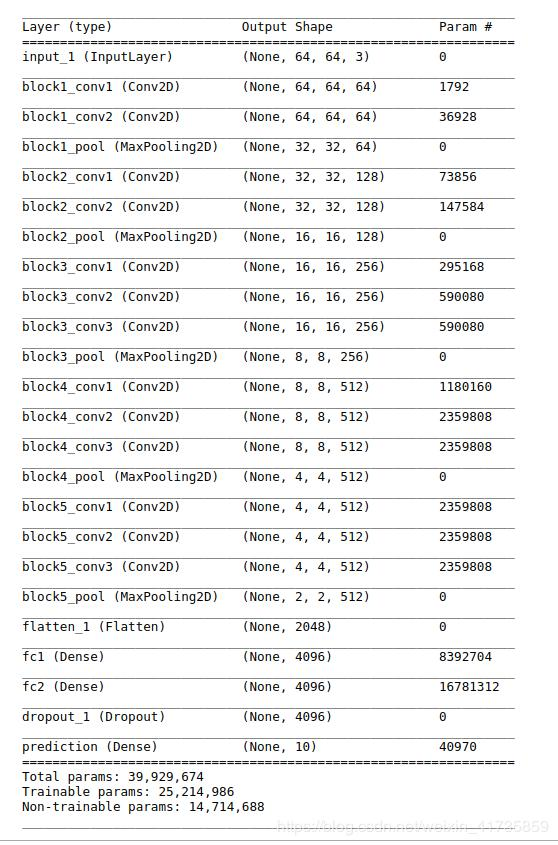
通过对上述的分析,VGG16共包含:
13个卷积层,用conv3-xxx表示;
5个池化层,用maxpool表示;
3个全连接层,用FC-xxx表示。
由于VGG16模型中只有13个卷积层和3个全连接层能产生权重参数,故VGG16的16来自于13+3。
VGG的优缺点
优点:
VGG16结构简单,其实VGGNet结构都简单,通过使用3x3大小的卷积核和最大池化层2x2;
通过实验展示了可以通过加深网络来提升模型性能。
缺点:
网络参数多,占用空间大。
vgg16详细结构:
二、实例:
Keras实现VGG16


import numpy as np
import warnings

from keras.models import Model
from keras.layers import Flatten
from keras.layers import Dense
from keras.layers import Input
from keras.layers import Conv2D
from keras.layers import MaxPooling2D
from keras.layers import GlobalMaxPooling2D
from keras.layers import GlobalAveragePooling2D
from keras.preprocessing import image
from keras.utils import layer_utils
from keras import backend as K
from keras.applications.imagenet_utils import decode_predictions
from keras.applications.imagenet_utils import preprocess_input
from keras_applications.imagenet_utils import _obtain_input_shape
from keras.engine.topology import get_source_inputs
实例化VGG16架构:
# 实例化VGG16架构
def VGG16(include_top=True, weights='imagenet',
          input_tensor=None, input_shape=None,
          pooling=None,
          classes=1000):
    """
    参数:
    :param include_top:
    是否在网络顶部包含3个全连接层
    :param weights:
    权重,随机初始化或者使用已在ImageNet上预训练的权重
    :param input_tensor:
    可选的Keras张量,input_tensor是layers.Input()的输出,
    其作为模型的图像输入
    :param input_shape:可选的shape tuple
    只有在include_top为False,才需要指定input_shape.
    输入的形状必须是带有channels_last数据格式如(224,224,3),
    或带有channels_first数据格式如(3,224,224).
    input_shape必须有3个输入通道,宽度和高度不应小于48.如(200,200,3)就是一个有效值
    :param pooling:池化模式
    当include_top为False时,
     pooling为None表示模型的输出僵尸最后一个卷积层以4D张量输出;
     pooling为avg表示全局均值池化将应用于最后一个卷积的输出,即模型的输出将是2D张量;
     pooling为max表示将使用全局最大池化。
    :param classes:图像分类的类数,可选
    只有在include_top为True时才指定,
    :return:
    """
    if weights not in {'imagenet', None}:
        raise ValueError('The `weights` argument should be either '
                         '`None` (random initialization) or `imagenet` '
                         '(pre-training on ImageNet).')

    if weights == 'imagenet' and include_top and classes != 1000:
        raise ValueError('If using `weights` as imagenet with `include_top`'
                         ' as true, `classes` should be 1000')
    # 确定正确的输入形状
    input_shape = _obtain_input_shape(input_shape,
                                      default_size=224,
                                      min_size=48,
                                      data_format=K.image_data_format(),
                                      require_flatten=include_top)

    if input_tensor is None:
        img_input = Input(shape=input_shape)
    else:
        if not K.is_keras_tensor(input_tensor):
            img_input = Input(tensor=input_tensor, shape=input_shape)
        else:
            img_input = input_tensor
    # Block 1
    x = Conv2D(64, (3, 3), activation='relu', padding='same', name='block1_conv1')(img_input)
    x = Conv2D(64, (3, 3), activation='relu', padding='same', name='block1_conv2')(x)
    x = MaxPooling2D((2, 2), strides=(2, 2), name='block1_pool')(x)

    # Block 2
    x = Conv2D(128, (3, 3), activation='relu', padding='same', name='block2_conv1')(x)
    x = Conv2D(128, (3, 3), activation='relu', padding='same', name='block2_conv2')(x)
    x = MaxPooling2D((2, 2), strides=(2, 2), name='block2_pool')(x)

    # Block 3
    x = Conv2D(256, (3, 3), activation='relu', padding='same', name='block3_conv1')(x)
    x = Conv2D(256, (3, 3), activation='relu', padding='same', name='block3_conv2')(x)
    x = Conv2D(256, (3, 3), activation='relu', padding='same', name='block3_conv3')(x)
    x = MaxPooling2D((2, 2), strides=(2, 2), name='block3_pool')(x)

    # Block 4
    x = Conv2D(512, (3, 3), activation='relu', padding='same', name='block4_conv1')(x)
    x = Conv2D(512, (3, 3), activation='relu', padding='same', name='block4_conv2')(x)
    x = Conv2D(512, (3, 3), activation='relu', padding='same', name='block4_conv3')(x)
    x = MaxPooling2D((2, 2), strides=(2, 2), name='block4_pool')(x)

    # Block 5
    x = Conv2D(512, (3, 3), activation='relu', padding='same', name='block5_conv1')(x)
    x = Conv2D(512, (3, 3), activation='relu', padding='same', name='block5_conv2')(x)
    x = Conv2D(512, (3, 3), activation='relu', padding='same', name='block5_conv3')(x)
    x = MaxPooling2D((2, 2), strides=(2, 2), name='block5_pool')(x)

    #
    if include_top:
        # 分类 block
        x = Flatten(name='flatten')(x)
        x = Dense(4096, activation='relu', name='fc1')(x)
        x = Dense(4096, activation='relu', name='fc2')(x)
        x = Dense(classes, activation='softmax', name='predictions')(x)
    else:
        # 当 include_top为False时,设置pooling
        if pooling == 'avg':
            x = GlobalAveragePooling2D()(x)
        elif pooling == 'max':
            x = GlobalMaxPooling2D()(x)

    # 确保模型考虑了所有的input_tensor
    if input_tensor is not None:
        inputs = get_source_inputs(input_tensor)
    else:
        inputs = img_input
    # 创建模型.
    model = Model(inputs, x, name='vgg16')

    # 加载权重
    if weights == 'imagenet':
        if include_top:
            weights_path ="vgg16_weights_tf_dim_ordering_tf_kernels.h5"
            #weights_path = get_file('vgg16_weights_tf_dim_ordering_tf_kernels.h5',WEIGHTS_PATH,cache_subdir='model')
        else:
            weights_path = "vgg16_weights_tf_dim_ordering_tf_kernels_notop.h5"
            #weights_path = get_file('vgg16_weights_tf_dim_ordering_tf_kernels_notop.h5',WEIGHTS_PATH_NO_TOP,cache_subdir='model')
        model.load_weights(weights_path)
        if K.backend() == 'theano':
            layer_utils.convert_all_kernels_in_model(model)

        if K.image_data_format() == 'channels_first':
            if include_top:
                maxpool = model.get_layer(name='block5_pool')
                shape = maxpool.output_shape[1:]
                dense = model.get_layer(name='fc1')
                layer_utils.convert_dense_weights_data_format(dense, shape, 'channels_first')

            if K.backend() == 'tensorflow':
                warnings.warn('You are using the TensorFlow backend, yet you '
                              'are using the Theano '
                              'image data format convention '
                              '(`image_data_format="channels_first"`). '
                              'For best performance, set '
                              '`image_data_format="channels_last"` in '
                              'your Keras config '
                              'at ~/.keras/keras.json.')
    return model
定义绘图工具:
import matplotlib.pyplot as plt
def percent(value):
    return '%.2f%%' % (value * 100)

def show_plot(preds):
    # 取得前五個最可能的類別及機率
    pred = decode_predictions(preds, top=5)[0]

    # 整理预测结果,value
    values = []
    bar_label = []
    for element in pred:
        values.append(element[2])
        bar_label.append(element[1])

    # 绘图并保存
    fig = plt.figure(u"Top-5 预测结果")
    ax = fig.add_subplot(111)
    ax.bar(range(len(values)), values, tick_label=bar_label, width=0.5, fc='g')
    ax.set_ylabel(u'probability')
    ax.set_title(u'Top-5')
    for a, b in zip(range(len(values)), values):
        ax.text(a, b + 0.0005, percent(b), ha='center', va='bottom', fontsize=7)

    fig = plt.gcf()
    plt.show()
测试:
model = VGG16(include_top=True, weights='imagenet')
img_path = 'cat.jpg'
# 图片尺寸变化shape->(224,224,3)
img = image.load_img(img_path, target_size=(224, 224))
x = image.img_to_array(img)
x = np.expand_dims(x, axis=0)
x = preprocess_input(x)
print('输入图片大小:', x.shape)
# 预测
preds = model.predict(x)
print('预测值:', decode_predictions(preds))
模型下载:
https://github.com/fchollet/deep-learning-models/releases/download/v0.1/vgg16_weights_tf_dim_ordering_tf_kernels.h5
https://github.com/fchollet/deep-learning-models/releases/download/v0.1/vgg16_weights_tf_dim_ordering_tf_kernels_notop.h5
参考: https://github.com/handsomeboy/vgg16
https://github.com/fchollet/deep-learning-models/blob/master/vgg16.py
参数说明
from keras.applications.vgg16 import VGG16

model_vgg = VGG16(include_top=False, weights='imagenet', input_shape=(ishape,ishape, 3))
参数:
- include_top: boolean (True or False)
是否包含最上层的全连接层. 因为VGGNET最后有三个全连接层, 因此,这个选项表示是否需要最上面的三个全连接层. 一般网络最后都会有全连接层, 最后一个全连接层更是设定了分类的个数, loss的计算方法, 并架设了一个概率转换函数(soft max). 其实soft max的作用就是将输出转换为各类别的概率,并计算loss.
可以这么说, 最上面三层使用来进行分类的, 其余层使用来进行特征提取的. 因此如果include_top=False,也就表示这个网络只能进行特征提取. 不能在进行新的训练或者在已有权重上fine-tune. - weights: 'None' / 'imagenet' / path (to the weight file)
None表示没有指定权重,对网络参数进行随机初始化.
'imagenet' 表示加载imagenet与训练的网络权重.
'path' 表示指向权重文件的路径.
VGG16 的框架是确定的, 而其权重参数的个数和结构完全由输入决定.
如果weight = None, 则输入尺寸可以任意指定,(范围不得小于48, 否则最后一个卷积层没有输出).
如果 weight = 'imagenet', 则输入尺寸必须严格等于(224,224), 权重的规模和结构有出入唯一决定, 使用了imagenet的权重,就必须使用训练时所对应的输入, 否则第一个全连接层的输入对接不上. (例如, 原来网络最后一个卷基层的输出为 300, 全连接层的神经元有1000个,则这里权重的结构为300X1000), 而其他的出入不能保证卷基层输出为300, 则对接不上会报错).
如果 weight = 'path', 则输入必须和path对应权值文件训练时的输入保持一致. - input_tensor: 图片tonsor输入项
- input_shape: tuple
如果include_top = False(表示用网络进行特征提取), 此时需要指定输入图片尺寸. 如果include_top = True(表示网路被用来进行重新训练或fine-tune), 则图片输入尺寸必须在有效范围内(width & height 大于48)或和加载权重训练时的输入保持一致. - pooling: 当include_top = False(网络被用于特征提取时改参数有效)
(纯自己理解, 可能有误).
最后一个卷基层的输出应该是一个4D的向量.(M,1,w',h'), 其中w'和h'表示卷积过后得到的基本尺寸. 可以这样想象, 待卷积的目标是一个(N, w, h)的矩阵. 每卷积一次都是在这个矩阵的(n, w,h)上进行卷积, n表示卷积核的深度(2D=2, 3D=3). 最后依然会得到(M, w',h')这样一个维度的矩阵作为卷基层的输出. 把每一个2D的(w', h')看做一个维度, 那么最终输出就是4D的(M,1,w',h').那么:
pooling = None, 表示对输出的特征不作处理,依然是4D的.
pooling = 'avg', 表示在M维度进行平均, 最终得到的是一个(1,1,w',h')的特征输出.
pooling = 'max', 亦然. - classes: 要训练的类别数. 仅当include_top = True, 没有'weights'参数给定.(表示训练一个新网络)