原文地址:http://www.cnblogs.com/yao2yao4/archive/2013/06/12/3132434.html
1、前言
现在搜索PropertyGuid,发现的一些文档,特别是在百度文库中,都是互相抄,我发现最初的文档在这儿http://msdn.microsoft.com/en-us/library/aa302326.aspx。这里面也有一些错误,看的时候注意辨别一下。
2、目标:以最少的代码,实现在GUI中配置下列结构的对象。

namespace WindowsFormsApplication1
{
    public partial class Form1 : Form
    {
        public Form1()
        {
            InitializeComponent();
        }
        private Database database = new Database();
    }
}
这个database对象就是待配置的对象,下面是Database类的结构:
public class Database
{
    public string Name { get; set; }
    public string Password { get; set; }
    public string InitializeCommand { get; set; }
    public List<Table> Tables { get; set; }
}
下面是Table类的结构:
public class Table
{
    public string Name { get; set; }
    public List<Column> Columns { get; set; }
    public string Comment { get; set; }
}
下面是Column类的结构:
public class Column
{
    public string Name { get; set; }
    public SupportedType Type { get; set; }
    public string Comment { get; set; }
    public bool IsMainKey { get; set; }
    public bool NotNull { get; set; }
    public bool IsAutoIncrement { get; set; }
    public bool IsIndex { get; set; }
}
下面是SupportedType的结构:
public enum SupportedType
{
    Boolean,
    DateTime,
    Decimal,
    Double,
    Int64,
    Int32,
    Int16,
    SByte,
    Single,
    String,
    UInt64,
    UInt32,
    UInt16,
    Byte
}
这里的例子用了大家都熟悉的数据库结构的模型,方便理解。
这里完成之后,向界面拖入Property控件,并把database字段赋给控件的SelectedObject属性,运行一下,得到以下效果:

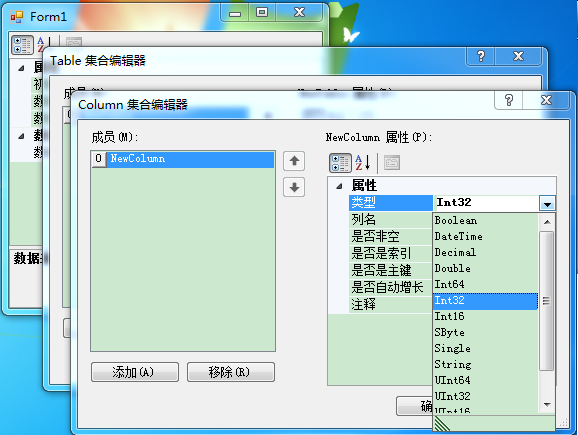
点击...,得到以下效果:
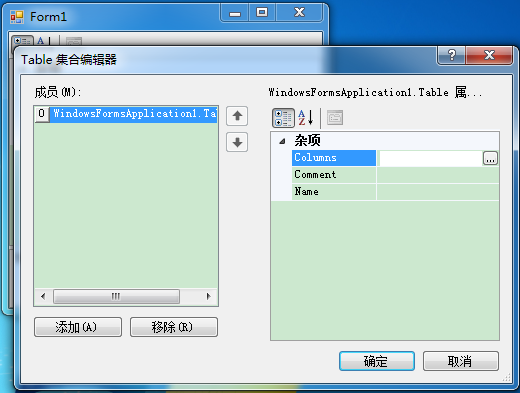
点击“添加”,再点击...,得到以下效果:
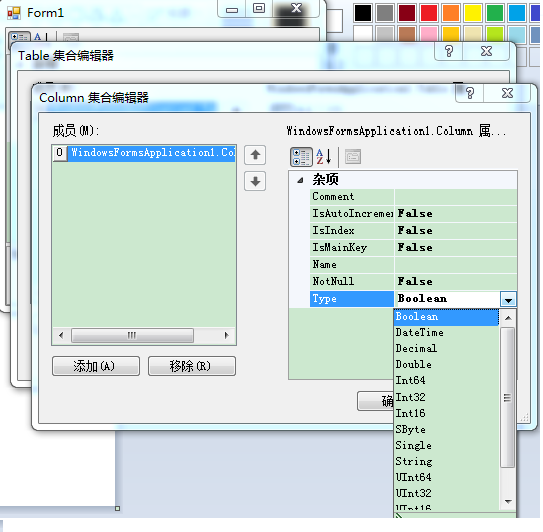
可以注意到我并没有写多少代码,就完成的大部分的效果,和Visual Studio的属性窗口十分类似。但是,这个不美观,也有BUG,下面开始改善一下这些效果。
首先介绍一些在使用PropertyGrid控件时常用的Attribute(至于Attribute是什么,自行搜索之):
1)在属性框被点击后,光标自动跳到一个属性的框中:DefaultProperty,附着在类上,参数是属性的名称;
2)当值改变时,变成粗体的效果:DefaultValue,附着在属性上,参数是非粗体时的值;(注意这个不会决定默认值,这个决定粗体效果。)
3)对属性分类:Category,附着在属性上,参数是类别名称;
4)只读,不可编写,变灰色:ReadOnly,附着在属性上,参数是false或true,不加此Attribute的效果是此值为false的效果;
5)显示的名称,设置后不再显示为属性的名称:DisplayName,附着在属性上,参数是显示的名称;
6)描述信息,在描述框里显示:Description,附着在属性上,参数是描述信息;
7)是否显示:Browsable,附着在属性上,参数为false或true,不加此Attribute的效果是此值为true的效果。
以下是一些经验:
8)每个项都写成自动属性的形式;
9)在构造函数中对每一个值都尽可能赋值,这个也决定了默认值。没有这一步,可能造成设置后无法保存的BUG;
一般:string类型可以初始化为string.empty,bool类型不必初始化,List先判断是否为null,如果为null,初始化一下。
10)可以被正确识别的对象:各种值类型、String、数组、DateTime、TimeSpan、Point、Size、Font、Color、枚举类型、Image、Bitmap、Metafile、Icon、Cursor、List<T>。
下面是优化后的代码,都在这儿了:
public partial class Form1 : Form
{
    public Form1()
    {
        InitializeComponent();
        propertyGrid1.SelectedObject = database;
    }
    private readonly Database database = new Database();
}
[DefaultProperty("Tables")]
public class Database
{
    public Database()
    {
        Name = "NewDatabase";
        Password = string.Empty;
        InitializeCommand = string.Empty;
        if (Tables == null)
        {
            Tables = new List<Table>();
        }
    }

    [Category("属性"),
        DisplayName("数据库名称")]
    public string Name { get; set; }

    [Category("属性"),
        DisplayName("数据库密码")]
    public string Password { get; set; }

    [Category("属性"),
        DisplayName("初始化语句")]
    public string InitializeCommand { get; set; }

    [Category("数据表设置"),
        DisplayName("数据表集合")]
    public List<Table> Tables { get; set; }
}
[DefaultProperty("Columns")]
public class Table
{
    public Table()
    {
        Name = "NewTable";
        Comment = string.Empty;
        if (Columns == null)
        {
            Columns = new List<Column>();
        }
    }

    [Category("属性"),
        DisplayName("数据表名称")]
    public string Name { get; set; }

    [Category("数据列设置"),
        DisplayName("数据列集合")]
    public List<Column> Columns { get; set; }

    [Category("属性"),
        DisplayName("备注")]
    public string Comment { get; set; }
}
[DefaultProperty("Name")]
public class Column
{
    public Column()
    {
        Name = "NewColumn";
        Type = SupportedType.Int32;
        Comment = string.Empty;
        NotNull = true;
    }

    [DisplayName("列名"),
        Category("属性")]
    public string Name { get; set; }

    [DisplayName("类型"),
        Category("属性")]
    public SupportedType Type { get; set; }

    [DisplayName("注释"),
        Category("属性")]
    public string Comment { get; set; }

    [DisplayName("是否是主键"),
        DefaultValue(false),
        Category("属性")]
    public bool IsMainKey { get; set; }

    [DisplayName("是否非空"),
        DefaultValue(true),
        Category("属性")]
    public bool NotNull { get; set; }

    [DisplayName("是否自动增长"),
        DefaultValue(false),
        Category("属性")]
    public bool IsAutoIncrement { get; set; }

    [DisplayName("是否是索引"),
        DefaultValue(false),
        Category("属性")]
    public bool IsIndex { get; set; }
}
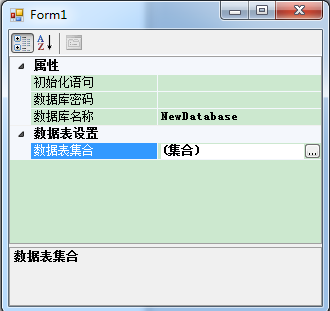
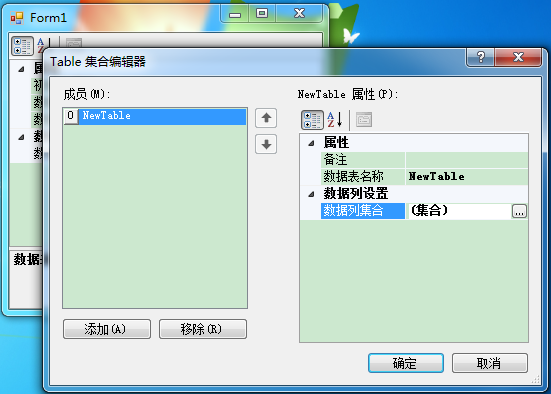
下面是优化后的效果:
3、遗留的问题
1)点击右上角的问号,没反应;
2)如果不是最顶层,就没有Description栏;
3)除了之前提到的一些类型,其它的类都不能自动使用上。
上述问题需要增加自定义的代码来解决,不符合本文“使用尽可能少的代码”的主题,相关的扩展心得会在之后的博文中表述出来。