(一)、failover故障转移
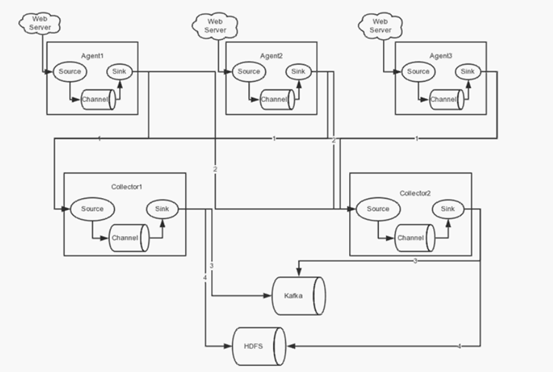
在完成单点的Flume NG搭建后,下面我们搭建一个高可用的Flume NG集群,架构图如下所示:

(1)节点分配
Flume的Agent和Collector分布如下表所示:
|
名称 |
Ip地址 |
Host |
角色 |
|
Agent1 |
192.168.200.101 |
Itcast01 |
WebServer |
|
Collector1 |
192.168.200.102 |
Itcast02 |
AgentMstr1 |
|
Collector2 |
192.168.200.103 |
Itcast03 |
AgentMstr2 |
Agent1数据分别流入到Collector1和Collector2,Flume NG本身提供了Failover机制,可以自动切换和恢复。下面我们开发配置Flume NG集群。
(2)配置
在下面单点Flume中,基本配置都完成了,我们只需要新添加两个配置文件,它们是flume-client.conf和flume-server.conf,其配置内容如下所示:
1、itcast01上的flume-client.conf配置
|
#agent1 name agent1.channels = c1 agent1.sources = r1 agent1.sinks = k1 k2 #set gruop agent1.sinkgroups = g1 #set sink group agent1.sinkgroups.g1.sinks = k1 k2 #set channel agent1.channels.c1.type = memory agent1.channels.c1.capacity = 1000 agent1.channels.c1.transactionCapacity = 100 agent1.sources.r1.channels = c1 agent1.sources.r1.type = exec agent1.sources.r1.command = tail -F /root/log/test.log agent1.sources.r1.interceptors = i1 i2 agent1.sources.r1.interceptors.i1.type = static agent1.sources.r1.interceptors.i1.key = Type agent1.sources.r1.interceptors.i1.value = LOGIN agent1.sources.r1.interceptors.i2.type = timestamp # set sink1 agent1.sinks.k1.channel = c1 agent1.sinks.k1.type = avro agent1.sinks.k1.hostname = itcast02 agent1.sinks.k1.port = 52020 # set sink2 agent1.sinks.k2.channel = c1 agent1.sinks.k2.type = avro agent1.sinks.k2.hostname = itcast03 agent1.sinks.k2.port = 52020 #set failover agent1.sinkgroups.g1.processor.type = failover agent1.sinkgroups.g1.processor.priority.k1 = 10 agent1.sinkgroups.g1.processor.priority.k2 = 5 agent1.sinkgroups.g1.processor.maxpenalty = 10000 #这里首先要申明一个sinkgroups,然后再设置2个sink ,k1与k2,其中2个优先级是10和5,#而processor的maxpenalty被设置为10秒,默认是30秒。‘ |
启动命令:
|
bin/flume-ng agent -n agent1 -c conf -f conf/flume-client.conf -Dflume.root.logger=DEBUG,console |
2、Itcast02和itcast03上的flume-server.conf配置
|
#set Agent name a1.sources = r1 a1.channels = c1 a1.sinks = k1
#set channel a1.channels.c1.type = memory a1.channels.c1.capacity = 1000 a1.channels.c1.transactionCapacity = 100
# other node,nna to nns a1.sources.r1.type = avro a1.sources.r1.bind = 0.0.0.0 a1.sources.r1.port = 52020 a1.sources.r1.channels = c1 a1.sources.r1.interceptors = i1 i2 a1.sources.r1.interceptors.i1.type = timestamp a1.sources.r1.interceptors.i2.type = host a1.sources.r1.interceptors.i2.hostHeader=hostname
#set sink to hdfs a1.sinks.k1.type=hdfs a1.sinks.k1.hdfs.path=/data/flume/logs/%{hostname} a1.sinks.k1.hdfs.filePrefix=%Y-%m-%d a1.sinks.k1.hdfs.fileType=DataStream a1.sinks.k1.hdfs.writeFormat=TEXT a1.sinks.k1.hdfs.rollInterval=10 a1.sinks.k1.channel=c1
|
启动命令:
|
bin/flume-ng agent -n agent1 -c conf -f conf/flume-server.conf -Dflume.root.logger=DEBUG,console |
(3)测试failover
1、先在itcast02和itcast03上启动脚本
|
bin/flume-ng agent -n a1 -c conf -f conf/flume-server.conf -Dflume.root.logger=DEBUG,console |
2、然后启动itcast01上的脚本
|
bin/flume-ng agent -n agent1 -c conf -f conf/flume-client.conf -Dflume.root.logger=DEBUG,console |
3、Shell脚本生成数据
|
while true;do date >> test.log; sleep 1s ;done |
4、观察HDFS上生成的数据目录。只观察到itcast02在接受数据

5、Itcast02上的agent被干掉之后,继续观察HDFS上生成的数据目录,itcast03对应的ip目录出现,此时数据收集切换到itcast03上

6、Itcast02上的agent重启后,继续观察HDFS上生成的数据目录。此时数据收集切换到itcast02上,又开始继续工作!

(二)、load balance负载均衡
(1)节点分配
如failover故障转移的节点分配
(2)配置
在failover故障转移的配置上稍作修改
itcast01上的flume-client-loadbalance.conf配置
|
#agent1 name agent1.channels = c1 agent1.sources = r1 agent1.sinks = k1 k2 #set gruop agent1.sinkgroups = g1 #set channel agent1.channels.c1.type = memory agent1.channels.c1.capacity = 1000 agent1.channels.c1.transactionCapacity = 100 agent1.sources.r1.channels = c1 agent1.sources.r1.type = exec agent1.sources.r1.command = tail -F /root/log/test.log # set sink1 agent1.sinks.k1.channel = c1 agent1.sinks.k1.type = avro agent1.sinks.k1.hostname = itcast02 agent1.sinks.k1.port = 52020 # set sink2 agent1.sinks.k2.channel = c1 agent1.sinks.k2.type = avro agent1.sinks.k2.hostname = itcast03 agent1.sinks.k2.port = 52020 #set sink group agent1.sinkgroups.g1.sinks = k1 k2 #set load-balance agent1.sinkgroups.g1.processor.type = load_balance # 默认是round_robin,还可以选择random agent1.sinkgroups.g1.processor.selector = round_robin #如果backoff被开启,则 sink processor会屏蔽故障的sink agent1.sinkgroups.g1.processor.backoff = true |
Itcast02和itcast03上的flume-server-loadbalance.conf配置
|
#set Agent name a1.sources = r1 a1.channels = c1 a1.sinks = k1 #set channel a1.channels.c1.type = memory a1.channels.c1.capacity = 1000 a1.channels.c1.transactionCapacity = 100 # other node,nna to nns a1.sources.r1.type = avro a1.sources.r1.bind = 0.0.0.0 a1.sources.r1.port = 52020 a1.sources.r1.channels = c1 a1.sources.r1.interceptors = i1 i2 a1.sources.r1.interceptors.i1.type = timestamp a1.sources.r1.interceptors.i2.type = host a1.sources.r1.interceptors.i2.hostHeader=hostname a1.sources.r1.interceptors.i2.useIP=false #set sink to hdfs a1.sinks.k1.type=hdfs a1.sinks.k1.hdfs.path=/data/flume/loadbalance/%{hostname} a1.sinks.k1.hdfs.fileType=DataStream a1.sinks.k1.hdfs.writeFormat=TEXT a1.sinks.k1.hdfs.rollInterval=10 a1.sinks.k1.channel=c1 a1.sinks.k1.hdfs.filePrefix=%Y-%m-%d |
(3)测试load balance
1、先在itcast02和itcast03上启动脚本
|
bin/flume-ng agent -n a1 -c conf -f conf/flume-server-loadbalance.conf -Dflume.root.logger=DEBUG,console |
2、然后启动itcast01上的脚本
|
bin/flume-ng agent -n agent1 -c conf -f conf/flume-client-loadbalance.conf -Dflume.root.logger=DEBUG,console |
3、Shell脚本生成数据
|
while true;do date >> test.log; sleep 1s ;done |
4、观察HDFS上生成的数据目录,由于轮训机制都会收集到数据

5、Itcast02上的agent被干掉之后,itcast02上不在产生数据

6、Itcast02上的agent重新启动后,两者都可以接受到数据
