docxtpl 的简介
docxtpl 的作者开发出它的原因主要是python-docx擅长创建word文档,却不擅长修改。
对于docxtpl来说,使用MicrosoftWord编辑文档时,直接在文档中插入类似于Jinja2的标记。将文档保存为.docx文件(XML格式):它将是.docx模板文件。
然后使用docxtpl加载这个.docx模板,按照Jinja2的语法传入关联的上下文变量,即可生成想要的Word文档,多次传入不同的上下文变量即可生成多个基于模板的word文档。
docxtpl 主要依赖两个包
- python-docx :读写word文档
- jinja2:管理插入到模板中的标签
jinja2语法可参考:
http://docs.jinkan.org/docs/jinja2/templates.html
docxtpl官方文档:
https://docxtpl.readthedocs.io/en/latest/
安装:
pip install docxtpl
基本使用示例:
from docxtpl import DocxTemplate
tpl = DocxTemplate("my_word_template.docx")
context = { 'company_name' : "World company" }
tpl.render(context)
tpl.save("generated_doc.docx")
docxtpl的使用手册
Jinja2语法
为了掌握docxtpl 的用法,我们需要学习或复习一下Jinja2的语法,然后再研究docxtpl 特有的类Jinja2语法。
基本语法:
{% if user %}
	<title> hello {{user}} </title>
{% else %}
	<title> welcome to docxtpl </title>
{% endif %}
<ul>
    {% for index in indexs %}
    <li> {{ index }} </li>
    {% endfor %}
</ul>
在模板中{{ variable }}结构表示变量,是一种特殊的占位符,告诉模板引擎这个位置的值,从渲染模板时使用的数据中获取;Jinja2除了能识别基本类型的变量,还能识别字典;
<p>{{mydict['key']}}</p>

<p>{{mylist[1]}}</p>

<p>{{mylist[myvariable]}}</p>
过滤器的本质就是函数,使用方式为:变量名 | 过滤器。 过滤器名写在变量名后面,中间用 | 分隔。如:{{variable | capitalize}},这个过滤器的作用:把变量variable的值的首字母转换为大写,其他字母转换为小写。 操作列表的常用过滤器如下:
列表操作:
first:取第一个元素
<p>{{ [1,2,3,4,5,6] | first }}</p>
last:取最后一个元素
<p>{{ [1,2,3,4,5,6] | last }}</p>
length:获取列表长度
<p>{{ [1,2,3,4,5,6] | length }}</p>
sum:列表求和
<p>{{ [1,2,3,4,5,6] | sum }}</p>
sort:列表排序
<p>{{ [6,2,3,1,5,4] | sort }}</p>
Jinja自定义过滤器
render() 的 jinja_env 选项参数可以传递一个jinja环境对象,从而添加一些定制的jinja过滤器:
from docxtpl import DocxTemplate
import jinja2
def multiply_by(value, by):
   return value * by

tpl = DocxTemplate("my_word_template.docx")
context = { 'price_dollars' : 5.00 }
jinja_env = jinja2.Environment()
jinja_env.filters['multiply_by'] = multiply_by
tpl.render(context,jinja_env)
tpl.save("generated_doc.docx")
然后在模板中能够使用
Euros price : {{ price_dollars|multiply_by(0.88) }}
类Jinja 2语法
4个重要的专属标签
为了管理段落、表行、表列、run,必须使用特殊的语法:
{%p jinja2_tag %} for paragraphs
{%tr jinja2_tag %} for table rows
{%tc jinja2_tag %} for table columns
{%r jinja2_tag %} for runs
正常的Jinja 2语法只有%的普通标签,而docxtpl的类语法包含%p,%tr,%tc,%r
%p:段落,即docx.text.paragraph.Paragraph对象
%tr:表格中的一行,即docx.table._Row对象
%tc:表格中的一列,即docx.table._Column对象
%r:段落中的一个片段,即docx.text.run.Run对象
通过使用这些标记,python-docx-template将真正的Jinja 2标记放入文档的XML源代码中的正确位置。
另外,需注意,这四种标签,起始标签不能在同一行,必须在不同的行上面。
例如:
{%p if display_paragraph %}Here is my paragraph {%p endif %}
需改写成:
{%p if display_paragraph %}
Here is my paragraph
{%p endif %}
否则无法正确渲染。
长文本拆分
包含jinja2标签的文本如果太长,可能无法读取:
My house is located {% if living_in_town %} in urban area {% else %} in countryside {% endif %} and I love it.
可以使用 {%- 和-%} 标签来拆分整个文本:
My house is located
{%- if living_in_town -%}
 in urban area
{%- else -%}
 in countryside
{%- endif -%}
 and I love it.
注意:
{%- xxx -%}标签必须在单独在一行中,不可在之前或之后添加其他的文本。
Jinja 2的语法对变量是使用双括弧:{{ variable }}
但如果variable 是RichText对象时,必须更改为:{{r variable }}
注意:
- r紧跟左括弧。variable不能使用r作为变量,因为{{r}} 可以解释为 {{r 没有指定变量
- 不要在同一run上使用2次
{{r. 使用 RichText.add() 方法在python代码上连接多个字符串和样式,在word文档模板上只需 写一个{{r标签。
表格处理与合并单元格
列跨越:
如果需要动态生成一个合并单元格,可以使用colspan标记:
{% colspan column_count %}
column_count是一个整数表示要跨越的列数。
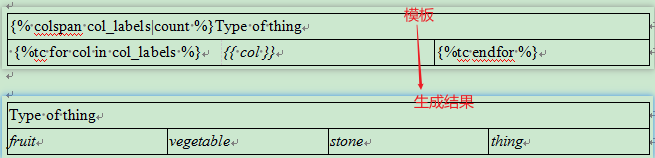
例如,word模板中:
| {% colspan col_labels|count %}Type of thing | ||
|---|---|---|
| {%tc for col in col_labels %} | {{ col }} | {%tc endfor %} |
python渲染代码:
tpl.render({'col_labels': ['fruit', 'vegetable', 'stone', 'thing']})
渲染结果:
水平合并单元格:
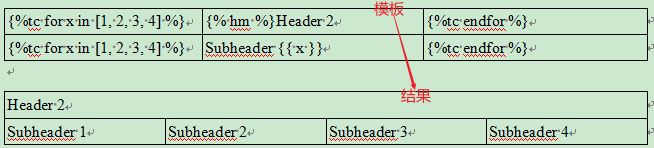
或者在for循环中:
{% hm %}
例如,word模板:
| {%tc for x in [1, 2, 3, 4] %} | {% hm %}Header 2 | {%tc endfor %} |
|---|---|---|
| {%tc for x in [1, 2, 3, 4] %} | Subheader {{ x }} | {%tc endfor %} |
最终渲染结果:
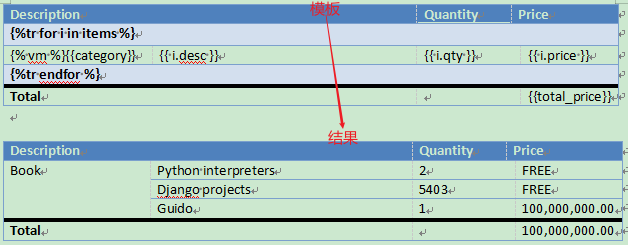
垂直合并单元格:
在for循环中:
{% vm %}
例如,word模板:
| Description | Quantity | Price | |
|---|---|---|---|
| {%tr for i in items %} | |||
| {% vm %}{{category}} | {{ i.desc }} | {{ i.qty }} | {{ i.price }} |
| {%tr endfor %} | |||
| Total | {{total_price}} |
python渲染代码:
context = {
    'items': [
        {'desc': 'Python interpreters', 'qty': 2, 'price': 'FREE'},
        {'desc': 'Django projects', 'qty': 5403, 'price': 'FREE'},
        {'desc': 'Guido', 'qty': 1, 'price': '100,000,000.00'},
    ],
    'total_price': '100,000,000.00',
    'category': 'Book',
}

tpl.render(context)
渲染结果:
RichText动态样式
使用{{ variable }}标记,它将保持目前的格式使用variable 变量的值进行字符串替换。但如果要添加动态变化的样式,则必须使用{{r variable }}标记,同时传入的variable变量是一个 RichText对象。RichText对象可以在python代码中更改颜色、粗体、斜体、大小等。
使用{{r variable }}标记时,它在docx模板中原本的样式将会被删除,如果没有在RichText()设置字体样式,样式将返回到Microsoft Word默认样式。
还可以通过Richtext将超链接添加到文本中:
tpl=DocxTemplate('your_template.docx')
rt = RichText('You can add an hyperlink, here to ')
rt.add('google',url_id=tpl.build_url_id('http://google.com'))
RichText(‘my text’)的简写是R(‘my text’)
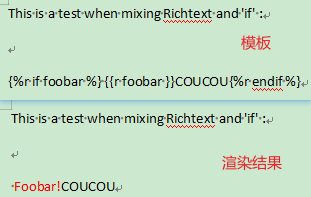
python代码示例:
from docxtpl import DocxTemplate, RichText

tpl = DocxTemplate('templates/richtext_and_if_tpl.docx')

context = {'foobar': RichText('Foobar!', color='ff0000')}
tpl.render(context)
tpl.save('output/richtext_and_if.docx')
richtext_and_if_tpl.docx文件模板内容:
{%r if foobar %} {{r foobar }}COUCOU{%r endif %}
渲染结果:
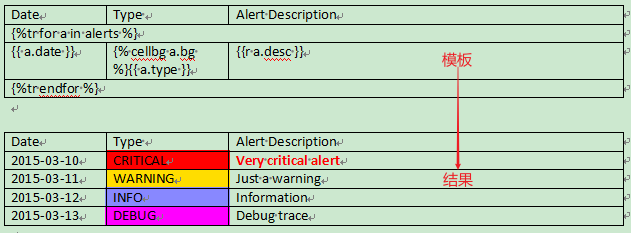
单元格颜色
需要更改表格单元格的背景色时,必须在单元格的开头放置以下标记
{% cellbg variable %}
variable 必须是颜色的十六进制码,不支持red等颜色单词。
比如模板:
| Date | Type | Alert Description |
|---|---|---|
| {%tr for a in alerts %} | ||
| {{ a.date }} | {% cellbg a.bg %}{{ a.type }} | {{r a.desc }} |
| {%tr endfor %} |
python渲染代码:
context = {
    'alerts': [
        {
            'date': '2015-03-10',
            'desc': RichText('Very critical alert', color='FF0000', bold=True),
            'type': 'CRITICAL',
            'bg': 'FF0000',
        },
        {
            'date': '2015-03-11',
            'desc': RichText('Just a warning'),
            'type': 'WARNING',
            'bg': 'FFDD00',
        },
        {
            'date': '2015-03-12',
            'desc': RichText('Information'),
            'type': 'INFO',
            'bg': '8888FF',
        },
        {
            'date': '2015-03-13',
            'desc': RichText('Debug trace'),
            'type': 'DEBUG',
            'bg': 'FF00FF',
        },
    ],
}

tpl.render(context)
渲染结果:
Escaping和转义
为了展示{%, %}, {{ or }}, 可以使用:
{_%, %_}, {_{ or }_}
传入 {{ variable }}的variable 变量不能使用<, > 和&等字符,必须转义它们,否则会导致整个文档错乱。
转义方法有 :
context = { 'variable':R('my text') }和在模板中{{r variable }}context = { 'variable':'my text'}和在模板中{{ variable|e }}context = { 'var':escape('my text')}和在模板中{{ <var> }}- 在调用渲染方法时启用自动转义:
tpl.render(context, autoescape=True)(默认值autoescape=False)
RichText()或R()支持换行符,新段落,缩进和分页符功能:只需使用
, a, 或f 在文本中,它们将作相应的转换。
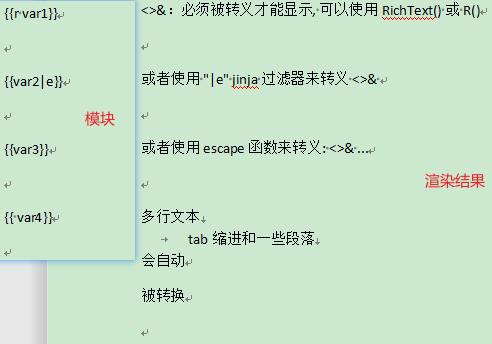
示例:
word模板内容:
{{orgin}}

{{r var1}}

{{var2|e}}

{{var3}}

{{ var4}}
python渲染脚本:
context = {
    'var1': R(
        '<>&:必须被转义才能显示, 可以使用RichText() 或 R()'
    ),
    'var2': '或者使用 "|e" jinja 过滤器来转义 <>& ',
    'var3': escape('或者使用escape函数来转义: <>& ...'),
    'var4': '多行文本
	tab缩进和一些段落
会自动a被转换',
}

tpl.render(context)
渲染结果:
假如不转义,直接传入这些特殊字符:
context = {
    'orgin': '直接传入<>&看看渲染结果:',
    'var1': R(
        '<>&:必须被转义才能显示, 可以使用RichText() 或 R()'
    ),
    'var2': '或者使用 "|e" jinja 过滤器来转义 <>& ',
    'var3': escape('或者使用escape函数来转义: <>& ...'),
    'var4': '多行文本
	tab缩进和一些段落
会自动a被转换',
}

tpl.render(context)
渲染结果:
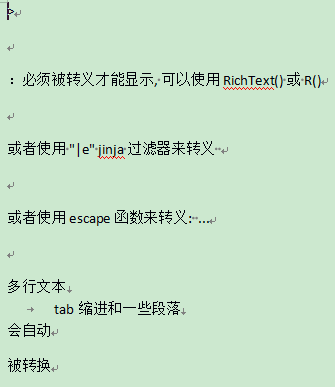
结果就是会导致其他已经转义的<>&等字符都无法正常显示。
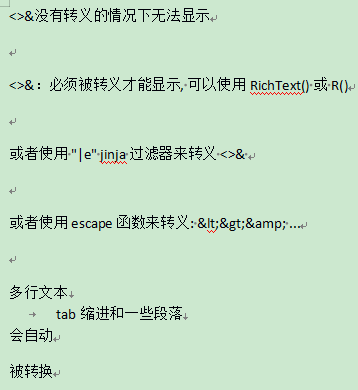
如果希望可以直接安全的转入这些字符,可以开启自动转义:
context = {
    'orgin': '<>&没有转义的情况下无法显示',
    'var1': R(
        '<>&:必须被转义才能显示, 可以使用RichText() 或 R()'
    ),
    'var2': '或者使用 "|e" jinja 过滤器来转义 <>& ',
    'var3': escape('或者使用escape函数来转义: <>& ...'),
    'var4': '多行文本
	tab缩进和一些段落
会自动a被转换',
}

tpl.render(context, autoescape=True)
渲染结果:
docxtpl的2个高级对象
内嵌图像
doxtpl.inlineImage对象可以动态地将一个或多个图像添加到文档中(支持JPEG和PNG格式)。
from docx.shared import Mm

myimage=InlineImage(tpl,'python_logo.png',width=Mm(20))
对于高度和宽度,必须使用毫米(毫米),英寸(英寸)或点(Pt)类。
示例
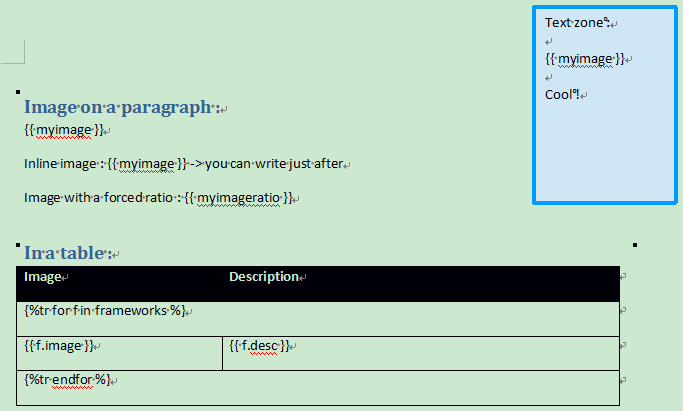
word模板:
python渲染代码:
from docxtpl import DocxTemplate, InlineImage

# for height and width you have to use millimeters (Mm), inches or points(Pt) class :
from docx.shared import Mm
import jinja2

tpl = DocxTemplate('templates/inline_image_tpl.docx')

context = {
    'myimage': InlineImage(tpl, 'templates/python_logo.png', width=Mm(20)),
    'myimageratio': InlineImage(
        tpl, 'templates/python_jpeg.jpg', width=Mm(30), height=Mm(60)
    ),
    'frameworks': [
        {
            'image': InlineImage(tpl, 'templates/django.png', height=Mm(10)),
            'desc': 'The web framework for perfectionists with deadlines',
        },
        {
            'image': InlineImage(tpl, 'templates/zope.png', height=Mm(10)),
            'desc': 'Zope is a leading Open Source Application Server and Content Management Framework',
        },
        {
            'image': InlineImage(tpl, 'templates/pyramid.png', height=Mm(10)),
            'desc': 'Pyramid is a lightweight Python web framework aimed at taking small web apps into big web apps.',
        },
        {
            'image': InlineImage(tpl, 'templates/bottle.png', height=Mm(10)),
            'desc': 'Bottle is a fast, simple and lightweight WSGI micro web-framework for Python',
        },
        {
            'image': InlineImage(tpl, 'templates/tornado.png', height=Mm(10)),
            'desc': 'Tornado is a Python web framework and asynchronous networking library.',
        },
    ],
}
# testing that it works also when autoescape has been forced to True
jinja_env = jinja2.Environment(autoescape=True)
tpl.render(context, jinja_env)
tpl.save('output/inline_image.docx')
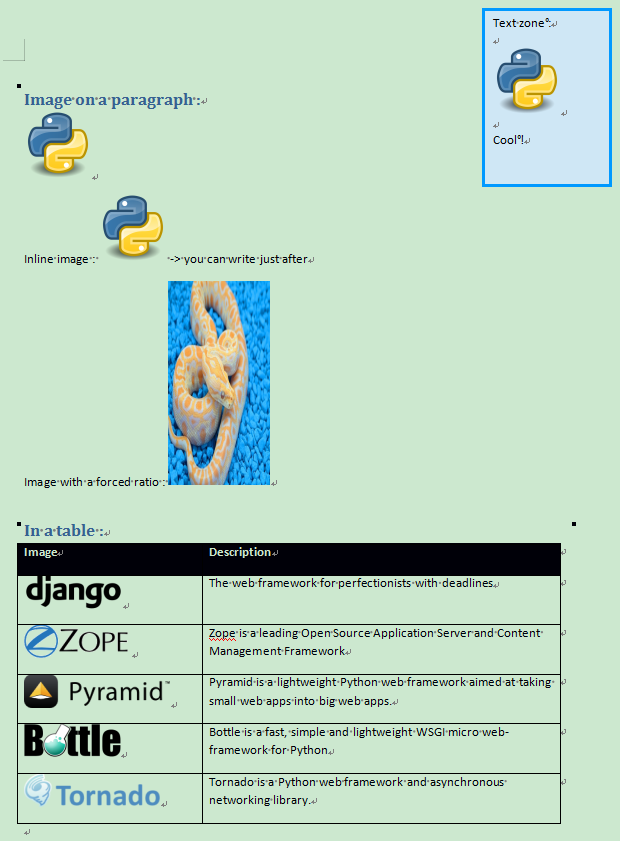
渲染结果:
子文件
Subdoc对象可以作为一个使用python-docx库从头开始构建word文档的对象,构建的内容可以直接嵌入到传入的变量位置:
sd = tpl.new_subdoc()
p = sd.add_paragraph('This is a sub-document inserted into a bigger one')
p = sd.add_paragraph('It has been ')
p.add_run('dynamically').style = 'dynamic'
p.add_run(' generated with python by using ')
p.add_run('python-docx').italic = True
p.add_run(' library')

context = {
    'mysubdoc': sd,
}
tpl.render(context)
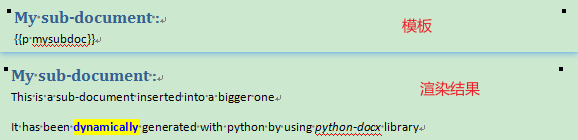
效果:
替换word文档的图片或媒体
在页眉/页脚中是无法动态添加图片和媒体的,但我们可以在模板中放置一个虚拟对象,像往常一样渲染模板,然后用另一个对象替换虚拟对象。从而实现图片和媒体的添加。
替换可以发生在页眉、页脚和整个文档正文中。
替换页眉/页脚中的图片
需要先在页眉/页脚中放置一张模板图片,替换时指定被插入的模板图片的文件名即可,替换dummy_header_pic.jpg的语法:
tpl.replace_pic('dummy_header_pic.jpg','header_pic_i_want.jpg')
被替换的图像在word文档中将保持原始文档的宽高比。
替换页眉/页脚中的媒体
与替换图片几乎一致,替换dummy_header_pic.jpg的语法:
tpl.replace_media('dummy_header_pic.jpg','header_pic_i_want.jpg')
警告:与replace_pic() 方法不同,dummy_header_pic.jpg 必须存在模板目录中。
替换嵌入对象
它的工作方式类似于媒体替换,只是它适用于嵌入式docx这样的嵌入式对象。
替换embedded_dummy.docx的语法:
tpl.replace_embedded('embdded_dummy.docx','embdded_docx_i_want.docx')
警告:与replace_pic()方法不同,embdded_dumy.docx必须存在于模板目录中。