rysnc(remote synchronize)在CentOS系统默认安装在/usr/bin,此外rysnc在windows平台下也有相应版本。主页地址为: http://rsync.samba.org/
概述
Rsync(remote synchronize) 远程同步工具,基于SSH同步本地和远程主机之间的文件。
好处:只同步两个文件不同的部分,相同的部分不在传递。类似于增量备份,
这使得在服务器传递备份文件或者同步文件,比起scp工具要省好多时间。
ubuntu默认安装了rsync:
默认的配置文件位置:/usr/share/doc/rsync/examples
配置文件名称:rsyncd.conf
需要将其复制到 /etc/ 下
rsync默认是没有启动的,可通过ps -e |grep rsync查看
可在 /etc/init.d 路径下执行:
./rsync start #启动
./rsync start #关闭
可在 /etc/default 路径下的 rsync文件中将其改为自启动
将 RSYNC_ENABLE=true
默认配置文件详解 rsyncd.conf
# sample rsyncd.conf configuration file

# GLOBAL OPTIONS

#motd file=/etc/motd  #欢迎信息,需要这玩意的话,可以在前面指定目录下建立指定名称的文件,将想当做欢迎语的信息写在里面,即可!
#log file=/var/log/rsyncd #日志文件的路径及名称,当配置后,rsync不能正确工作时,需要查看该文件
# for pid file, do not use /var/run/rsync.pid if
# you are going to run rsync out of the init.d script.
# The init.d script does its own pid file handling,
# so omit the "pid file" line completely in that case.
# pid file=/var/run/rsyncd.pid
#syslog facility=daemon #指定rsync发送日志消息给syslog时的消息级别,常见的消息级别是:uth, authpriv, cron, daemon, ftp, kern, lpr, mail, news, security,               #sys-log, user, uucp, local0, local1, local2, local3,local4, local5, local6和local7。默认值是daemon。
#socket options=  #自定义tcp选项,默认是关闭的

# MODULE OPTIONS  #以下是模块信息,我们可以创建多个模块

[ftp]  #模块的名称可以自定义

        comment = public archive  #模块描述
        path = /var/www/pub     #需要同步的路径
        use chroot = yes #默认是yes|true,如果为true,那么在rsync在传输文件以前首先chroot到path参数指定的目录下。这样做的原因是实现额外的安全 防护,但是缺点是需要               #root权限,并且不能备份指向外部的符号连接指向的目录文件。
#       max connections=10   #最大连接数
        lock file = /var/lock/rsyncd #指定支持max connections参数的锁文件
# the default for read only is yes...
        read only = yes
        list = yes #客户请求时可用模块是否列出该模块
        uid = nobody #设定该模块传输文件时守护进程应该具有的uid
        gid = nogroup #设定该模块传输文件时守护进程应具有的gid,此项与uid配合可以确定文件的访问权限
#       exclude =
     #用来指定多个由空格隔开的多个模式列表,并将其添加到exclude列表中。这等同于在客户端命令中使用--exclude来指定模式,不过配置文件中 指定的exlude模式不会传递给客户     #端,而仅仅应用于服务器。一个模块只能指定一个exlude选项,但是可以在模式前面使用"-"和"+"来指定是 exclude还是include


#       exclude from = #可以指定一个包含exclude模式定义的文件名
#       include =
#       include from =
#       auth users =
     #该选项指定由空格或逗号分隔的用户名列表,只有这些用户才允许连接该模块。这里的用户和系统用户没有任何关系。如果"auth users"被设置,那么客户端发出对该模块的连接请求     #以后会被rsync请求challenged进行验证身份这里使用的 challenge/response认证协议。用户的名和密码以明文方式存放在"secrets file"选项指定的文件中。默认情况下无     #需密码就可以连接模块(也就是匿名方式)


#       secrets file = /etc/rsyncd.secrets
     #该文件每行包含一个username:password对,以明文方式存储,只有在auth users被定义时,此选项才生效。同时我们需要将此文件权限设置为0600

        strict modes = yes
     #该选项指定是否监测密码文件的权限,如果该选项值为true那么密码文件只能被rsync服务器运行身份的用户访问,其他任何用户不可以访问该文件。默认值为true

#       hosts allow = #允许的主机IP
#       hosts deny = #拒绝访问的主机IP
        ignore errors = no  #设定rsync服务器在运行delete操作时是否忽略I/O错误
        ignore nonreadable = yes #设定rysnc服务器忽略那些没有访问文件权限的用户
        transfer logging = no #使rsync服务器使用ftp格式的文件来记录下载和上载操作在自己单独的日志中
#       log format = %t: host %h (%a) %o %f (%l bytes). Total %b bytes. #设定日志格式
        timeout = 600 #超时设置(秒)
        refuse options = checksum dry-run #定义一些不允许客户对该模块使用的命令选项列表
        dont compress = *.gz *.tgz *.zip *.z *.rpm *.deb *.iso *.bz2 *.tbz
补充:
  日志格式选项列表:
%h:远程主机名
%a:远程IP地址
%l:文件长度字符数
%p:该次rsync会话的进程id
%o:操作类型:"send"或"recv"、”del.”
%f:文件名
%P:模块路径
%m:模块名
%t:当前时间
%u:认证的用户名(匿名时是null)
%b:实际传输的字节数
%c:当发送文件时,该字段记录该文件的校验码
配置举例
服务器:192.168.31.62
客户端:192.168.31.63
1.先说服务器端:
# sample rsyncd.conf configuration file

# GLOBAL OPTIONS

#motd file=/etc/motd
log file=/var/log/rsyncd
# for pid file, do not use /var/run/rsync.pid if
# you are going to run rsync out of the init.d script.
# The init.d script does its own pid file handling,
# so omit the "pid file" line completely in that case.
pid file=/var/run/rsyncd.pid
syslog facility=daemon
#socket options=

# MODULE OPTIONS

[ftp]

        comment = public archive
        path = /opt/rsync
        use chroot = no

        lock file = /var/lock/rsyncd

        read only = yes
        list = yes
        uid = nobody
        gid = nogroup

        auth users = scdev
        secrets file = /etc/rsyncd.secrets
        strict modes = yes
        hosts allow = 192.168.31.63

        ignore errors = yes
        ignore nonreadable = yes
        transfer logging = yes

        timeout = 600
        refuse options = checksum dry-run
        dont compress = *.gz *.tgz *.zip *.z *.rpm *.deb *.iso *.bz2 *.tbz
本例配置使用了验证权限的配置,需要建立
/etc/rsyncd.secrets
scdev:passwd
$sudo chmod 0600 /etc/rsyncd.secrets
2.客户端
同服务端一样,只不过,rsyncd.conf一般设为空文件,即可
密码文件也要创建,只不过里面只写密码
passwd
$sudo chmod 0600 /etc/rsyncd.secrets
至此,配置就完成了!
3.在客户端执行
rsync -vzrtopg --progress scdev@scdev1005::ftp /opt/rsync
提示输入密码:#输入你密码验证文件中的密码即可
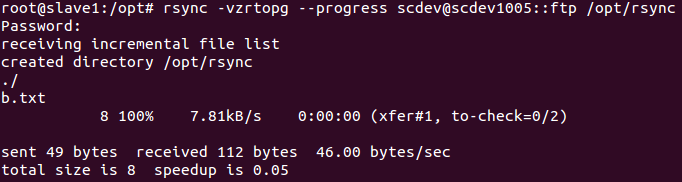
完成同步!
也可以不输入密码,通过指定密码文件的方式
rsync -vzrtopg --delete --progress scdev@scdev1005::ftp /opt/rsync --password-file=/etc/rsyncd.secrets
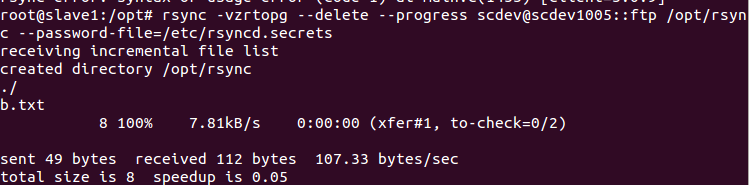
完成同步!
可以自己写个脚本myRsync.sh,省得每次都要输命令。
#!/usr/bin/env bash
echo "welcome use myrsync.sh"
 sudo rsync -vzrtopg scdev@scdev1005::ftp /opt/rsync --password-file=/etc/rsyncd.secrets
echo "Done !"
一定要给予可执行的权限:chmod +x myRsync.sh
以后直接执行myRsync.sh就好。其实最好的方法是利用crontab 等命令做自动的执行!
详细补充:
常用的两种方式:
1.从远程rsync服务器中拷贝文件到本地机。当SRC路径信息包含"::"分隔符时启动该模式。
如:rsync -av root@172.16.78.192::www /databack
2.从本地机器拷贝文件到远程rsync服务器中。当DST路径信息包含"::"分隔符时启动该模式。
如:rsync -av /databack root@172.16.78.192::www
-vzrtopg解释:
v是verbose,z是压缩,r是recursive,topg都是保持文件原有属性如属主、时间的参数(也可以用直接用a来代替rtopg, a为 --archive 归档模式,表示以递归方式传输
文件,并保持所有文件属性,等于-rlptgoD)。
--progress解释:
是指显示出详细的进度情况,
--delete解释:
是指如果服务器端删除了这一文件,那么客户端也相应把文件删除,保持真正的一致。
--exclude解释:
Here are some exclude/include examples:
--exclude "*.o" would exclude all filenames matching *.o
--exclude "/foo" would exclude a file in the base directory called foo
--exclude "foo/" would exclude any directory called foo.
--exclude "/foobar" would exclude any file called bar two or more levels below a base directory called foo.
--include "*/" --include "*.c" --exclude "*" would include all directories and C source files
--include "foo/" --include "foo/bar.c" --exclude "*" would include only foo/bar.c
(the foo/ directory must be explicitly included or it would be excluded by the "*")
例如:/usr/bin/rsync -vzrtopg --delete --exclude "res/" --exclude "default.properties" --progress rsync@192.168.8.126::test /usr/local/share/rsync_backup --password-
file=/etc/rsync.pass#把服务器的/home/hyj/workspace/test文件夹中的内容备份到客户端的/usr/local/share/rsync_backup中,不包括:res目录和default.properties文件
rsync 命令常用参数
-a 递归方式传输文件,并保持文件属性,等价-rlptgoD不包含-H
-r 子目录以递归模式处理
-l 保持符号链接文件
-H 保持硬链接文件
-p 保持文件权限
-t 保持文件时间信息
-g 保持文件归属组信息
-o 保持文件归属用户信息
-D 保持设备文件和特殊文件
-z 在传输文件时进行压缩处理
--exclude=PATTERN 指定排除一个不需要传输文件匹配模式
--exclude-from=FILE 从FILE中读取排除规则
--include=PATTERN 指定需要传输的文件匹配模式
--include-from=FILE 从FILE中读取匹配规则
--copy-unsafe-links 复制指向复制源路径目录以外的链接文件
--safe-links 忽略指向复制源路径目录以外的链接文件(默认)
--existing 仅更新那些已经存在于接收端的文件,而不复制新创建文件
--ignore-existing 忽略那些已经存在于接收端的文件,只复制新创建文件
-b 当有变化时,对目标目录中的旧文件进行备份
--backup-dir=DIR 与-b结合使用,指定备份路径
--link-dest=DIR 当文件未改变时在指定路径创建硬链接文件
--delete 删除接收端还存在而保存端不存在的文件
--delete-before 接收端在传输之前进行删除操作(默认)
--delete-during 接收端在传输过程中进行删除操作
--delete-after 接收端在传输之后进行删除操作
--delete-excluded 接收端在传输同时进行删除操作
--e,--rsh=COMMAND 指定代替rsh的shell程序,例如可以指定为ssh
--ignore-erros 即使出现I/O错误也要进行删除
--partial 保留因故没有完全传输的文件,以加快随后的再次传输
--progress 在传输时显示传输过程
-p 等价于—partial—progress
--delay-updates 将正在更新的文件先保存到.~tmp~临时目录,待传输完毕再更新目标文件
-v,--verbose 详细输出模式
-q,--quiet 精简输出模式
-h,--human-readable 输出文件大小
-n,--dry-run 显示那些文件将要被传输
--list-only 仅列出文件而不进行复制
--rsync-path=PROGRAM 指定远程服务器上的rsync命令所在路径
--password-file=FILE 指定从FILE中读取口令,避免在终端中输入口令
-4,-6 使用IPv4或者IPv6
--version 打印版本信息
--help 显示帮组信息
注意: 若用普通用户身份运行rsync命令,同步后的文件的属主将改变为这个普通用户身份;若用超级用户身份运行rsync命令同步后文件属性保持原来用户身份不变。若指定-tg但目标计算机没有指定用户和组,则复制的文件归入501用户 501组