Style在Android中的继承关系
Android的Styles(样式)和Themes(主题)非常类似Web开发里的CSS,方便开发者将页面内容和布局呈现分开。Style和Theme在Android里的定义方式是完全一样的,两者只是概念上的区别:Style作用在单个视图或控件上,而Theme用于Activity或整个应用程序。由于作用范围的不同,Theme也就需要比Style包含更多的定义属性值的项目(item)。不过本文,我将Style和Theme都归为Style来称呼。
Android的Style和Web的CSS相比,有一个缺陷就是只能针对一个对象只能通过android:theme="@style/AppTheme"或style="@style/MyStyle"指定一个值。而CSS则可以通过class属性在DOM元素上定义多个样式来达到组合的效果。不过Style也有CSS没有的功能,那就是继承(Inheritance)。(当然CSS通过LESS和SASS这些工具也获得继承的能力。)
Style继承简介
根据Android Developers官方文档的介绍,定义Style的继承有两种方式:一是通过parent标志父Style;
-
<style name="GreenText" parent="@android:style/TextAppearance">
-
<item name="android:textColor">#00FF00</item>
-
</style>
另一种则是将父Style的名字作为前缀,然后通过“.”连接新定义Style的名字:
-
<style name="CodeFont.Red">
-
<item name="android:textColor">#FF0000</item>
-
</style>
第二种方式可以无限连接子Style来实践多层继承:
-
<style name="CodeFont.Red.Big">
-
<item name="android:textSize">30sp</item>
-
</style>
相对第一种,Android对第二种方式做出的限制就是Style必须是由自己定义的,或者说父Style和子Style必须是定义在同一个程序内,不能是引用第三方或系统的Style。毕竟对于系统的Style的引用是需要加上android:前缀作为命名空间。
其次在使用Style时,对于第二种方式定义的Style,必须引用其完全的名字,也就是说必须要包含完整的前缀和名字:
-
<EditText
-
style="@style/CodeFont.Red.Big"
-
... />
Android对于第一种定义方式并没用限制,所以所有以第二种方式定义的Style都可以转用第一种:
-
<style name="Big" parent="CodeFont.Red">
-
<item name="android:textSize">30sp</item>
-
</style>
只要parent中的名字对应上实际定义的Style名字即可。不过换成第一种后Style的名字如果太简洁就容易冲突了。
两种继承方式混合的效果
前面说到Style的两种继承方式的效果是一致的,那假如将两种方式混在一起定义一个Style又会是什么样的效果呢?下边就用实际例子来分析一下。
首先定义一些实验所需的自定义属性(attr),(这样可以减少系统属性的干扰,因为系统总是会为它的属性定义值,那样可能无法分辨最后的效果是来自系统还是定义的值)
-
<?xml version="1.0" encoding="utf-8"?>
-
<resources>
-
<declare-styleable name="CustomStyle">
-
<attr name="customColor" format="color"/>
-
<attr name="customText" format="string"/>
-
<attr name="customSize" format="dimension"/>
-
</declare-styleable>
-
</resources>
接着定义一个TextView的子类,并在其中获取上边自定义属性的值并赋予TextView去呈现:
-
package com.ider.trial.styles;
-
import android.content.Context;
-
import android.content.res.TypedArray;
-
import android.graphics.Color;
-
import android.util.AttributeSet;
-
import android.util.TypedValue;
-
import android.widget.TextView;
-
/**
-
* @author Ider
-
*/
-
public class StyledTextView extends TextView {
-
public StyledTextView(Context context) {
-
this(context, null);
-
}
-
public StyledTextView(Context context, AttributeSet attrs) {
-
this(context, attrs, 0);
-
}
-
public StyledTextView(Context context, AttributeSet attrs, int defStyleAttr) {
-
super(context, attrs, defStyleAttr);
-
final TypedArray a = context.getTheme()
-
.obtainStyledAttributes(attrs, R.styleable.CustomStyle, defStyleAttr, 0);
-
final CharSequence text = a.getText(R.styleable.CustomStyle_customText);
-
final int color = a.getColor(R.styleable.CustomStyle_customColor, Color.RED);
-
final float size = a.getDimensionPixelSize(R.styleable.CustomStyle_customSize, 70);
-
a.recycle();
-
setText(text);
-
setTextColor(color);
-
setTextSize(TypedValue.COMPLEX_UNIT_PX, size);
-
}
-
}
然后就是定义研究所需的Style
-
<resources>
-
<style name="SuperStyleOne">
-
<item name="customColor">@android:color/holo_orange_dark</item>
-
<item name="customText">Hello World</item>
-
<item name="customSize">30dp</item>
-
</style>
-
<style name="SuperStyleTwo">
-
<item name="customText">www.iderzheng.com</item>
-
</style>
-
<style name="SuperStyleOne.SubOne">
-
<item name="customColor">@android:color/holo_blue_dark</item>
-
</style>
-
<style name="SuperStyleOne.SubTwo" parent="SuperStyleTwo">
-
</style>
-
<style name="SuperStyleOne.SubThree" parent="SuperStyleTwo">
-
<item name="customText">blog.iderzheng.com</item>
-
</style>
-
</resources>
上边定义的Style里,SuperStyleOne将通过添加前缀的方式作用到子Style上,而SuperStyleTwo则通过指定到parent来其作用。可以看到SubTwo和SubThree混合了两种方式。
最后在Activity的布局视图里使用自定类并设定上不同的Style
-
<LinearLayout xmlns:android="http://schemas.android.com/apk/res/android"
-
xmlns:tools="http://schemas.android.com/tools"
-
android:orientation="vertical"
-
android:layout_width="match_parent"
-
android:layout_height="match_parent"
-
android:paddingLeft="@dimen/activity_horizontal_margin"
-
android:paddingRight="@dimen/activity_horizontal_margin"
-
android:paddingTop="@dimen/activity_vertical_margin"
-
android:paddingBottom="@dimen/activity_vertical_margin"
-
tools:context=".MainActivity">
-
<com.ider.trial.styles.StyledTextView
-
style="@style/SuperStyleOne"
-
android:layout_width="wrap_content"
-
android:layout_height="wrap_content"/>
-
<com.ider.trial.styles.StyledTextView
-
style="@style/SuperStyleOne.SubOne"
-
android:layout_width="wrap_content"
-
android:layout_height="wrap_content"/>
-
<com.ider.trial.styles.StyledTextView
-
style="@style/SuperStyleOne.SubTwo"
-
android:layout_width="wrap_content"
-
android:layout_height="wrap_content"/>
-
<com.ider.trial.styles.StyledTextView
-
style="@style/SuperStyleOne.SubThree"
-
android:layout_width="wrap_content"
-
android:layout_height="wrap_content"/>
-
</LinearLayout>
运行之后得到效果如下: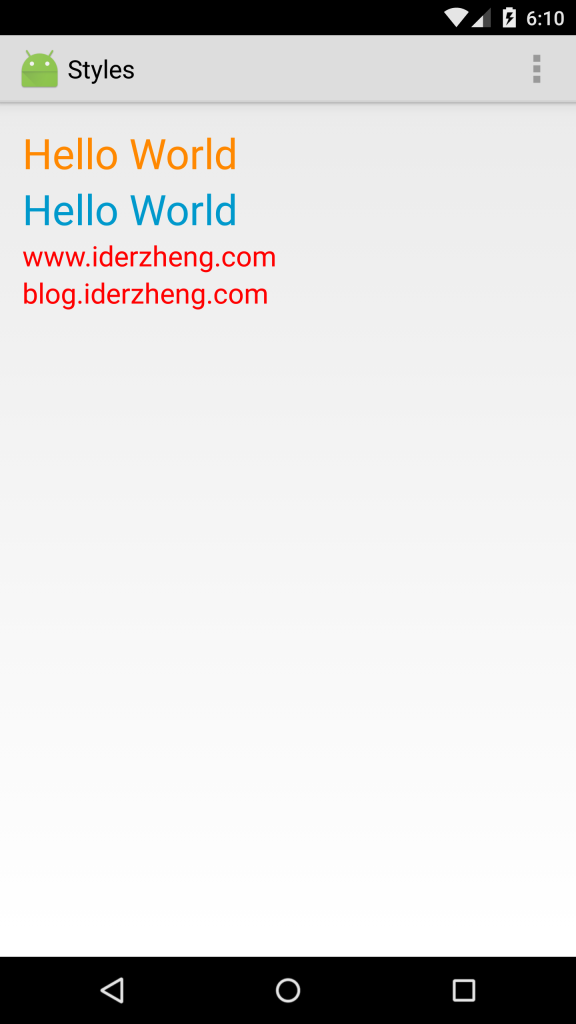
第一个和第二个都是Style标准的使用方式,也看到它们正确地获得了定义的属性值,子Style也正确的继承和覆盖了父Style的属性值。
对于第三个和第四个,它们呈现的颜色是代码中使用的默认红色(Color.RED),字体的值也是源自代码中的使用值,所以明显比前两者要小。这也就是说它们并没用继承下SuperStyleOne中定义的字体大小和颜色。但是SuperStyleTwo中定义的内容被第三个正确的显示了出来,也说明SubTwo成功继承通过parent指定的父Style的内容。而第四个呈现出来内容则说明覆盖的效果也是正确的。
在做这个试验之前,我一直以为两种方式会同时其作用,只是用parent指定比用前缀有高优先级。也就是说Android会先从当前Style定义中找某个属性的值,如果没有找到就转到parent指定的父Style中找,还没有则转到前缀指定的父Style中找。但是通过上边的结果表明:当使用parent指定父Style后,前缀方式则不在其作用,只是作为Style的名字。也就是说:Android的Style不支持多继承。Style的继承只能单线一层层下来。
反过来在看看系统定义的Style也更容易懂了,比如打开themes_holo.xml,会看到很多一样的内容被”冗余”地定义在Theme.Holo和Theme.Holo.Light两个Style下。但因为Theme.Holo.Light用parent指定了其父Style是Theme.Light,所以Theme.Holo.Light并没有从Theme.Holo继承任何属性值,也因此这样的冗余是必须的。
-
<style name="Theme.Holo.Light" parent="Theme.Light">
-
... ... ... ...
-
</style>
使用Theme.Holo.Light作为Style的名字只是为了名字更加的清晰明了。
http://blog.iderzheng.com/android-style-inheritance/