昨日完成了寒假作业的体温登记APP,今日对开发过程中遇到的困难,开发思路等进行总结。
首先上报体温要有数据存储的地方,于是我先学习了SQLite数据库。首先创建了一个类MyDBHelper继承SQLiteOpenHelper用于创建和打开数据库。
重写Oncerate()方法在里面调用SQLiteDataBase的execSQL(sql)方法可以直接执行sql语句。代码部分:
public class MyDBHelper extends SQLiteOpenHelper {
    private Context context;
    public MyDBHelper(Context context,String name,int version) {
        super(context, name, null, version);
        this.context=context;
    }

    @Override
    public void onCreate(SQLiteDatabase db) {
        String sql="create table personwendu(id integer primary key autoincrement, address varchar, name varchar, wendu varchar, dateandtime varchar)";
        db.execSQL(sql);
        Toast.makeText(context,"数据加入成",Toast.LENGTH_LONG).show();
    }

    @Override
    public void onUpgrade(SQLiteDatabase db, int oldVersion, int newVersion) {

    }
}
之后就是数据的增删改查。在Activity中实现增删改查的方法,由不同按钮对应。体温上报我们只用到了创建,增加与查询。
创建数据库我们用MyDBHelper mydbh=new MyDBHelper(this,"amydb.db",1);SQLiteDatabase sqldb=mydbh.getReadableDatabase();就可以,“amydb.db”为数据库的名字。
我们用SQLiteDatabase的insert方法sqldb.insert("personwendu",null,contentvalues);其中“personwendu”为表的名字,null表示列为空值的列名没有则为null,contentvalues是以键值对的方式插入。
ContentValues contentvalues=new ContentValues();
contentvalues.put("name",text1.getText().toString());
contentvalues.put("dateandtime",text2.getText().toString());
contentvalues.put("address",text4.getText().toString());
contentvalues.put("wendu",text3.getText().toString());
下面为代码:
 public void createDB(View view)
    {
        MyDBHelper mydbh=new MyDBHelper(this,"amydb.db",1);
        SQLiteDatabase sqldb=mydbh.getReadableDatabase();
    }
    public void insertDB(View view)
    {
        MyDBHelper mydbh=new MyDBHelper(this,"amydb.db",1);
        SQLiteDatabase sqldb=mydbh.getReadableDatabase();
        ContentValues contentvalues=new ContentValues();
        text1=(EditText)findViewById(R.id.tv_text1);
        text2=(EditText)findViewById(R.id.tv_text2);
        text3=(EditText)findViewById(R.id.tv_text3);
        text4=(EditText)findViewById(R.id.tv_text4);
        contentvalues.put("name",text1.getText().toString());
        contentvalues.put("dateandtime",text2.getText().toString());
        contentvalues.put("address",text4.getText().toString());
        contentvalues.put("wendu",text3.getText().toString());
        long flag=sqldb.insert("personwendu",null,contentvalues);
        Toast.makeText(this,"数据加入成功"+flag,Toast.LENGTH_LONG).show();
    }
对于查可以直接使用SQLiteDatabase的rawQuery(sql,String[]),sql为sql语句,Sting[]为问号处的值,没有填null。
返回的为Cursor对象可以使用getString来获取值。查看数据我使用了弹窗的样式,下面为代码:
public void queryData(View view)
    {
        MyDBHelper mydbh=new MyDBHelper(this,"amydb.db",1);
        SQLiteDatabase sqldb=mydbh.getReadableDatabase();
        Cursor cursor=sqldb.rawQuery("select * from personwendu",null);
        String str="";
        if(cursor.moveToFirst())
        {
            do{
                String name=cursor.getString(cursor.getColumnIndex("name"));
                String dateandtime=cursor.getString(cursor.getColumnIndex("dateandtime"));
                String address=cursor.getString(cursor.getColumnIndex("address"));
                String wendu=cursor.getString(cursor.getColumnIndex("wendu"));
                str=str+name+"|"+dateandtime+"|"+wendu+"
"+address+"
";
            }while(cursor.moveToNext());
        }
        AlertDialog.Builder builder=new AlertDialog.Builder(this);
        builder.setTitle("历史记录").setIcon(R.mipmap.ic_launcher).setMessage(str)
                .setPositiveButton("ok", new DialogInterface.OnClickListener() {
                    @Override
                    public void onClick(DialogInterface dialog, int which) {
                    }
                });
        AlertDialog ad=builder.create();
        ad.show();
    }
由于要自动生产时间和日期,在这里使用了java的date类来实现,当用户点击编辑框时便会调用生产时间的而函数,具体代码如下:
 public void autoTimeAndDate(View view)
    {
        text2=(EditText)findViewById(R.id.tv_text2);
        SimpleDateFormat simpleDateFormat = new SimpleDateFormat("yyyy年MM月dd日 HH:mm:ss");// HH:mm:ss
//获取当前时间
        Date date = new Date(System.currentTimeMillis());
        text2.setText(simpleDateFormat.format(date));
    }
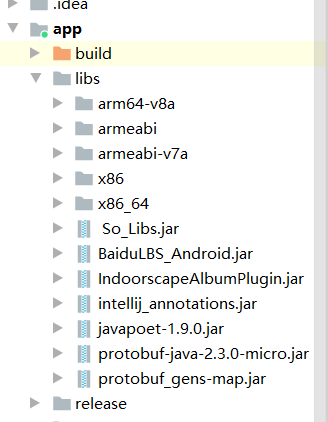
最难的就是如何自动获取地址了,这个比较麻烦需要导入百度地图的SDK。下载SDK是比较好说的,下载完解压,将libs文件复制到如下结构的libs中:
光有SDK还不能运行要有对应的AK,需要在百度地图官网申请,但需要SHA1,在android studio中的Terminal中输入keytool -list -v -keystore debug.keystore即可。
对于获取地址部分的代码官网获取为之的示例中有相关代码,但有几点注意:
1.要注意是否有SDKInitializer.initialize(getApplicationContext());这一句,而且一定要在setContentView(R.layout.activity_main);之前。
2.要有option.setIsNeedAddress(true);否者获取地址时为空。
3.不要忘了在AndroidManifest.xml中设置权限,相关权限代码官网有。
4.不要忘了<meta-data
    android:name="com.baidu.lbsapi.API_KEY"
    android:value="AftIey7qGe6wZZ6MsdEmsOLdECVVi8I9">
</meta-data>
<service
    android:name="com.baidu.location.f"
    android:enabled="true"
    android:process=":remote">
</service>
获取地址的代码:
public class MainActivity extends AppCompatActivity {
    private EditText text1;
    private EditText text2;
    private EditText text3;
    private EditText text4;
    private WenDate wendate=new WenDate();
    private TextView mTv = null;
    public LocationClient mLocationClient = null;
    private MyLocationListener myListener = new MyLocationListener();

    public class MyLocationListener extends BDAbstractLocationListener {
        @Override
        public void onReceiveLocation(BDLocation location){
            //此处的BDLocation为定位结果信息类,通过它的各种get方法可获取定位相关的全部结果
            //以下只列举部分获取地址相关的结果信息
            //更多结果信息获取说明,请参照类参考中BDLocation类中的说明
            String addr = location.getAddrStr();    //获取详细地址信息
            String country = location.getCountry();    //获取国家
            String province = location.getProvince();    //获取省份
            String city = location.getCity();    //获取城市
            String district = location.getDistrict();    //获取区县
            String street = location.getStreet();    //获取街道信息
            String adcode = location.getAdCode();    //获取adcode
            String town = location.getTown();
            //获取乡镇信息
            text4=(EditText)findViewById(R.id.tv_text4);
            text4.setText(country+province+city+district+town+street+adcode);
        }
    }
    @Override
    protected void onCreate(Bundle savedInstanceState) {
        super.onCreate(savedInstanceState);
        Log.v("MainActivity","MainActivity启动");
       // MyDBHelper mydbh=new MyDBHelper(this,"mydb.db",1);
        //SQLiteDatabase sqldb=mydbh.getReadableDatabase();
        SDKInitializer.initialize(getApplicationContext());
        setContentView(R.layout.activity_main);
    }
    public void autoAddress(View view)
    {
        mLocationClient = new LocationClient(getApplicationContext());
        //声明LocationClient类
        mLocationClient.registerLocationListener(myListener);
        LocationClientOption option = new LocationClientOption();
        option.setIsNeedAddress(true);
        option.setNeedNewVersionRgc(true);
        mLocationClient.setLocOption(option);
        //注册监听函数
        mLocationClient.start();
    }
}
接下来是布局界面这个比较简单,就是四个编辑框,其中温度与姓名自己输入,地址与时间日期点击编辑框自动获取,然后两个按钮,一个点击是添加,一个点击是查看历史记录。
下面为代码部分:
<?xml version="1.0" encoding="utf-8"?>
<RelativeLayout xmlns:android="http://schemas.android.com/apk/res/android"
    xmlns:app="http://schemas.android.com/apk/res-auto"
    xmlns:tools="http://schemas.android.com/tools"
    android:layout_width="match_parent"
    android:layout_height="match_parent"
    android:orientation="vertical"
    tools:context=".MainActivity">

    <TextView
        android:layout_width="match_parent"
        android:layout_height="match_parent"
        android:background="#bac" />

    <EditText
        android:id="@+id/tv_text1"
        android:layout_width="300dp"
        android:layout_height="66dp"
        android:layout_above="@+id/tv_button1"
        android:layout_alignParentEnd="true"
        android:layout_alignParentRight="true"
        android:layout_marginEnd="7dp"
        android:layout_marginRight="7dp"
        android:layout_marginBottom="338dp"
        android:hint="请输入姓名"
        android:textColorHint="#cc00" />

    <EditText
        android:id="@+id/tv_text2"
        android:layout_width="300dp"
        android:layout_height="66dp"
        android:layout_above="@+id/tv_button1"
        android:layout_alignParentEnd="true"
        android:layout_alignParentRight="true"
        android:layout_marginEnd="11dp"
        android:layout_marginRight="11dp"
        android:layout_marginBottom="273dp"
        android:hint="点击以获取当前时间与日期"
        android:onClick="autoTimeAndDate"
        android:textColorHint="#cc00" />

    <EditText
        android:id="@+id/tv_text3"
        android:layout_width="300dp"
        android:layout_height="66dp"
        android:layout_above="@+id/tv_button1"
        android:layout_alignParentEnd="true"
        android:layout_alignParentRight="true"
        android:layout_marginEnd="11dp"
        android:layout_marginRight="11dp"
        android:layout_marginBottom="222dp"
        android:hint="请输入现在的体温"
        android:textColorHint="#cc00" />

    <EditText
        android:id="@+id/tv_text4"
        android:layout_width="300dp"
        android:layout_height="66dp"
        android:layout_above="@+id/tv_button1"
        android:layout_alignParentEnd="true"
        android:layout_alignParentRight="true"
        android:layout_marginEnd="11dp"
        android:layout_marginRight="11dp"
        android:layout_marginBottom="164dp"
        android:hint="点击以获取当前位置"
        android:textColorHint="#cc00"
        android:onClick="autoAddress"/>

    <Button
        android:id="@+id/tv_button1"
        android:layout_width="252dp"
        android:layout_height="66dp"
        android:layout_alignParentEnd="true"
        android:layout_alignParentRight="true"
        android:layout_alignParentBottom="true"
        android:layout_centerVertical="true"
        android:layout_marginEnd="44dp"
        android:layout_marginRight="44dp"
        android:layout_marginBottom="131dp"
        android:background="#66ffff"
        android:onClick="insertDB"
        android:text="确定添加"
        android:textColor="#cc00"
        android:textSize="20sp" />

    <Button
        android:id="@+id/tv_button2"
        android:layout_width="252dp"
        android:layout_height="66dp"
        android:layout_alignParentEnd="true"
        android:layout_alignParentRight="true"
        android:layout_alignParentBottom="true"
        android:layout_centerVertical="true"
        android:layout_marginEnd="50dp"
        android:layout_marginRight="50dp"
        android:layout_marginBottom="46dp"
        android:background="#66ffff"
        android:onClick="queryData"
        android:text="查看历史记录"
        android:textColor="#cc00"
        android:textSize="20sp" />

</RelativeLayout>
运行界面截图:
