https://www.cnblogs.com/kevingrace/p/5690820.html
在日常的Git版本库管理工作中用到了很多操作命令,以下做一梳理:
|
1
2
3
4
5
6
7
8
9
10
11
12
13
14
15
16
17
18
19
20
21
22
23
24
|
查看分支列表,带有*的分支表示是当前所在分支[root@115~~]#git branch查看分支详细情况 (推荐这种方式)[root@115~~]#git branch -av创建分支(比如devlop):[root@115~~]#git branch devlop切换已有分支[root@115~~]#git checkout devlop创建并切换分支(比如opstest):[root@115~~]#git checkout -b opstest将远程分支remotes/origin/testapp(比如通过git branch -av发现的)拉到本地,创建别名testapp并切换进去[root@115~~]#git checkout -b testapp remotes/origin/testapp (当前已经切换到testapp)删除分支(比如opstest)git branch -d devlop如果opstest分支有新内容没有提交的话,这样删除会有提示:git branch -D opstest进行强制删除 |
------------------------------------------------------------------------------------------------------
如果opstest是当前所在分支,则删除不了!必须将其切换出去后才能删除
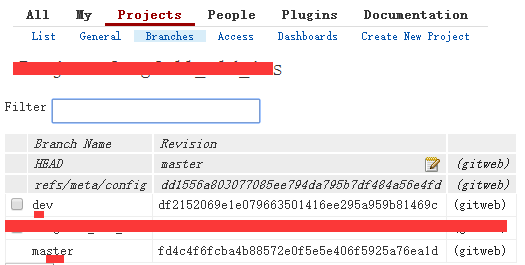
在gerrit界面上创建的分支,如下,直接删除是不行的!
|
1
2
3
4
5
6
7
8
9
10
11
12
13
14
15
16
17
18
19
20
21
22
23
24
25
|
[wangshibo@115~]$ git branch * master[wangshibo@115~]$ git branch -av* master 44f4b3a Add new fileremotes/origin/HEAD -> origin/masterremotes/origin/dev 44f4b3a Add new fileremotes/origin/master 44f4b3a Add new file[wangshibo@115 ]$ git branch -d remotes/origin/deverror: branch 'remotes/origin/dev' not found.正确删除方式是:登陆gerrit服务器,找到gerrit安装目录的git/项目名称/refs/heads下删除dev[gerrit@115]$ pwd/home/gerrit/gerrit_site/git/GItLearn.git/refs/heads[gerrit@115]$ lsdev[gerrit@115]$ lsdev[gerrit@115]$ rm -f dev [gerrit@115]$ ls[gerrit@115]$这样,就成功删除了gerrit界面里创建的分支了!! |
------------------------------------------------------------------------------------------------------
|
1
2
3
4
5
|
合并分支比如将分支devlop合并到master分支下注意:合并前要先切回到要并入的分支[root@115~~]#git checkout master[root@115~~]#git marge devlop |
------------------------------------------------------------------------------------------------------
合并的时候,有时候会出现冲突
冲突的时候,git会报出哪些文件冲突,这时候需要手动解决完冲突方可提交。
|
1
2
3
4
5
6
7
8
9
10
11
12
13
14
15
16
17
18
19
20
21
22
23
24
25
26
27
28
29
30
31
32
33
34
35
36
37
38
39
40
|
[root@115~~]# git devlop masterAuto-merging index.htmlCONFLICT (content): Merge conflict in index.htmlAutomatic merge failed; fix conflicts and then commit the result.通过git status查看冲突文件。[root@115~~]#git statusindex.html: needs merge# On branch master# Changed but not updated:# (use "git add <file>..." to update what will be committed)# (use "git checkout -- <file>..." to discard changes in working directory)## unmerged: index.html#打开index.html,git会在冲突位置做上标示。<<<<<<< HEAD:index.html<div id="footer">contact : email.support@github.com</div>=======<div id="footer">please contact us at support@github.com</div>>>>>>>> iss53:index.html解决完冲突,这时候需要手动标识该冲突已经解决,类似svn的resolved。[root@115~~]#git add index.html[root@115~~]#git status# On branch master# Changed but not updated:# (use "git add <file>..." to update what will be committed)# (use "git checkout -- <file>..." to discard changes in working directory)## modified: index.html#这时候就可以提交了。[root@115~~]#git commit -m "合并分支devlop"[master e3ece67] 合并分支devlop1 files changed, 1 insertions(+), 0 deletions(-) |
管理多个分支
前面提到,git非常推荐频繁使用分支,在大量分支的情况下,我们需要对分支做好管理(曾经一次上线,开了13个分支 = =)
通过-av可以看到最后一次提交日志。
|
1
2
3
4
5
6
7
8
9
10
11
12
13
14
15
16
17
18
19
20
|
[root@115~~]#git branch -av* master b904c07 把丘迟的产品搜改动合并一下p4popt 8b93380 p4p加上refpid,开发给出来的配置是 P4P_refpidprepub a6cc66b P4P解析参数少一次替换,顺便解决!失效的问题product 301ae4e rankbar图片换成data uri通过--merged和--no-merged来查看分支是否已经合并完成。[root@115~~]#git branch --merged* masterp4popt[root@115~~]#git branch --no-mergedprepubproduct未合并的分支,在删除时会提示分支未合并。[root@115~~]#git branch -d productwarning: deleting branch 'product' that has been merged to'refs/remotes/s/product', but it is not yet merged to HEAD.Deleted branch product (was 301ae4e). |
分支管理流程
一般情况下,分支可以划分为长分支和短分支两种。
长分支
长期任务
prepub:上线前合并,根据上线列表,从各个分支中集中到该分支,统一部署提测
master:上线后合并,长期保留一个稳定可用的分支应付紧急任务
项目
较难解决的bug
新特性试验田
重构
长分支,经常会落后其他分支一大截,需要养成习惯,适时从其他重要分支进行合并, 尤其是项目分支 。
短分支
临时需求
小bug
分支可视化
git本身的log提供--gragh选项,可以提供字符界面的分支可视化视图。
[root@115~~]#git log --graph --pretty=oneline
| * 50cc7a78b7f2704a2014afa3667f6ac5b5b47374 merging refs/remotes/origin/prepub into HEAD
| |
| | * 8f685bd1be3757effe32d6ff37f86bd07dd2b549 又被无情地冲掉了代码
| * | 75a17b4ad610327a9b0e1eecfc6c4bf9cade7359 修改icon
| |/
| * 146a0990de450c854b1a7d9995e12979fff2d537 merging refs/remotes/origin/prepub into HEAD
| |
| | * 93b379680796eb443961bb8c59008f8ae5678be4 Merge branch 'prepub' of search.ued.taobao.net:projects/search into prepub
| | |
| | * | 8b93380ccfb9020bf8f8e1e8a4a553601de3c788 p4p加上refpid,开发给出来的配置是 P4P_refpid
| * | | 08201de89834f6fecb195c2b7c3546b5cafccc85 秒杀折扣浮动层样式
| | |/
| |/|
| * | 0f4d1df17f79c7aa3ca3d36ab848c10b78029010 修改icon
| * | ae719fc29cc550321f284323db06a294b97c1398 p4p创意优化
| |/
| * a6d4501e1456589d30ab1a5800b651876629c8ca 修改icon
git还有很多GUI工具,可以提供可视化地分支走势图,比如gitk,qgit,GitX等等。
远程分支
至今为止,前面所有提到的概念都是直接本地操作的,并不需要任何网络连接。
而git本身是一个分布式代码管理工具(DVCS),所以分支管理上,存在本地分支和远程分支两种概念。
可以简单的理解,远程分支就是别人的本地分支push到服务器上的时候产生的。比如master就是一个最典型的远程分支(默认)。
|
1
2
3
4
5
6
7
8
9
10
11
12
13
14
15
16
17
18
19
20
21
22
23
24
25
26
27
28
29
30
31
32
33
34
35
36
37
38
39
40
41
42
43
44
45
46
47
48
49
50
51
52
53
54
55
56
57
58
59
60
61
62
63
64
65
66
67
68
69
70
71
72
|
[root@115~~]#git push origin master除了master之外,我们还可以随便创建分支,然后push到服务器上去。[root@115~~]#git push -u origin prepubCounting objects: 27, done.Delta compression using up to 2 threads.Compressing objects: 100% (15/15), done.Writing objects: 100% (15/15), 7.30 KiB, done.Total 15 (delta 10), reused 0 (delta 0)To git@search.ued.taobao.net:projects/search.git1b95a57..779dbe1 prepub -> prepub远程分支的标识形式为{remote/branch},比如origin/product。[root@115~~]#git branch -amasterp4popt* prepubproductremotes/origin/HEAD -> origin/masterremotes/origin/masterremotes/origin/p4poptremotes/origin/prepubremotes/origin/product远程分支和本地分支需要区分,所以,在从服务器上拉取特定分支的时候,需要指定本地分支名字。[root@115~~]#git branch product origin/productBranch product set up to track remote branch product from origin.而1.6.2以上版本的git,可以通过--track选项,简化这一过程。这也是为什么直接执行git clone的时候,会自动创建本地master分支的原因。(实际上,pull操作相当于fetch+merge。)[root@115~~]#git checkout --track origin/productBranch product set up to track remote branch refs/remotes/origin/product.Switched to a new branch "product"远程分支和本地分支是松散的结构,可以把任意远程分支合并到任意本地分支里;同样,也可以把任意本地分支push到任意远程分支上。# THIS WILL MESS UP YOUR REPO!![root@115~~]#git branchmaster* prepubp4poptproduct[root@115~~]#git pull origin product[root@115~~]#git push origin master同步本地远程分支。[root@115~~]#git fetch origin删除远程分支。[root@115~~]#git push origin :p4poptTo git@search.ued.taobao.net:projects/search.git- [deleted] p4popt补充:git cherry-pick和git rebase git
cherry-pick可以选择某一个分支中的一个或几个commit(s)来进行操作。例如,假设我
们有个稳定版本的分支,叫v2.0,另外还有个开发版本的分支v3.0,我们不能直接把两个分支合并,这样会导致稳定版本混乱,但是又想增加一个v3.0
中的功能到v2.0中,这里就可以使用cherry-pick了。先在v3.0中查看要合并的commit的commit id[root@115~~]#git log假设是 commit f79b0b1ffe445cab6e531260743fa4e08fb4048b切到v2.0中[root@115~~]#git check v2.0合并commit[root@115~~]#git cherry-pick f79b0b1ffe445cab6e531260743fa4e08fb4048bgit
rebase有点类似git merge,但是两者又有不同,打个比方,你有两个抽屉A和B,里面都装了衣服,现在想把B中的衣服放到A中,git
merge是那种横冲直撞型的,拿起B就倒入A里面,如果满了(冲突)再一并整理;而git
rebase就很持家了,它会一件一件的从B往A中加,会根据一开始放入的时间顺序的来加,如果满了你可以处理这一件,你可以继续加,或者跳过这一件,又
或者不加了,把A还原。所以merge适合那种比较琐碎的,简单的合并,系统级的合并还是用rebase吧。合并b[root@115~~]#git rebase b处理完冲突继续合并[root@115~~]#git rebase --continue跳过[root@115~~]#git rebase --skip取消合并[root@115~~]#git rebase --abort |