一、一个强大的UITextView分类,让系统TextView自带placeholder属性、自动高度、支持输入图片三大功能
1、效果:
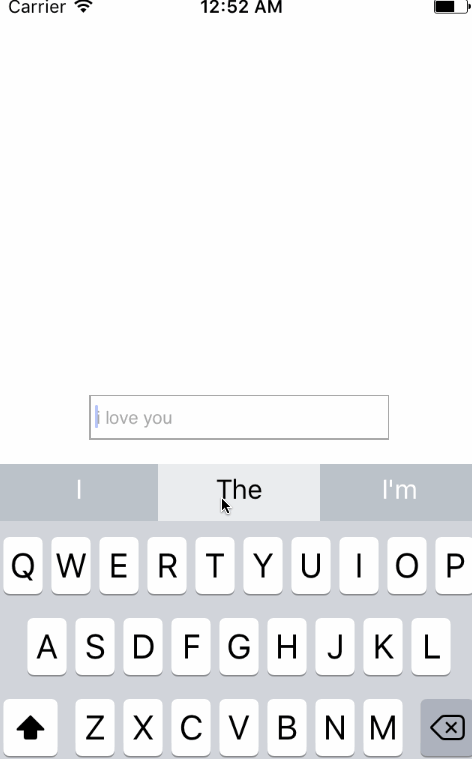
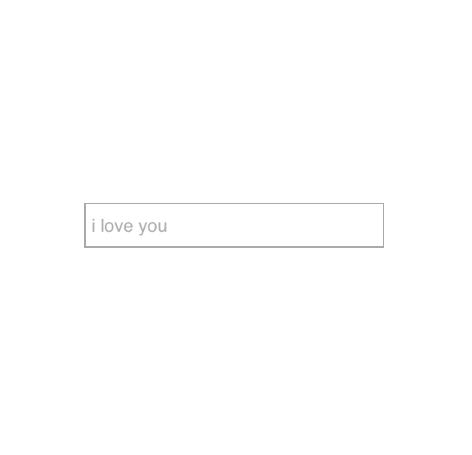
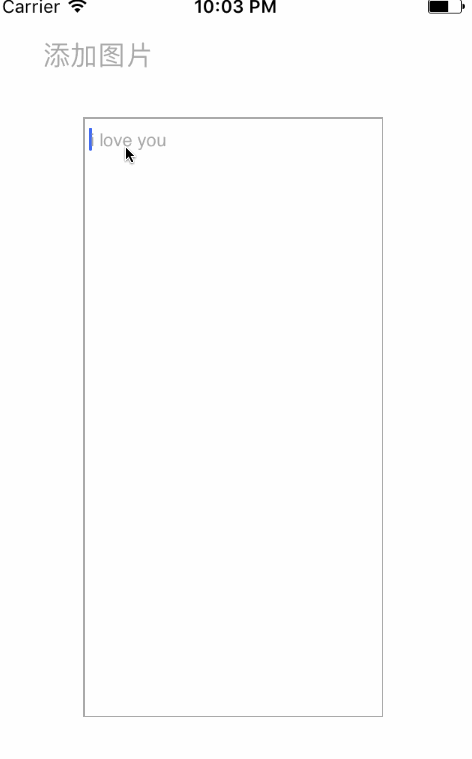
功能一、让系统TextView自带placeholder属性
功能二、自动改变高度,类似聊天输入框
功能三、支持输入图片

2、使用方法:
将UITextView+WZB.h和UITextView+WZB.m拖入工程
只需要在需要使用的地方直接导入头文件UITextView+WZB.h,你的UITextView就拥有了这三大功能
// 直接设置placeholder属性即可
    textView.placeholder = @"i love you";
    [self.view addSubview:textView];
如果想要计算高度,只需要调用这个方法即可,你需要在block回调里手动更改textView的高度
/* 自动高度的方法,maxHeight:最大高度, textHeightDidChanged:高度改变的时候调用 */
- (void)autoHeightWithMaxHeight:(CGFloat)maxHeight textViewHeightDidChanged:(textViewHeightDidChangedBlock)textViewHeightDidChanged;
如图

插入图片的方法如下:
/* 添加一张图片 image:要添加的图片 */
- (void)addImage:(UIImage *)image;
/* 添加一张图片 image:要添加的图片 size:图片大小 */
- (void)addImage:(UIImage *)image size:(CGSize)size;
/* 插入一张图片 image:要添加的图片 size:图片大小 index:插入的位置 */
- (void)insertImage:(UIImage *)image size:(CGSize)size index:(NSInteger)index;

/* 添加一张图片 image:要添加的图片 multiple:放大/缩小的倍数 */
- (void)addImage:(UIImage *)image multiple:(CGFloat)multiple;
/* 插入一张图片 image:要添加的图片 multiple:放大/缩小的倍数 index:插入的位置 */
- (void)insertImage:(UIImage *)image multiple:(CGFloat)multiple index:(NSInteger)index;
注释写的很清楚,效果如下:
3、实现大致原理:
使用runtime为textView添加如下属性
// 占位文字
static const void *WZBPlaceholderViewKey = &WZBPlaceholderViewKey;
// 占位文字颜色
static const void *WZBPlaceholderColorKey = &WZBPlaceholderColorKey;
// 最大高度
static const void *WZBTextViewMaxHeightKey = &WZBTextViewMaxHeightKey;
// 高度变化的block
static const void *WZBTextViewHeightDidChangedBlockKey = &WZBTextViewHeightDidChangedBlockKey;
// 动态添加属性的本质是: 让对象的某个属性与值产生关联
objc_setAssociatedObject(self, WZBPlaceholderViewKey, placeholderView, OBJC_ASSOCIATION_RETAIN_NONATOMIC);
objc_setAssociatedObject(self, WZBTextViewMaxHeightKey, [NSString stringWithFormat:@"%lf", maxHeight], OBJC_ASSOCIATION_COPY_NONATOMIC);
objc_setAssociatedObject(self, WZBTextViewHeightDidChangedBlockKey, textViewHeightDidChanged, OBJC_ASSOCIATION_COPY_NONATOMIC);
objc_setAssociatedObject(self, WZBPlaceholderColorKey, placeholderColor, OBJC_ASSOCIATION_RETAIN_NONATOMIC);
监听
  // 监听文字改变
    [[NSNotificationCenter defaultCenter] addObserver:self selector:@selector(textViewTextChange) name:UITextViewTextDidChangeNotification object:self];
    // 这些属性改变时,都要作出一定的改变,尽管已经监听了TextDidChange的通知,也要监听text属性,因为通知监听不到setText:
    NSArray *propertys = @[@"frame", @"bounds", @"font", @"text", @"textAlignment", @"textContainerInset"];
    // 监听属性
    for (NSString *property in propertys) {
       [self addObserver:self forKeyPath:property options:NSKeyValueObservingOptionNew context:nil];
    }
当文字发生变化的时候
- (void)textViewTextChange {
    self.placeholderView.hidden = (self.attributedText.length > 0 && self.attributedText);
    if (self.maxHeight >= self.bounds.size.height) {
        // 计算高度
        NSInteger currentHeight = ceil([self sizeThatFits:CGSizeMake(self.bounds.size.width, MAXFLOAT)].height);
        NSInteger lastheight = ceil(self.maxHeight + self.textContainerInset.top + self.textContainerInset.bottom);
        // 如果高度有变化,调用block
        if (currentHeight != lastheight) {

            self.scrollEnabled = currentHeight >= self.maxHeight;
            if (self.textViewHeightDidChanged) {
                self.textViewHeightDidChanged((currentHeight >= self.maxHeight ? self.maxHeight : currentHeight));
            }
        }
    }
}
添加图片是用的NSTextAttachment
- (void)addImage:(UIImage *)image size:(CGSize)size index:(NSInteger)index multiple:(CGFloat)multiple {
    NSMutableAttributedString *attributedString = [[NSMutableAttributedString alloc] initWithAttributedString:self.attributedText];
    NSTextAttachment *textAttachment = [[NSTextAttachment alloc] init];
    textAttachment.image = image;
    CGRect bounds = textAttachment.bounds;
    if (!CGSizeEqualToSize(size, CGSizeZero)) {
        bounds.size = size;
        textAttachment.bounds = bounds;
    } else if (multiple > 0.0f) {
        textAttachment.image = [UIImage imageWithCGImage:textAttachment.image.CGImage scale:multiple orientation:UIImageOrientationUp];
    } else {
        CGFloat oldWidth = textAttachment.image.size.width;
        CGFloat scaleFactor = oldWidth / (self.frame.size.width - 10);
        textAttachment.image = [UIImage imageWithCGImage:textAttachment.image.CGImage scale:scaleFactor orientation:UIImageOrientationUp];
    }

    NSAttributedString *attrStringWithImage = [NSAttributedString attributedStringWithAttachment:textAttachment];
    [attributedString replaceCharactersInRange:NSMakeRange(index, 0) withAttributedString:attrStringWithImage];
    self.attributedText = attributedString;
    // 记得走下这两个方法
    [self textViewTextChange];
    [self refreshPlaceholderView];
}
4、GitHub源码地址:UITextView-WZB
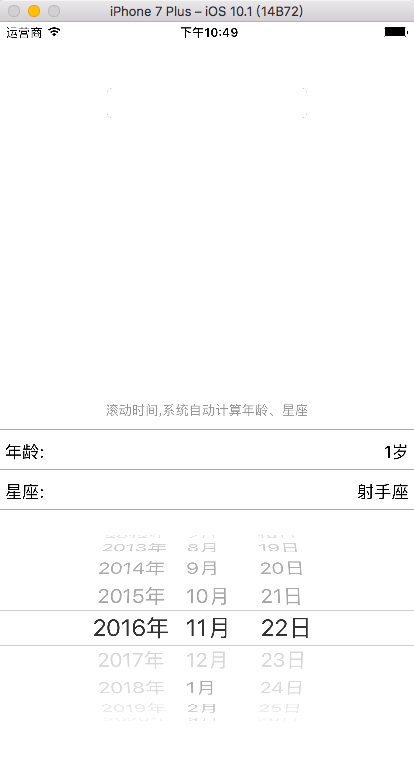
1、效果:

2、使用方法:
将WZBDatePicker.h和WZBDatePicker.m拖入工程
只需要在需要使用的地方直接导入头文件WZBDatePicker.h,然后调用下边这个方法即可
/* 显示方法 view:如果WZBDatePickerInputView传拥有inputView的控件,其他传普通的view,pickerType:显示方式 resultDidChange:滑动picker的时候调用  block参数age:年龄,constellation:星座 **/
    [WZBDatePicker showToView:self.view pickerType:WZBDatePickerNormal resultDidChange:^(NSString *age, NSString *constellation){
        // to do
    }];
typedef NS_ENUM(NSInteger, WZBDatePickerType) {
    WZBDatePickerNormal = 0,    // 普通的显示在界面上
    WZBDatePickerInputView = 1,      // 做键盘显示
    WZBDatePickerBottomPop          // 从视图底部弹出
};

@interface WZBDatePicker : UIView

/* 显示方法 view:如果WZBDatePickerInputView传拥有inputView的空间,其他传普通的view,pickerType:显示方式 resultDidChange:滑动picker的时候调用  block参数age:年龄,constellation:星座 **/
+ (instancetype)showToView:(UIView *)view pickerType:(WZBDatePickerType)pickerType resultDidChange:(void(^)(NSString *age, NSString *constellation))resultDidChange;

/* 设置初始时间 **/
- (void)setCurrentDate:(NSDate *)date;

/* 隐藏 **/
- (void)hidden;

/* 是否有黑色半透明遮罩,默认没有,在pickerType!=WZBDatePickerBottomPop时不起任何作用 **/
@property (nonatomic, assign, getter=isEnableDarkMask) BOOL enableDarkMask;
h文件中提供了这些方法和属性,注释写的很清楚,可以直接使用。
如果做键盘显示,需要这样:
/* 显示方法 view:如果WZBDatePickerInputView传拥有inputView的空间,其他传普通的view,pickerType:显示方式 resultDidChange:滑动picker的时候调用  block参数age:年龄,constellation:星座 **/
    [WZBDatePicker showToView:self.textField pickerType:WZBDatePickerInputView resultDidChange:^(NSString *age, NSString *constellation){
        self.textField.text = [NSString stringWithFormat:@"%@--%@", age, constellation];
    }];
注意,参数view,必须传带有inputView的控件,比如UITextField或UITextView等
3、实现大致原理:
里边是一个tableView,tableView的headerView是一个label,显示信息。tableView的footerView是个UIDatePicker,显示日期。这样写是因为比较好控制中间两行cell的显示与隐藏,headerView和footerView也不用单独管理size
监听picker的滚动,并刷新tableView或者调用block更新时间,如果是键盘,隐藏了中间两行cell,所以不需要刷新tableView
- (void)dateDidChanged:(UIDatePicker *)datePicker {
    self.checkedDate = datePicker.date;
    self.pickerType == WZBDatePickerInputView ? [self upData] : [self.tableView reloadData];
}
如果enableDarkMask为yes,背景颜色变成半透明颜色,并且启用单击手势
- (void)setEnableDarkMask:(BOOL)enableDarkMask {
    _enableDarkMask = enableDarkMask;
    if (self.pickerType == WZBDatePickerBottomPop) {
        self.backgroundColor = self.isEnableDarkMask ? [UIColor colorWithWhite:0 alpha:0.2] : [UIColor clearColor];
    }
}
4、GitHub源码地址:WZBDatePicker
三、一句话实现一个带有文字闪动渐变的标签
1、效果:

2、使用方法:
将WZBGradualLabel.h和WZBGradualLabel.m拖入工程
只需要在需要使用的地方直接导入头文件WZBGradualLabel.h,然后调用下边这个方法即可
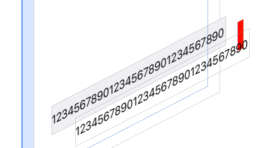
/*
     * frame:label的frame
     * title:text
     * duration:时间间隔
     * gradualWidth:渐变颜色的宽
     * superView:label的父控件
     **/
    [WZBGradualLabel gradualLabelWithFrame:(CGRect){10, 450, WZBScreenWidth - 20, 40} title:@"123456789012345678901234567890" duration:2  superview:self.view];
下边是提供的一些属性和方法
/*
/* 渐变颜色色值,有默认值 **/
@property (nonatomic, strong) NSArray *gradualColors;
/*
 * frame:label的frame
 * title:text
 * duration:时间间隔
 * gradualWidth:渐变颜色的宽
 * superView:label的父控件
 **/
+ (instancetype)gradualLabelWithFrame:(CGRect)frame title:(NSString *)title duration:(NSTimeInterval)duration gradualWidth:(CGFloat)gradualWidth superview:(UIView *)superview;
/*
 * frame:label的frame
 * title:text
 * superView:label的父控件
 **/
+ (instancetype)gradualLabelWithFrame:(CGRect)frame title:(NSString *)title superview:(UIView *)superview;
/*
 * frame:label的frame
 * title:text
 * duration:时间间隔
 * superView:label的父控件
 **/
+ (instancetype)gradualLabelWithFrame:(CGRect)frame title:(NSString *)title duration:(NSTimeInterval)duration superview:(UIView *)superview;
/*
 * frame:label的frame
 * title:text
 * gradualWidth:渐变颜色的宽
 * superView:label的父控件
 **/
+ (instancetype)gradualLabelWithFrame:(CGRect)frame title:(NSString *)title gradualWidth:(CGFloat)gradualWidth superview:(UIView *)superview;
h文件中提供了这些方法和属性,注释写的很清楚,所有方法可以直接使用。colors是个数组,可以设置渐变层的颜色,至少传入两个值
3、实现大致原理:
其实看到层级图,它是有三层的,最底层的label就是你要显示的label,中间有层红色的部分,这个其实是渐变层view(截图没截好),最上层的label是渐变层的文字
self.gradientLayer.mask = self.label.layer;
这句话是设置渐变图层的mask为label图层,这样就可以用文字裁剪渐变图层了,只保留文字的部分
至于动画改变,我用的是一个UIView动画,动态改变中间层View和渐变层label的x值,view是添加在底层label上的,上层label是添加在中间view上的,先让view在父控件的最左边,上层label在此view的右边,说白了就是让上层label和底层label完全重合,为了维持这一状态,中间的view向右走,上层label必须以同样的值向左走!具体请看代码:
- (void)changX {
    __block CGRect frame1 = self.leftView.frame;
    __block CGRect frame2 = self.label.frame;
    frame1.origin.x = -self.gradualWidth;
    frame2.origin.x = self.gradualWidth;
    self.leftView.frame = frame1;
    self.label.frame = frame2;
    [UIView animateWithDuration:self.duration animations:^{
        frame1.origin.x = self.bounds.size.width;
        self.leftView.frame = frame1;
        frame2.origin.x = -self.bounds.size.width;
        self.label.frame = frame2;
    }];
}
kvo监听这些属性,也是为了维持上层label和底层label能完全重合的状态,以便支持用户对label进行文字对其、文字改变、文字换行、字体大小、frame、换行以及attributedText等操作
// kvo监听属性
for (NSString *property in self.propertys) {
    [self addObserver:self forKeyPath:property options:NSKeyValueObservingOptionNew context:nil];
}

- (void)observeValueForKeyPath:(NSString *)keyPath ofObject:(id)object change:(NSDictionary<NSKeyValueChangeKey,id> *)change context:(void *)context {
    if ([keyPath isEqualToString:@"text"]) {
        self.label.text = self.text;
    } else if ([keyPath isEqualToString:@"font"]) {
        self.label.font = self.font;
    } else if ([keyPath isEqualToString:@"textAlignment"]) {
        self.label.textAlignment = self.textAlignment;
    } else if ([keyPath isEqualToString:@"attributedText"]) {
        self.label.attributedText = self.attributedText;
    } else if ([keyPath isEqualToString:@"frame"]) {
        self.label.frame = (CGRect){self.label.frame.origin, self.frame.size};
    } else if ([keyPath isEqualToString:@"numberOfLines"]) {
        self.label.numberOfLines = self.numberOfLines;
    }
}
4、GitHub源码地址:WZBGradualLabel
四、一行代码画一个表格,UIView的分类,可以很简单的画擅长表格
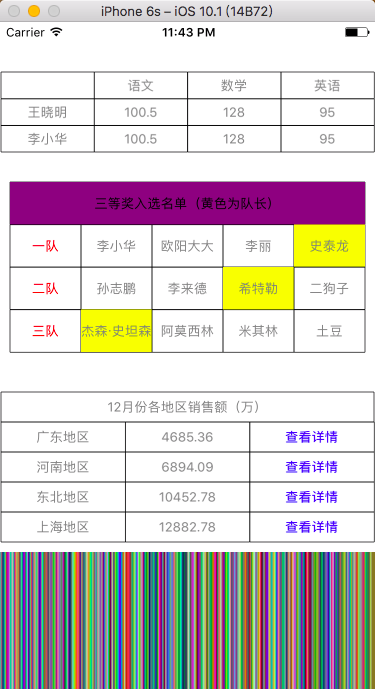
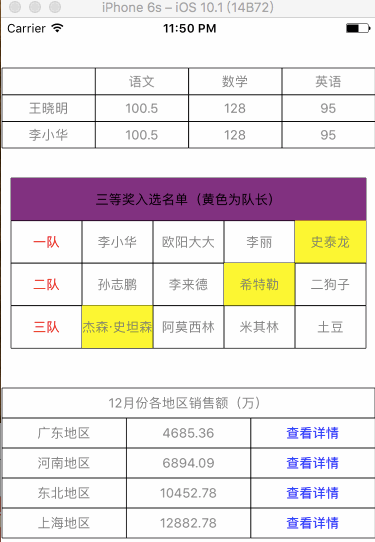
1、效果:
很多app用到了这种html元素效果,写了个demo
效果如下:
2、使用方法:
只需要一行代码 ,可以自定义文字颜色、背景颜色、合并单元格、点击事件等操作
/**
     * 创建一个表格
     * line:列数
     * columns:行数
     * data:数据
     */
    [v1 wzb_drawListWithRect:v1.bounds line:4 columns:3 datas:@[@"", @"语文", @"数学", @"英语", @"王晓明", @"100.5", @"128", @"95", @"李小华", @"100.5", @"128", @"95", @"张爱奇", @"100.5", @"128", @"95"]];
/**
 * 创建一个表格
 * line:列数
 * columns:行数
 * data:数据
 */
- (void)wzb_drawListWithRect:(CGRect)rect line:(NSInteger)line columns:(NSInteger)columns datas:(NSArray *)datas;

/**
 * 创建一个表格
 * line:列数
 * columns:行数
 * data:数据
 * lineInfo:行信息,传入格式:@{@"0" : @"3"}意味着第一行创建3个格子
 */
- (void)wzb_drawListWithRect:(CGRect)rect line:(NSInteger)line columns:(NSInteger)columns datas:(NSArray *)datas lineInfo:(NSDictionary *)lineInfo;

/**
 * 创建一个表格
 * line:列数
 * columns:行数
 * data:数据
 * colorInfo:颜色信息,传入格式:@{@"0" : [UIColor redColor]}意味着第一个格子文字将会变成红色
 */
- (void)wzb_drawListWithRect:(CGRect)rect line:(NSInteger)line columns:(NSInteger)columns datas:(NSArray *)datas colorInfo:(NSDictionary *)colorInfo;
/**
 * 创建一个表格
 * line:列数
 * columns:行数
 * data:数据
 * colorInfo:颜色信息,传入格式:@{@"0" : [UIColor redColor]}意味着第一个格子文字将会变成红色
 * lineInfo:行信息,传入格式:@{@"0" : @"3"}意味着第一行创建3个格子
 */
- (void)wzb_drawListWithRect:(CGRect)rect line:(NSInteger)line columns:(NSInteger)columns datas:(NSArray *)datas colorInfo:(NSDictionary *)colorInfo lineInfo:(NSDictionary *)lineInfo;
/**
 * 创建一个表格
 * line:列数
 * columns:行数
 * data:数据
 * colorInfo:颜色信息,传入格式:@{@"0" : [UIColor redColor]}意味着第一个格子文字将会变成红色
 * lineInfo:行信息,传入格式:@{@"0" : @"3"}意味着第一行创建3个格子
 * backgroundColorInfo:行信息,传入格式:@{@"0" : [UIColor redColor]}意味着第一个格子背景颜色变成红色
 */
- (void)wzb_drawListWithRect:(CGRect)rect line:(NSInteger)line columns:(NSInteger)columns datas:(NSArray *)datas colorInfo:(NSDictionary *)colorInfo lineInfo:(NSDictionary *)lineInfo backgroundColorInfo:(NSDictionary *)backgroundColorInfo;
/**
 * 获取第index个格子的label
 */
- (UILabel *)getLabelWithIndex:(NSInteger)index;

/**
 * 画一条线
 * frame: 线的frame
 * color:线的颜色
 * lineWidth:线宽
 */
- (void)wzb_drawLineWithFrame:(CGRect)frame lineType:(WZBLineType)lineType color:(UIColor *)color lineWidth:(CGFloat)lineWidth;
.h文件中提供了这些方法,用法看注释即可,getLabelWithIndex:方法是得到第index个格子,比如你有10个格子,[view getLabelWithIndex:0];是得到第一个格子,可以对其进行任何操作,比如我在第三个表格中拿到右边三个label,添加单击手势进行跳转
3、实现大致原理:
/**
 * 创建一个表格
 * line:列数
 * columns:行数
 * data:数据
 * colorInfo:颜色信息,传入格式:@{@"0" : [UIColor redColor]}意味着第一个格子文字将会变成红色
 * lineInfo:行信息,传入格式:@{@"0" : @"3"}意味着第一行创建3个格子
 * backgroundColorInfo:行信息,传入格式:@{@"0" : [UIColor redColor]}意味着第一个格子背景颜色变成红色
 */
- (void)wzb_drawListWithRect:(CGRect)rect line:(NSInteger)line columns:(NSInteger)columns datas:(NSArray *)datas colorInfo:(NSDictionary *)colorInfo lineInfo:(NSDictionary *)lineInfo backgroundColorInfo:(NSDictionary *)backgroundColorInfo {
    NSInteger index = 0;
    CGFloat x = rect.origin.x;
    CGFloat y = rect.origin.y;
    CGFloat h = (1.0) * rect.size.height / columns;
    NSInteger newLine = 0;
    for (NSInteger i = 0; i < columns; i++) {

        // 判断合并单元格
        if (lineInfo) {
            for (NSInteger a = 0; a < lineInfo.allKeys.count; a++) {

                // 新的列数
                NSInteger newColumn = [lineInfo.allKeys[a] integerValue];
                if (i == newColumn) {
                    newLine = [lineInfo[lineInfo.allKeys[a]] integerValue];
                } else {
                    newLine = line;
                }
            }
        } else {
            newLine = line;
        }


        for (NSInteger j = 0; j < newLine; j++) {

            // 线宽
            CGFloat w = (1.0) * rect.size.width / newLine;
            CGRect frame = (CGRect){x + w * j, y + h * i, w, h};

            // 画线
            [self wzb_drawRectWithRect:frame];

            // 创建label
            UILabel *label = [[UILabel alloc] initWithFrame:frame];

            // 文字居中
            label.textAlignment = NSTextAlignmentCenter;
            [self addSubview:label];

            // 判断文字颜色
            UIColor *textColor = [colorInfo objectForKey:[NSString stringWithFormat:@"%zd", index]];
            if (!textColor) {
                textColor = [UIColor grayColor];
            }
            label.textColor = textColor;

            // 判断背景颜色
            UIColor *backgroundColor = [backgroundColorInfo objectForKey:[NSString stringWithFormat:@"%zd", index]];
            if (!backgroundColor) {
                backgroundColor = [UIColor clearColor];
            }
            label.backgroundColor = backgroundColor;

            // 字体大小
            label.font = [UIFont systemFontOfSize:13];

            // label文字
            label.text = datas[index];

            // label的tag值
            label.tag = WZBTag + index;
            index++;
        }
    }
}
这是核心代码,其中做了合并单元格、文字颜色、背景颜色、等判断。画线是用的贝塞尔曲线和CAShapeLayer,代码在下边,每个单元格里都创建了label显示文字。我还提供了方法画一条直线,相信项目中很多页面某些位置需要画一条直线, - (void)wzb_drawLineWithFrame:(CGRect)frame lineType:(WZBLineType)lineType color:(UIColor *)color lineWidth:(CGFloat)lineWidth这个方法能够很方便的实现这一需求
- (void)wzb_drawLineWithFrame:(CGRect)frame lineType:(WZBLineType)lineType color:(UIColor *)color lineWidth:(CGFloat)lineWidth {

    // 创建贝塞尔曲线
    UIBezierPath *linePath = [[UIBezierPath alloc] init];

    // 线宽
    linePath.lineWidth = lineWidth;

    // 起点
    [linePath moveToPoint:CGPointMake(0, 0)];

    // 重点:判断是水平方向还是垂直方向
    [linePath addLineToPoint: lineType == WZBLineHorizontal ? CGPointMake(frame.size.width, 0) : CGPointMake(0, frame.size.height)];

    // 创建CAShapeLayer
    CAShapeLayer *lineLayer = [CAShapeLayer layer];

    // 颜色
    lineLayer.strokeColor = color.CGColor;
    // 宽度
    lineLayer.lineWidth = lineWidth;

    // frame
    lineLayer.frame = frame;

    // 路径
    lineLayer.path = linePath.CGPath;

    // 添加到layer上
    [self.layer addSublayer:lineLayer];
}
下边画了一下随机颜色的线条,最终效果是这样: