一、背景
我们都比较习惯于Win7+VirtualBox+CentOS的组合当做我们的开发环境,然而如果当我们在虚拟机中安装和使用的时候,发现系统存储不够用,怎么办,使用VirtualBox 4 版本以上的可以方便、快速的扩容。
首先,VirtualBox 中虚拟硬盘有几种形式,VMDK,VDI,VHD,HDD等,以下是他们的区别和特点:
1.对于VMDK是VMware开发并使用的,同时也被SUN的xVM、QEMU、SUSE Studio、.NET DiscUtils支持,所以兼容性会好些
2.VDI是Virtual Box 自己的处理格式,而且Virtual Box支持Windows和Linux,所以对于使用VirtualBox的用户比较好
3.VHD是Windows专有的处理格式,HDD是Apple专有的处理格式,所以不会支持跨平台,一般不会考虑。
鉴于以上特点,我们主要考虑VMDK和VDI的扩容。
二、扩容步骤
2.1 物理扩容
VDI扩容和简单,只需要在命令行里执行一条命令:
VBoxManage modifyhd centos00.vdi --resize 20480 //xxxx.vdi一般会于VirtualBox VMs里,10240M=10G;
如果是VMDK就要先转换成VDI,然后再扩容
VBoxManage clonehd "centos00.vmdk" "centos00.vdi" --format vdi //VMDK转换成VDI
VBoxManage modifyhd "centos00.vdi" --resize 20480 //这里的单位是M
VBoxManage clonehd "centos00.vdi" "centos00.vmdk" --format vmdk //VDI转换成VMDK
2.2 加载虚拟机系统文件(.VDI或者.VMDK都支持,所以没必要再把vdi格式的文件再转换回去)
首先,再命令行中能过VBoxManage list hdds就可以看到我们克隆的文件了:
UUID:           f04ed61c-0ed6-466b-9179-5ab7a222ef55
Parent UUID:    base
State:          created
Type:           normal (base)
Location:       /Users/XXXXX/VirtualBox VMs/centos00/centos00.vdi
Storage format: vdi
Capacity:       20480 MBytes
Encryption:     disabled
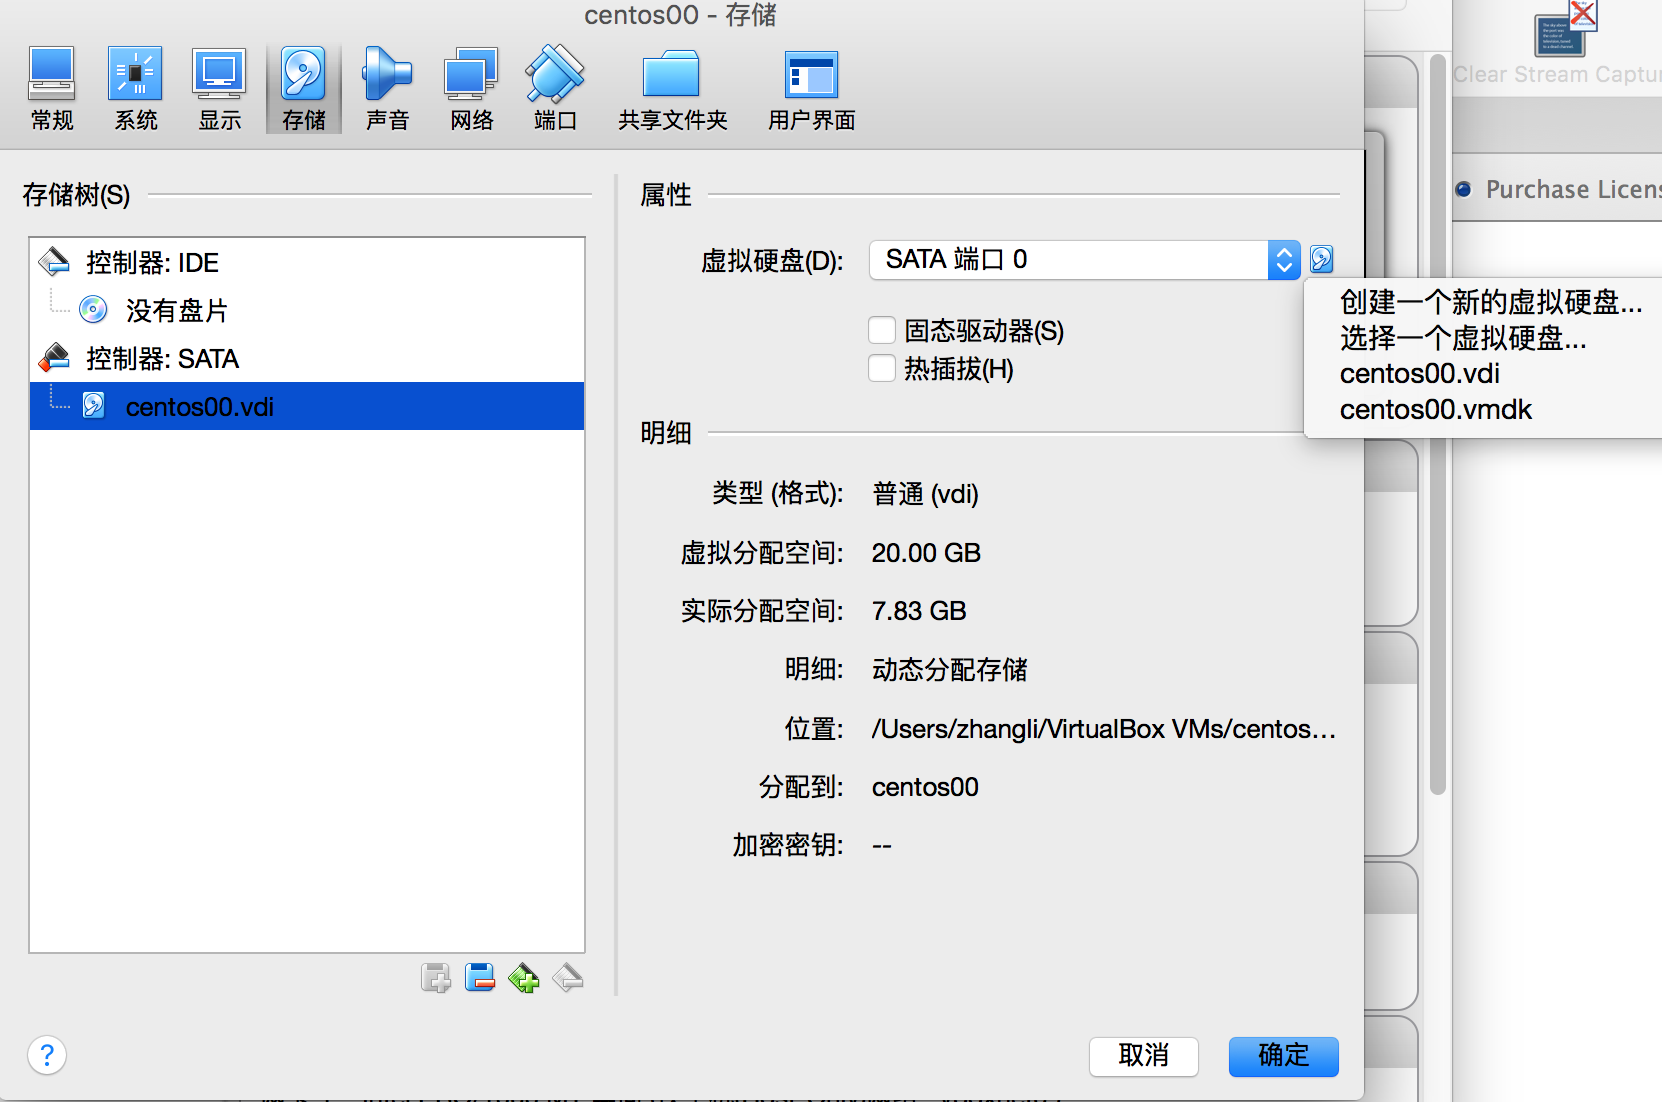
其次,打开虚拟机--选个系统--右击--设置--存储--控制器SATA--右边的添加虚拟硬盘--选择克隆的文件就行了。

在虚拟机打开系统,通过df -h查看发现,根目录还是原样,下面我们通过LVM来扩展分区。
2.3 LVM分区调整
2.3.1 查看分区情况
打开虚拟机,通过命令查询虚拟机中分区如下:
fdisk -l
Disk /dev/sda: 8589 MB, 8589934592 bytes
255 heads, 63 sectors/track, 1044 cylinders
Units = cylinders of 16065 * 512 = 8225280 bytes
Sector size (logical/physical): 512 bytes / 512 bytes
I/O size (minimum/optimal): 512 bytes / 512 bytes
Disk identifier: 0x000032be

   Device Boot      Start         End      Blocks   Id  System
/dev/sda1   *           1          64      512000   83  Linux
Partition 1 does not end on cylinder boundary.
/dev/sda2              64        1045     7875584   8e  Linux LVM
可以看到我们已经创建的分区,sda1 sda2的什么,也可以ls /dev/来查看。如果有第二块硬盘会看到sdb,我这里是只有一块,且已经分了sda1和sda2.
下面创建将扩展的空间,创建新分区
2.3.2 创建新分区
[root@fengyan00 ~]# fdisk /dev/sda
WARNING: DOS-compatible mode is deprecated. It's strongly recommended to
switch off the mode (command 'c') and change display units to
sectors (command 'u').
Command (m for help): n
Command action
e extended
p primary partition (1-4)
p
Partition number (1-4): 4
2.3.3 格式化分区
在格式化之前请先重启虚拟机,否则格式化会报错。重启后就可继续执行以下命令继续了
//将分区格式化为ext4格式 如果失败就重启linux系统就好了
[root@fengyan00 ~]# mkfs.ext4 /dev/sda4
mke2fs 1.41.12 (17-May-2010)
文件系统标签=
操作系统:Linux
块大小=4096 (log=2)
分块大小=4096 (log=2)
Stride=0 blocks, Stripe width=0 blocks
786432 inodes, 3144054 blocks
157202 blocks (5.00%) reserved for the super user
第一个数据块=0
Maximum filesystem blocks=3221225472
96 block groups
32768 blocks per group, 32768 fragments per group
8192 inodes per group
Superblock backups stored on blocks:
        32768, 98304, 163840, 229376, 294912, 819200, 884736, 1605632, 2654208

正在写入inode表: 完成
Creating journal (32768 blocks): 完成
Writing superblocks and filesystem accounting information: 完成

This filesystem will be automatically checked every 36 mounts or
180 days, whichever comes first.  Use tune2fs -c or -i to override.
2.3.4 扩展到卷组
[root@fengyan00 ~]# pvcreate /dev/sda4
  Physical volume "/dev/sda4" successfully created
[root@fengyan00 ~]# vgextend VolGroup /dev/sda4
  Volume group "VolGroup" not found
  Cannot process volume group VolGroup
[root@fengyan00 ~]# sudo vgextend VolGroup /dev/sda4
  Volume group "VolGroup" not found
  Cannot process volume group VolGroup
[root@fengyan00 ~]# sudo vgextend vg_fengyan00 /dev/sda4
  Volume group "vg_fengyan00" successfully extended
2.3.5 查看根分区
[root@fengyan00 ~]# sudo lvdisplay
  --- Logical volume ---
  LV Path                /dev/vg_fengyan00/lv_root
  LV Name                lv_root
  VG Name                vg_fengyan00
  LV UUID                D3G2Xg-SJSM-goYf-oWxt-B2iL-XzAU-p2H4rJ
  LV Write Access        read/write
  LV Creation host, time fengyan00, 2017-01-17 23:13:26 +0800
  LV Status              available
  # open                 1
  LV Size                6.71 GiB
  Current LE             1718
  Segments               1
  Allocation             inherit
  Read ahead sectors     auto
  - currently set to     256
  Block device           253:0

  --- Logical volume ---
  LV Path                /dev/vg_fengyan00/lv_swap
  LV Name                lv_swap
  VG Name                vg_fengyan00
  LV UUID                0MlrQN-WEMH-G92b-DA3u-jiQU-H2fl-RJNL4t
  LV Write Access        read/write
  LV Creation host, time fengyan00, 2017-01-17 23:13:27 +0800
  LV Status              available
  # open                 1
  LV Size                816.00 MiB
  Current LE             204
  Segments               1
  Allocation             inherit
  Read ahead sectors     auto
  - currently set to     256
  Block device           253:1
2.3.6 扩展到容量逻辑分区
[root@fengyan00 ~]# sudo lvextend /dev/vg_fengyan00/lv_root /dev/sda4
  Size of logical volume vg_fengyan00/lv_root changed from 6.71 GiB (1718 extents) to 18.70 GiB (4788 extents).
  Logical volume lv_root successfully resized
2.3.7 刷新逻辑分区容量
[root@fengyan00 ~]# sudo resize2fs /dev/vg_fengyan00/lv_root
resize2fs 1.41.12 (17-May-2010)
Filesystem at /dev/vg_fengyan00/lv_root is mounted on /; on-line resizing required
old desc_blocks = 1, new_desc_blocks = 2
Performing an on-line resize of /dev/vg_fengyan00/lv_root to 4902912 (4k) blocks.
The filesystem on /dev/vg_fengyan00/lv_root is now 4902912 blocks long.
2.3.8 查看系统分区使用情况
sudo df -h// 会发现根分区,现在容量扩充了
2.3.9 重启系统
sudo reboot // 重启系统,一切OK